
Prechen 23.8 inch Portable Touchscreen Monitor
Contents
Prechen 23.8 inch Portable Touchscreen Monitor User Manual
Model: 23.8 inch Portable Touchscreen Monitor
1. Introduction
Thank you for choosing the Prechen 23.8 inch Portable Touchscreen Monitor. This manual provides essential information for setting up, operating, and maintaining your new monitor. Please read it thoroughly before use to ensure optimal performance and longevity of your device.
Key Features:
- 23.8 Inch Portable Touchscreen Display: Offers multi-touch capability for intuitive interaction. Note: Touch functionality is not available when connected to Apple devices, PS3/4/5, Switch, X-box, Steam-Deck, or Fire TV stick/cube.
- Exceptional Visual Experience: Full HD 1920 x 1080 resolution, 100% sRGB color gamut, and a 4000:1 contrast ratio for sharp images and vibrant colors.
- Ultra-thin and Portable Design: Lightweight with an integrated 90° adjustable stand. Supports 75x75mm VESA mounting.
- Versatile Connectivity: Equipped with USB-C and HDMI ports for connection to laptops, PCs, and smartphones.
- Built-in Stereo Speakers: Provides clear audio without the need for external sound systems.
2. Package Contents
Please check the box for the following items:
- Prechen 23.8 inch Portable Touchscreen Monitor x 1
- User Manual x 1
- USB-C to USB-C Cable x 1
- USB-A to USB-C Cable x 1
- HDMI Cable x 1
- Power Adapter x 1

Figure 2.1: Included Accessories
3. Setup Instructions
3.1 Connecting the Monitor
Before connecting to any device, ensure the monitor is powered by the included power adapter. Connect the power adapter to the DC port on the monitor.
Option 1: USB-C Connection (Signal & Touch)
- Connect the power adapter to the monitor's DC port.
- Use the USB-C to USB-C cable to connect the monitor's Type-C 3.1 port to a full-featured USB-C port on your laptop, PC, or smartphone. This single cable can transmit both video signal and touch data.

Figure 3.1: USB-C Connection
Option 2: HDMI and USB-A Connection (Signal & Touch)
- Connect the power adapter to the monitor's DC port.
- Use the HDMI cable to connect the monitor's HDMI port to the HDMI output of your device (laptop, PC, game console).
- Use the USB-A to USB-C cable to connect the monitor's Type-C 3.1 port to a USB-A port on your device. This connection is required for touch functionality.

Figure 3.2: HDMI and USB-A Connection
3.2 Adjusting the Stand
The integrated stand allows for a 0-90° adjustable viewing angle. Simply adjust the stand to your desired position for comfortable use.

Figure 3.3: Adjustable Stand
3.3 VESA Mounting
The monitor supports 75x75mm VESA mounting. This allows for wall mounting or attachment to compatible monitor arms (sold separately).

Figure 3.4: VESA Mounting
4. Operating Instructions
4.1 Power On/Off and OSD Controls
The monitor features several buttons for control:
- Menu/ON/OFF/Switching Button: Press to power on/off or access the On-Screen Display (OSD) menu.
- Brightness Shortcuts+/UP: Adjust brightness or navigate up in the OSD menu.
- Volume Shortcuts-/Down: Adjust volume or navigate down in the OSD menu.
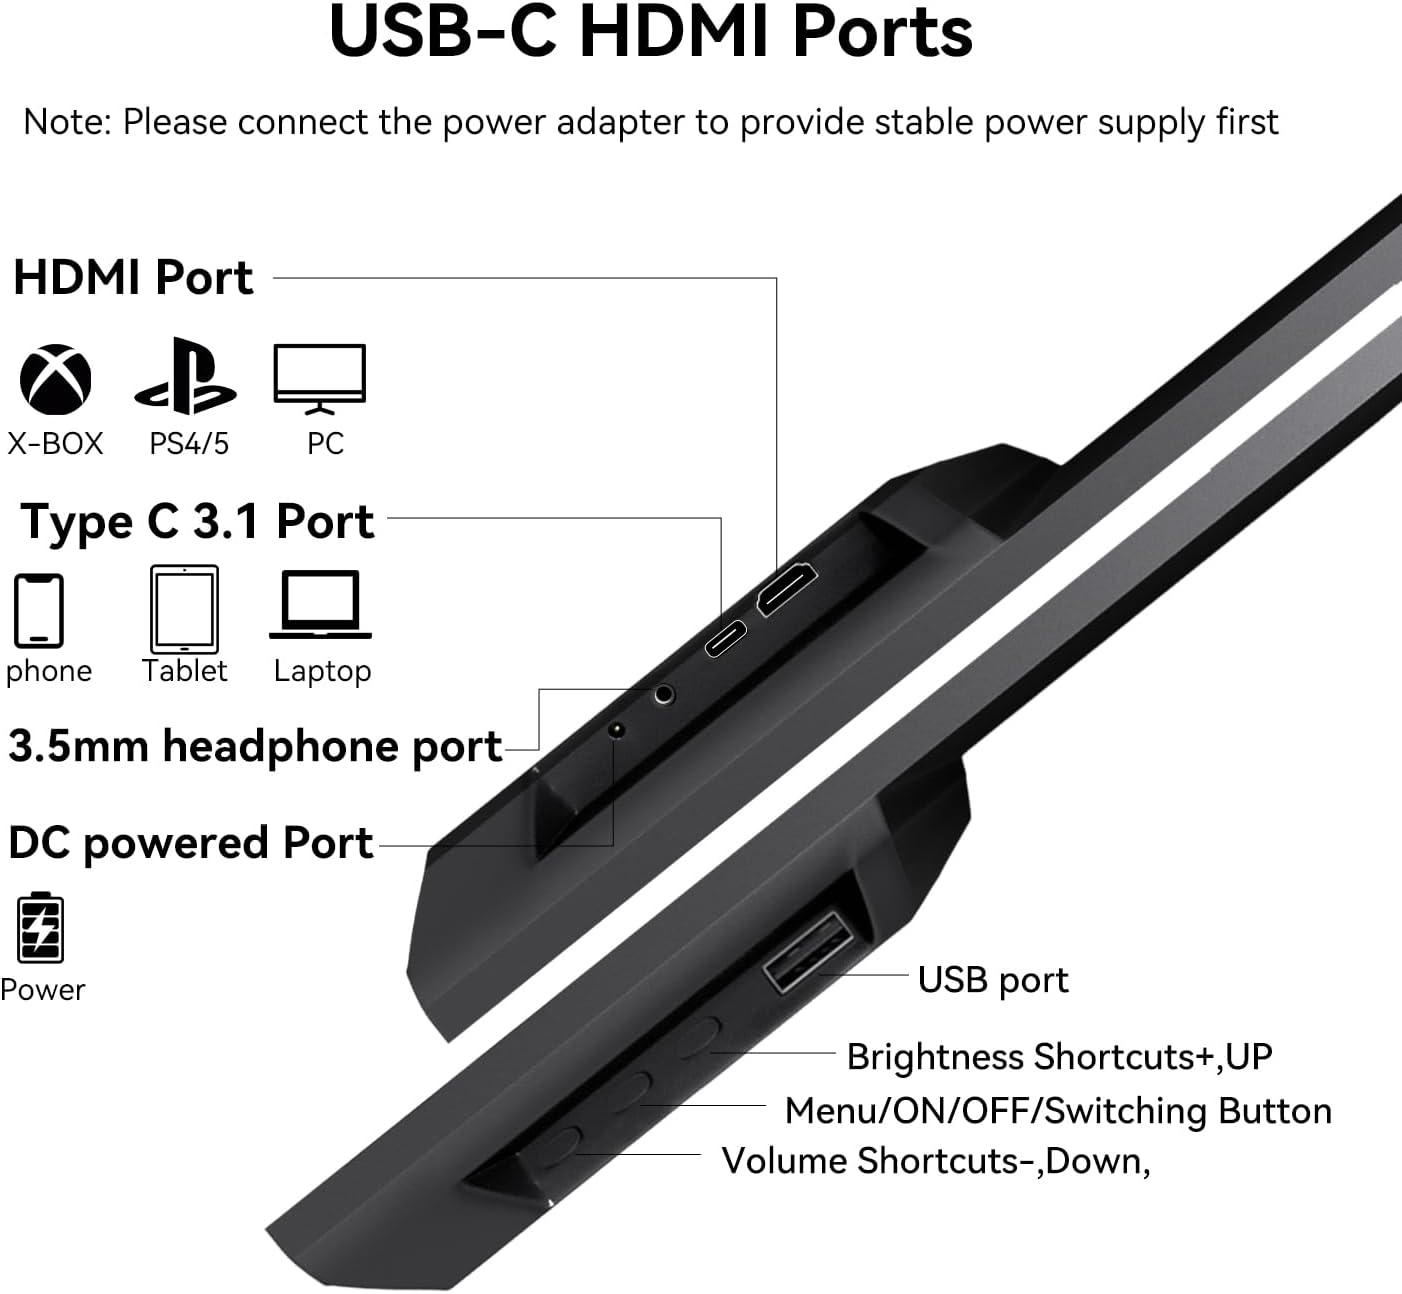
Figure 4.1: Monitor Ports and Controls
4.2 Touch Functionality
The monitor supports multi-touch gestures for seamless interaction. Common gestures include:
- Touch: Single tap for selection.
- 2-finger Touch: For specific application functions.
- Narrow/Enlarge: Pinch in/out with two fingers to zoom.
- Multi-touch: Use multiple fingers for advanced interactions.
- UP/Down/Drag: Swipe or drag to scroll or move items.
Important Note: Due to system protection, touch functionality is not available when the monitor is connected to devices such as Apple devices, PS3/4/5, Switch, X-box, Steam-Deck, or Fire TV stick/cube.

Figure 4.2: Touch Gestures
4.3 Audio Output
The monitor features dual built-in stereo speakers for audio output. You can also connect headphones or external speakers via the 3.5mm headphone port.

Figure 4.3: Dual Speakers
5. Maintenance
5.1 Cleaning the Monitor
To clean the monitor screen and casing:
- Power off the monitor and unplug the power adapter.
- Use a soft, lint-free cloth slightly dampened with water or a non-abrasive screen cleaner.
- Wipe the screen gently. Avoid applying excessive pressure.
- Do not use alcohol, ammonia-based cleaners, or abrasive materials, as these can damage the screen or casing.
5.2 Storage
When not in use, store the monitor in a cool, dry place away from direct sunlight and extreme temperatures. If transporting, use appropriate protective packaging.
6. Troubleshooting
If you encounter issues with your monitor, please refer to the following common problems and solutions:
| Problem | Possible Cause | Solution |
|---|---|---|
| No power | Power adapter not connected or faulty. | Ensure the power adapter is securely connected to the monitor's DC port and a working power outlet. |
| No signal | Incorrect cable connection or input source. | Verify that the USB-C or HDMI cable is securely connected to both the monitor and the source device. Check the input source settings on your device. |
| Touch function not working | Incompatible device or incorrect connection. | Ensure the USB-C cable is full-featured (for USB-C only connection) or the USB-A to USB-C cable is connected (for HDMI connection). Remember, touch is not supported on Apple devices, PS3/4/5, Switch, X-box, Steam-Deck, Fire TV stick/cube. |
| Display flickering or unstable | Insufficient power or faulty cable. | Always connect the power adapter to ensure stable power. Try a different cable if available. |
| No sound from speakers | Volume too low or muted, or audio output settings on source device. | Increase monitor volume using the buttons. Check audio output settings on your connected device to ensure sound is routed to the monitor. |
7. Specifications
| Feature | Detail |
|---|---|
| Screen Size | 23.8 inches |
| Panel Type | VA |
| Native Resolution | 1920 x 1080 (Full HD) |
| Color Gamut | 100% sRGB |
| Contrast Ratio | 4000:1 |
| Brightness | 300 cd/m² |
| Refresh Rate | 75Hz |
| Connectivity | 1x HDMI, 1x USB Type-C (full-featured), 1x USB port, 1x 3.5mm Headphone Jack, 1x DC Power Port |
| Special Features | Touchscreen, Portable, Adjustable Stand (0-90°), Built-in Stereo Speakers, VESA Mountable (75x75mm), Eye Care (Low-blue light, anti-flicker) |
| Dimensions (Thinnest Part) | 0.9 cm / 0.35 inches |
| Weight (Monitor) | 2.3 kg / 5.07 lbs |
8. Warranty and Support
8.1 Warranty Information
Please refer to the warranty card included with your product for detailed warranty terms and conditions. The warranty typically covers manufacturing defects for a specified period from the date of purchase.
8.2 Customer Support
For technical assistance, troubleshooting beyond this manual, or warranty claims, please contact Prechen customer support through the retailer where you purchased the product or visit the official Prechen website for contact information.
Documents and downloads
Ask a question about this manual
Ask about setup, troubleshooting, compatibility, parts, safety, or missing instructions. Manuals+ will review the question and use this page’s manual context to help answer it.