
Douk Audio XZ-P10-AU
Contents
Nobsound P10 HiFi Headphone Amplifier User Manual
Model: XZ-P10-AU
Introduction
Thank you for purchasing the Nobsound P10 HiFi Headphone Amplifier. This device is designed to enhance your audio experience by providing powerful and clear sound to a wide range of headphones. Please read this manual carefully to ensure proper setup and operation.
Product Overview
Key Features:
- Powerful Output: Delivers up to 1100mW @32Ω, capable of driving headphones from 24Ω IEMs to 600Ω studio models.
- Flexible Connectivity: Features RCA and 3.5mm AUX inputs, along with 6.35mm and 3.5mm headphone outputs (simultaneous use). The 3.5mm output can also function as a preamp output.
- High-Voltage Circuit: Incorporates a built-in 30V boost power supply for reduced distortion and cleaner audio.
- Customizable Sound: Equipped with two NE5532 op-amp chips in plug-in sockets, allowing for easy swapping to fine-tune the sound signature.
- Compact Design: Housed in a durable mini aluminum chassis, suitable for desktop use.
What's in the Box:

Image: Contents of the Nobsound P10 package, including the amplifier unit, DC 5V power adapter, and user manual.
- 1x P10 Headphone Amplifier
- 1x DC 5V Power Adapter
- 1x User Manual
Setup Instructions
- Placement: Place the P10 amplifier on a stable, flat surface, away from direct sunlight, heat sources, or excessive moisture.
- Connect Audio Input:
- For RCA input: Connect your audio source (e.g., CD player, DAC) to the RCA IN ports on the rear panel using an RCA cable.
- For 3.5mm AUX input: Connect your audio source (e.g., PC, phone) to the AUX IN port on the rear panel using a 3.5mm audio cable.
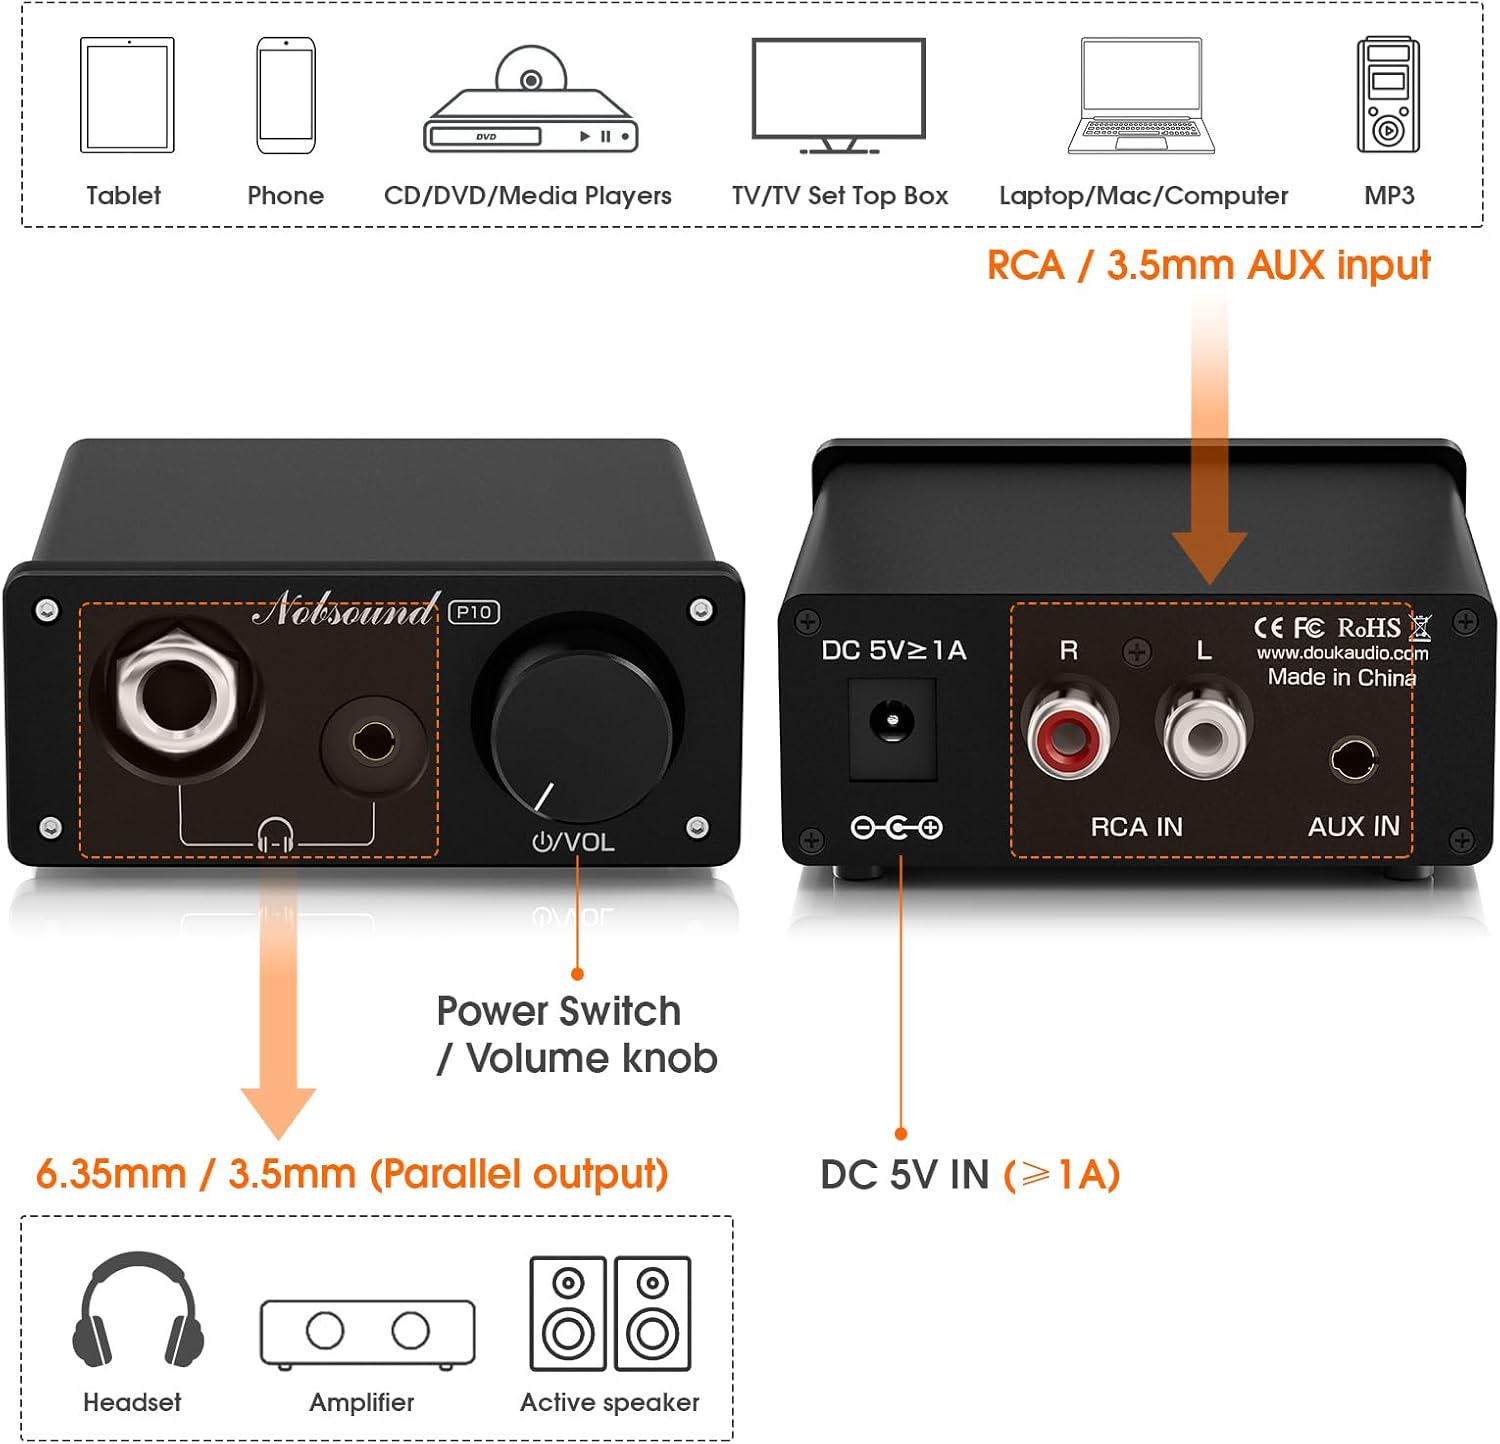
Image: Front and rear panel diagram of the P10, illustrating the DC 5V power input, RCA and AUX audio inputs, and 6.35mm/3.5mm headphone outputs.

Image: The P10 amplifier connected to both headphones and an audio source, demonstrating its versatile input and output options.
- Connect Headphones/Output Device:
- Connect your headphones to either the 6.35mm or 3.5mm headphone output jack on the front panel. Both can be used simultaneously.
- If using the 3.5mm output as a preamp for speakers or another amplifier, connect a 3.5mm audio cable from this port to your receiving device.
- Connect Power: Connect the included DC 5V power adapter to the DC 5V IN port on the rear panel of the amplifier, then plug the adapter into a wall outlet.
Operating Instructions
- Power On/Off: The volume knob on the front panel also functions as the power switch. Rotate the knob clockwise until you hear a click to turn the unit on. Rotate counter-clockwise until it clicks to turn off.
- Volume Adjustment: After powering on, slowly rotate the volume knob clockwise to increase the volume to a comfortable listening level. Rotate counter-clockwise to decrease volume.
- Source Selection: The P10 automatically detects the active input. If both RCA and AUX inputs are connected, ensure only one source is playing at a time to avoid signal mixing.

Image: The front panel of the P10 amplifier, highlighting the headphone outputs and the combined power switch/volume control knob.
Customizing Sound with Swappable Op-Amps
The Nobsound P10 features two NE5532 op-amp chips installed in plug-in sockets. This design allows users to "roll" or swap out these op-amps with other compatible dual op-amps (e.g., LME49720) to alter the amplifier's sound characteristics and personalize their listening experience.
Procedure for Swapping Op-Amps:
- Power Off and Disconnect: Ensure the amplifier is powered off and disconnected from the power adapter and all audio cables.
- Open Chassis: Carefully remove the screws securing the top cover of the amplifier to access the internal circuit board.
- Remove Existing Op-Amps: Using a suitable tool (e.g., IC extractor or small flat-head screwdriver), gently pry the NE5532 op-amp chips from their sockets. Be careful not to bend the pins.
- Insert New Op-Amps: Align the pins of the new compatible dual op-amps with the sockets. Ensure the orientation (usually indicated by a dot or notch on the chip and socket) is correct. Gently press the op-amps into place until fully seated.
- Reassemble: Securely reattach the top cover of the amplifier.
- Test: Reconnect power and audio, then test the amplifier with the new op-amps.
Note: Swapping op-amps requires care and knowledge of electronic components. If you are unsure, seek assistance from an experienced technician. Incorrect installation can damage the device.

Image: Internal view of the P10 amplifier, illustrating the removable op-amp chips for sound customization.
Specifications
| Feature | Detail |
|---|---|
| Model Number | XZ-P10-AU |
| Product Dimensions | 3.23 x 3.07 x 1.26 inches |
| Item Weight | 7.4 ounces |
| Output Power | Up to 1100mW @32Ω |
| Headphone Impedance Range | 24Ω - 600Ω |
| Input Voltage | DC 5V |
| Internal Boost Voltage | 30V |
| Audio Inputs | RCA, 3.5mm AUX |
| Audio Outputs | 6.35mm Headphone, 3.5mm Headphone (also Preamp Out) |
| Op-Amps | NE5532 (swappable) |
| Color | Black |
| Manufacturer | Nobsound |
Troubleshooting
- No Sound:
- Ensure the amplifier is powered on and the volume knob is turned up.
- Verify all audio cables are securely connected to both the source and the amplifier.
- Check the audio source (e.g., PC, phone) to ensure it is playing audio and its volume is not muted or too low.
- Try a different audio source or headphones to isolate the issue.
- Distorted Sound:
- Reduce the volume on both the amplifier and the audio source.
- Ensure your headphones' impedance is within the supported range (24Ω-600Ω).
- Check for loose cable connections.
- Humming or Buzzing Noise:
- Ensure the power adapter is securely connected and is the original 5V adapter.
- Try plugging the amplifier into a different power outlet.
- Move the amplifier away from other electronic devices that might cause interference.
- Check if the audio cables are shielded and not running parallel to power cables.
Maintenance
- Cleaning: Use a soft, dry cloth to clean the exterior of the amplifier. Do not use liquid cleaners or solvents.
- Storage: When not in use for extended periods, store the amplifier in a cool, dry place, away from direct sunlight and extreme temperatures.
- Ventilation: Ensure the amplifier has adequate ventilation. Do not block the ventilation slots.
Warranty and Support
For warranty information and technical support, please refer to the documentation provided with your purchase or contact Douk Audio customer service directly. Keep your purchase receipt as proof of purchase for warranty claims.
You can visit the Douk Audio Store for more information: Douk Audio Store
Documents and downloads
Ask a question about this manual
Ask about setup, troubleshooting, compatibility, parts, safety, or missing instructions. Manuals+ will review the question and use this page’s manual context to help answer it.