Introduction
Thank you for choosing the SYMIK Intelligent 4-in-1 Charging Case. This device is designed to efficiently charge your Insta360 Ace Pro 2, Ace Pro, and Ace batteries, while also offering power bank functionality, battery accumulation, and secure storage. This manual provides detailed instructions for setup, operation, maintenance, and troubleshooting to ensure optimal performance and longevity of your charger.

Figure 1: SYMIK Intelligent 4-in-1 Charging Case
Key Features
- Intelligent 4-in-1 Charging Case: Functions as a dual-channel 24W fast charger, 10.5W output power source, battery accumulator, and battery storage case. Compatible with Insta360 Ace Pro 2, Ace Pro, and Ace batteries.
- Unparalleled Intelligence with OLED Screen: Features a 0.96" OLED screen displaying real-time battery and charging information, including State of Charge (SOC), power, voltage, current, battery health, cycle counts, capacity, and temperature.
- Max 15W Fastest Charging Speed: Charges two Ace Pro 2 batteries from 0% to 80% in 40 minutes (at 10W per channel) or 0% to 100% in 75 minutes. In 15W boost mode, a single battery charges from 0% to 80% in 25 minutes.
- Bi-directional (Two-Way) Charger: Capable of charging Insta360 batteries and also providing power to small external devices like phones or tablets.
- Original Accumulation Mode: Allows combining the charge from two partially charged batteries into one fully charged battery, reducing the need for mid-use battery swaps.
- Unparalleled Charging Accuracy: Equipped with highly accurate Texas Instruments charging management chips, achieving ±8mV accuracy for precise charging and extended battery lifespan.
- Electrically and Mechanically Precisely Engineered: Constructed with a semi-clear fire-resistant PC shell, internal aluminum heat sink, magnetic lid lock, and anti-slip pad for safety and durability.
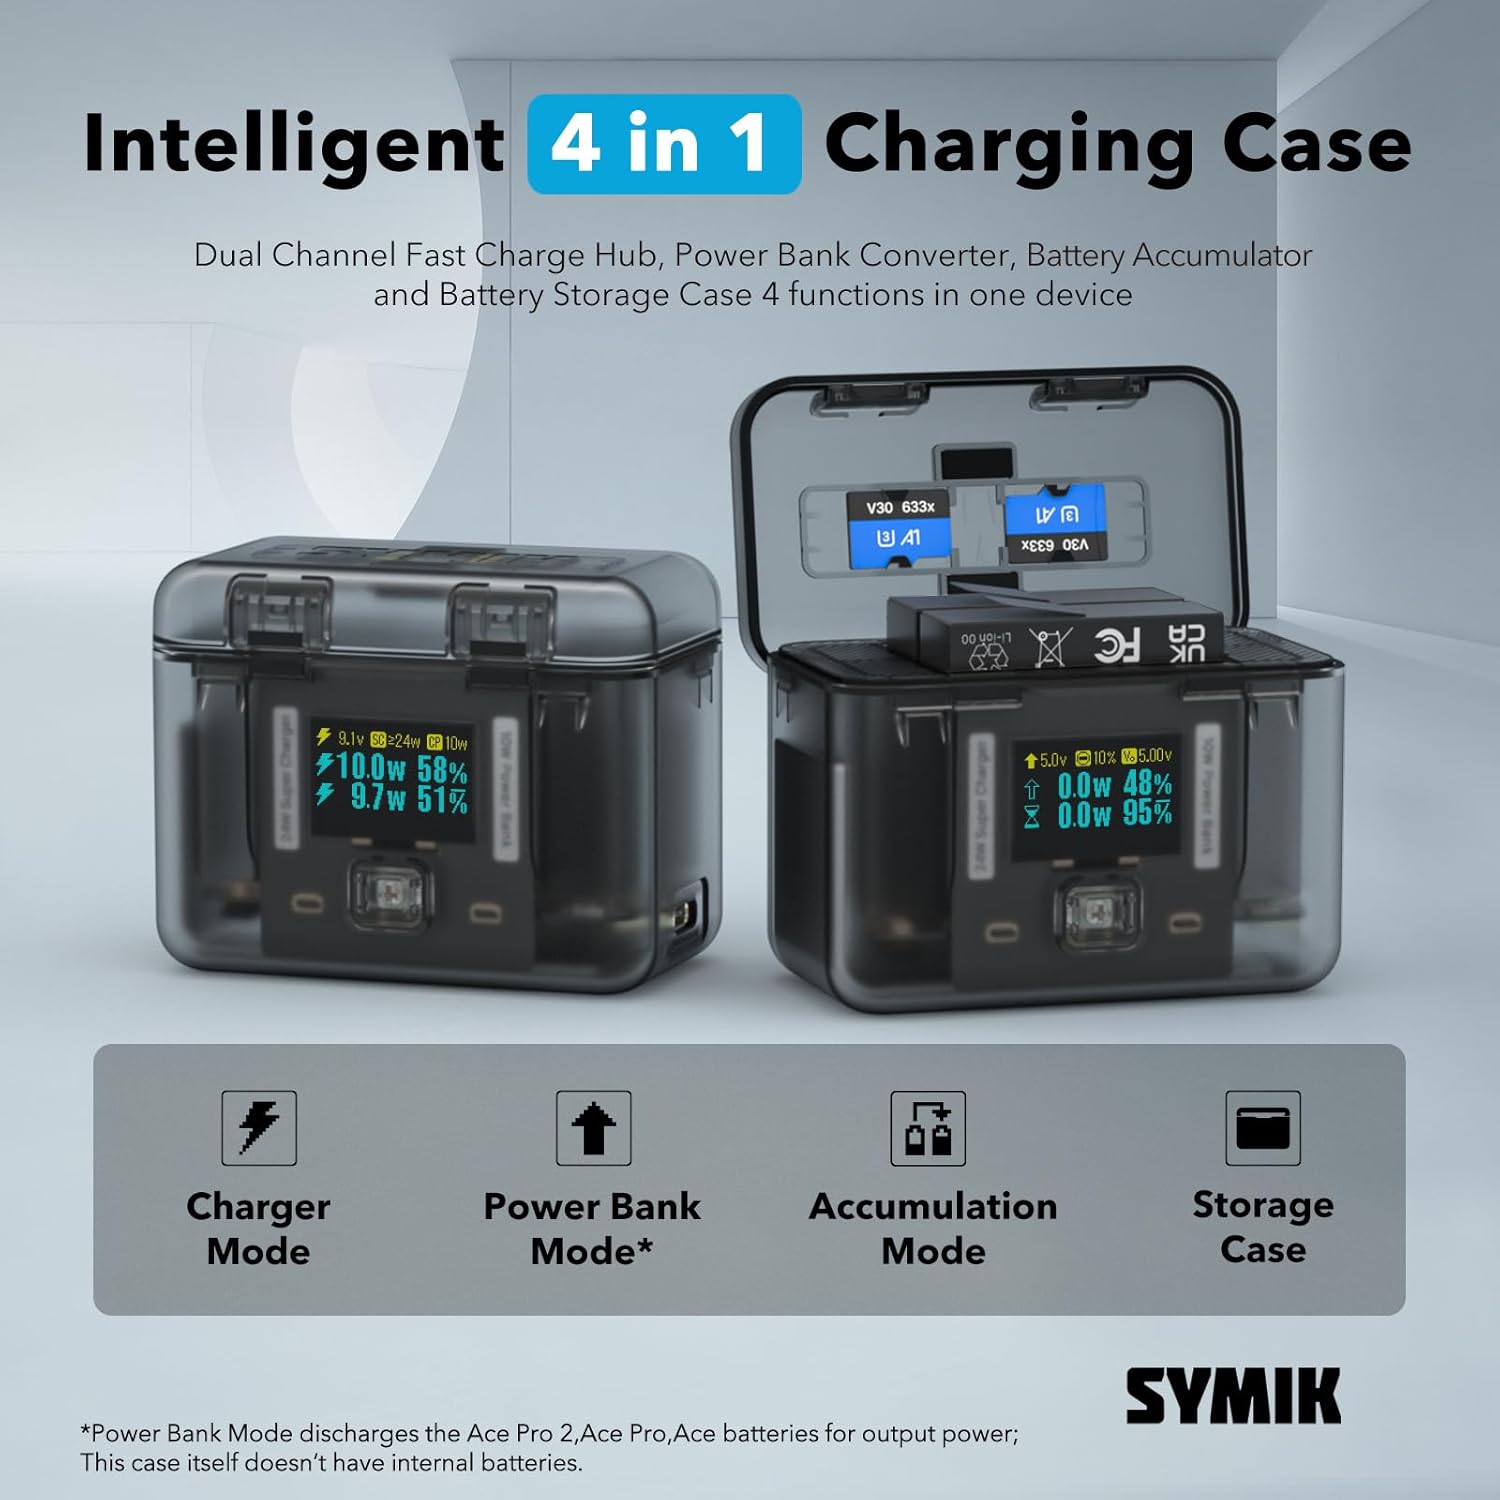
Figure 2: Overview of the 4-in-1 functionalities
Setup
- Unpack the Charger: Carefully remove the SYMIK Charging Case from its packaging. Ensure all components are present.
- Connect Power: Connect a USB-C cable (not included) to the USB-C input port on the charger. Connect the other end to a compatible USB power adapter (e.g., 24W or higher for optimal performance). The OLED screen will illuminate.
- Insert Batteries: Open the lid of the charging case. Insert your Insta360 Ace Pro 2, Ace Pro, or Ace batteries into the designated slots. Ensure they are inserted correctly according to the orientation indicators. The charger will automatically detect the battery type.
- Initial Charge: For first-time use, it is recommended to fully charge any inserted batteries.
Operating Instructions
Charging Batteries
Once batteries are inserted and the charger is connected to a power source, the charger will automatically begin charging. The OLED screen provides detailed real-time charging status.

Figure 3: Fast Charging Speed indication on OLED screen
Understanding the OLED Display
The 0.96" OLED screen provides comprehensive information at a glance:
- Battery State of Charge (SOC): Percentage of charge remaining.
- Charge/Discharge Power: Current power in Watts (W).
- Voltage (V) and Current (A): Real-time electrical readings.
- Battery Stage of Health (SOH): Indication of battery degradation.
- Cycle Counts: Number of charge/discharge cycles.
- Available Capacity (mAh) and Full Charge Capacity (mAh): Battery capacity information.
- Temperature: Battery temperature in Celsius and Fahrenheit.
- Power Source Capabilities: Displays the available power from the connected source.

Figure 4: Detailed information on the OLED screen
Bi-directional (Two-Way) Charging / Power Bank Mode
The charger can act as a power bank to charge other devices. Ensure at least one charged Insta360 battery is in the case.
- Connect External Device: Connect your phone, tablet, or other small device to the USB-C port of the SYMIK charger using a compatible USB-C to USB-C or USB-C to Lightning cable.
- Power Output: The charger will begin to discharge the internal Insta360 batteries to power your external device. The OLED screen will indicate discharge power.

Figure 5: Bi-directional charging capability
Original Accumulation Mode
This unique feature allows you to consolidate charge from two partially charged batteries into one fully charged battery.
- Insert Batteries: Place two partially charged Insta360 batteries into the charging slots.
- Initiate Accumulation: The charger will intelligently transfer energy from one battery to the other until one battery is fully charged, if possible. The OLED screen will show the accumulation process.
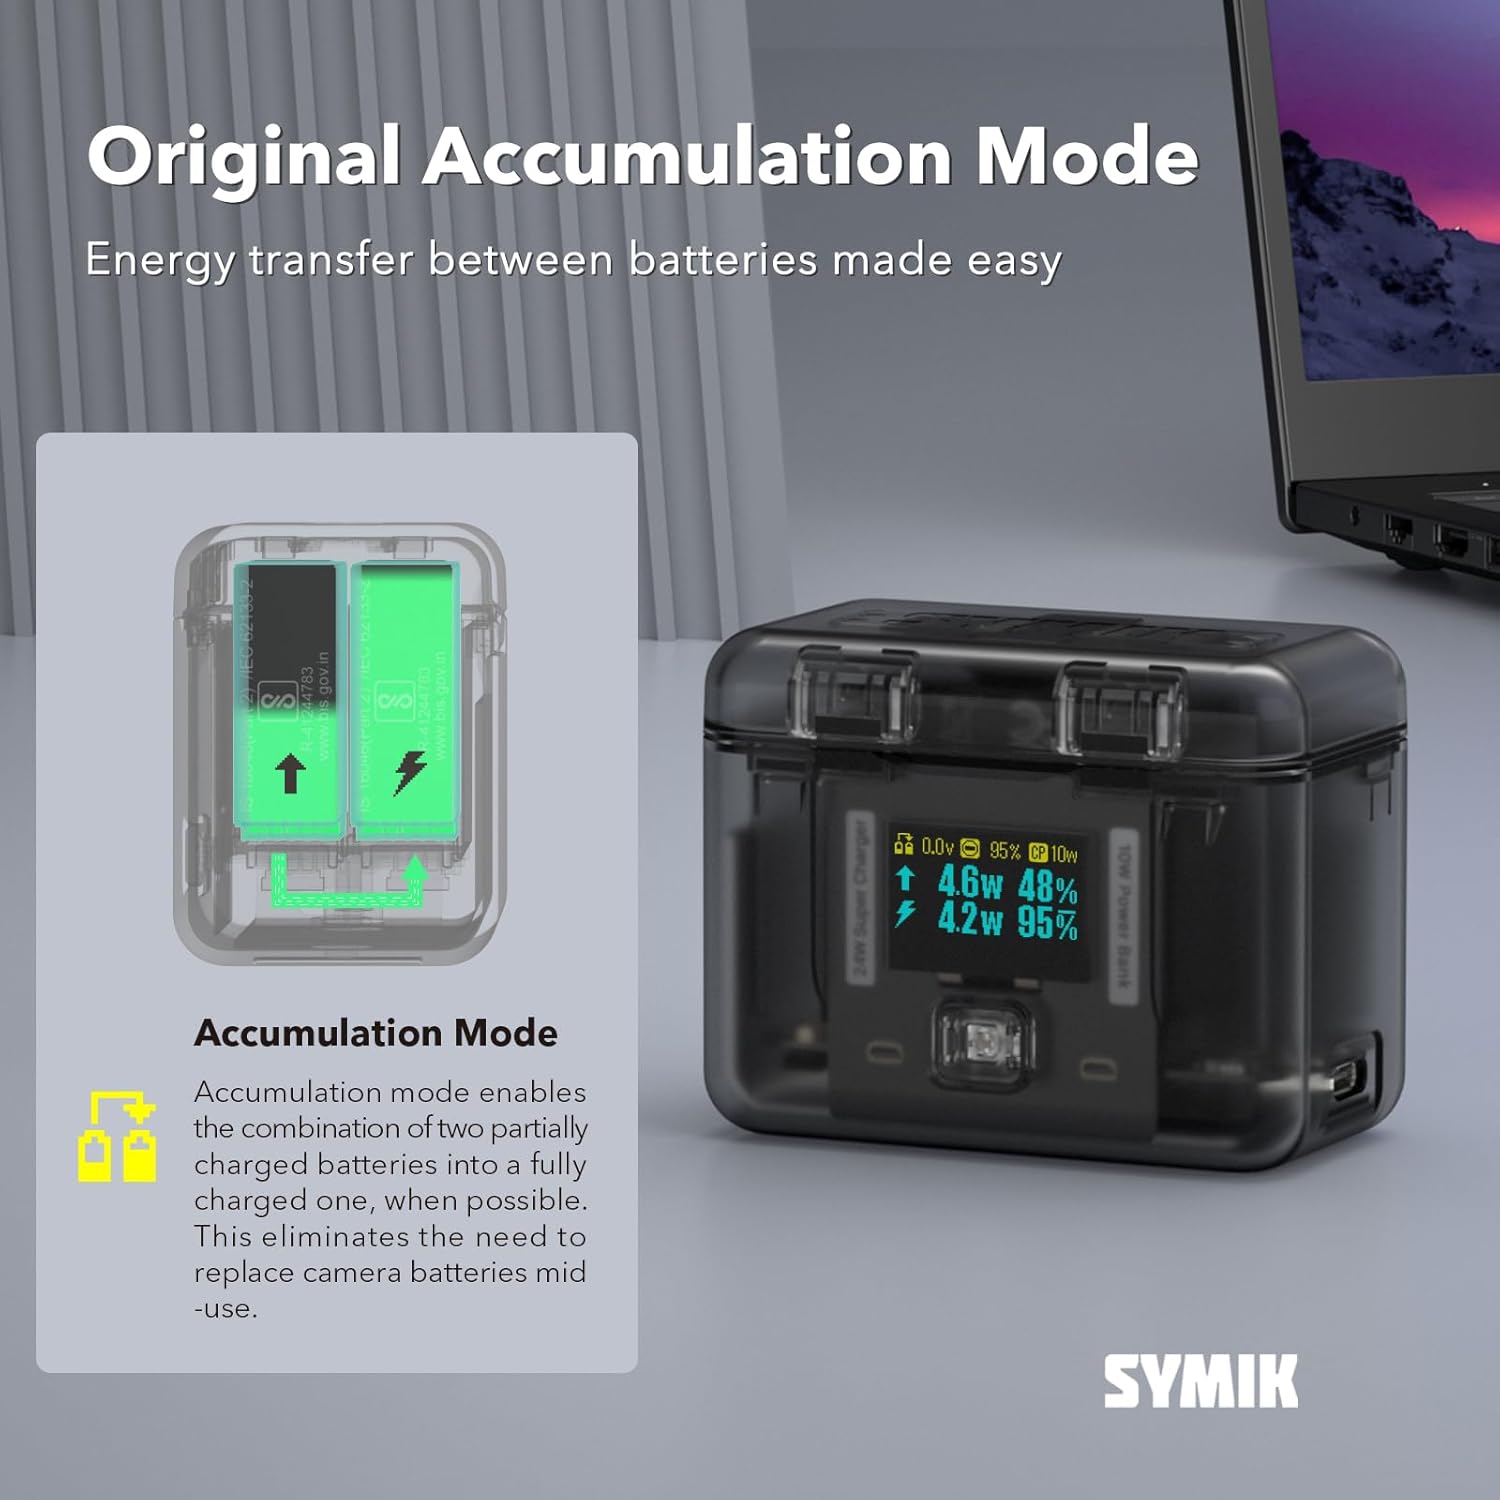
Figure 6: Accumulation Mode in action
Battery Type Auto Detection
The charger automatically detects the chemical characteristics of Ace Pro 2 (4.48V) and Ace Pro/Ace (4.40V) batteries and applies the correct charging profiles for optimal and safe charging.

Figure 7: Automatic battery type detection
Maintenance
- Cleaning: Use a soft, dry cloth to wipe the exterior of the charger. Do not use liquid cleaners or solvents. Ensure no dust or debris accumulates in the battery slots or USB-C port.
- Storage: Store the charger in a cool, dry place away from direct sunlight and extreme temperatures. When not in use for extended periods, ensure batteries are removed.
- Handling: Avoid dropping the charger or subjecting it to strong impacts. The semi-clear PC shell and internal components are designed for durability but can be damaged by misuse.
Troubleshooting
- Charger Not Powering On:
Solution: Ensure the USB-C cable is securely connected to both the charger and a working power adapter. Try a different USB-C cable or power adapter. - Batteries Not Charging:
Solution: Verify batteries are inserted correctly. Check the OLED screen for error messages or low input power indication. Ensure the power adapter provides sufficient wattage (24W recommended for fast charging). - Slow Charging Speed:
Solution: Ensure you are using a power adapter capable of delivering at least 24W. Charging speed can be affected by ambient temperature; ensure operation within the specified temperature range (32° to 104° F / 0° to 40° C). - Inaccurate Battery Readings:
Solution: The SYMIK charger features high accuracy (±8mV). If you suspect inaccurate readings, ensure the battery contacts are clean. Note that extreme temperatures can temporarily affect battery performance and readings. - Power Bank Mode Not Working:
Solution: Ensure there are charged Insta360 batteries inside the case. Verify the external device is properly connected via the USB-C port.
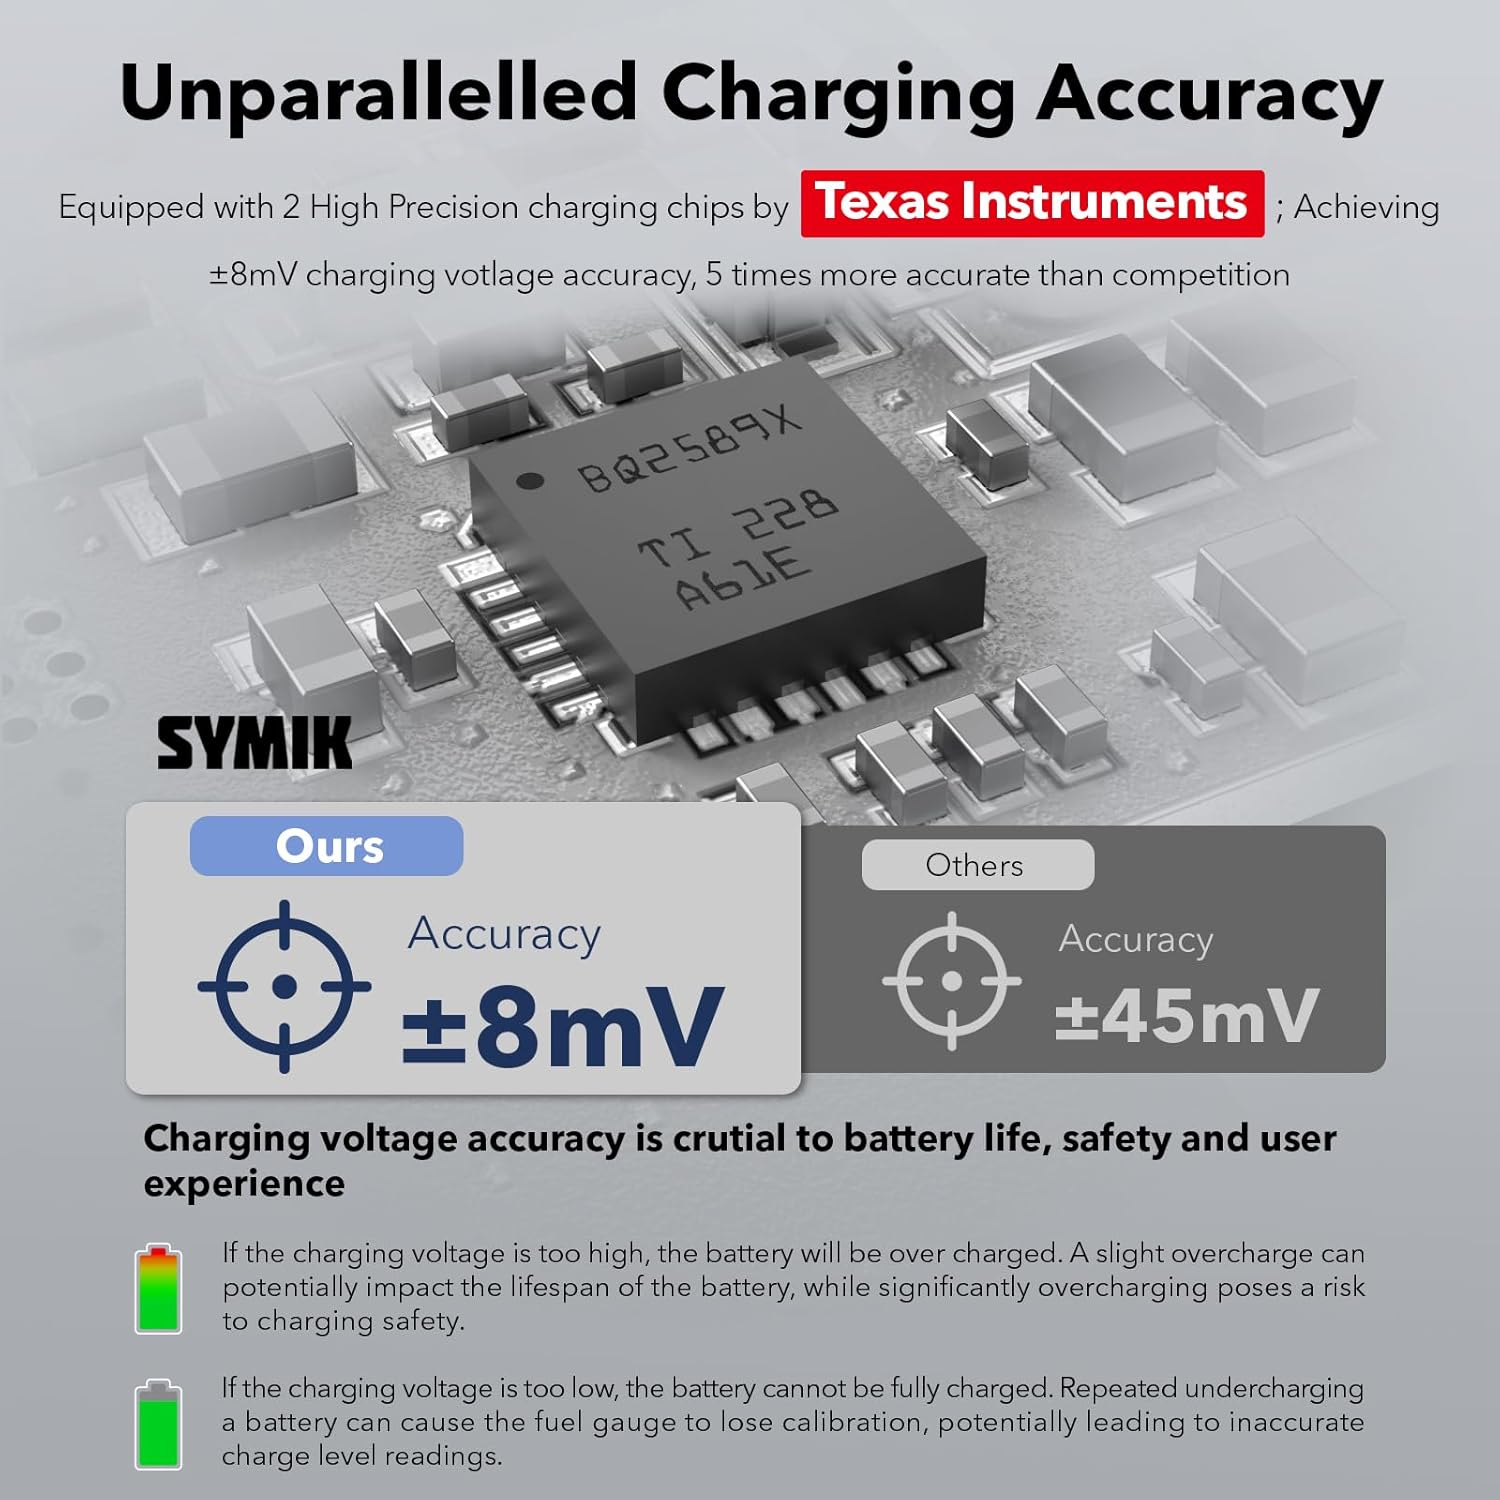
Figure 8: High charging accuracy for reliable performance
Specifications
| Feature | Detail |
|---|---|
| Product Dimensions | 2.9 x 2.3 x 1.7 inches (74 x 58 x 43 mm) |
| Item Weight | 4.6 ounces (99 grams) |
| Model Number | ACECC |
| Operating Temperature | 32° to 104° F (0° to 40° C) |
| Charger Mode USB-C Input | 5V 3A; 9V 2.7A; (24W Max) |
| Power Bank Mode USB-C Output | 5V 2.1A (10.5W) |
| Charge Power Limit (Each Channel) | Up to 15W Adjustable |
| Charging Time (Ace Pro 2 1800mAh) | 0% to 80% in 40 min @ 10W; 0% to 100% in 70 min @ 10W; 0% to 80% in 29 min @ 15W |
| Charging Time (Ace Pro 1 1650mAh) | 0% to 80% in 36 min @ 10W; 0% to 100% in 60 min @ 10W; 0% to 80% in 25 min @ 15W |
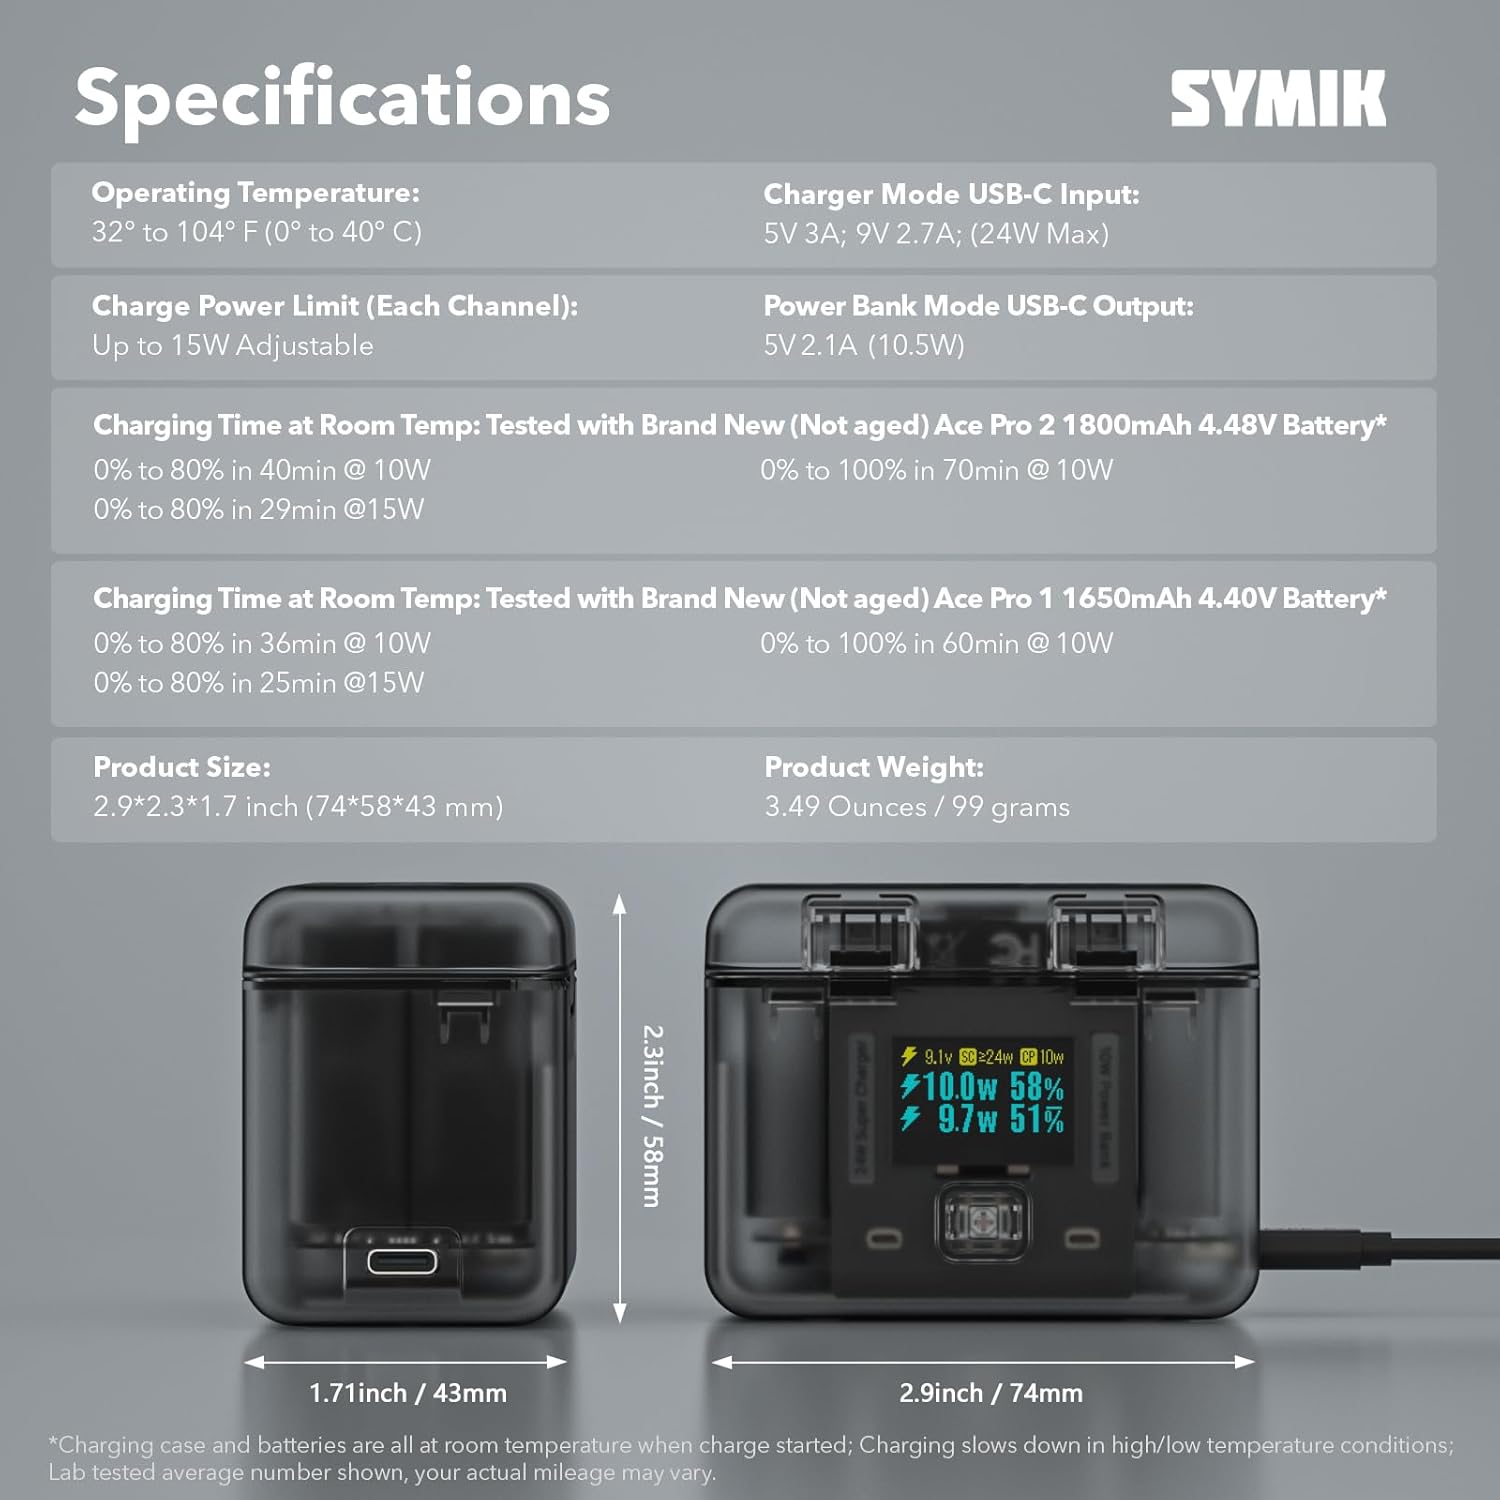
Figure 9: Detailed product specifications
Warranty and Support
SYMIK products are designed and manufactured to the highest quality standards. For warranty information or technical support, please refer to the product packaging or visit the official SYMIK store on Amazon. Keep your purchase receipt as proof of purchase for any warranty claims.
For further assistance, you may contact SYMIK customer service through the Amazon platform or the contact information provided on the SYMIK brand store page.
SYMIK Store Link: https://www.amazon.com/stores/SYMIK/page/768A0A1A-7E63-45AF-B198-4C241088136E


