
1. Introduction
The KCEVE KC-302HX KVM Switch is designed to streamline your workspace by allowing you to control up to three computers (two laptops and one desktop) using a single set of keyboard, mouse, and two HDMI monitors. This device supports high-resolution video output up to 4K@60Hz, offers USB 3.0 data transfer speeds, and includes 85W Power Delivery (PD) for compatible USB-C laptops. It is an ideal solution for users who need to switch between multiple systems efficiently.

Image: The KVM switch supports various resolutions, including 4K@60Hz and 2K Quad HD, for a high-quality visual experience.
2. Package Contents
Please verify that all items listed below are included in your package:
- 1 x KCEVE KC-302HX KVM Switch
- 2 x USB-C Cables
- 2 x HDMI Cables
- 1 x USB 3.0 Cable
- 1 x 1.5m Wired Remote Control
- 1 x DC 12V Power Supply
- 1 x User Manual

Image: A visual representation of the KVM switch and all accompanying cables and accessories included in the box.
3. Product Overview
The KCEVE KC-302HX KVM Switch features a robust design with clearly labeled ports and controls for intuitive operation.
Front Panel
- ON/OFF Switch: Power control for the device.
- USB 3.0 Ports (x3): For connecting USB peripherals such as keyboard, mouse, printer, scanner, or U-disk.
- PC Selection Buttons (PC1, PC2, PC3): Manual switching between connected computers.
- Wired Remote Port: For connecting the included wired remote control.
- LED Indicators: Show which computer input is currently active.
Rear Panel
- HDMI Output Ports (OUT A, OUT B): Connect to your two HDMI monitors.
- PC Input Ports (PC1, PC2, PC3):
- PC1 & PC2 (Laptops): Each requires 1x USB-C (with PD) and 1x HDMI input.
- PC3 (Desktop): Requires 1x USB 3.0 and 2x HDMI inputs.
- DC 12V Power Input: Connect the included power adapter.
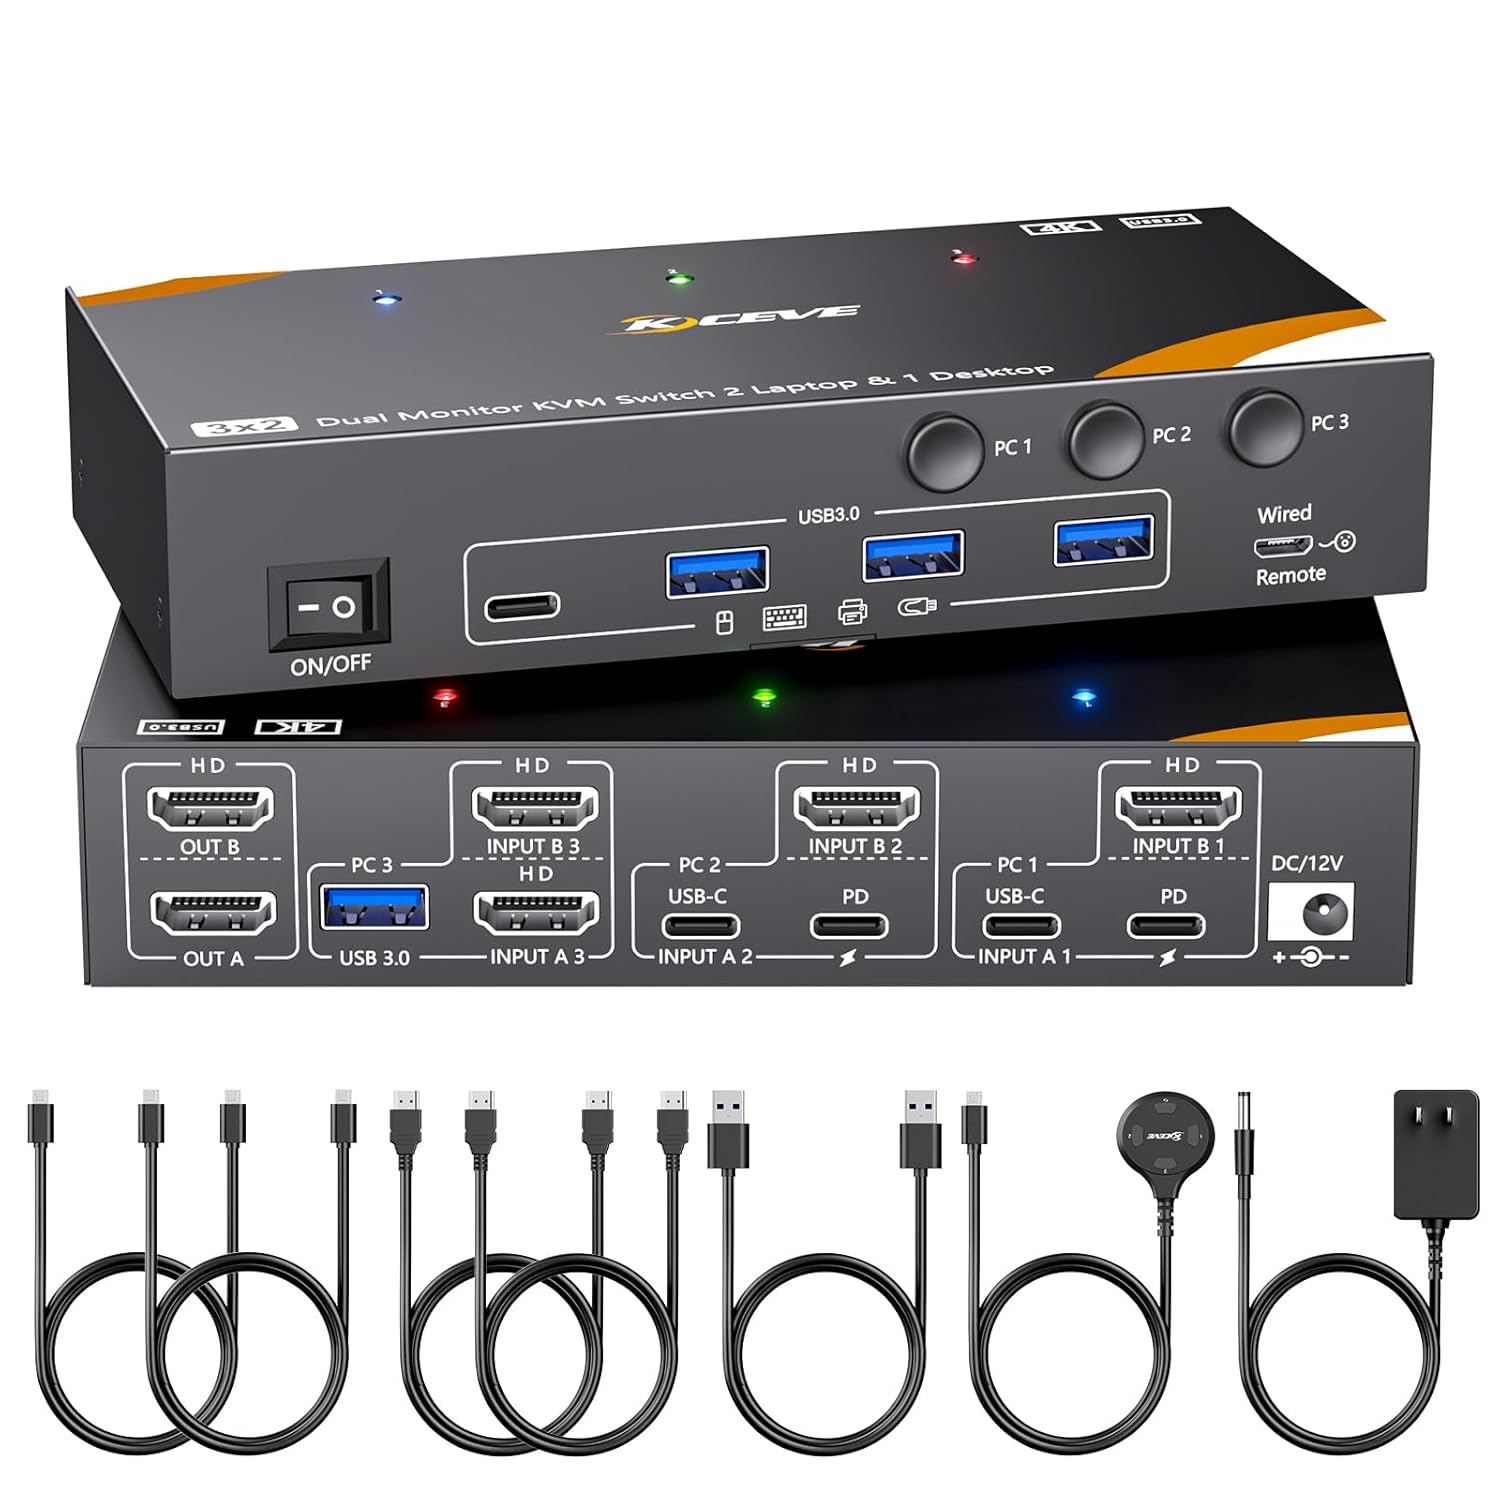
Image: A comprehensive view of the KVM switch, highlighting its front panel controls and rear panel connection ports.

Image: A detailed connection diagram showing how to connect two laptops and one desktop to the KVM switch, along with peripherals and monitors.
4. Setup Instructions
Follow these steps to connect your computers and peripherals to the KVM switch.
- Connect Monitors: Connect your two HDMI monitors to the KVM switch's OUT A and OUT B HDMI ports.
- Connect Peripherals: Connect your keyboard, mouse, and other USB 3.0 devices (e.g., printer, webcam) to the USB 3.0 ports on the front panel of the KVM switch.
- Connect Computers:
- For PC1 (Laptop) & PC2 (Laptop): For each laptop, connect one HDMI cable from the laptop's HDMI output to the corresponding INPUT B port on the KVM switch (e.g., INPUT B 1 for PC1, INPUT B 2 for PC2). Then, connect one USB-C cable from the laptop's USB-C port to the corresponding INPUT A USB-C port on the KVM switch (e.g., INPUT A 1 for PC1, INPUT A 2 for PC2). Important: Ensure your laptop's USB-C port and HDMI port can output video simultaneously.
- For PC3 (Desktop): Connect two HDMI cables from your desktop's graphics card outputs to the INPUT B 3 and INPUT A 3 HDMI ports on the KVM switch. Then, connect one USB 3.0 cable from your desktop's USB port to the USB 3.0 INPUT A 3 port on the KVM switch.
- Connect Power: Connect the included DC 12V power adapter to the KVM switch's DC 12V power input and plug it into a power outlet.
- Power On: Turn on the KVM switch using the ON/OFF switch on the front panel.
- Optional Wired Remote: Connect the 1.5m wired remote to the dedicated port on the front panel for convenient switching.
Note on Apple M1/M2/M3 Devices: Apple M1/M2 chips only support single-screen output. MacBook Pro (M3) cannot output images through both USB-C and HDMI ports simultaneously; it can only output one image at a time.

Image: An example setup showing a user efficiently managing two laptops and one desktop with two monitors and shared peripherals via the KVM switch.
5. Operating Instructions
5.1 Switching Methods
You can switch between the connected computers using two methods:
- Panel Buttons: Press the PC1, PC2, or PC3 buttons on the front panel of the KVM switch to select the desired computer. The corresponding LED indicator will illuminate.
- Wired Remote: Use the included 1.5m wired remote control to switch between computers. This is convenient if the KVM switch is not easily accessible.

Image: Illustration of the two available switching methods: directly pressing buttons on the KVM unit or using the external wired remote control.
5.2 Video Output Modes
The KVM switch supports both Extended Mode and Mirror Mode for dual monitor setups. After switching, you may need to press "Windows + P" on your keyboard to select your preferred display mode.
- Extended Mode: Displays different content on each monitor, extending your desktop workspace.
- Mirror Mode: Duplicates the same content on both monitors.

Image: Visual examples demonstrating how Extended Mode and Mirror Mode appear on a dual monitor setup.
5.3 USB 3.0 Data Transfer
The KVM switch features USB 3.0 ports, supporting ultra-fast data transfer speeds up to 5Gbps. This allows for quick and efficient use of shared USB devices. It is backward compatible with USB 2.0/1.1 devices.

Image: A graphic illustrating the significant speed difference between USB 3.0 (5Gbps) and USB 2.0 (480Mbps) data transfer.
5.4 Power Delivery (PD) Functionality
For laptops connected via USB-C, the KVM switch provides 85W Power Delivery, allowing it to charge your laptop while in use. To ensure optimal charging, it is recommended to use a 100W PD charger to power the KVM switch.

Image: An illustration demonstrating how a 100W PD charger powers the KVM switch, which then delivers 85W charging to a connected laptop.
6. Compatibility
The KCEVE KC-302HX KVM Switch offers broad compatibility with various operating systems and devices:
- Operating Systems: Compatible with Windows 7/8/10/11/XP/Vista, Mac OS, Linux, and Chrome systems.
- Input Devices: Supports HDMI and USB-C input devices such as desktops, laptops, Apple TV, PS5, HDTVs, monitors, and projectors.
7. Specifications
| Feature | Specification |
|---|---|
| Model Number | KC-302HX |
| Product Dimensions | 6 x 3 x 1.2 inches |
| Item Weight | 12.8 ounces |
| Video Resolution | Up to 4K@60Hz, 4K@30Hz, 2K@144Hz, 1080P@144Hz (backward compatible) |
| HDMI Standard | HDMI 2.0, HDCP 2.2 compliant |
| USB Data Transfer | USB 3.0 (up to 5Gbps), backward compatible with USB 2.0/1.1 |
| Power Delivery (PD) | 85W for USB-C laptops (requires 100W PD charger for KVM) |
| Power Input | DC 12V |
| Switching Methods | Panel Button, Wired Remote |
| Housing Material | Metal shell |
8. Troubleshooting
If you encounter issues with your KVM switch, please refer to the following common solutions:
- No Display on Monitor:
- Ensure all HDMI cables are securely connected to both the KVM switch and your monitors/computers.
- Verify that the KVM switch is powered on and the correct input (PC1, PC2, or PC3) is selected.
- Check if your computer's display settings are configured for dual monitors (Extended or Mirror mode).
- For laptops connected via USB-C, confirm that the USB-C port supports video output.
- Try using different HDMI cables, as cable quality can affect signal transmission, especially at higher resolutions.
- USB Devices Not Working:
- Ensure the USB cables from your computers are correctly connected to the KVM switch.
- Verify that the KVM switch has sufficient power.
- Try connecting the USB device directly to the computer to confirm it is functional.
- Reconnect the USB device to the KVM switch.
- Intermittent Connection/Flickering:
- Ensure all cables are firmly connected.
- Reduce the display resolution or refresh rate to see if the issue persists.
- Use high-quality HDMI 2.0 cables for optimal performance.
If these steps do not resolve your issue, please contact KCEVE customer support for further assistance.
9. Maintenance
To ensure the longevity and optimal performance of your KCEVE KC-302HX KVM Switch, follow these maintenance guidelines:
- Keep the device in a cool, dry place away from direct sunlight and extreme temperatures.
- Avoid exposing the device to water or other liquids.
- Clean the exterior of the device with a soft, dry cloth. Do not use harsh chemicals or abrasive cleaners.
- Ensure proper ventilation around the KVM switch to prevent overheating.
- Handle cables carefully to prevent damage to connectors and ports.
10. Warranty and Support
KCEVE provides comprehensive support for its products:
- Warranty: The KVM switch comes with a 12-month after-sales service period.
- Technical Support: Lifetime technical support is provided for the KCEVE KC-302HX KVM Switch.
For any questions, technical assistance, or warranty claims, please feel free to contact KCEVE customer support. Refer to the product packaging or the official KCEVE website for contact information.


