1. Introduction
This manual provides comprehensive instructions for the safe and effective installation, operation, and maintenance of your Generic Lockable Aluminum Roof Rack Cross Bars. Designed for Ford Ranger models from 2019 to 2025, these cross bars facilitate the secure transport of various cargo. Please read this manual thoroughly before installation and use to ensure proper function and safety.
2. Safety Information
Adherence to the following safety guidelines is crucial for preventing injury and damage to your vehicle or cargo.
- Weight Limit: Do not exceed the maximum load capacity of 220 lbs (100 kg) for the cross bars, ensuring weight is evenly distributed. Always refer to your vehicle's owner's manual for its specific roof load capacity, and never exceed the lower of the two limits.
- Secure Attachment: Ensure all fasteners, clamps, and locks are securely tightened before each trip. Regularly check for any looseness during extended travel.
- Cargo Securing: Always properly secure all cargo to the cross bars using appropriate straps, nets, or other securing devices. Loose cargo can shift, causing damage or creating a hazard.
- Vehicle Clearance: Be aware of the increased height of your vehicle with the roof rack and cargo installed. Exercise caution when entering garages, car washes, or areas with low overhead clearance.
- Driving Habits: Adjust your driving speed and habits to account for the added weight and wind resistance. Avoid sudden maneuvers, hard braking, or high speeds, especially in windy conditions.
- Regular Inspection: Periodically inspect the cross bars for any signs of wear, damage, or corrosion. Replace any damaged components immediately.
3. Package Contents
Verify that all components are present and undamaged before beginning installation.

Figure 3.1: Overview of all included components for the roof rack system.
- 2 x Aluminum Cross Bars
- 4 x Mounting Feet/Clamps
- 4 x Lock Cylinders with Keys
- Assorted Mounting Hardware (bolts, washers, rubber pads)
- 1 x Hex Wrench (for installation)
4. Compatibility
These roof rack cross bars are designed for specific vehicle types. Ensure your vehicle matches the compatibility requirements.
- Vehicle Model: Ford Ranger
- Model Years: 2019, 2020, 2021, 2022, 2023, 2024, 2025
- Roof Type: Compatible with vehicles that have a smooth roof or flush side rails (without raised side rails). Not compatible with vehicles that have raised side rails.

Figure 4.1: Visual guide for compatible roof types. The cross bars are suitable for vehicles without raised side rails.

Figure 4.2: Further clarification on roof rail compatibility, indicating suitability for smooth roofs.
5. Setup (Installation)
Follow these steps carefully for proper installation. It is recommended to have a second person assist during installation.
- Identify Components: Lay out all components and familiarize yourself with each part as shown in Figure 3.1.
- Assemble Mounting Feet: Attach the mounting feet to the cross bars. Ensure the rubber pads are correctly positioned to protect your vehicle's paint. The base features a non-slip rubber mat to prevent scratching and improve grip.
- Position Cross Bars: Carefully place the assembled cross bars onto your vehicle's roof. Adjust their position to be evenly spaced and parallel. The adjustable length on both sides allows for easier fitting.
- Secure Clamps: Using the provided hex wrench, tighten the clamps onto the vehicle's door frame or designated mounting points. Ensure a snug fit without over-tightening, which could damage the vehicle.
- Install Locks: Insert the lock cylinders into the mounting feet and secure them with the provided keys. This provides an anti-theft feature for your cross bars and cargo.
- Final Check: Before driving, gently shake each cross bar to confirm it is securely attached and does not move. Double-check all bolts and locks.
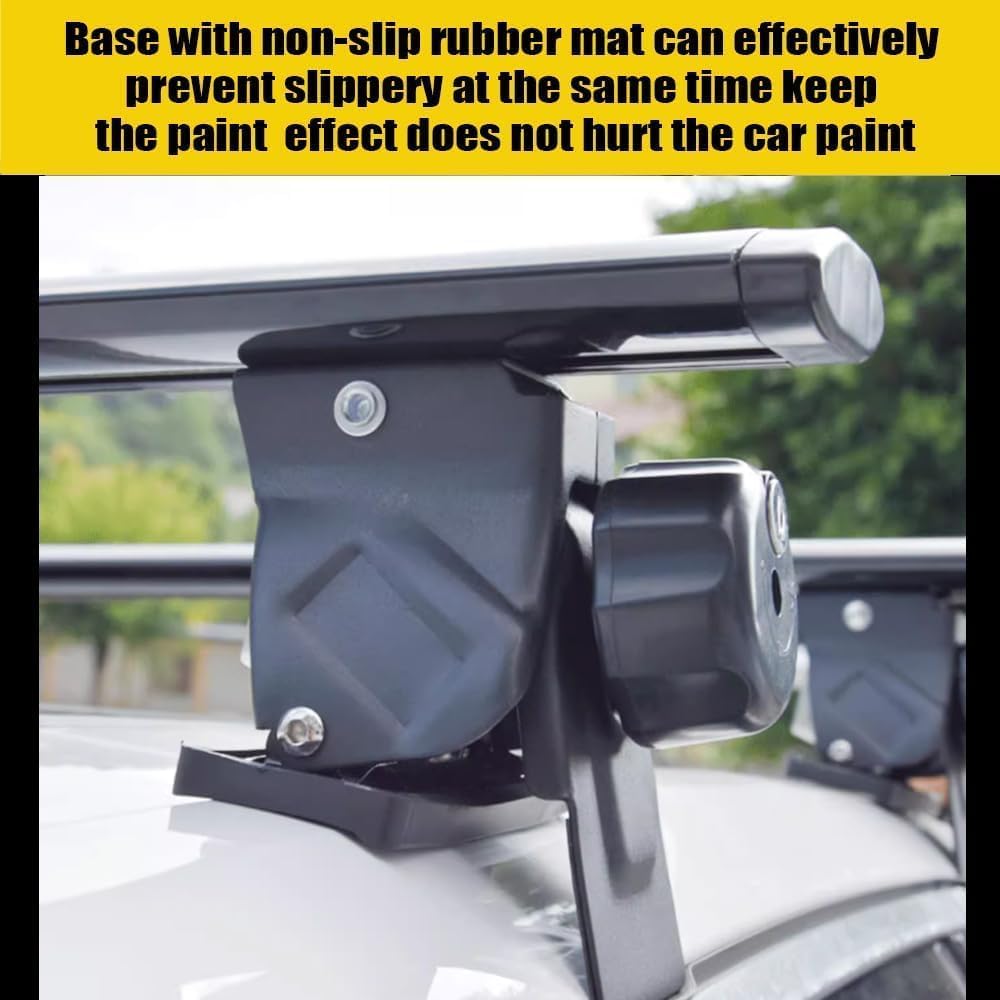
Figure 5.1: Detail of the non-slip rubber mat on the mounting base.

Figure 5.2: Installed roof rack cross bars on a vehicle.

Figure 5.3: Components and an example of the installed roof rack.
Note on Sunroof/Skylight Clearance: The heightened design provides approximately 6 cm (2.36 inches) of clearance from the roof. Ensure your sunroof or skylight opening height does not exceed this clearance to avoid interference. The sunroof opening size should not be greater than the roof strip on both sides simultaneously.

Figure 5.4: Measurement of the 6 cm clearance from the roof to the cross bar.
6. Operating Instructions (Usage)
These cross bars are designed for versatile cargo transport. Follow these guidelines for optimal use.
- Loading Cargo: Place cargo evenly across the cross bars. Distribute weight to avoid excessive stress on one area.
- Securing Cargo: Use appropriate tie-down straps, bungee cords, or cargo nets to firmly secure items such as kayaks, snowboards, bikes, fishing poles, or luggage. Ensure no part of the cargo obstructs your view or interferes with vehicle operation.
- Locking Mechanism: Utilize the integrated anti-theft locks to secure the cross bars and deter unauthorized removal of your gear.
- Aerodynamic Design: The streamlined design helps reduce wind resistance and noise, contributing to a more fuel-efficient ride.

Figure 6.1: Demonstration of the cross bar's high strength and load capacity.
7. Maintenance
Regular maintenance ensures the longevity and safe operation of your roof rack cross bars.
- Cleaning: Clean the cross bars with mild soap and water. Avoid abrasive cleaners or solvents that could damage the finish.
- Fastener Checks: Periodically check all bolts, clamps, and locking mechanisms for tightness. Re-tighten as necessary.
- Rubber Pad Inspection: Inspect the rubber pads for wear, cracks, or damage. Replace if necessary to maintain paint protection and grip.
- Storage: If removing the cross bars for extended periods, store them in a dry, protected area to prevent corrosion and damage.
8. Troubleshooting
Refer to this section for common issues and their solutions.
| Problem | Possible Cause | Solution |
|---|---|---|
| Cross bars feel loose after installation. | Clamps not sufficiently tightened. | Re-tighten all mounting bolts and clamps using the hex wrench. Ensure rubber pads are correctly seated. |
| Excessive wind noise during driving. | Improper positioning or loose components. | Verify cross bars are parallel and securely tightened. Ensure no gaps exist between the mounting feet and the vehicle roof. |
| Difficulty locking/unlocking. | Key or lock mechanism obstruction/damage. | Ensure the key is fully inserted and turned correctly. Do not force the key. Check for debris in the lock cylinder. |
| Scratches on vehicle paint after use. | Missing or damaged rubber pads; improper installation. | Ensure all rubber pads are in place and undamaged. Re-install carefully, ensuring no metal parts directly contact the vehicle's paint. |
9. Specifications
| Feature | Detail |
|---|---|
| Model Number | CC-06-12-25 |
| Material | High-grade Aluminum, High Carbon Steel Base |
| Color | Black |
| Maximum Load Capacity | 220 lbs (100 kg) - when weight is evenly distributed |
| Compatibility | Ford Ranger (2019-2025) - Vehicle Specific Fit, for models without raised side rails |
| Security Features | Anti-theft locks |
| Design | Low-profile, streamlined for reduced wind resistance |
| Roof Clearance | Approximately 6 cm (2.36 inches) |
10. Warranty and Support
We are committed to providing exceptional customer service. If you encounter any installation issues, have questions, or experience concerns after receiving your product, please contact our support team. We are dedicated to resolving any problems quickly to ensure your satisfaction with your roof rack cross bars.
For support, please refer to the contact information provided at your point of purchase or on the product packaging.


