1. Introduction
This manual provides comprehensive instructions for the installation, operation, and maintenance of your BITIWEND Wireless Doorbell Chime. This product is designed to extend the audible notification range of your existing Blink Video Doorbell system, ensuring you never miss a visitor.
The system consists of a wired transmitter and a plug-in receiver (chime unit). The transmitter connects to your Blink Video Doorbell, and the receiver can be placed in various locations throughout your home.
2. Package Contents
Please verify that all items are present in your package:
- 1 x Wireless Doorbell Chime Receiver
- 1 x Wired Transmitter
- 1 x Small Screwdriver (for wiring)
- 1 x Double-sided Adhesive Sticker (for transmitter mounting)
- 1 x User Manual

Figure 2.1: Main components of the BITIWEND Wireless Doorbell Chime system.
3. Compatibility
This BITIWEND Wireless Doorbell Chime is compatible with the following Blink Video Doorbell models:
- Blink Video Doorbell (1st Generation)
- Blink Video Doorbell (2nd Generation)
Important Note:
- If your Blink Video Doorbell is currently connected to a wired doorbell, you must remove the wires from the existing wired doorbell before connecting the BITIWEND transmitter.
- This product cannot be connected to an existing wired doorbell simultaneously with the Blink Video Doorbell.

Figure 3.1: Compatibility with Blink Video Doorbell models.
4. Setup and Installation
4.1. Connecting the Transmitter to your Blink Video Doorbell
- Prepare your Blink Video Doorbell: Ensure your Blink Video Doorbell is powered off or disconnected from any existing wired chime system.
- Access Wiring Terminals: Remove the back plate of your Blink Video Doorbell to expose the wiring terminals.
- Connect Transmitter Wires: Connect the two wires from the BITIWEND transmitter to the two screw terminals on the back of your Blink Video Doorbell. It does not matter which wire connects to which screw. Use the provided screwdriver to secure the connections. Tug gently on the wires to ensure they are secure.
- Mount Transmitter: Secure the transmitter to the back of the Blink Video Doorbell or a nearby surface using the double-sided adhesive sticker.
- Reassemble Doorbell: Reattach the back plate to your Blink Video Doorbell.

Figure 4.1: Wiring diagram for connecting the transmitter to the Blink Video Doorbell.
Video 4.1: Instructions on connecting the transmitter to a Blink Video Doorbell (2nd Gen).
Video 4.2: Instructions on connecting the transmitter to a Blink Video Doorbell (1st Gen).
4.2. Pairing the Receiver with the Transmitter
- Plug in Receiver: Plug the wireless chime receiver into a standard electrical outlet in your desired location.
- Enter Pairing Mode: On the receiver, press and hold the Volume button for 5-7 seconds until the receiver emits a "ding" sound and its indicator light flashes rapidly. This indicates it is in pairing mode.
- Trigger Doorbell: Press the button on your Blink Video Doorbell. The transmitter's indicator light will illuminate, sending a signal to the receiver.
- Confirmation: If pairing is successful, the receiver will play the selected chime, and its light will stop flashing rapidly.

Figure 4.2: Step-by-step guide for pairing the receiver with the transmitter.
Video 4.3: Visual guide on how to pair the expander (transmitter) and doorbell receiver.
4.3. Blink App Setup (for Blink Video Doorbell 2nd Gen)
For optimal integration and to ensure your Blink Video Doorbell (2nd Gen) is correctly configured, follow these steps within the Blink app:
- Open the Blink app and navigate to your device settings.
- Select "Doorbell and Chime Settings".
- Choose "Mount with wiring" if prompted.
- Follow the on-screen instructions to confirm wiring and power settings.
- Test the chime sound within the app to ensure proper functionality.
Video 4.4: Guide on setting up the Blink Video Doorbell (2nd Gen) app for wired chime integration.
5. Operating Instructions
5.1. Changing Chime Music
Your receiver offers 58 different chime melodies. To change the music:
- Short press the Music Up (▲▲) or Music Down (▼▼) buttons on the side of the receiver to cycle through the available melodies.
- Once you hear your preferred melody, stop pressing the buttons. The receiver will save your selection automatically.
Video 5.1: Instructions on how to change the doorbell receiver music.
5.2. Adjusting Volume
The receiver has 5 adjustable volume levels, ranging from 0-110dB. To adjust the volume:
- Short press the Volume button (speaker icon) on the side of the receiver to cycle through the volume levels.
- Select your desired volume level. The receiver will save your selection automatically.

Figure 5.2: Receiver features including volume and chime selection.
5.3. Wide Coverage and Multiple Connections
The doorbell extender system offers a wireless coverage range of up to 656 feet (approximately 200 meters) in open areas. This allows for flexible placement of the receiver throughout your home, including garages or backyards.
One transmitter can connect to up to 20 receivers, making it suitable for larger living spaces or properties where multiple chime points are desired. Transmitters and receivers are pre-paired from the factory, but re-pairing may be necessary if issues arise.

Figure 5.3: Illustration of the 200M wireless range and multi-receiver capability.

Figure 5.4: Examples of multi-scene application for the chime receiver.
6. Maintenance
To ensure optimal performance and longevity of your BITIWEND Wireless Doorbell Chime, follow these general maintenance guidelines:
- Cleaning: Wipe the surfaces of the transmitter and receiver with a soft, dry cloth. Avoid using abrasive cleaners or solvents.
- Placement: Ensure the receiver is plugged into a stable power outlet and not obstructed by furniture or other objects that could interfere with the wireless signal.
- Environmental Conditions: Avoid exposing the devices to extreme temperatures, direct sunlight, or excessive moisture.
7. Troubleshooting
If you encounter issues with your BITIWEND Wireless Doorbell Chime, please refer to the following common troubleshooting steps:
| Problem | Possible Cause | Solution |
|---|---|---|
| Receiver does not chime when doorbell is pressed. | Not paired, out of range, power issue. | 1. Ensure receiver is plugged in and powered on. 2. Re-pair the receiver and transmitter (refer to Section 4.2). 3. Move the receiver closer to the Blink Video Doorbell. |
| Chime sound is too low or too loud. | Volume setting needs adjustment. | Adjust the volume using the Volume button on the receiver (refer to Section 5.2). |
| Cannot change chime melody. | Incorrect button usage. | Ensure you are using the Music Up/Down buttons to cycle through melodies (refer to Section 5.1). |
| Transmitter indicator light does not illuminate. | Wiring issue, doorbell not providing power. | 1. Check the wiring connections between the transmitter and the Blink Video Doorbell (refer to Section 4.1). 2. Ensure the Blink Video Doorbell itself is functioning correctly. |
8. Specifications
- Model Number: B22
- Brand: BITIWEND
- Item Weight: 5.9 ounces
- Product Dimensions: 3.94 x 3.35 x 3.94 inches
- Color: Black
- Wireless Range: Up to 656 feet (200 meters)
- Chime Melodies: 58 options
- Volume Levels: 5 levels (0-110dB)
- Max Receivers per Transmitter: Up to 20
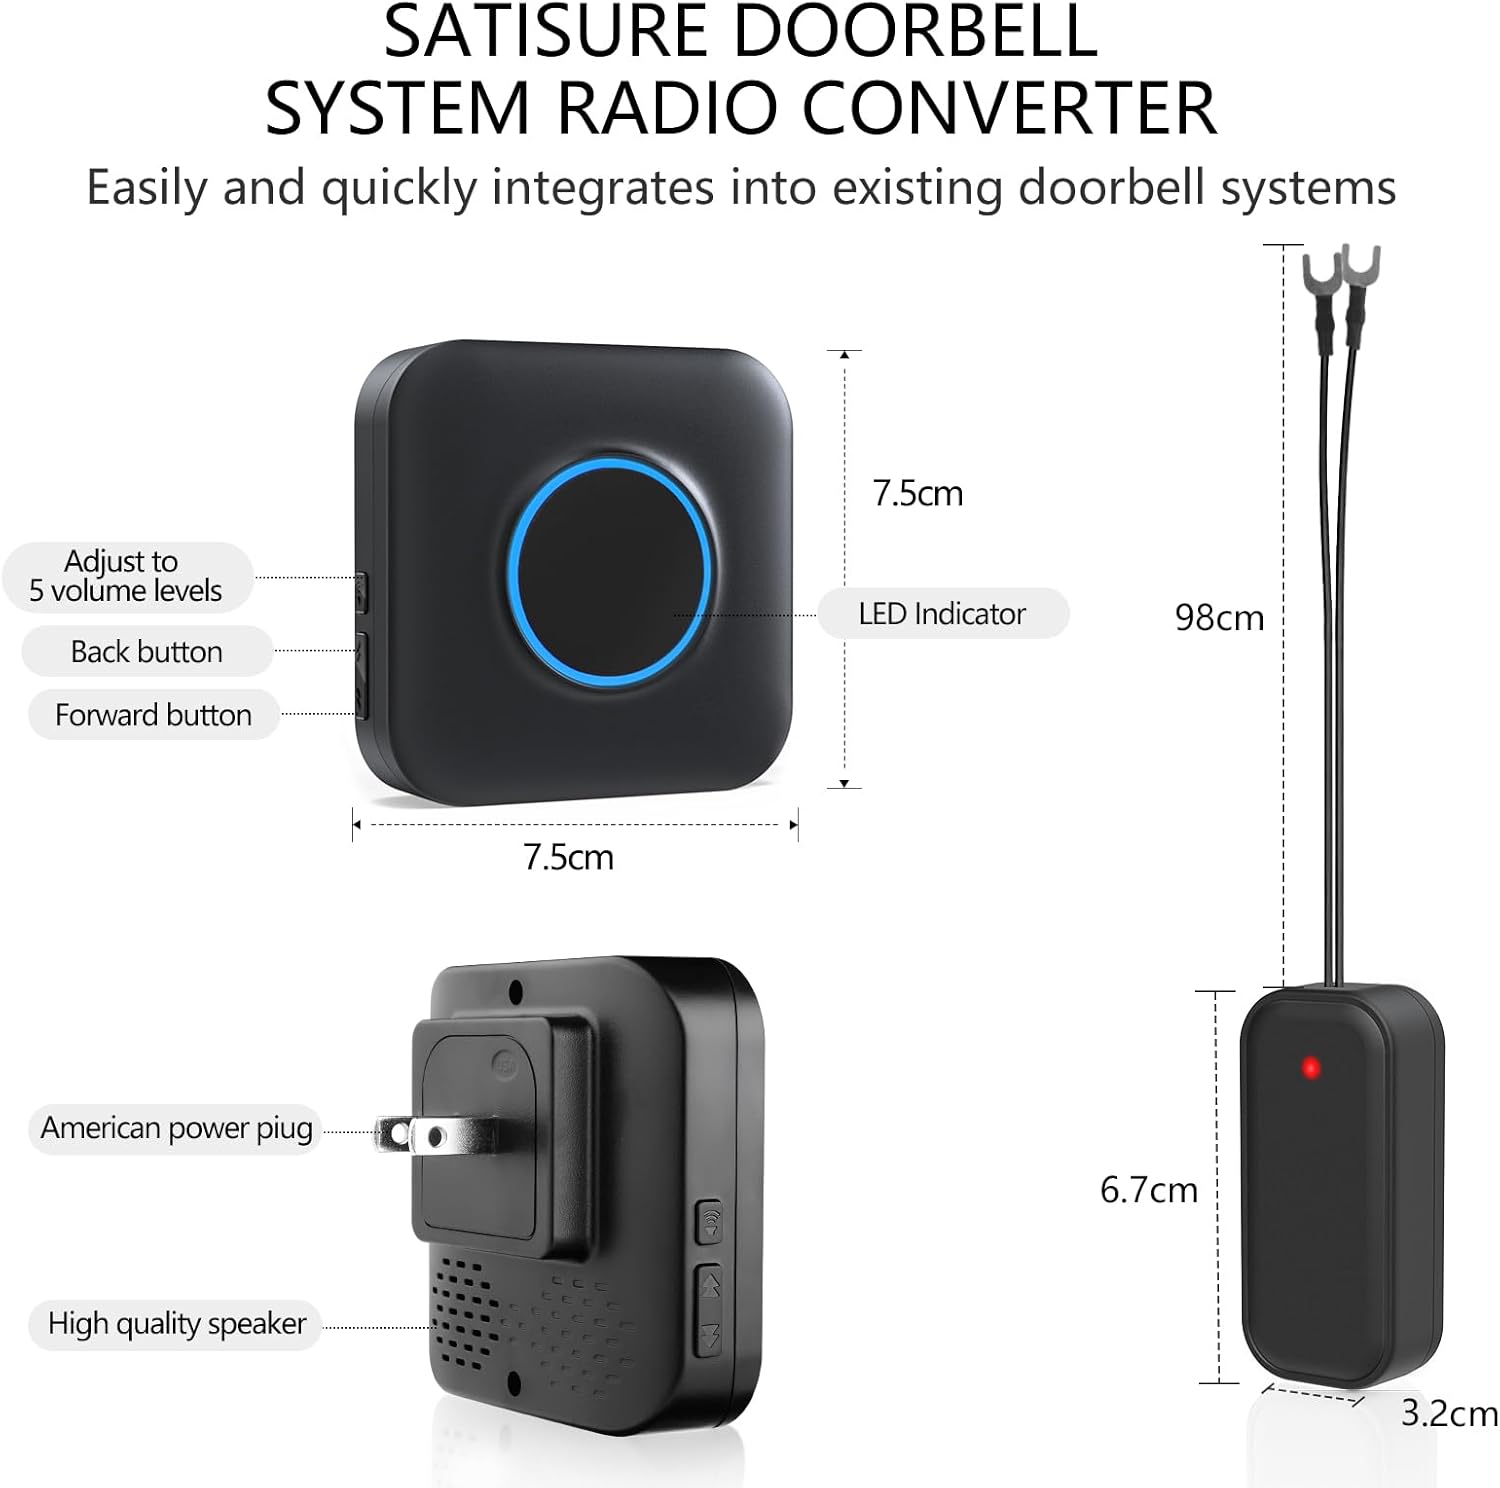
Figure 8.1: Product dimensions and feature overview.
9. Warranty and Support
BITIWEND offers a 30-day money-back guarantee for this product. For any questions, concerns, or technical assistance, please contact our professional after-sales service team. We are committed to providing excellent service and support.
Please refer to your purchase documentation or the BITIWEND official website for contact information.


