Introduction
The KeeKit Wireless Digital Refrigerator and Freezer Thermometer provides accurate temperature monitoring for your refrigerator and freezer. It features a color LCD display, two wireless sensors, smart alarm functions, and records of minimum and maximum temperatures. This manual will guide you through the setup, operation, and maintenance of your device.
Package Contents
Please verify that all items are present in the package:
- 1x Main Display Unit
- 2x Wireless Sensors
- 1x USB Charging Cable
- 1x User Manual

Image: Contents of the KeeKit Wireless Thermometer package.
Product Features
- Large LCD Color Display: A 4.5-inch high-definition color LCD screen displays real-time temperatures from the main unit and two sensors simultaneously. Three-color differentiation aids in easy reading.
- Smart Alarm Function: Customize alarm thresholds for each sensor. Immediate alerts notify you of unsafe temperatures. A 1-minute delayed alarm prevents false triggers from brief fridge openings.
- High-Accuracy Measurement: Wide measuring range of -40℃~60℃ (-40℉~140℉) with ±1℃ (±1.8℉) precision. Sensors update every 60 seconds.
- Backlight: An exclusive backlight function ensures clear readings in dim environments. On battery power, press to activate for 10 seconds. With USB power, choose between two brightness levels (high/low).
- Dual Power Supply: The main unit operates on 3 AAA batteries (not included) or USB power (USB prioritized). Sensors require 2 AA batteries each.
- Multi-Installation Options: The main unit features a hanging hole, foldable stand, and magnet for versatile placement on walls, countertops, or metal surfaces.
- Min/Max Records: View 24-hour or all-time maximum and minimum temperature history. Long-press to reset records.
- ℃/℉ Switching: One-touch switching between Celsius and Fahrenheit units.
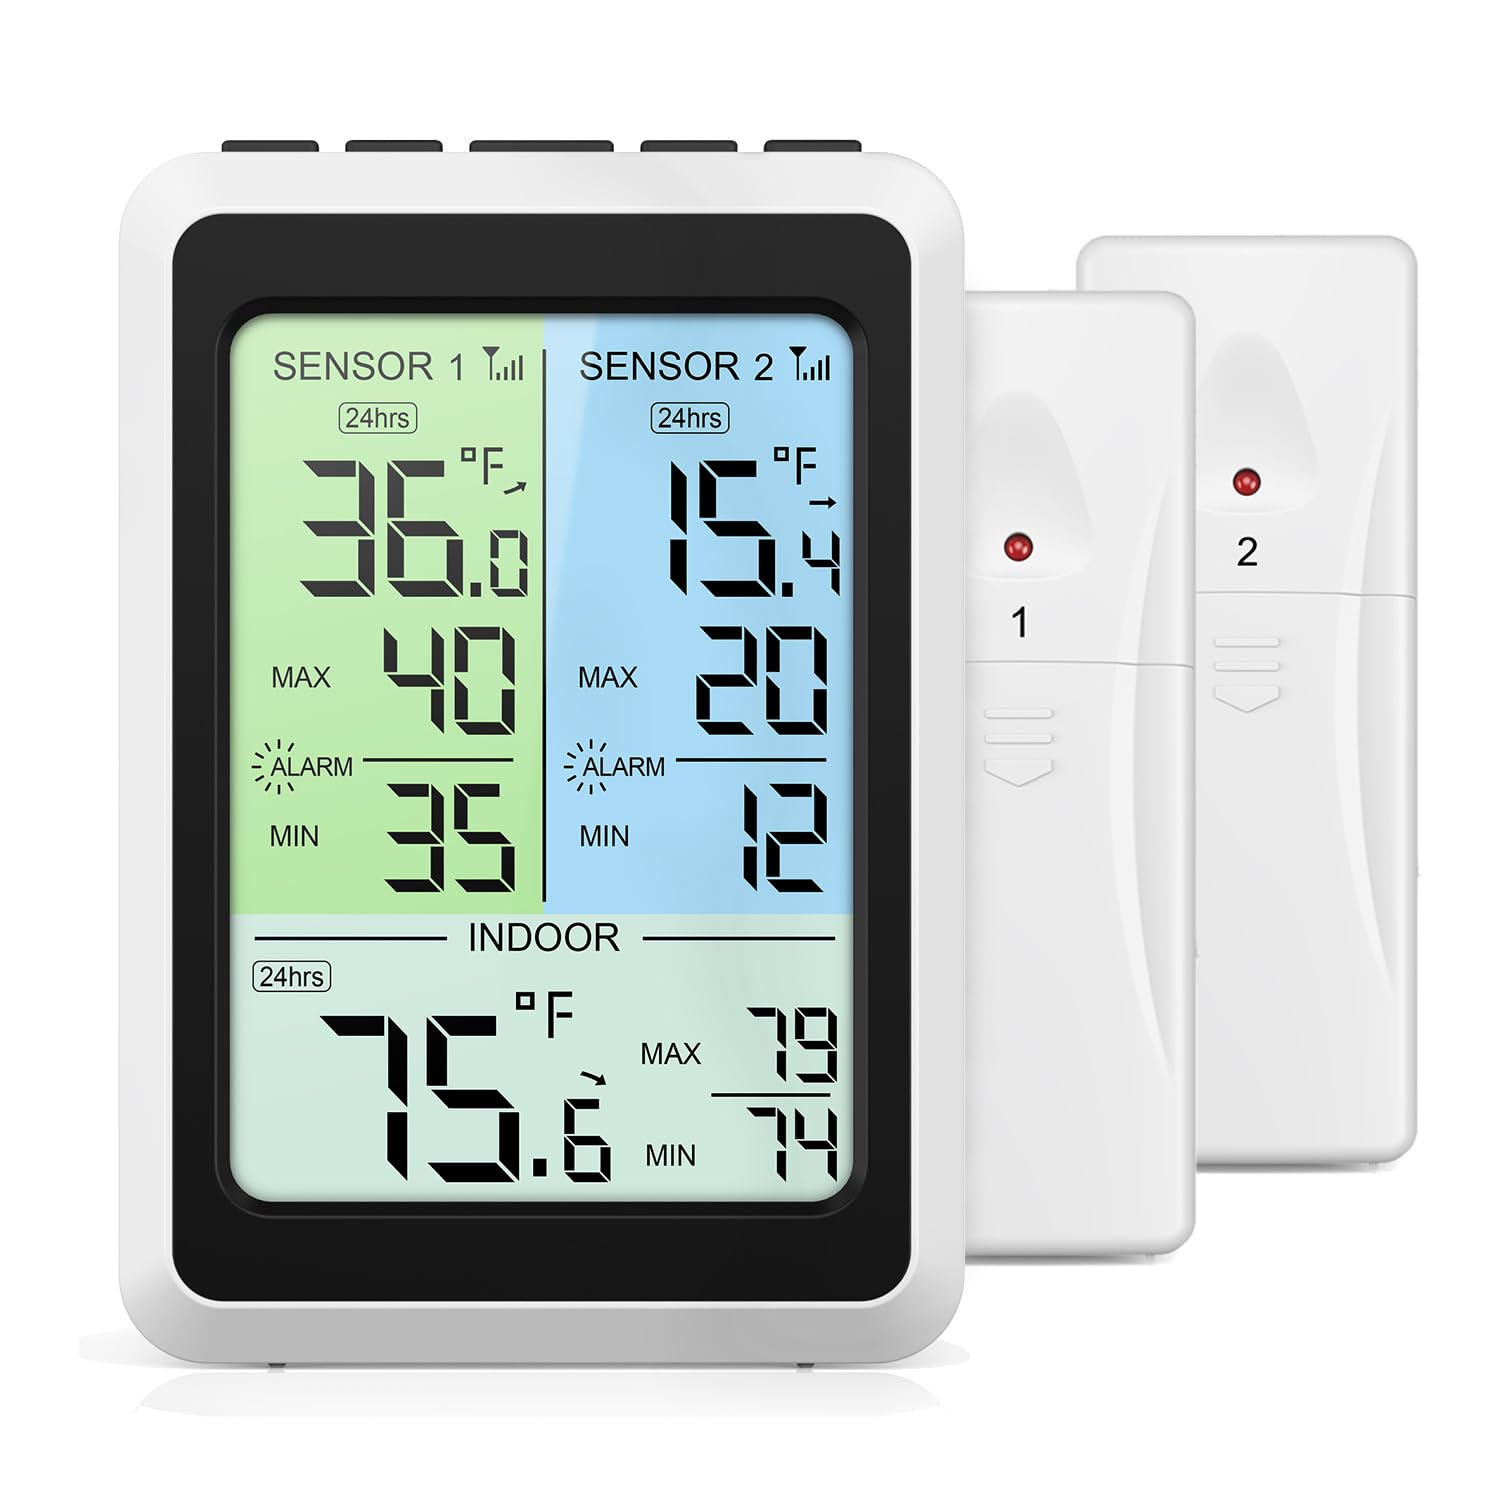
Image: Overview of the KeeKit Wireless Thermometer's main features and display.
Setup
- Install Batteries in Sensors: Open the battery compartment on the back of each wireless sensor. Insert 2 AA batteries into each sensor, ensuring correct polarity. Close the compartment securely.
- Power the Main Unit:
- Battery Power: Open the battery compartment on the back of the main display unit. Insert 3 AAA batteries, observing correct polarity. Close the compartment.
- USB Power: Connect the provided USB charging cable to the power port on the main unit and plug the other end into a 5V USB power adapter (not included). USB power is prioritized if both are connected.

Image: Main unit power options: USB cable and AAA battery compartment.
- Sensor Placement: Place the wireless sensors in your refrigerator and freezer. Ensure they are positioned where they can accurately measure the temperature of the compartment. The sensors will automatically transmit data to the main unit.
- Stabilization: Allow 15-30 minutes for the sensors to stabilize and provide accurate readings after placement, especially when moving them to a new temperature environment.

Image: Example placement of wireless sensors in a refrigerator and freezer.
Operating Instructions
LCD Display Overview
The 4.5-inch color LCD displays indoor temperature, and temperatures from Sensor 1 and Sensor 2. Different colors help distinguish between the readings.
Switching Temperature Units (℃/℉)
Press the ℃/℉ button on the main unit to toggle between Celsius and Fahrenheit display modes.
Setting Smart Alarms
- Press the SET button to enter alarm setting mode.
- Use the UP/DOWN buttons to adjust the high and low temperature thresholds for Sensor 1, Sensor 2, and the indoor unit.
- Press SET again to confirm each setting and move to the next.
- An alarm will sound if the temperature exceeds or falls below the set thresholds. The alarm has a 1-minute delay to prevent nuisance alerts from brief door openings.

Image: Display illustrating the temperature alarm function with adjustable ranges.
Backlight Function
- Battery Power: Press the LIGHT button to activate the backlight. It will automatically turn off after 10 seconds to conserve energy.
- USB Power: When powered by USB, the backlight can be set to two brightness levels (high/low) or turned off. Press the LIGHT button to cycle through these options.
Viewing and Resetting MAX/MIN Records
The device records the maximum and minimum temperatures over a 24-hour period or all-time. Press the MAX/MIN button to cycle through these records. To reset the records, long-press the MAX/MIN button.
Installation
The main display unit offers multiple installation options:
- Foldable Stand: Use the integrated foldable stand to place the unit on a countertop or desk.
- Hanging Hole: Utilize the hanging hole on the back to mount the unit on a wall using a screw or hook (not included).
- Magnet: The built-in magnet allows you to attach the unit to metal surfaces, such as a refrigerator door.

Image: Various installation methods for the main display unit.
Maintenance
Battery Replacement
- Main Unit: Replace the 3 AAA batteries when the low battery indicator appears on the display.
- Wireless Sensors: Replace the 2 AA batteries in each sensor when their respective low battery indicators are shown.
Ensure correct polarity when inserting new batteries. Dispose of used batteries responsibly.
Cleaning
Wipe the main unit and sensors with a soft, damp cloth. Do not use abrasive cleaners or immerse the devices in water.
Troubleshooting
- No Display/Unit Not Powering On:
- Check if batteries are installed correctly and are not depleted.
- If using USB power, ensure the cable is securely connected and the power adapter is functional.
- Sensors Not Connecting/Displaying Readings:
- Ensure batteries in sensors are fresh and correctly installed.
- Verify sensors are within the 100-meter signal range of the main unit.
- Avoid placing sensors near large metal objects or sources of strong electromagnetic interference.
- If a sensor consistently reads '7 degrees' or similar fixed value, check for internal connection issues or battery terminal problems.
- Inaccurate Temperature Readings:
- Allow 15-30 minutes for sensors to stabilize after initial placement or significant temperature changes.
- Ensure sensors are not directly exposed to cold air vents or heat sources.
- Alarm Not Sounding:
- Check that alarm thresholds are set correctly.
- Ensure the alarm function is enabled.
- Backlight Not Working:
- If on battery power, press the LIGHT button. It will only stay on for 10 seconds.
- If on USB power, press the LIGHT button to cycle through brightness levels.
Specifications
| Indoor Temperature Range | 14℉~140℉ (-10℃~60℃) |
| Outdoor Temperature Range (Sensors) | -40℉~140℉ (-40℃~60℃) |
| Temperature Precision | ±1℃ (±1.8℉) |
| Indoor Temperature Update Frequency | 10 seconds |
| Sensor Update Frequency | 60 seconds |
| Wireless Range | Up to 100 meters (328 feet) in open air |
| Main Unit Power Supply | 3 x AAA batteries (not included) or USB power |
| Sensor Power Supply | 2 x AA batteries (not included) per sensor |
| Package Dimensions | 5.59 x 3.94 x 3.07 inches |
| Item Weight | 10.9 ounces |
Note: Readings below -40℉ (-40℃) or above 140℉ (60℃) will display as -L- or -H- respectively.
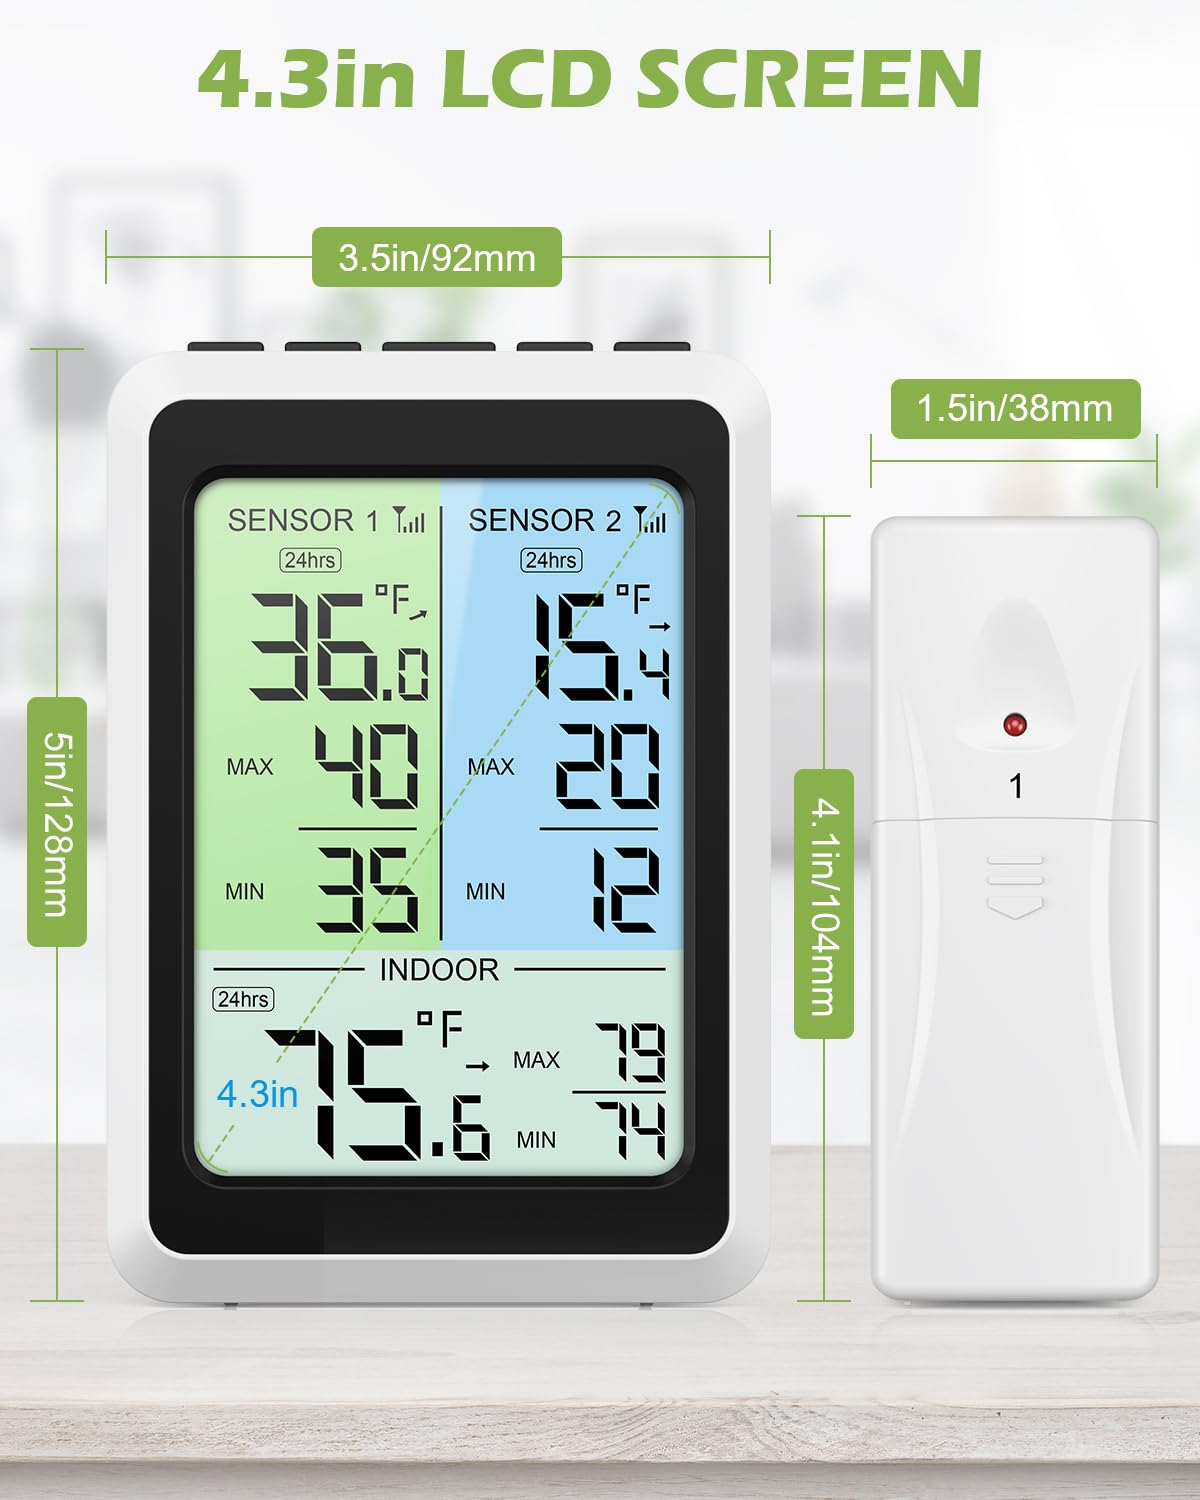
Image: Dimensions of the main unit and wireless sensors.
Warranty and Support
KeeKit is committed to providing quality products and customer satisfaction. Your product is covered by the following:
- 1-Year Warranty: Covers manufacturing defects and malfunctions under normal use.
- 30-Day Return Guarantee: Allows for returns within 30 days of purchase.
- 90-Day Replacement Guarantee: Provides for product replacement within 90 days if issues arise.
- 24/7 Online Customer Support: Assistance is available around the clock for any inquiries or issues.
- Lifetime Technical Support Service: Ongoing technical assistance for the lifespan of your product.
For support, please refer to the contact information provided with your purchase or visit the official KeeKit website.