Introduction
The Minolta MN1232A 12x32 Digital Binoculars combine powerful 12x optical magnification with a built-in 4K UHD digital camera, allowing for both observation and high-definition recording. This device is designed for users who wish to capture detailed photos up to 48 megapixels and smooth 4K videos. It features an 8x digital zoom, a 2.4-inch IPS anti-glare screen for clear viewing, and fog-resistant optics, making it suitable for various outdoor activities.
What's in the Box
Upon unpacking, please ensure all the following items are present:
- Minolta 12x32 Digital Binoculars (MN1232A)
- USB Cable
- Carrying Pouch
- 32GB Memory Card
- Neck Strap
- Cleaning Cloth
- User Manual (This document)
- Warranty Card

Image: The Minolta MN1232A Digital Binoculars shown with all included accessories: carrying pouch, user manual, 32GB memory card, USB cable, cleaning cloth, and neck strap.
Product Overview
Familiarize yourself with the components and controls of your Minolta MN1232A Digital Binoculars.

Image: A detailed diagram illustrating the various parts of the Minolta MN1232A Digital Binoculars, including the LCD screen, power button, menu button, mode button, charging port, memory card slot, adjustable eyepiece, center focusing knob, capture/OK button, and zoom controls.
Key Components:
- Objective Lenses: 32mm multi-coated lenses for clear viewing.
- Eyepieces: Adjustable for comfortable viewing.
- 2.4" IPS Digital Screen: Flip-up display for live view, playback, and menu navigation.
- Tactile Button Controls: Intuitive buttons for power, menu, mode, zoom, and capture.
- Center Focusing Knob: For adjusting binocular focus.
- Memory Card Slot: Supports MicroSD cards for storage.
- USB Charging Port: For recharging the internal battery.
- Tripod Mount: Standard thread for tripod compatibility.
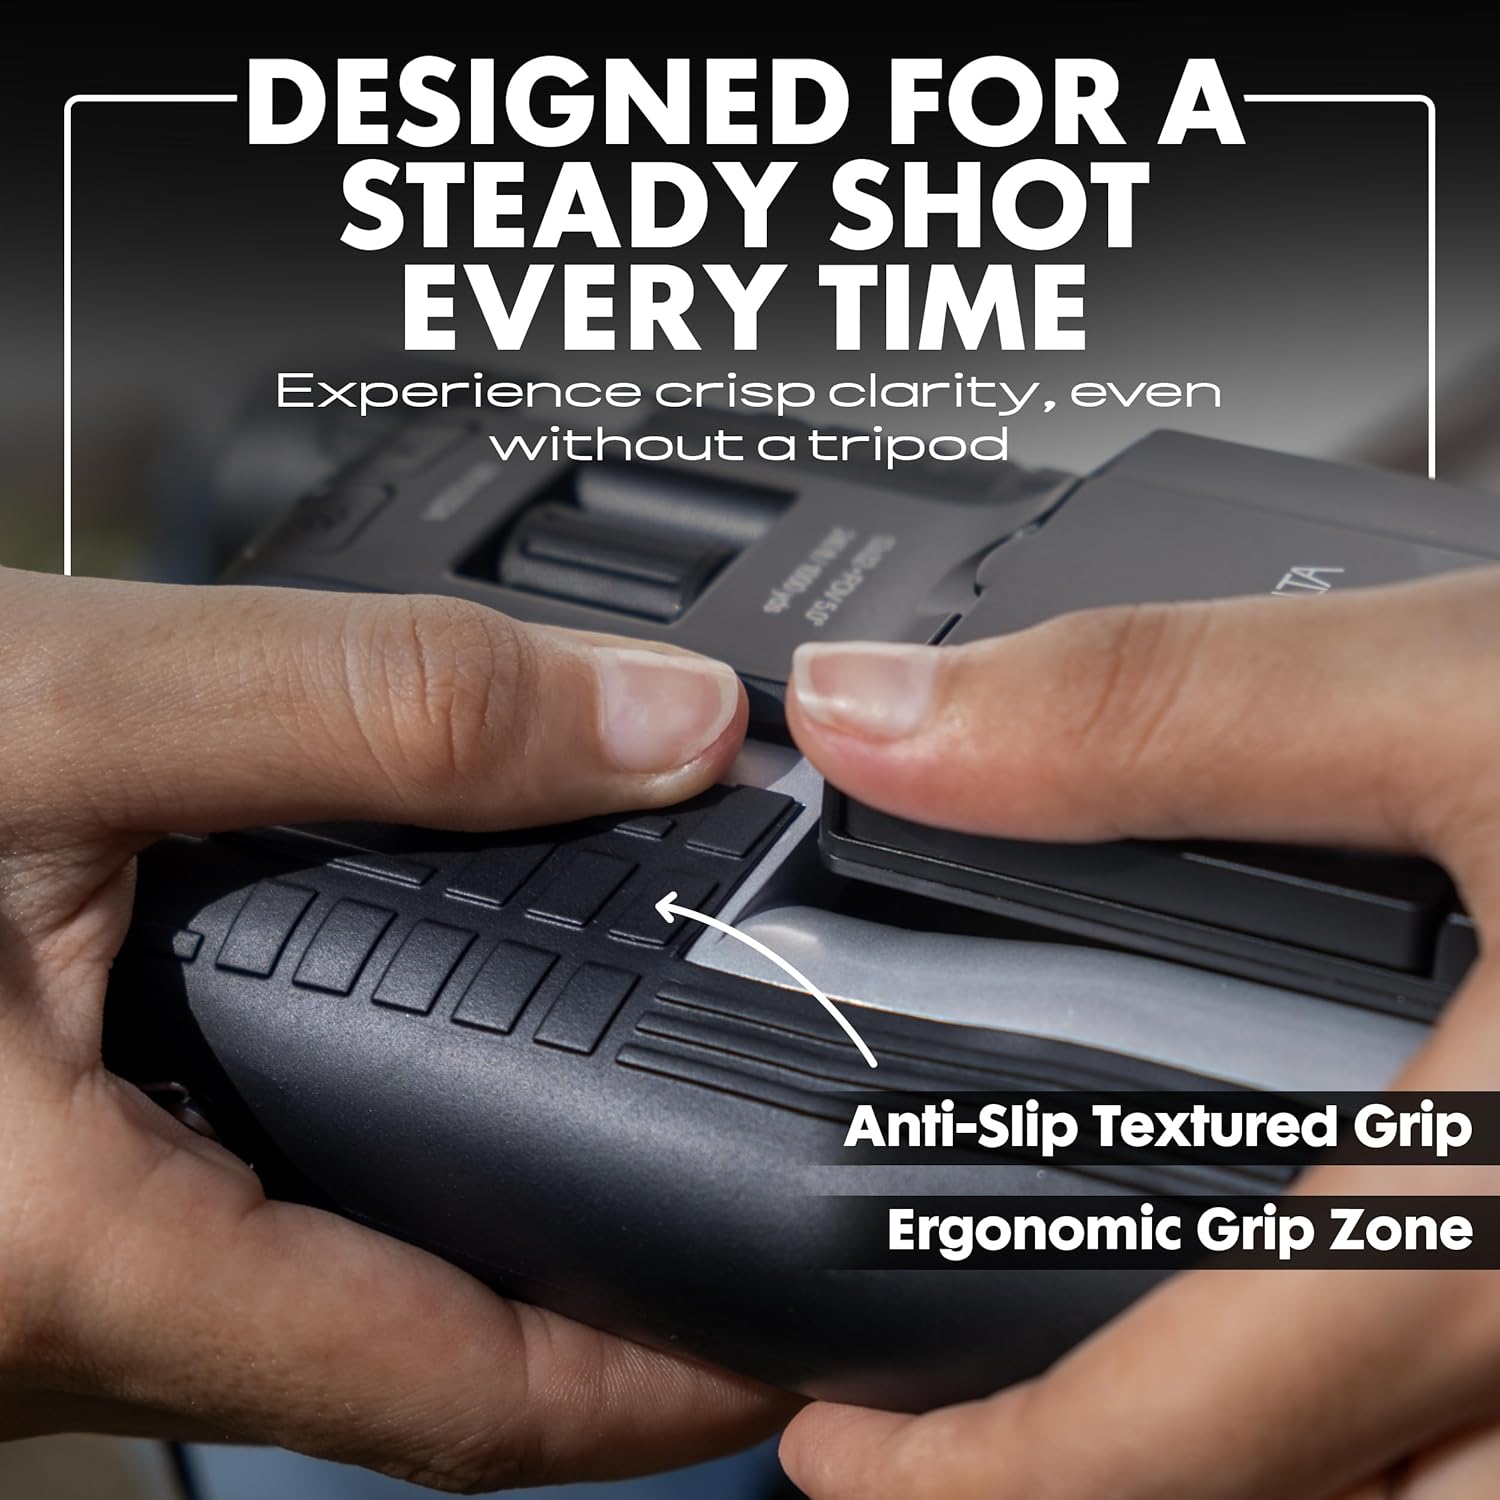
Image: A close-up view highlighting the ergonomic rubber grip texture on the binoculars, designed for comfortable and secure handling.

Image: The underside of the binoculars, clearly showing the standard tripod mounting thread for stable long-duration observation or recording.
Setup
1. Charging the Battery
Before first use, fully charge the internal rechargeable battery. Connect the provided USB cable to the binoculars' charging port and plug the other end into a USB power adapter (not included) or a computer's USB port. The charging indicator light will illuminate during charging and turn off when fully charged.
2. Inserting the Memory Card
The binoculars require a MicroSD card (32GB card included) to store photos and videos. Locate the memory card slot, usually protected by a rubber flap. Insert the MicroSD card with the gold contacts facing down until it clicks into place. To remove, gently press the card until it springs out.
3. Attaching the Neck Strap
Thread the neck strap through the designated loops on the binoculars to prevent accidental drops and for convenient carrying.
Operating Instructions
1. Power On/Off
Press and hold the Power button for approximately 3 seconds to turn the device on or off. The 2.4-inch IPS display will activate.
2. Using the Binoculars
Adjust the distance between the eyepieces to match your interpupillary distance for a single, clear circular field of view. Use the center focusing knob to achieve sharp focus on your subject. The binoculars offer 12x optical magnification.

Image: A visual comparison showing the clarity and detail achieved with 12x optical magnification and further enhanced with 8x digital zoom on a distant subject.
3. Photo and Video Capture
The device supports 48MP still photos and 4K UHD video recording.
- Switching Modes: Press the Mode button to cycle between Photo, Video, and Playback modes.
- Taking Photos: In Photo mode, press the Capture/OK button to take a picture.
- Recording Videos: In Video mode, press the Capture/OK button to start recording. Press again to stop.

Image: An example of a high-resolution 48-megapixel photo, demonstrating the detail captured by the binoculars' camera function.

Image: A still frame from a 4K UHD video, illustrating the smooth and high-resolution video capabilities of the device.
4. Digital Zoom
In addition to 12x optical magnification, the binoculars feature an 8x digital zoom. Use the zoom buttons (Left/Right or specific zoom controls as indicated on the device) to digitally magnify your view further. Note that digital zoom may reduce image quality compared to optical zoom.
5. IPS Display Usage
The 2.4-inch IPS display can be flipped up for convenient viewing of live footage, captured media, and menu settings. Its anti-glare properties ensure visibility even in bright conditions.

Image: A user actively viewing the live feed on the flip-up 2.4-inch IPS display of the binoculars, showing a forest path.
6. Menu Navigation
Press the Menu button to access settings. Use the directional buttons (often the zoom buttons) to navigate through options and the Capture/OK button to select. Settings may include resolution, exposure, time-lapse interval, loop recording duration, and more.
7. Special Recording Modes
- Time-Lapse Mode: Capture a series of photos at set intervals to create a time-lapse video.
- Loop Recording Mode: Continuously record video, overwriting the oldest files when the memory card is full. This is useful for continuous monitoring.

Image: A time-lapse photograph showcasing a city skyline transitioning from sunrise to sunset, illustrating the device's time-lapse capability.

Image: A serene forest path, symbolizing the continuous recording feature of loop recording mode.
Maintenance
Cleaning the Lenses and Screen
Use the provided lens cloth or a soft, lint-free cloth to gently wipe the objective lenses, eyepieces, and IPS screen. For stubborn smudges, a small amount of lens cleaning fluid designed for optics can be applied to the cloth, not directly to the lens. Avoid abrasive materials or harsh chemicals.
Storage
When not in use, store the binoculars in the included carrying pouch in a cool, dry place away from direct sunlight and extreme temperatures. Ensure the lenses are capped to protect them from dust and scratches.
Troubleshooting
| Problem | Possible Cause | Solution |
|---|---|---|
| Device does not power on. | Low or depleted battery. Incorrect power button press. | Ensure the battery is fully charged. Press and hold the Power button for 3 seconds. |
| Cannot take photos or record videos. | No memory card inserted or card is full/corrupted. Incorrect mode selected. | Insert a formatted MicroSD card. Check available space. Ensure you are in Photo or Video mode. |
| Image/Video quality is poor. | Lenses are dirty. Digital zoom used excessively. Low light conditions. | Clean lenses and screen. Minimize digital zoom for best quality. Ensure adequate lighting. |
| Screen is blurry or unclear. | Protective film still on screen. Screen is dirty. | Remove any protective film. Clean the screen with a soft cloth. |
Specifications
| Feature | Detail |
|---|---|
| Model Number | MN1232A |
| Magnification | 12x Optical, 8x Digital Zoom |
| Objective Lens Diameter | 32 mm |
| Photo Resolution | Up to 48 Megapixels |
| Video Resolution | 4K UHD |
| Display | 2.4-inch IPS Anti-Glare Screen |
| Special Features | Compact Design, Fog Proof, Lightweight, Time-Lapse, Loop Recording |
| Item Weight | 1.57 pounds (0.71 kg) |
| Product Dimensions | 7.95 x 5.91 x 3.7 inches (20.19 x 15.01 x 9.4 cm) |
Official Product Video
Video: An overview of the Minolta MN1232A Digital Binoculars, showcasing its features and capabilities in various outdoor settings. This video provides a visual guide to the product's design and functionality.
Warranty and Support
Your Minolta MN1232A Digital Binoculars come with a limited warranty. Please refer to the included Warranty Card for detailed terms and conditions, including coverage period and how to make a claim.
For technical support, troubleshooting assistance, or to inquire about replacement parts, please visit the official Minolta support website or contact their customer service. Contact information can typically be found on the Warranty Card or the Minolta brand store on Amazon: Minolta Store.


