
Introduction
This instruction manual provides essential information for the safe and efficient installation, operation, and maintenance of your Sysracks 42U Floor Standing Server Rack, model SRF 42.6.10. Please read this manual thoroughly before proceeding with any installation or operation to ensure proper use and to prevent damage to the equipment or injury to personnel.
The Sysracks 42U Floor Standing Server Rack is designed to house and secure IT, networking, telecom, and AV equipment in various environments. It features a durable steel structure, perforated panels for airflow, and security features.
Setup
1. Unpacking and Inspection
Carefully unpack all components from the packaging. Inspect the rack and all accessories for any signs of damage that may have occurred during transit. If any damage is found, do not proceed with installation and contact Sysracks customer support immediately.
- Ensure all listed components are present.
- Verify the integrity of the cabinet structure, doors, and panels.
2. Placement
Position the server rack in a suitable location, ensuring adequate space for ventilation and access around the unit. The rack is designed for floor mounting.

Image: Sysracks 42U server rack positioned in an office setting. Ensure sufficient clearance for airflow and maintenance.
- The cabinet is equipped with four lockable casters for easy movement. Unlock them to move the cabinet and lock them to secure its position.
- Use the leveling feet for added stability once the rack is in its final position. Adjust each foot until the cabinet is level and stable.
3. Component Installation
Install the included accessories such as the Power Distribution Unit (PDU) and fixed shelf.
3.1. Power Distribution Unit (PDU) Installation
Mount the PDU to the designated mounting points within the rack. Ensure it is securely fastened before connecting any equipment.
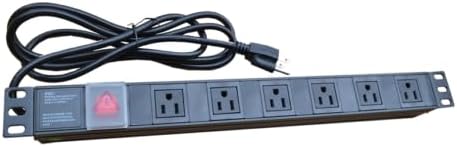
Image: The included Power Distribution Unit (PDU). Install securely before use.
3.2. Fixed Shelf Installation
Install the fixed shelf at the desired height using the adjustable U-marked mounting rails. This shelf supports non-rackmount components.

Image: Interior of the server rack, illustrating the adjustable U-marked mounting rails for component installation.
3.3. Mounting Rails Adjustment
The U-marked mounting rails are adjustable to accommodate various equipment depths. Loosen the screws, slide the rails to the required depth, and re-tighten the screws securely.
4. Cable Management
Utilize the brush cable entry panels for organized and clean cable routing. This helps minimize clutter and improves airflow.
5. Security Features
The front door and side panels are lockable to provide enhanced security for your equipment. Ensure all locks are engaged after installing equipment.
- The side panels are removable for convenient access during installation and maintenance.
Operating Instructions
1. Powering Equipment
Connect your IT equipment to the installed PDU. Ensure that the total power draw does not exceed the PDU's capacity. Power on your equipment according to their respective manuals.
2. Ventilation System
The rack is equipped with an active fan unit and a Thermo Control System to maintain optimal operating temperatures. The perforated front door and side panels facilitate passive cooling.

Image: Airflow diagram showing the four fan units and air control system for optimal ventilation.
- The Thermo Control System automatically manages the fan speed based on the internal temperature to prevent overheating.
- Ensure that the fan unit is powered and operating correctly.
3. Accessing Equipment
Use the provided keys to unlock the front door and side panels for access to your equipment. The quick-release mechanism on the side panels allows for convenient removal.
Maintenance
1. Cleaning
- Regularly clean the exterior surfaces of the cabinet with a soft, damp cloth. Avoid abrasive cleaners.
- Periodically clean the perforated panels and fan vents to ensure unobstructed airflow. Use compressed air to remove dust from fan blades.
2. Fan Unit Inspection
Inspect the fan unit periodically for proper operation. Listen for unusual noises and ensure all fans are spinning freely. Replace any malfunctioning fans promptly.
3. Lock and Hinge Lubrication
Apply a small amount of lubricant to the door hinges and lock mechanisms annually to ensure smooth operation and prevent seizing.
4. Cable Management Check
Periodically check cable routing to ensure cables are not pinched or obstructing airflow. Reorganize as necessary to maintain optimal conditions.
Troubleshooting
1. Overheating Equipment
- Symptom: Equipment inside the rack is running hot.
- Possible Cause: Insufficient airflow, fan malfunction, blocked vents.
- Solution:
- Ensure the fan unit is powered and operating.
- Clean any dust or debris from the fan vents and perforated panels.
- Verify that there is adequate space around the rack for air circulation.
- Check if the Thermo Control System is set correctly.
2. No Power to Equipment
- Symptom: Equipment connected to the PDU is not receiving power.
- Possible Cause: PDU not powered, tripped circuit breaker, loose connections.
- Solution:
- Check the main power supply to the PDU.
- Inspect the PDU for any tripped circuit breakers or power switches.
- Ensure all power cables are securely connected.
3. Difficulty Opening Doors/Panels
- Symptom: Front door or side panels are stiff or difficult to open/close.
- Possible Cause: Lack of lubrication, obstruction, damaged hinge/lock.
- Solution:
- Apply lubricant to hinges and lock mechanisms.
- Check for any physical obstructions.
- If damage is suspected, contact customer support.
Specifications
| Feature | Detail |
|---|---|
| Brand | Sysracks |
| Model Number | SRF 42.6002 (Also referred to as SRF 42.6.10 in product title) |
| Rack Units | 42U |
| Dimensions (D x W x H) | 39"D x 24"W x 84"H |
| Material | Metal |
| Color | Black RAL 9005 |
| Mounting Type | Floor Mount |
| Weight Capacity | Up to 1600 lbs |
| Ventilation | Active fan unit with Thermo Control System, perforated panels |
| Security | Lockable front door and side panels |
| Included Accessories | PDU, fixed shelf, casters, leveling feet, hardware |
| UPC | 764333744320 |

Image: Dimensional view of the Sysracks 42U server rack, showing its height, depth, and width.
Warranty Information
This Sysracks 42U Floor Standing Server Rack comes with a 3-year warranty from the date of purchase. This warranty covers defects in materials and workmanship under normal use. It does not cover damage caused by misuse, accident, unauthorized modification, or improper installation.
For warranty claims or further details, please retain your proof of purchase and contact Sysracks customer support.
Customer Support
If you encounter any issues or have questions regarding your Sysracks 42U Floor Standing Server Rack that are not addressed in this manual, please contact Sysracks customer support.
- Online Support: Visit the official Sysracks website for FAQs, troubleshooting guides, and contact forms.
- Email Support: Refer to your product packaging or the Sysracks website for the appropriate support email address.
- Phone Support: Contact numbers may be available on the Sysracks website for direct assistance.
Please have your model number (SRF 42.6.10) and proof of purchase ready when contacting support.