Introduction
Thank you for purchasing the MilleLoom 6-Drawer Dresser with Charging Station and LED Lights. This manual provides detailed instructions for assembly, operation, and maintenance to ensure safe and efficient use of your new furniture. Please read this manual thoroughly before assembly and retain it for future reference.
Important Safety Information
Please observe the following safety precautions to prevent injury or damage to the product.
- Anti-Tipping Device: Always install the included anti-tipping device to secure the dresser to a wall. This is crucial to prevent serious injury from tipping furniture, especially in households with children.
- Weight Capacity: Do not overload drawers or the top surface. Refer to the specifications section for maximum weight limits.
- Electrical Safety: The built-in charging station contains electrical components. Ensure the power cord is not pinched or damaged during assembly or use. Do not expose the charging station to liquids. Unplug the dresser from the power outlet before cleaning or if any electrical issues occur.
- Assembly: Assemble the dresser on a soft, clean surface to prevent scratches. Ensure all hardware is securely tightened before use. Do not use power tools for tightening screws unless explicitly instructed, as over-tightening can damage components.
- Placement: Place the dresser on a level surface to ensure stability.
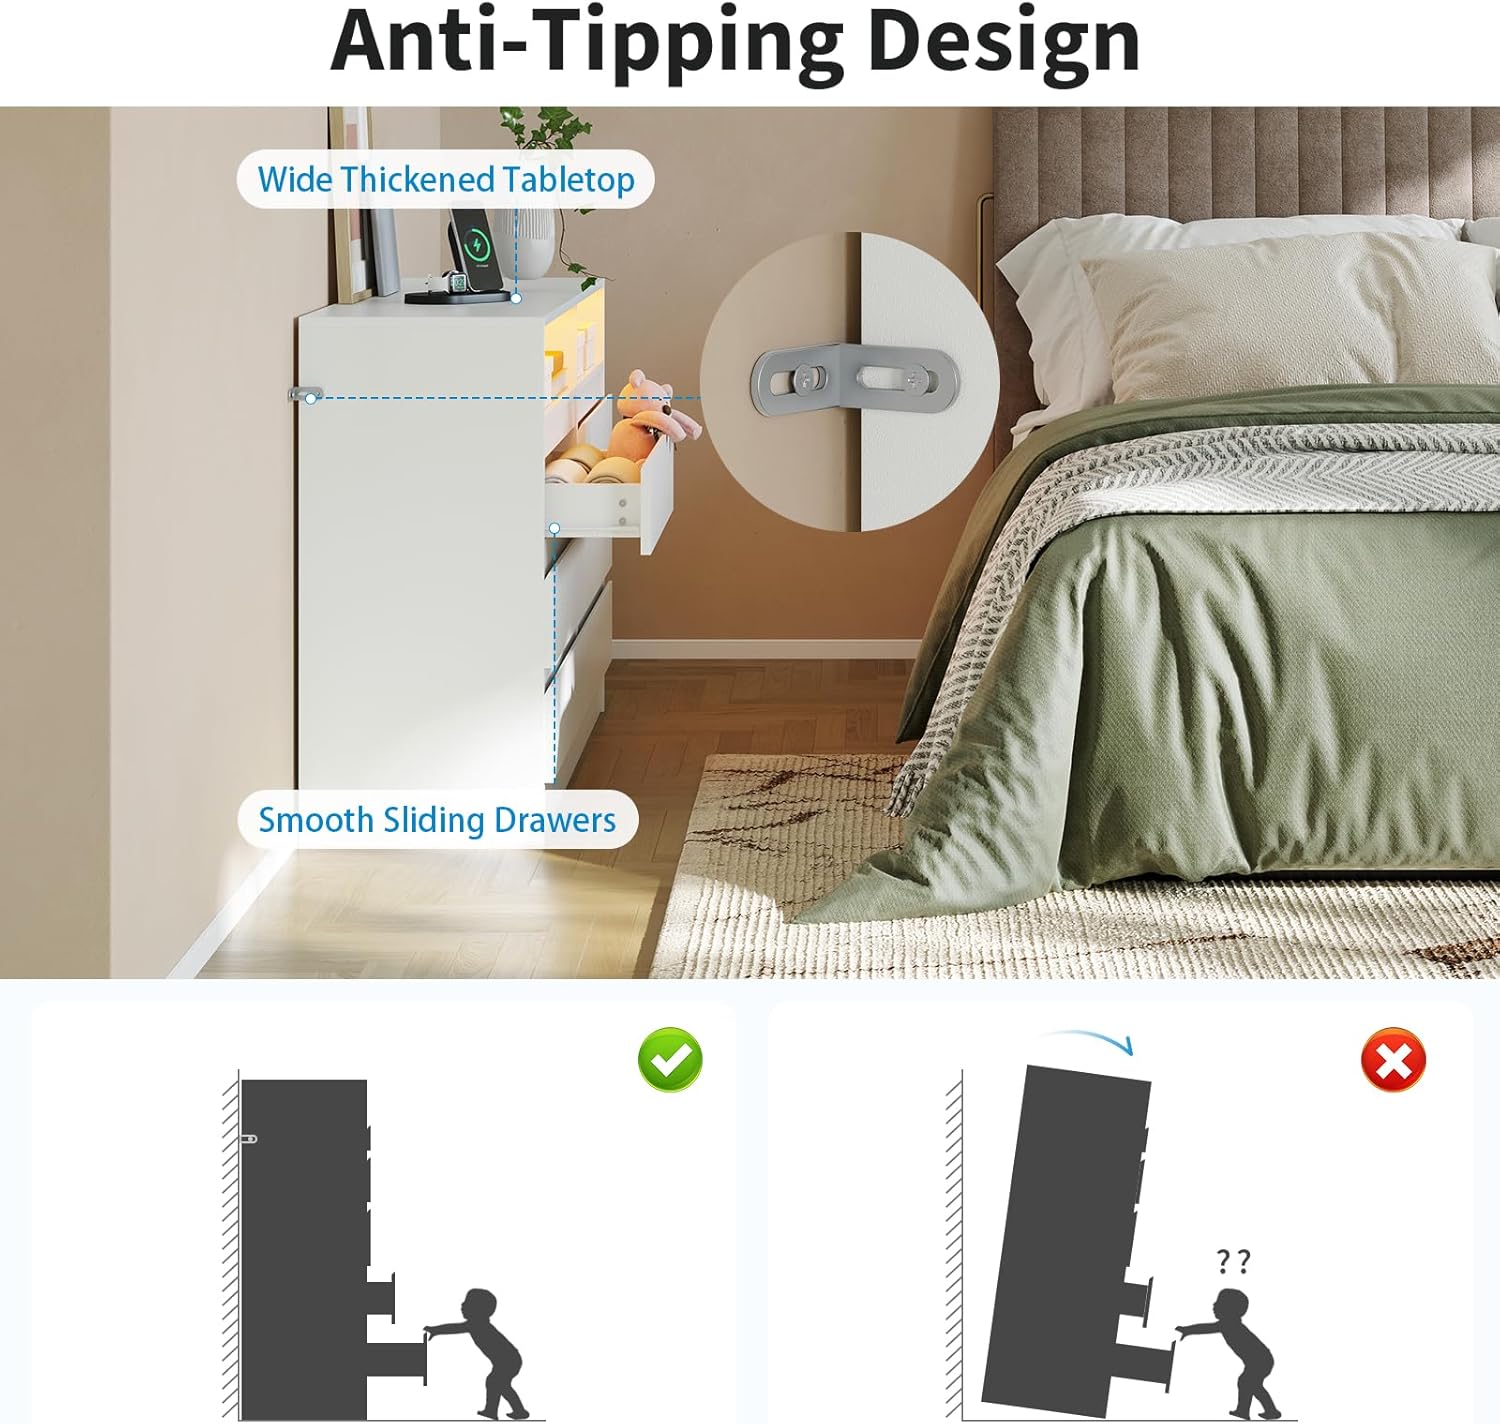
Figure 1: Anti-Tipping Design. This image illustrates the importance of installing the anti-tipping device to prevent the dresser from falling forward, ensuring safety.
Package Contents
Before beginning assembly, please verify that all parts and hardware are present. If any items are missing or damaged, please contact customer support.
- Dresser Panels (Top, Bottom, Sides, Back)
- Drawer Fronts, Sides, and Bottoms (6 sets)
- Drawer Slides (Ball-bearing type)
- Gold Metal Handles (6 pieces)
- Built-in Charging Station (2 AC outlets, 2 USB ports, power cord)
- RGB LED Light Strip with Key Control
- Anti-Tipping Device
- Assembly Hardware (screws, dowels, cam locks, etc.)
- Assembly Instructions Manual
Setup and Assembly
Assembly is designed to be straightforward with labeled parts and clear instructions. It is recommended to have two people for assembly.
- Prepare Workspace: Clear a spacious area and lay out all components on a soft, clean surface to prevent damage.
- Identify Parts: Match each part to the corresponding label in the assembly diagram.
- Assemble Frame: Follow the step-by-step instructions to connect the main panels of the dresser frame using the provided hardware. Ensure all connections are secure.
- Install Drawer Slides: Attach the ball-bearing drawer slides to the dresser frame and drawer sides as indicated. Ensure they are aligned for smooth operation.
- Assemble Drawers: Construct the six drawers, attaching the fronts, sides, and bottoms. Install the gold metal handles onto the drawer fronts.
- Integrate Charging Station: Carefully place the built-in charging station into its designated slot on the top surface. Ensure the power cord is routed correctly and not pinched.
- Install LED Lights: Adhere the RGB LED light strip to the designated area within the open display spaces. Connect the key control unit.
- Install Anti-Tipping Device: Securely attach the anti-tipping device to the back of the dresser and to a wall stud using appropriate wall anchors (not always included, check package). This step is critical for safety.
- Final Check: Verify that all screws and fasteners are tight and that the dresser is stable.
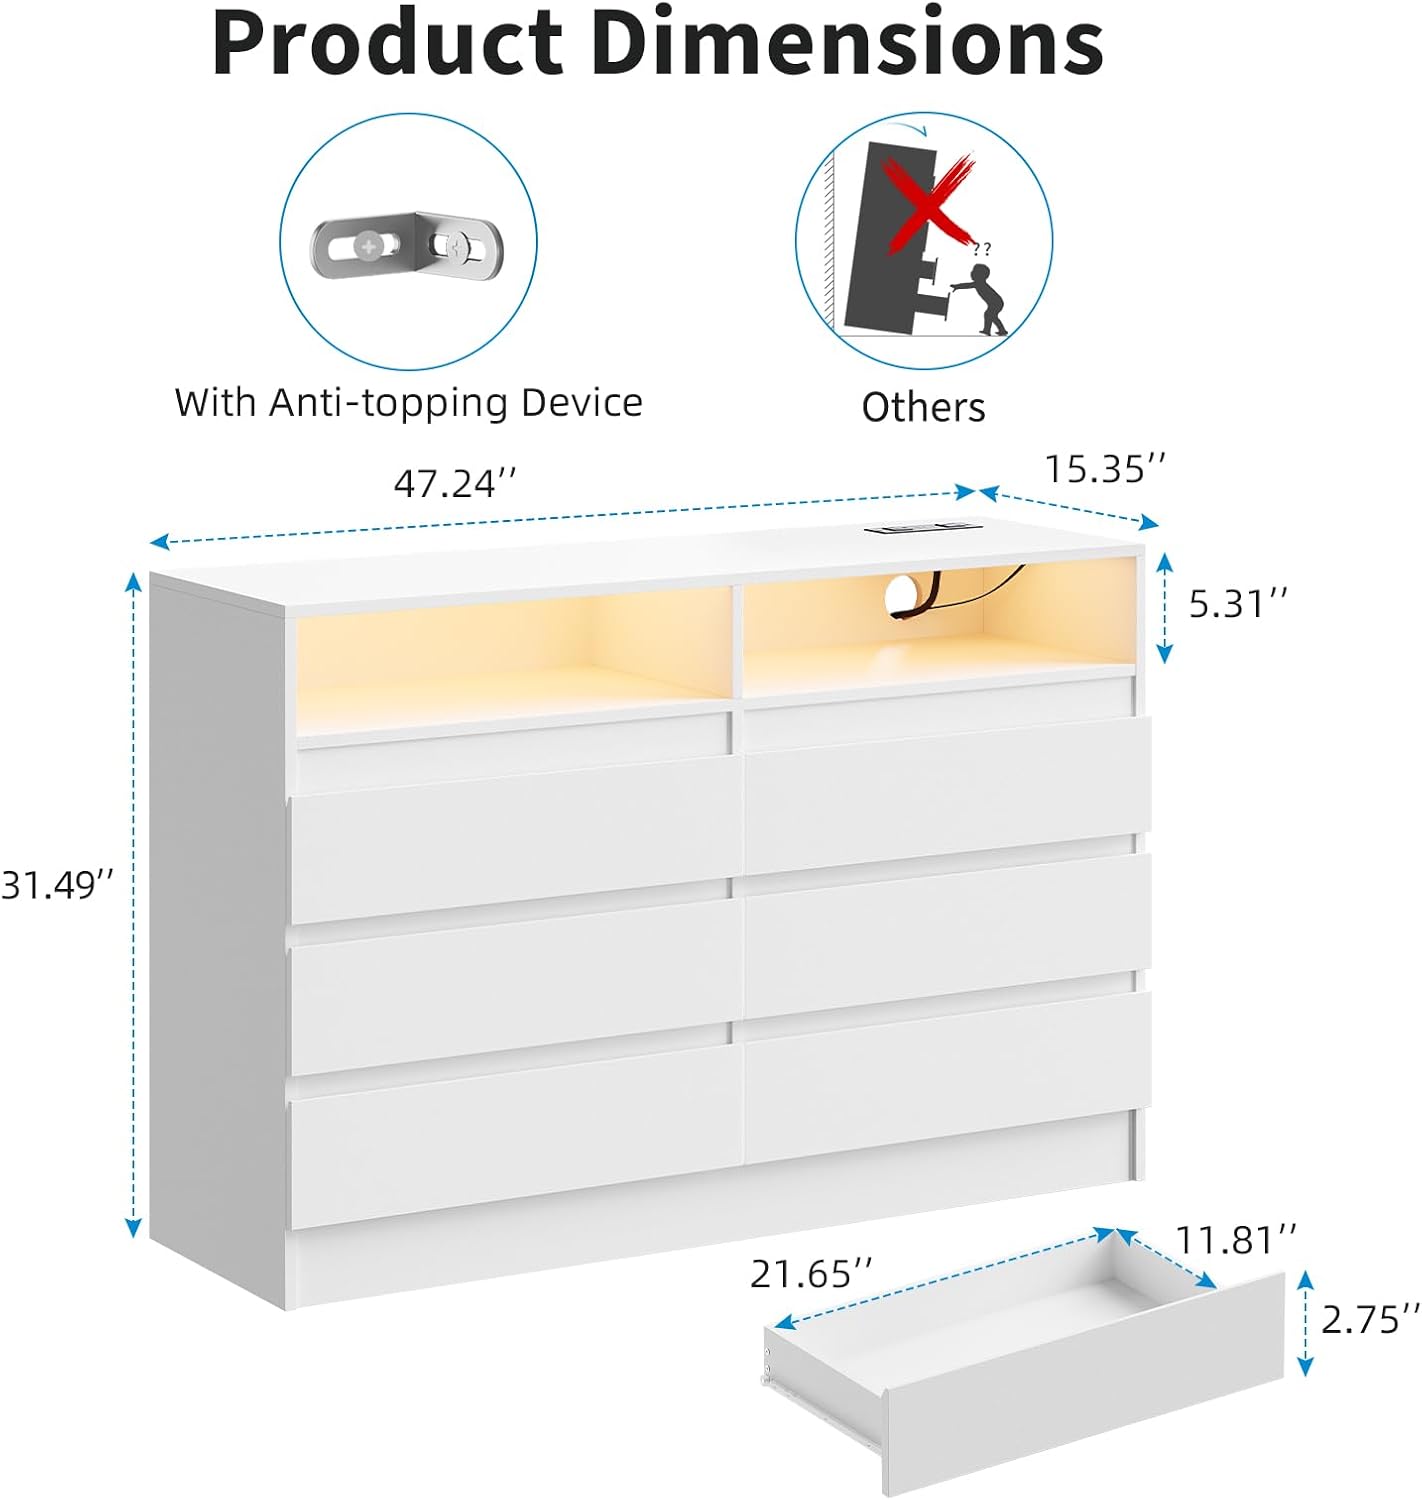
Figure 2: Product Dimensions and Anti-Tipping Device. This image provides key measurements for the dresser and highlights the anti-tipping device.

Figure 3: Quality Features. Details on the smooth drawer operation, thickened tabletop for durability, and enhanced base stability.
Operating Instructions
LED Lights
The dresser features multi-color RGB LED lights to enhance your room's ambiance.
- Power On/Off: Use the key control button to turn the LED lights on or off.
- Change Colors: Press the key control button repeatedly to cycle through various colors and lighting modes.
- Adjust Brightness: Some models may allow brightness adjustment via the key control. Refer to the specific instructions included with the LED strip for detailed functionality.

Figure 4: Adjustable RGB Light Strips. This image demonstrates the different color options for the LED lights and highlights the key control for operation.
Charging Station
The integrated charging station provides convenient power access for your electronic devices.
- Connect to Power: Plug the dresser's main power cord into a standard wall outlet.
- AC Outlets: Use the two 125V/12A AC outlets to power lamps, laptops, or other small appliances.
- USB Ports: Use the two 5V/2A USB ports to charge smartphones, tablets, and other USB-powered devices.
- Overload Protection: Avoid overloading the charging station. Do not plug in high-power appliances that exceed the specified limits.

Figure 5: Built-in Charging Station. This image details the power outlets and USB ports available for charging devices.
Maintenance
Proper care will extend the life and appearance of your dresser.
- Cleaning: Wipe surfaces with a soft, damp cloth. Avoid harsh chemicals or abrasive cleaners, which can damage the finish.
- Spills: Clean spills immediately with a dry cloth to prevent staining or water damage.
- Hardware: Periodically check and tighten all hardware to ensure the dresser remains stable.
- Electrical Components: Keep the charging station and LED lights free from dust. Do not attempt to repair electrical components yourself.
Troubleshooting
If you encounter any issues, please refer to the following common problems and solutions.
| Problem | Possible Cause | Solution |
|---|---|---|
| Dresser is wobbly/unstable. | Hardware not fully tightened; uneven floor. | Ensure all screws and fasteners are securely tightened. Move the dresser to a level surface or use shims if necessary. |
| Drawers do not slide smoothly. | Drawer slides misaligned; debris in slides. | Check that drawer slides are correctly installed and aligned. Clean any dust or debris from the slide mechanisms. |
| LED lights do not turn on. | Power cord unplugged; LED strip not connected; faulty key control. | Ensure the dresser is plugged into a working outlet. Check that the LED strip is properly connected to the power source and key control. Test the key control button. |
| Charging station not working. | Dresser power cord unplugged; device not properly connected; circuit overload. | Verify the dresser is plugged in. Ensure devices are securely connected to the AC outlets or USB ports. Unplug some devices if an overload is suspected. |
| Missing parts or instructions. | Packaging error. | Contact customer support immediately with your purchase details. |
Specifications
- Brand: MilleLoom
- Model Name: Drawer Dresser
- Model Number: PHK_33A5FDR6x5v
- Product Dimensions: 47.24" W x 15.35" D x 31.49" H
- Color: White
- Material: Premium MDF
- Number of Drawers: 6
- Item Weight: Approximately 112.6 pounds
- Charging Station: 2 AC Outlets (125V/12A), 2 USB Ports (5V/2A)
- LED Lights: RGB Multi-color, Key Control
- Assembly Required: Yes

Figure 6: Spacious Storage. This image illustrates the ample storage provided by the six deep drawers and the open display areas.
Warranty and Customer Support
MilleLoom is committed to providing high-quality products. For specific warranty details, please refer to the documentation included with your purchase or contact the retailer.
If you have any questions, require assistance with assembly, or need to report missing/damaged parts, please contact MilleLoom customer support. Have your model number (PHK_33A5FDR6x5v) and purchase information ready for faster service.
You can typically find customer support contact information on the retailer's website or on the product packaging.