1. Introduction
Thank you for choosing the Sharmeal 6000A Jump Starter with Air Compressor. This device is a versatile tool designed for vehicle emergencies and maintenance. It functions as a powerful jump starter for various vehicles, an efficient air compressor for tire inflation, a portable power bank for electronic devices, and an emergency LED flashlight.
This manual provides essential information for the safe and effective operation, maintenance, and troubleshooting of your device. Please read it thoroughly before first use and keep it for future reference.
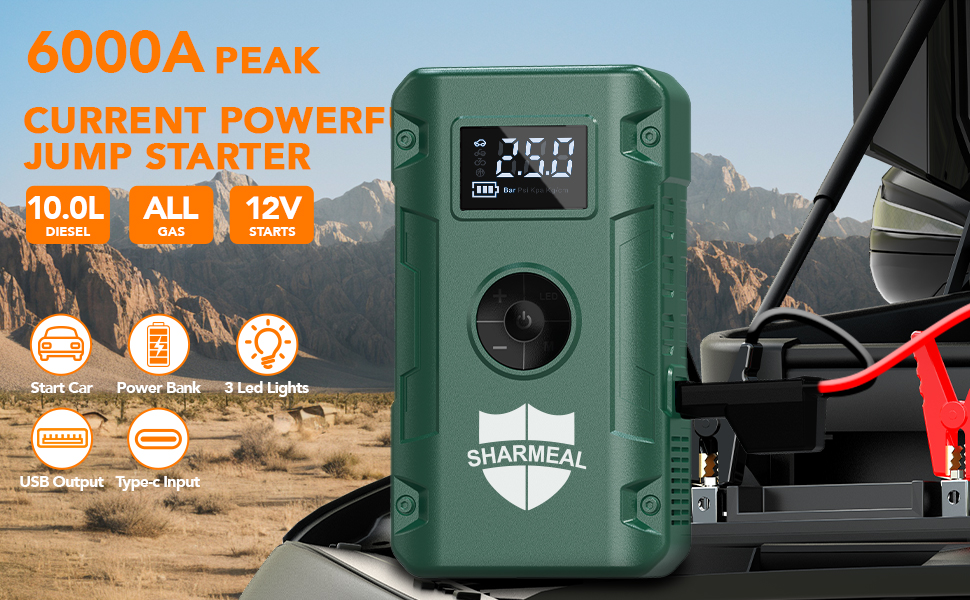
Image: Overview of the Sharmeal 6000A Jump Starter highlighting its key features.
2. Important Safety Information
Always observe the following safety precautions to prevent injury or damage to the device and your vehicle:
- Read all instructions carefully before using the product.
- Keep the device away from children and pets.
- Do not disassemble, modify, or attempt to repair the unit yourself. Contact qualified service personnel for assistance.
- Use the device in a well-ventilated area.
- Avoid short-circuiting the jumper clamps.
- Ensure correct polarity when connecting to a vehicle battery (red to positive, black to negative).
- Do not expose the device to rain, moisture, or extreme temperatures.
- The device incorporates 10 integrated safety protections, including reverse polarity, reverse connection, overcurrent, overvoltage, overload, overcharge, over discharge, and short circuit protection.

Image: Visual representation of the 10 safety protections integrated into the jump starter.
3. Package Contents
Verify that all items are present in your package:
- 1x Sharmeal Jump Starter with Air Compressor
- 1x Smart Jumper Cables
- 1x Air Pump Hose
- 3x Gas Nozzles (various adapters)
- 1x Type-C Charging Cable
- 1x User Manual
- 1x Portable Carrying Case
- 1x Velvet Bag
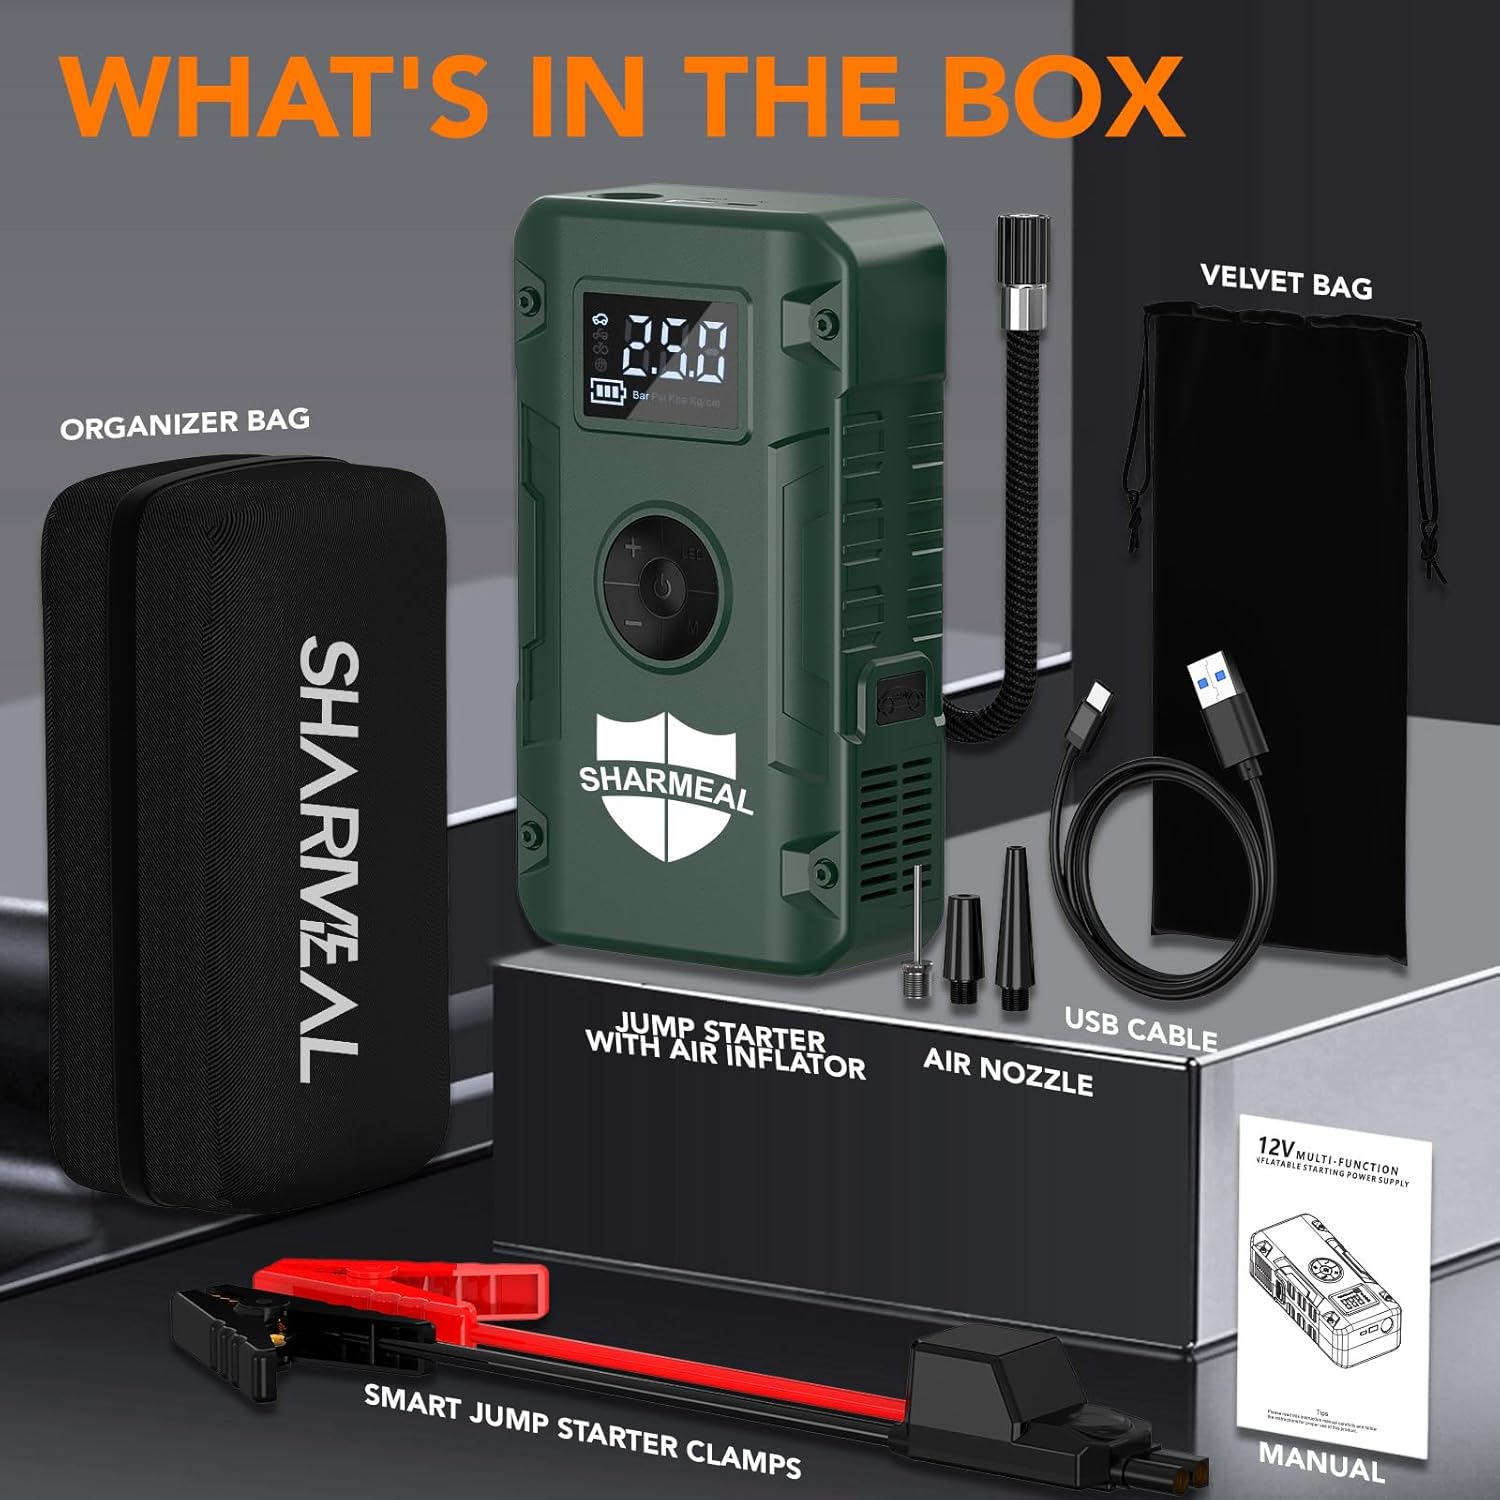
Image: All components included in the product package.
4. Product Overview
Familiarize yourself with the components and controls of your Sharmeal Jump Starter:
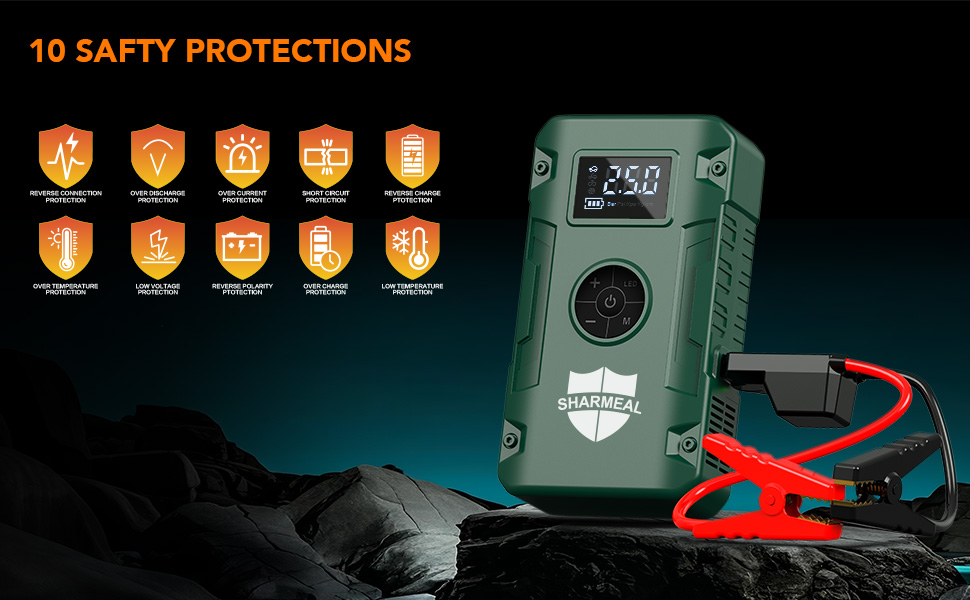
Image: Labeled diagram of the jump starter's features and ports.
- LED Display: Shows battery level, air pressure, and operating modes.
- Control Panel: Buttons for power, settings, and inflation adjustments.
- 12V Car Start Outlet: Port for connecting jumper cables.
- USB Output: For charging external devices.
- Type-C Charging Input: For recharging the jump starter.
- LED Flashlight: Multi-mode emergency light.
- Air Hose Connection: Port for the air pump hose.
5. Setup and Initial Charging
5.1 Initial Charge
Before first use, it is recommended to fully charge the jump starter. Although units may arrive with a partial charge, a full charge ensures optimal performance and battery longevity.
5.2 Charging the Jump Starter
- Connect the provided Type-C charging cable to the 'Charging Input' port on the jump starter.
- Connect the other end of the Type-C cable to a suitable USB power adapter (not included) or a powered USB port.
- The LED display will indicate the charging status. Charge until the display shows 100% or a full battery icon.
- Once fully charged, disconnect the charging cable.
6. Operating the Jump Starter
This device is designed to jump-start 12V vehicles with dead batteries, including cars, trucks, SUVs, motorcycles, and more, supporting up to all gas or 10.0L diesel engines.
6.1 Jump Starting a Vehicle
- Prepare the Jump Starter: Ensure the jump starter is adequately charged.
- Connect Jumper Cables: Insert the smart jumper cable connector firmly into the 12V Car Start Outlet on the jump starter.
- Connect to Car Battery: Attach the red (+) clamp to the positive terminal of the vehicle's dead battery. Attach the black (-) clamp to the negative terminal of the vehicle's dead battery. Ensure the clamps make good contact with the battery terminals. The smart cable will indicate if the connection is correct.
- Start the Vehicle: Once the clamps are securely connected and the smart cable indicates readiness, start your vehicle's engine. If the vehicle does not start immediately, wait 30 seconds before attempting again.
- Remove Clamps: After the vehicle starts, immediately remove the black (-) clamp from the car battery, then the red (+) clamp. Finally, disconnect the jumper cable from the jump starter.
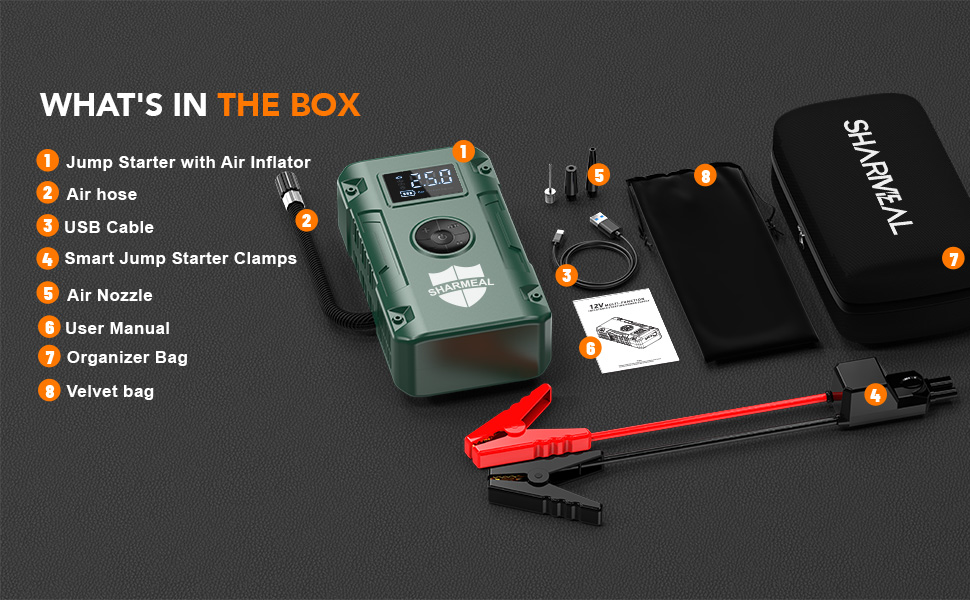
Image: Step-by-step instructions for jump starting a vehicle.
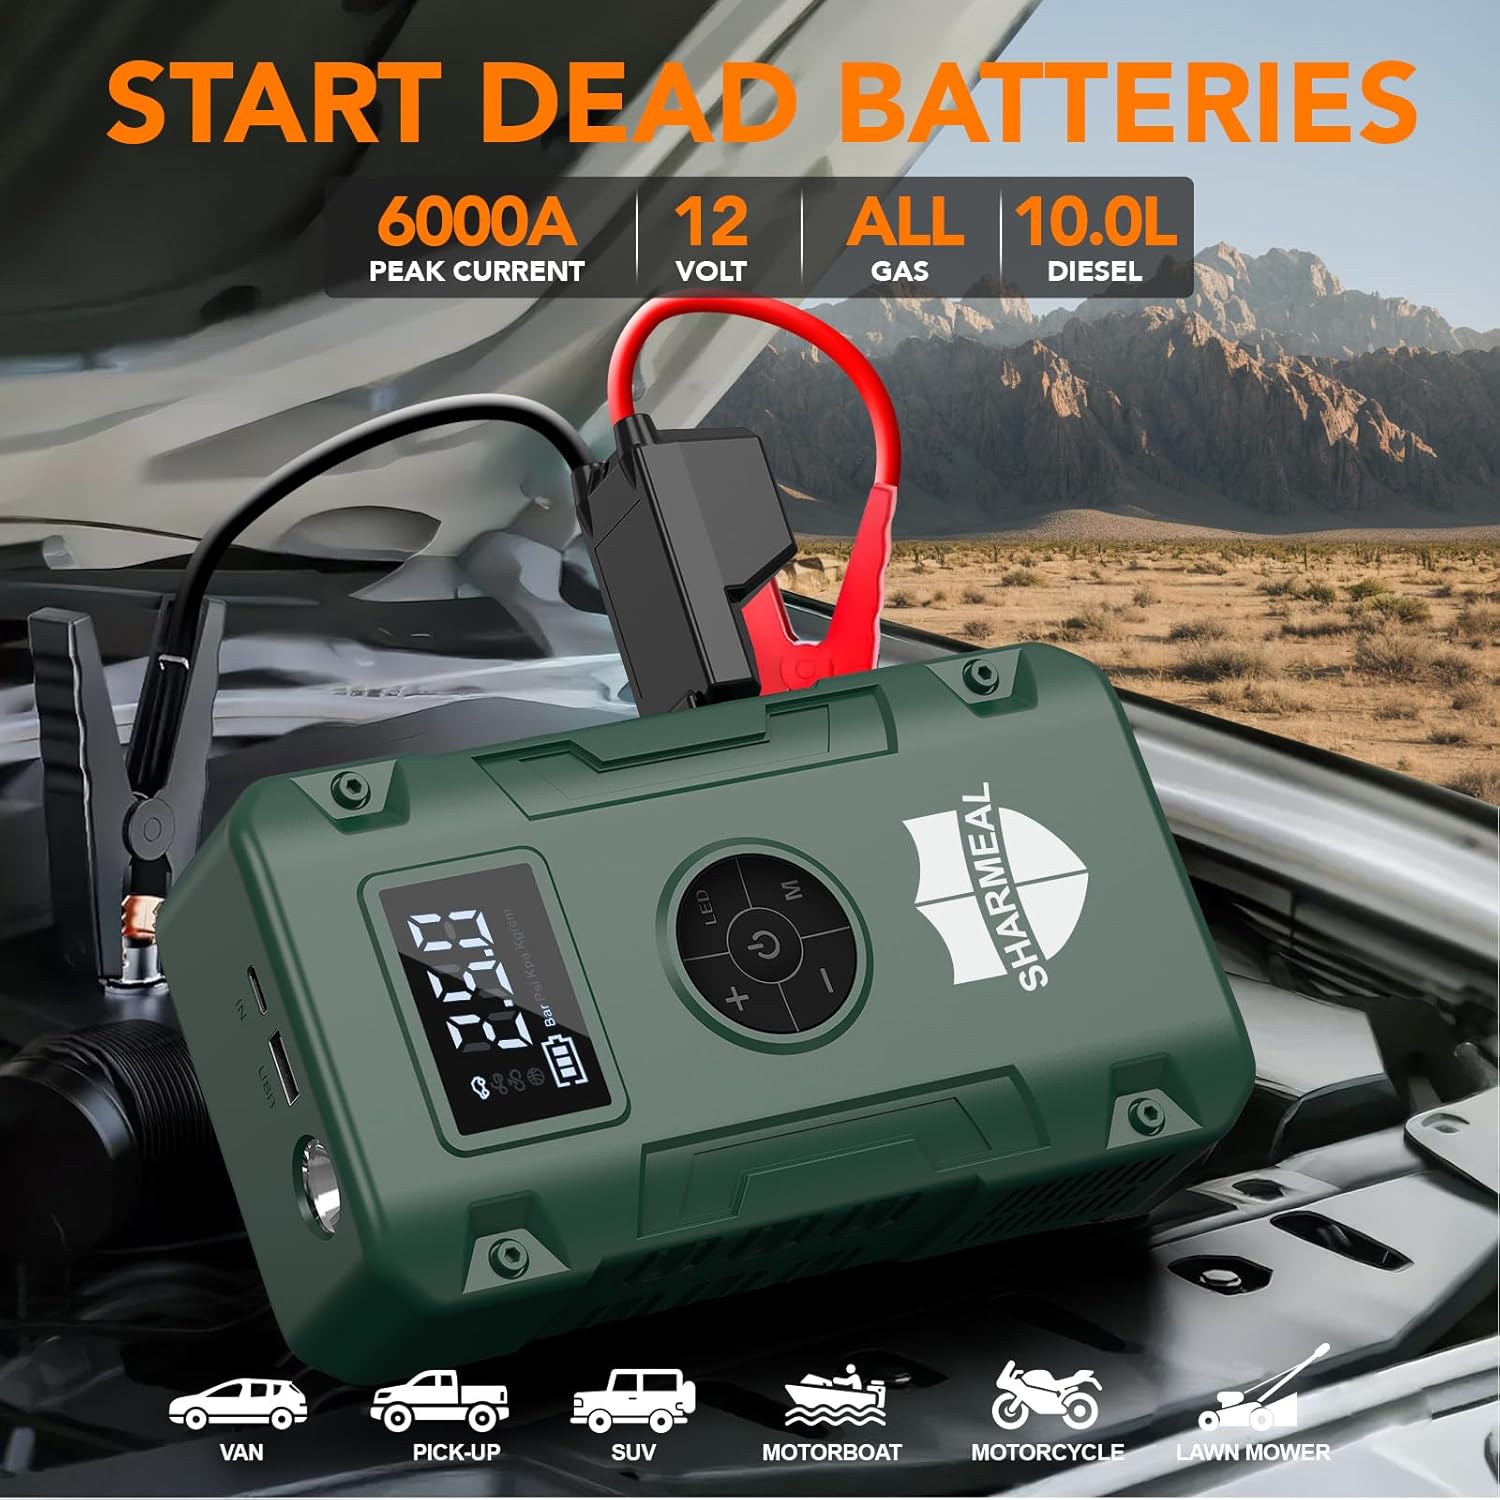
Image: Jump starter in use, demonstrating its capacity and vehicle compatibility.
7. Operating the Air Compressor
The built-in air compressor can inflate tires and other inflatables up to 150 PSI, featuring an automatic stop function.
7.1 Inflating Tires
- Connect Air Hose: Screw the air pump hose onto the air hose connection port on the jump starter.
- Attach to Tire Valve: Connect the other end of the air hose to the tire valve stem. Ensure a secure connection to prevent air leakage.
- Power On and Set Pressure: Turn on the jump starter. The LED display will show the current tire pressure. Use the '+' and '-' buttons to set your desired target pressure. You can also cycle through pressure units (PSI, BAR, KPA, KG/CM²) using the 'Setting Key'.
- Start Inflation: Press the 'Power/Air Pump Start Key' to begin inflation. The compressor will automatically stop once the preset pressure is reached.
- Disconnect: Disconnect the air hose from the tire valve and then from the jump starter.
Use the included gas nozzles for inflating bicycles, balls, inflatable boats, and other items.

Image: Air compressor function demonstrating tire inflation and various mode settings.
8. Operating as a Portable Power Bank
The jump starter can also serve as a portable power bank to charge your electronic devices.
8.1 Charging External Devices
- Connect your device's USB charging cable to the 'USB Output' port on the jump starter.
- The jump starter will automatically begin charging your device.
- Monitor your device's charging status. Disconnect once charging is complete.
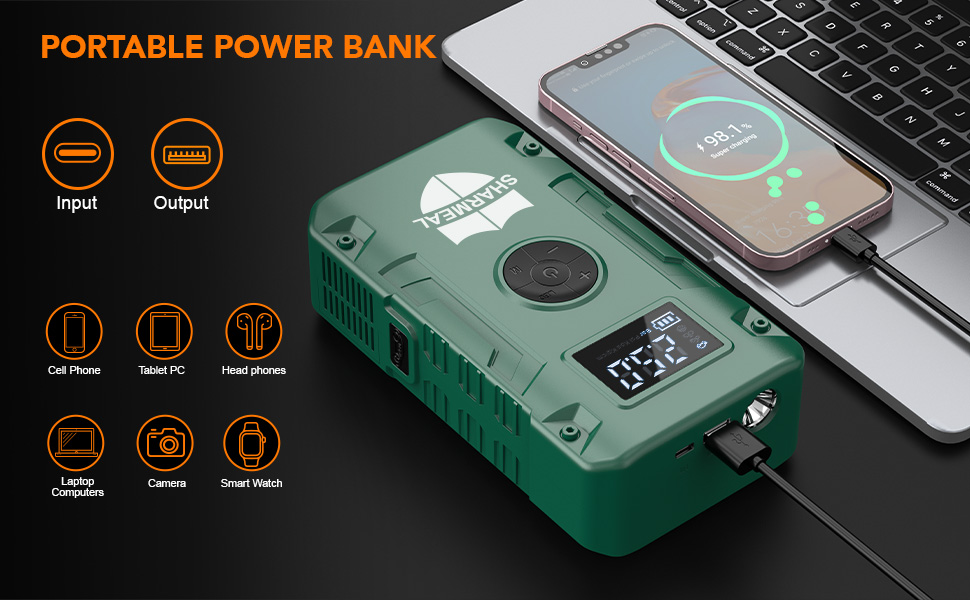
Image: Jump starter used as a power bank for various electronic devices.
9. Operating the LED Flashlight
The integrated LED flashlight offers three modes for various emergency situations.
9.1 Using the Flashlight
- Turn On: Long press the 'Illumination Switch' button to turn on the flashlight (standard illumination mode).
- Cycle Modes: Short press the 'Illumination Switch' button to cycle through the modes: Strobe Light, SOS Light.
- Turn Off: Long press the 'Illumination Switch' button again to turn off the flashlight.

Image: Demonstrating the multi-functional emergency light modes.
10. Maintenance
10.1 Charging
For optimal performance and battery life, it is recommended to charge the jump starter after every use, especially after jump-starting a vehicle or using the air compressor extensively. If not used frequently, charge the device every 3-6 months to maintain battery health.
10.2 Storage
Store the jump starter in a cool, dry place, away from direct sunlight, moisture, and flammable materials. Use the provided portable carrying case for protection.
10.3 Cleaning
Wipe the exterior of the device with a soft, dry cloth. Do not use harsh chemicals or abrasive cleaners. Ensure all ports are free from dust and debris.
11. Troubleshooting
| Problem | Possible Cause | Solution |
|---|---|---|
| Jump starter will not charge. | Charging cable is faulty or not connected properly. Power adapter is not working. | Ensure the Type-C cable is securely connected to both the jump starter and a working power source. Try a different Type-C cable or power adapter. |
| Jump starter display shows low percentage but unit is dead. | Battery percentage display may not be perfectly accurate, especially under heavy load or after prolonged use without full recharge. | Always ensure the unit is fully charged before critical use. Recharge after every use for best results, regardless of the displayed percentage. |
| Vehicle does not start after jump attempt. | Incorrect clamp connection. Vehicle battery is severely damaged. Jump starter battery is too low. | Verify correct polarity and secure connection of clamps. Ensure jump starter is fully charged. If the battery is severely damaged, it may require professional service. |
| Air compressor not inflating or stops prematurely. | Air hose not securely connected. Target pressure not set or set too low. Jump starter battery is low. | Ensure the air hose is tightly screwed onto both the jump starter and the tire valve. Check and adjust the target pressure setting. Recharge the jump starter. |
12. Specifications
| Feature | Detail |
|---|---|
| Brand | Sharmeal |
| Model | GL963 |
| Peak Output Current | 6000 Amps |
| Max Inflation Pressure | 150 PSI |
| Engine Compatibility | Up to All Gas or 10.0L Diesel Engine |
| Automotive Fit Type | Universal Fit |
| Charging Input | Type-C |
| Flashlight Modes | Flashlight, Strobe Light, SOS Light |
| Safety Protections | 10 integrated protections (Reverse Polarity, Overcurrent, etc.) |
| Manufacturer | Foshan Xianming Intelligent Technology Co., Ltd |
13. Warranty and Support
13.1 Warranty Information
This Sharmeal Jump Starter comes with a 24-month warranty from the date of purchase. The warranty covers manufacturing defects and malfunctions under normal use. It does not cover damage caused by misuse, unauthorized modification, accidents, or natural disasters.
13.2 Customer Support
For technical assistance, warranty claims, or any questions regarding your product, please contact customer support through the retailer where the product was purchased or visit the official Sharmeal website for contact information.
Please have your model number (GL963) and proof of purchase ready when contacting support.