1. Introduction
This manual provides essential information for the safe and efficient operation, installation, and maintenance of your Hobart HL200-1STD Legacy Planetary Mixer. Designed for professional food preparation, this robust 20-quart tabletop unit is suitable for commercial kitchens, bakeries, and foodservice operations. Please read this manual thoroughly before using the mixer.
Key Features
- Commercial Grade: Designed for professional kitchen use with robust construction and reliable performance.
- Capacity: 20-quart bowl capacity, ideal for medium-volume mixing needs.
- Versatile Mixing: Planetary mixing action ensures thorough ingredient incorporation and consistent results.
- Standard Accessories: Comes complete with essential mixing attachments for various food preparation tasks.
- Tabletop Design: Space-saving configuration provides convenient access while maintaining professional mixing capabilities.
2. Important Safety Instructions
To prevent injury or damage, always follow basic safety precautions when using electrical appliances. Read all instructions carefully before operation.
- Ensure the mixer is properly grounded.
- Keep hands, hair, and clothing away from moving parts during operation.
- Never operate the mixer with a damaged cord or plug, or if it has been dropped or damaged.
- Unplug the mixer from the outlet before cleaning, assembling, or disassembling parts.
- Do not immerse the motor base in water or other liquids.
- Use only attachments recommended by the manufacturer.
- Supervise children and individuals with reduced capabilities to ensure safe use.
- Do not use outdoors.
3. Package Contents
Verify that all items are present upon unpacking:
- Hobart HL200-1STD Legacy Planetary Mixer Unit
- 20-Quart Stainless Steel Mixing Bowl
- Flat Beater (Paddle)
- Dough Hook
- Wire Whip
- Safety Guard
- User Manual
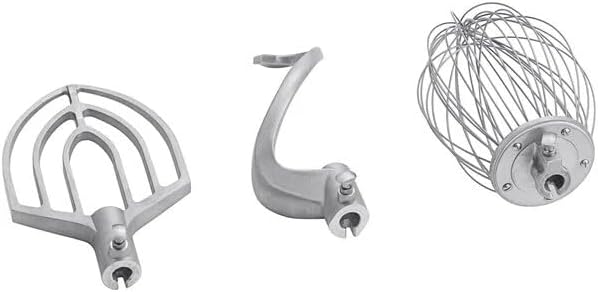
Figure 1: Standard mixer attachments including flat beater, dough hook, and wire whip.
4. Setup Guide
4.1 Unpacking and Inspection
- Carefully remove the mixer and all accessories from the packaging.
- Inspect the unit for any shipping damage. Contact your supplier immediately if damage is found.
- Retain packaging materials for future transport or storage.
4.2 Placement
- Place the mixer on a sturdy, level, and stable countertop or table capable of supporting its weight (approximately 280 lbs).
- Ensure adequate clearance around the mixer for ventilation and operation.
- Avoid placing near heat sources or in direct sunlight.
4.3 Power Connection
- Verify that the electrical supply matches the specifications on the mixer's rating plate.
- Plug the mixer into a properly grounded electrical outlet. Do not use extension cords.
4.4 Bowl and Attachment Installation
- Ensure the mixer is unplugged and the speed control is set to 'OFF'.
- Lower the bowl lift handle to its lowest position.
- Place the mixing bowl onto the bowl support pins and rotate it slightly to lock it into place.
- Select the desired attachment (flat beater, dough hook, or wire whip).
- Slide the attachment onto the agitator shaft, aligning the pin on the shaft with the slot on the attachment. Rotate the attachment upwards until the pin locks into the slot.
- Raise the bowl lift handle to its highest position, ensuring the bowl is securely locked.

Figure 2: The Hobart HL200-1STD Legacy Planetary Mixer ready for operation.
5. Operating Your Mixer
5.1 Controls Overview
- ON/OFF Switch: Powers the mixer on and off.
- Speed Control Dial: Adjusts the mixing speed (typically multiple settings).
- Bowl Lift Handle: Raises and lowers the mixing bowl.
- Safety Guard: Must be in place for operation.
5.2 Mixing Procedures
- Ensure the mixer is properly set up with the desired attachment and bowl.
- Add ingredients to the mixing bowl. Do not overfill.
- Ensure the safety guard is closed and locked.
- Turn the mixer ON and select the appropriate speed for your recipe. Start at a low speed to prevent splashing, then gradually increase if needed.
- Monitor the mixing process. Do not leave the mixer unattended during operation.
- To stop, turn the mixer OFF. Wait for the attachment to come to a complete stop before lowering the bowl or removing ingredients.

Figure 3: A user adding ingredients to the mixer during operation.
6. Care and Maintenance
Regular cleaning and maintenance will extend the life of your mixer and ensure optimal performance.
6.1 Cleaning
- Always unplug the mixer before cleaning.
- Remove the bowl and attachments. Wash them with warm, soapy water, rinse thoroughly, and dry immediately. These parts are not dishwasher safe.
- Wipe down the exterior of the mixer with a damp cloth. Do not use abrasive cleaners or immerse the motor base in water.
- Clean the safety guard regularly.
6.2 Storage
- Store the mixer in a clean, dry place when not in use.
- Keep attachments with the mixer to prevent loss.
7. Troubleshooting
Refer to the table below for common issues and their solutions.
| Problem | Possible Cause | Solution |
|---|---|---|
| Mixer does not turn on | Not plugged in; Power switch off; Circuit breaker tripped; Safety guard not closed | Check power cord; Turn ON switch; Reset breaker; Ensure safety guard is securely closed |
| Attachment not mixing properly | Attachment not installed correctly; Wrong attachment for task; Bowl not raised | Re-install attachment; Use correct attachment; Ensure bowl lift is in highest position |
| Excessive noise or vibration | Overloaded; Mixer not on level surface; Loose parts | Reduce load; Place on level surface; Check for loose components and tighten if safe to do so. If problem persists, contact support. |
8. Technical Specifications
| Feature | Specification |
|---|---|
| Brand | Glownary (Manufactured by Hobart) |
| Model Name | HL200-1STD |
| Capacity | 20 Quarts |
| Product Dimensions | 25"D x 20"W x 38"H |
| Item Weight | 280 pounds |
| Color | Stainless Steel |
| Controls Type | Manual |
| Is Dishwasher Safe | No (for attachments and bowl) |
| Manufacture Year | 2023 |
9. Warranty and Customer Support
For warranty information, service, or technical assistance, please contact Glownary customer support. Details regarding specific warranty terms and conditions are typically provided with your purchase documentation.
You can visit the official Glownary store for more information and support resources: