Introduction
Thank you for choosing the Culligan MaxClear 3 Gallon Gravity Water Filter System. This system is designed to provide cleaner, safer drinking water by reducing microplastics, lead, and Total PFAS, while retaining essential minerals. It is NSF/ANSI-42 certified for contaminant reduction. This manual will guide you through the assembly, operation, and maintenance of your new water filter system.

Image: The complete Culligan MaxClear 3 Gallon Gravity Water Filter System, featuring a brushed stainless-steel design with a spigot and stand, accompanied by six ceramic filters.
What's in the Box
Your Culligan MaxClear system includes the following components:
- Upper Container (Stainless Steel)
- Lower Container (Stainless Steel)
- Lid with Knob
- Stainless Steel Spigot
- Stainless Steel Stand
- Ceramic Filters (Quantity as per package, e.g., 6 filters for this model)
- Rubber Stopper(s)
- Silicone and Stainless Steel Washers
- User Manual (this document)
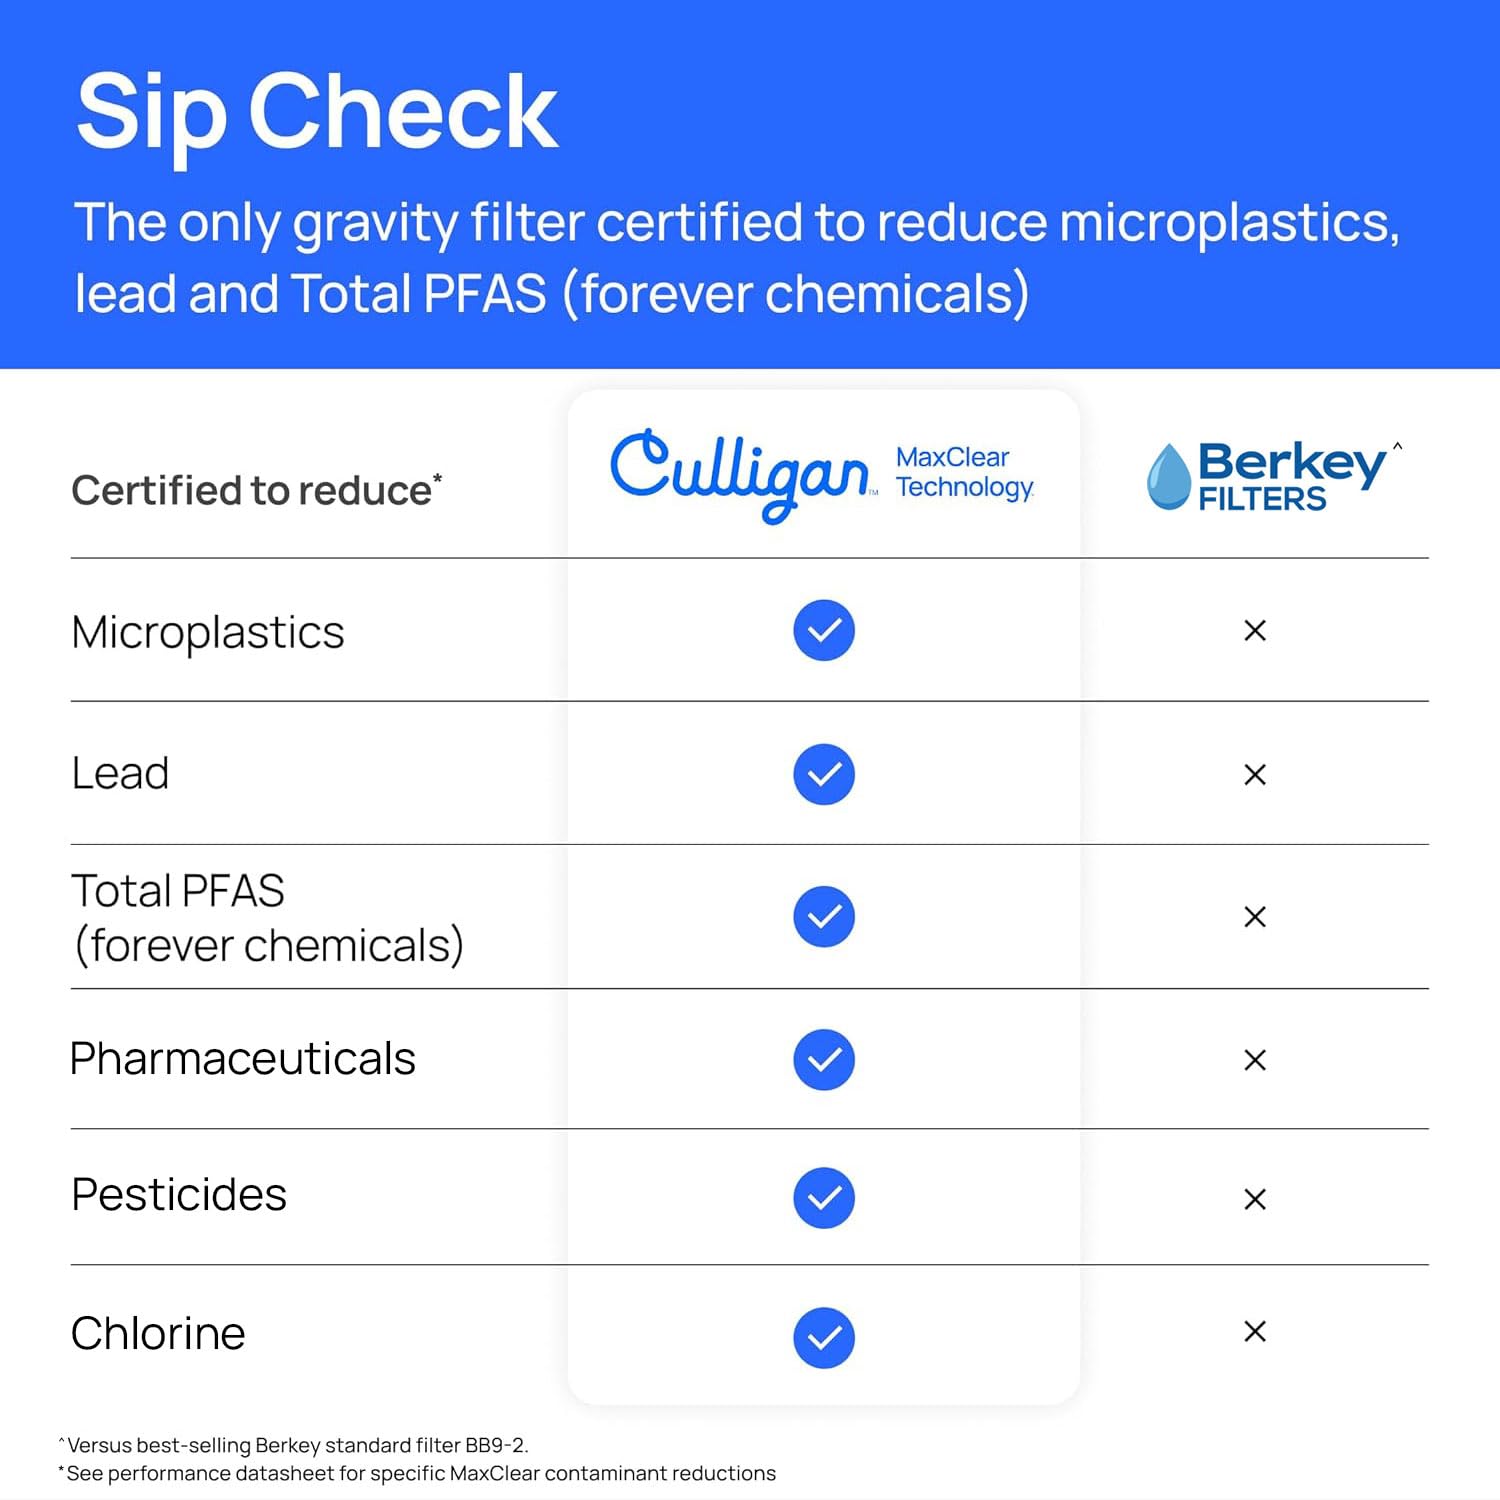
Image: All components of the Culligan MaxClear Water Filter System laid out, including the upper and lower stainless steel containers, lid, spigot, stand, ceramic filters, and small parts.
Setup and Assembly
Follow these steps to assemble your Culligan MaxClear Gravity Water Filter System:
1. Prepare Components
- Wash all stainless steel components (upper container, lower container, lid, spigot, stand) with warm, soapy water and rinse thoroughly. Do not use abrasive cleaners.
- Gently scrub the white ceramic portion of each filter with water to remove any ceramic dust.
2. Install the Spigot
- Slide one stainless steel washer and one silicone washer onto the spigot stem, positioning them snugly against the spigot base.
- Insert the spigot stem through the hole at the base of the lower container from the outside.
- From the inside of the lower container, add another silicone washer and a stainless steel washer onto the spigot stem.
- Fasten the nut onto the stem and tighten it securely using the provided spigot wrench. Ensure there are washers on both sides of the container wall for a leak-proof seal.
3. Install the Filters
- Ensure a rubber washer is positioned at the base of each filter.
- Insert the filter stem(s) upright into the designated holes in the bottom of the upper container.
- From the underside of the upper container, snugly fasten the wing nut onto each filter stem. Tighten just enough so the filter stands upright without wobbling. Do not overtighten.
- If you are using fewer filters than available holes, plug the remaining holes with the provided rubber stopper(s) to prevent unfiltered water from passing through.
4. Final Assembly
- Place the stainless steel stand on a stable, flat surface.
- Sit the lower container (with spigot installed) onto the stand.
- Place the upper container (with filters installed) inside the lower container.
- Place the lid on top of the upper container.
Assembly Video Guide
Video: A step-by-step guide demonstrating the assembly process of the Culligan MaxClear Gravity Water Filter System, including spigot and filter installation.
Operating Instructions
Using your Culligan MaxClear system is simple:
- Pour untreated water into the upper container. Ensure the water level does not exceed the top of the filters.
- Allow gravity to draw the water through the ceramic filters into the lower container. This process may take some time, especially during the first few uses.
- Once filtered, water will collect in the lower container, ready for dispensing.
- To dispense water, open the spigot. Close it securely after use to prevent leaks.

Image: A person pouring water into the top container of the Culligan MaxClear Gravity Water Filter System, demonstrating the refilling process.
Maintenance
Regular maintenance ensures optimal performance and longevity of your filter system.
Filter Replacement
Filters should be replaced periodically based on usage and water quality. Refer to the filter packaging for specific replacement intervals. When replacing, follow these general steps:
- Empty both containers of any remaining water.
- Remove the upper container from the lower container.
- Unscrew the wing nuts from the bottom of the upper container to release the old filters.
- Discard old filters responsibly.
- Install new filters by following the "Install the Filters" steps in the Setup and Assembly section.
- After installing new filters, it is recommended to flush the system by filtering and discarding the first full batch of water to remove any residual manufacturing dust.
Video: A demonstration of how to change the filters in the Culligan MaxClear Gravity Water Filter System, ensuring proper installation for continued clean water.
Cleaning the System
Clean the stainless steel containers and lid regularly with warm, soapy water and a soft cloth. Rinse thoroughly and dry to prevent water spots. Do not use abrasive materials or harsh chemicals that could damage the stainless steel finish.
Troubleshooting
If you encounter any issues with your Culligan MaxClear system, consider the following:
- Slow Filtration: This can occur if filters are clogged or if they are new and need to be fully saturated. Ensure filters are properly scrubbed before first use. If filters are old, they may need replacement.
- Leaks: Check that the spigot is securely tightened with washers on both sides of the container wall. Ensure filter wing nuts are snug but not overtightened.
- Unpleasant Taste/Odor: If water quality deteriorates, filters may be exhausted and require replacement. Ensure the system is cleaned regularly.
For further assistance, please contact Culligan customer support.
Specifications
- Model Number: MCV706B
- Capacity: 3 Gallons
- Material: Stainless Steel
- Product Dimensions: 9.4"L x 9.4"W x 27.6"H
- Installation Type: Countertop
- Purification Method: Ceramic, Granular Activated Carbon
- Power Source: Gravity-fed
- Special Feature: Heavy Duty, Lightweight, Portable
- Certifications: NSF/ANSI-42 certified for reduction of Microplastics, Lead, and Total PFAS.

Image: A visual representation of the Culligan MaxClear Gravity Water Filter System with key dimensions labeled, including height, depth, and width.
Warranty and Support
For warranty information, product registration, or customer support, please refer to the official Culligan website or contact their customer service department. Keep your purchase receipt for warranty claims.
Visit the Culligan Store: Culligan Water Store


