1. Introduction
This user manual provides essential information for the safe and effective operation, setup, and maintenance of your ReliPrint U160Pro Handheld Inkjet Printer. Please read this manual thoroughly before using the device to ensure proper functionality and to prevent damage or injury. Keep this manual for future reference.
2. Safety Information
Adhering to the following safety guidelines is crucial for preventing accidents and ensuring the longevity of your printer.
- Electrical Safety: Use only the provided power adapter for charging. Do not operate the printer with wet hands or in damp environments. Ensure the charging port is dry before connecting the charger.
- Ink Cartridge Handling: Ink cartridges contain chemicals. Avoid direct contact with skin and eyes. In case of contact, rinse immediately with plenty of water and seek medical attention if irritation persists. Keep cartridges out of reach of children.
- Operation Environment: Operate the printer in a well-ventilated area. Avoid exposure to extreme temperatures, direct sunlight, or dusty conditions.
- Maintenance: Disconnect the power supply before performing any cleaning or maintenance. Do not attempt to disassemble or repair the printer yourself; contact authorized service personnel.
- Storage: Store the printer and ink cartridges in a cool, dry place, away from direct heat sources and corrosive materials.
3. Package Contents
Verify that all items listed below are present in your package upon unboxing.
- ReliPrint U160Pro Handheld Inkjet Printer
- Protective Carrying Case
- Ink Cartridge (pre-installed or separate)
- Power Adapter/Charger
- Roller Guide Attachment
- USB Cable
- User Manual (this document)

Figure 3.1: ReliPrint U160Pro Handheld Inkjet Printer and its accessories neatly organized within its durable protective carrying case.
4. Product Overview
The ReliPrint U160Pro is a robust handheld inkjet printer designed for industrial applications, capable of printing on various surfaces such as steel pipes and concrete. Its ergonomic design and integrated screen facilitate ease of use in diverse working environments.
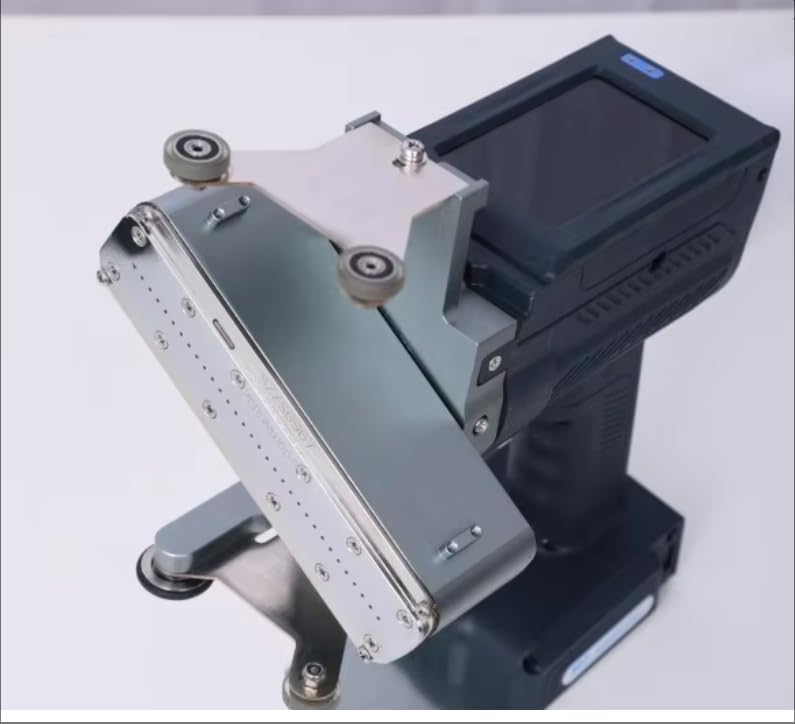
Figure 4.1: A detailed view of the U160Pro printer, highlighting the print head and an attached roller guide mechanism, designed for stable and consistent printing on curved or uneven surfaces.
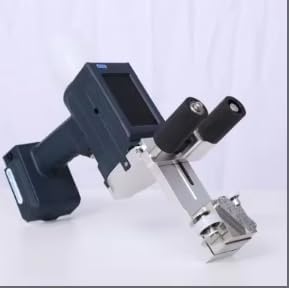
Figure 4.2: The U160Pro printer shown from a side angle, illustrating its compact handheld form factor and a different type of roller guide attachment, optimized for specific application requirements.
5. Setup
Follow these steps to prepare your ReliPrint U160Pro for first use.
- Charge the Battery: Connect the power adapter to the printer's charging port and plug it into a power outlet. Allow the battery to fully charge before initial use. The charging indicator light will change color or turn off when charging is complete.
- Install Ink Cartridge: Open the ink cartridge compartment cover. Carefully insert the ink cartridge into its slot, ensuring it is seated correctly. Close the compartment cover securely.
- Attach Roller Guide: If required for your application, attach the appropriate roller guide to the printer's print head assembly. Ensure it is firmly secured to prevent movement during printing.
- Power On: Press and hold the power button until the display screen illuminates. The printer will perform a self-check.
- Initial Settings: Follow the on-screen prompts to set the language, date, and time.
6. Operating Instructions
This section outlines the basic steps for operating your ReliPrint U160Pro printer.
- Create or Load Print Content: Navigate through the printer's menu using the touchscreen or navigation buttons. You can create new print content (text, numbers, symbols) directly on the device or load pre-saved templates via USB.
- Adjust Print Settings: Select desired print parameters such as font size, print density, print speed, and print direction. Ensure these settings are appropriate for the material you are printing on.
- Prepare Printing Surface: Ensure the surface to be printed on is clean, dry, and free from debris for optimal ink adhesion.
- Start Printing: Position the printer's print head (with or without the roller guide) firmly against the starting point of the desired print area. Press the print trigger button and smoothly move the printer across the surface at a consistent speed.
- Review Print Quality: After printing, inspect the output for clarity and accuracy. Adjust settings as needed for subsequent prints.
7. Maintenance
Regular maintenance ensures optimal performance and extends the lifespan of your printer.
- Print Head Cleaning: If print quality degrades or lines appear, clean the print head using a lint-free cloth lightly dampened with the recommended cleaning solution (if provided) or isopropyl alcohol. Do not use abrasive materials.
- Ink Cartridge Replacement: When the ink level is low or the cartridge is empty, replace it with a new, compatible ReliPrint ink cartridge. Follow the installation steps outlined in Section 5.
- Exterior Cleaning: Wipe the printer's exterior with a soft, dry cloth to remove dust and grime. Avoid using harsh chemicals.
- Storage: For prolonged storage, ensure the ink cartridge is properly capped or stored according to its instructions to prevent drying. Store the printer in its protective case in a cool, dry environment.
8. Troubleshooting
Refer to the table below for common issues and their potential solutions.
| Problem | Possible Cause | Solution |
|---|---|---|
| No power/Printer won't turn on | Low battery; Power button not pressed correctly; Faulty charger | Charge the battery; Press and hold the power button firmly; Try a different power outlet or charger |
| Poor print quality (faded, streaky) | Low ink; Clogged print head; Incorrect print settings; Dirty printing surface | Replace ink cartridge; Clean print head (refer to Section 7); Adjust print density/speed; Clean the printing surface |
| Printer not printing | Ink cartridge not installed correctly; Print trigger not activated; Error message on screen | Reinstall ink cartridge; Ensure print trigger is pressed during movement; Refer to on-screen error codes for specific instructions |
| Ink smudging | Printing too fast; Surface not suitable for ink; Ink not dry | Reduce print speed; Ensure surface is clean and dry; Allow adequate drying time for ink |
9. Specifications
Detailed technical specifications for the ReliPrint U160Pro Handheld Inkjet Printer.
| Feature | Specification |
|---|---|
| Model Number | U160Pro |
| Brand | ReliPrint |
| Product Dimensions | 14 x 10 x 7 inches (35.56 x 25.4 x 17.78 cm) |
| Item Weight | 4.4 pounds (2 kg) |
| Manufacturer | Printer Spare Parts |
| Compatible Devices | Printer (for ink cartridges) |
| Printing Technology | Inkjet, 16 Dots |
| Typical Applications | Steel Pipe, Industrial Concrete, various surfaces |
10. Warranty and Support
For warranty information, technical support, or service inquiries, please refer to the warranty card included with your product or contact your authorized ReliPrint dealer or customer service. Please have your product model number (U160Pro) and purchase details ready when contacting support.