1. Important Safety Instructions
Please read all instructions carefully before using your Xlife Cordless Vacuum Cleaner P12. Retain this manual for future reference.
General Safety
- Do not use outdoors or on wet surfaces.
- Do not allow to be used as a toy. Close attention is necessary when used by or near children.
- Use only as described in this manual. Use only manufacturer's recommended attachments.
- Do not use with damaged cord or plug. If appliance is not working as it should, has been dropped, damaged, left outdoors, or dropped into water, return it to a service center.
- Do not pull or carry by cord, use cord as a handle, close a door on cord, or pull cord around sharp edges or corners. Do not run appliance over cord. Keep cord away from heated surfaces.
- Do not unplug by pulling on cord. To unplug, grasp the plug, not the cord.
- Do not handle plug or appliance with wet hands.
- Do not put any object into openings. Do not use with any opening blocked; keep free of dust, lint, hair, and anything that may reduce airflow.
- Keep hair, loose clothing, fingers, and all parts of body away from openings and moving parts.
- Turn off all controls before unplugging.
- Use extra care when cleaning on stairs.
- Do not use to pick up flammable or combustible liquids, such as gasoline, or use in areas where they may be present.
- Do not pick up anything that is burning or smoking, such as cigarettes, matches, or hot ashes.
Battery and Charging Safety
- Recharge only with the charger specified by the manufacturer. A charger that is suitable for one type of battery pack may create a risk of fire when used with another battery pack.
- Use appliances only with specifically designated battery packs. Use of any other battery packs may create a risk of injury and fire.
- When battery pack is not in use, keep it away from other metal objects, like paper clips, coins, keys, nails, screws or other small metal objects, that can make a connection from one terminal to another. Shorting the battery terminals together may cause burns or a fire.
- Under abusive conditions, liquid may be ejected from the battery; avoid contact. If contact accidentally occurs, flush with water. If liquid contacts eyes, additionally seek medical help. Liquid ejected from the battery may cause irritation or burns.
2. Product Overview
The Xlife P12 Cordless Vacuum Cleaner is designed for efficient and versatile cleaning across various surfaces. Familiarize yourself with its components and key features.
Included Components
- Adjustable Extension Stick
- Vacuum Head (Main Brush)
- HEPA Filter (pre-installed)
- 2-in-1 Tool (Crevice and Brush)
- Long Crevice Tool
- Wall Mount
- Power Adapter
- User Manual

Figure 2.1: Xlife P12 Cordless Vacuum Cleaner with all components, including the main unit, extension wand, floor brush, and various attachments.
Key Features
- 4-Smart Suction Modes & 48KPa HyperPower: Customize cleaning with Eco, Normal, Sport, and Turbo modes for different floor types and debris levels.
- 50min Extended Runtime & Swappable Battery: Provides up to 50 minutes of continuous cleaning on standard mode, with a detachable battery for convenient charging and potential unlimited runtime with spare batteries.
- GreenLight Dust Reveal Technology: A patented green beam illuminates invisible particles on floors, aiding in thorough cleaning, especially for pet owners and allergy sufferers.
- V-Shape Anti-Tangle Roller System: Designed to repel pet and human hair wrap, reducing maintenance time.
- 180° Agile Swivel & Height-Adjustable Tube: The pivoting head allows easy maneuverability under furniture, and the extendable handle adjusts for user comfort.
- One-Touch Hygienic Dustbin Emptying: Allows for sealed-container ejection of debris directly into the trash without hand contact.
- 7-Stage HEPA Medical-Grade Filtration: Traps 99.97% of particles down to 0.3µm, including pollen, mold, and pet dander, for improved air quality.
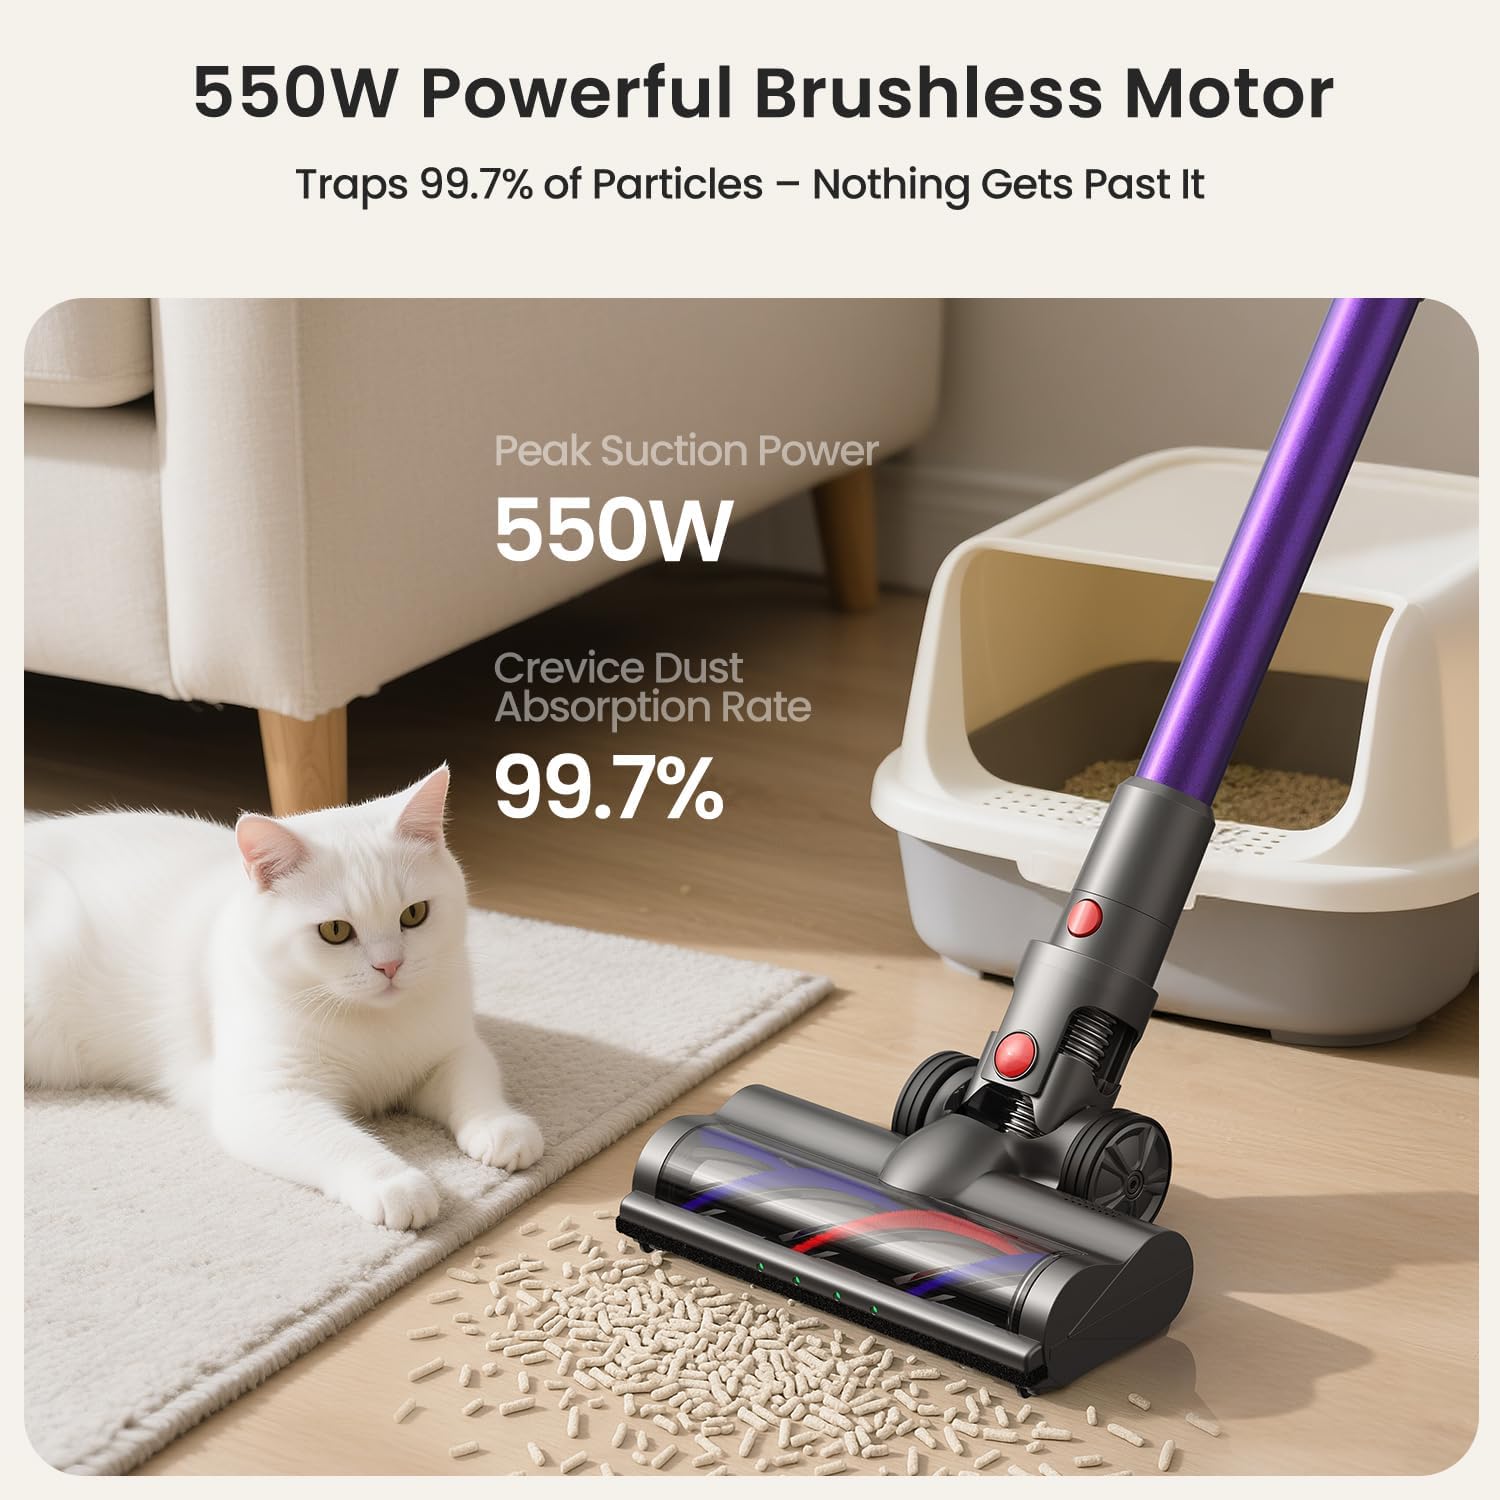
Figure 2.2: The 550W powerful brushless motor ensures efficient dust absorption.
3. Setup
Follow these steps to assemble and prepare your Xlife P12 Cordless Vacuum Cleaner for first use.
Assembly
- Attach the Extension Stick: Insert the adjustable extension stick into the main vacuum body until it clicks securely into place.
- Attach the Vacuum Head: Connect the vacuum head (main brush) to the bottom of the extension stick, ensuring it locks firmly.
- Install Battery: Ensure the battery pack is fully inserted into the main vacuum body until it clicks.
Initial Charging
Before first use, fully charge the battery. The battery charges in approximately 4.5 hours.
- Connect the power adapter to the charging port on the battery or the wall mount.
- Plug the adapter into a power outlet.
- The battery indicator lights will show charging status. Once fully charged, the lights will indicate completion.
Wall Mount Installation (Optional)
The included wall mount provides a convenient storage and charging solution.
- Choose a suitable location near a power outlet.
- Mark the drilling points for the wall mount.
- Drill holes and insert wall anchors if necessary.
- Secure the wall mount to the wall using the provided screws.
- Hang the vacuum cleaner on the wall mount for storage and charging.

Figure 3.1: The vacuum features one-touch dust emptying and a convenient wall-mountable charging station.
4. Operating the Vacuum Cleaner
Learn how to effectively use your Xlife P12 for various cleaning tasks.
Powering On/Off
- To turn on, press the power button located on the main unit handle.
- To turn off, press the power button again.
Selecting Suction Modes
The Xlife P12 offers four suction modes to optimize cleaning for different needs:
- Eco Mode (Low): Ideal for light dust on hardwood or tile floors, maximizing runtime up to 50 minutes.
- Normal Mode (Medium): Balances power and runtime for low-pile carpets and general debris.
- Sport Mode (High): Provides deeper cleaning for carpets, effective against ground-in dirt.
- Turbo Mode (Max): Delivers 48KPa cyclone force for embedded pet hair and stubborn dirt, with a runtime of approximately 15 minutes.
Press the mode selection button on the display to cycle through the available suction modes.

Figure 4.1: The vacuum's green light illuminates dust, and the display shows current suction power.
Adjustable Stick and Maneuverability
The adjustable extension stick allows you to customize the vacuum's height for comfortable use, accommodating users up to 6'4". The 180° pivoting head enables seamless cleaning under furniture and around obstacles.

Figure 4.2: Flexible maneuverability and green light detection help reach every corner.
Using Attachments
The Xlife P12 comes with versatile attachments for different cleaning scenarios:
- 2-in-1 Tool: Use the brush for dusting surfaces like shelves and upholstery, and the crevice tool for tight spaces.
- Long Crevice Tool: Ideal for reaching narrow gaps, corners, and car interiors.
To attach, simply remove the extension stick or main vacuum head and insert the desired attachment until it clicks.
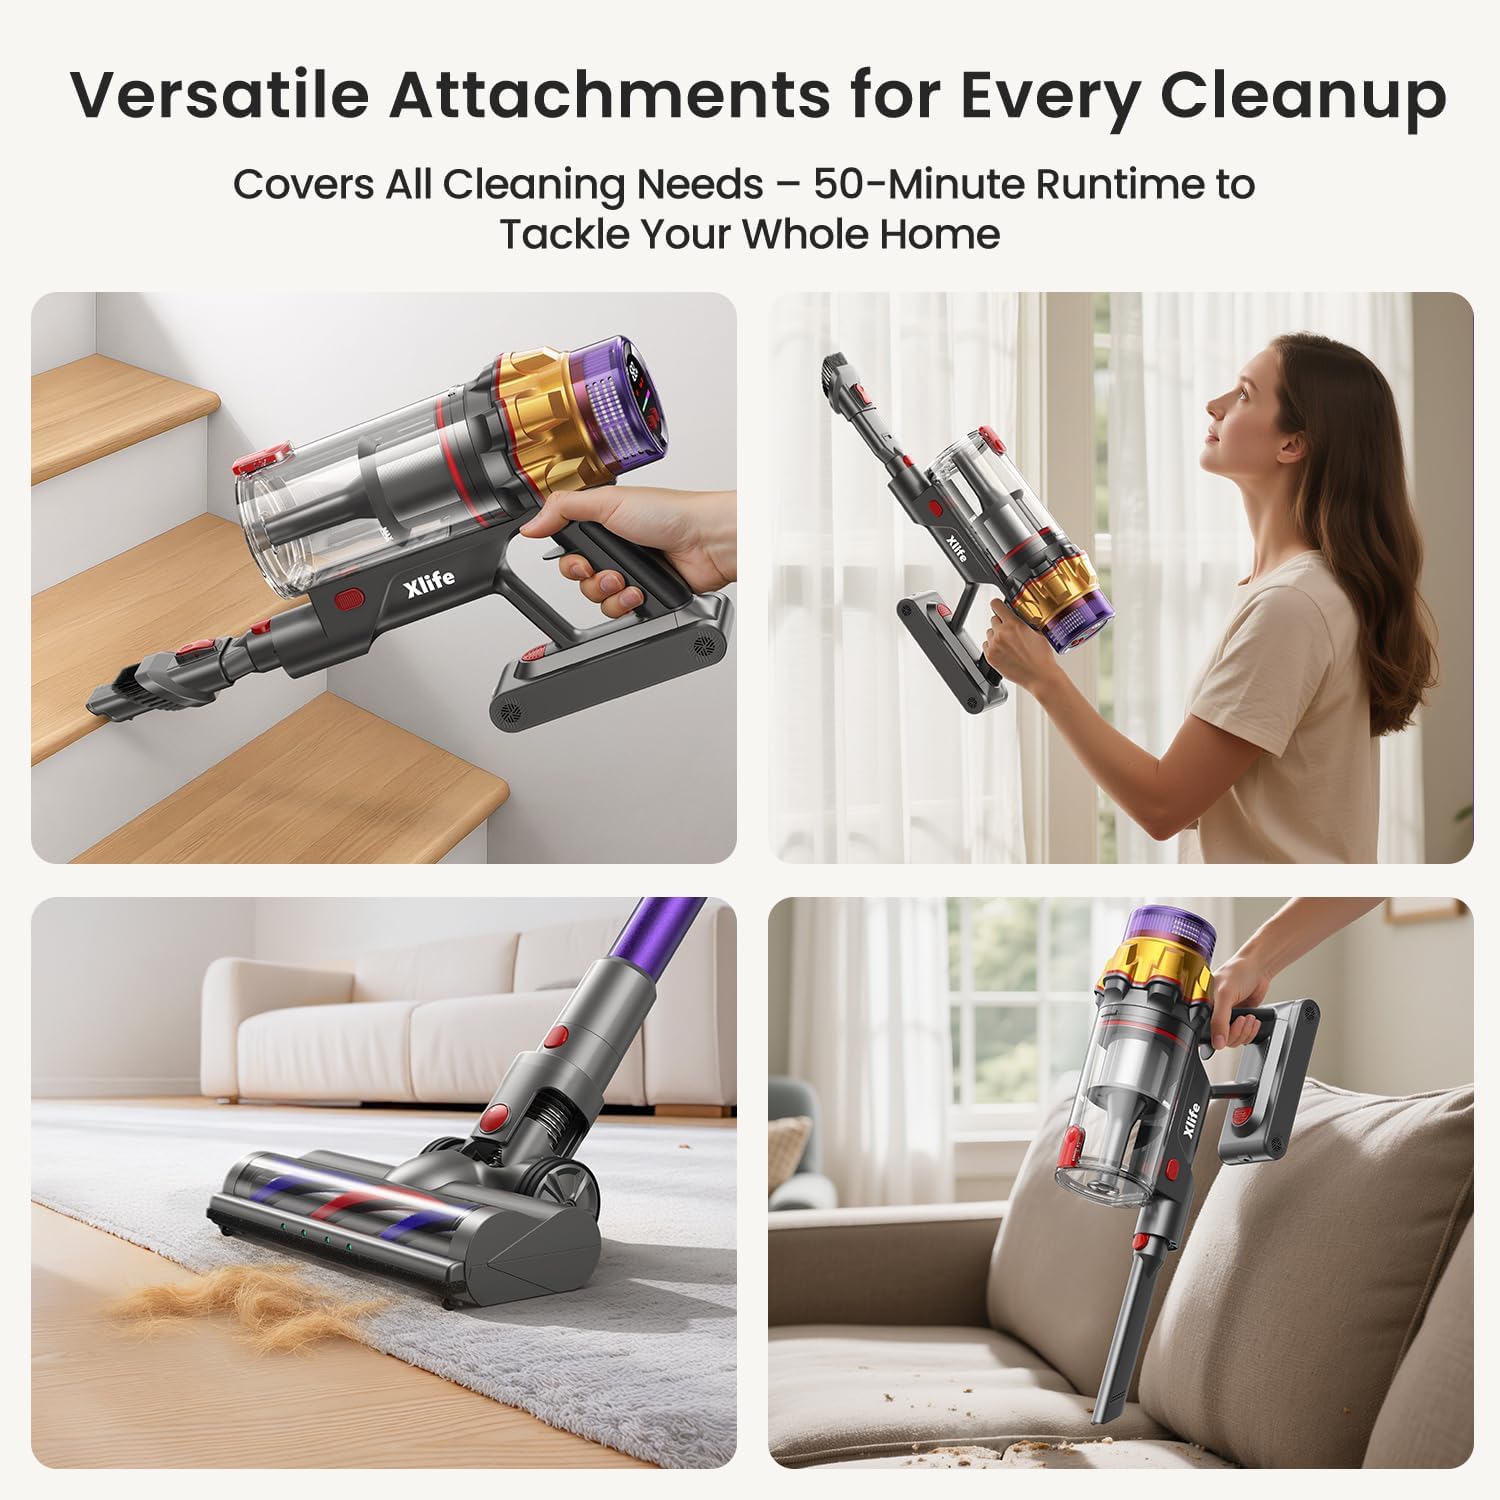
Figure 4.3: The vacuum can be configured for various cleaning tasks, including handheld for stairs and upholstery.
5. Maintenance
Regular maintenance ensures optimal performance and extends the lifespan of your Xlife P12 Cordless Vacuum Cleaner.
Emptying the Dustbin
Empty the 0.8L dustbin regularly, especially when it reaches the MAX fill line, to maintain suction power.
- Hold the main unit over a trash can.
- Press the one-touch release button on the dustbin. The bottom flap will open, allowing debris to fall out without direct hand contact.
- Close the dustbin flap securely after emptying.
Cleaning the Filter
The 7-stage HEPA filtration system requires periodic cleaning to prevent loss of suction and maintain air quality.
- Twist and remove the dustbin from the main unit.
- Carefully remove the HEPA filter and pre-filter components.
- Tap the filters gently over a trash can to remove loose dust.
- If necessary, rinse the filters under cold running water. Ensure they are completely dry (allow 24-48 hours) before reassembling. Do not use detergent or hot water.
- Reassemble the filters and dustbin in reverse order.
Cleaning the Brush Roller
The V-shape anti-tangle roller system minimizes hair wrap, but occasional cleaning may still be necessary.
- Turn off the vacuum and detach the main vacuum head.
- Locate the brush roller release mechanism (usually a latch or button) on the side of the vacuum head.
- Remove the brush roller.
- Use scissors or a cleaning tool to cut and remove any tangled hair or debris from the brush roller.
- Reinsert the brush roller and secure the release mechanism.

Figure 5.1: The V-shaped brush design helps prevent hair tangles, reducing maintenance.
Battery Care
- Always use the original Xlife charger.
- Do not expose the battery to extreme temperatures.
- If storing the vacuum for an extended period, charge the battery to about 50% and store in a cool, dry place.
6. Troubleshooting
Refer to this section for common issues and their solutions.
| Problem | Possible Cause | Solution |
|---|---|---|
| Vacuum does not turn on. | Battery is not charged or not properly installed. | Ensure battery is fully charged and securely clicked into place. |
| Low suction power. | Dustbin is full. Filter is clogged. Obstruction in nozzle or hose. | Empty dustbin. Clean HEPA filter. Check for and remove any blockages. |
| Brush roller not spinning. | Hair or debris tangled in brush. Brush roller not properly installed. | Clean brush roller of tangled hair. Ensure brush roller is correctly reinserted. |
| Short runtime. | Battery not fully charged. Using Turbo mode excessively. | Fully charge battery. Use lower suction modes for longer cleaning sessions. |
| Vacuum makes unusual noise. | Obstruction in airflow path. Damaged component. | Check for and remove any blockages. If noise persists, contact customer support. |
7. Specifications
Detailed technical specifications for the Xlife P12 Cordless Vacuum Cleaner.
| Specification | Detail |
|---|---|
| Brand | Xlife |
| Model Name | Cordless Stick Vacuum P12 |
| Wattage | 550 watts |
| Suction Power | Up to 48KPa (Turbo Mode) |
| Runtime | Up to 50 minutes (Eco Mode) |
| Charging Time | Approx. 4.5 hours |
| Dustbin Capacity | 0.8 Liters |
| Filter Type | 7-Stage HEPA Filter |
| Noise Level | 68 dB |
| Product Dimensions | 11"L x 7.28"W x 45.9"H |
| Item Weight | 5.5 pounds |
| Battery Type | Lithium-Ion |
| Number of Speeds | 4 |
| Special Features | Cordless, High Power, Lightweight, Pet Hair Tool, Green Light Dust Detection, Adjustable Stick |

Figure 7.1: Battery runtime and charging duration details.
8. Warranty and Support
For warranty information and customer support, please refer to the official Xlife website or contact their customer service directly.
You can also find a downloadable PDF version of this user manual here: Xlife P12 User Manual (PDF)


