
ViewSonic LS950WU
ViewSonic LS950WU Laser Projector User Manual
Model: LS950WU
1. Introduction
The ViewSonic LS950WU is a high-performance laser projector designed for large venues and professional applications. It combines powerful laser projection with flexible installation options and durable technology. With its impressive 7100 ANSI lumens brightness, native WUXGA (1920 x 1200) resolution, and advanced DLP technology, the LS950WU ensures sharp, vivid, and high-contrast images even in brightly lit environments.
This projector supports modern image formats, offers a wide range of professional installation features, and incorporates innovative control functions, making it an ideal choice for businesses, educational institutions, and creative installations.

Figure 1.1: ViewSonic LS950WU Laser Projector, showcasing its sleek design and front lens.
2. Important Safety Instructions
Please read all instructions carefully before operating the projector. Keep this manual for future reference.
- Power Source: Only use the power cord supplied with the projector. Connect to a grounded power outlet.
- Ventilation: Do not block ventilation openings. Ensure adequate space around the projector for proper airflow to prevent overheating.
- Heat: The projector generates heat during operation. Do not place it near heat sources or in direct sunlight.
- Moisture: Do not expose the projector to rain, moisture, or excessive humidity. Do not place objects filled with liquids on or near the projector.
- Cleaning: Unplug the projector from the power outlet before cleaning. Use a soft, dry cloth. Do not use liquid or aerosol cleaners.
- Laser Safety: Do not look directly into the projector lens when the laser light source is active. Avoid direct eye exposure to the laser beam.
- Servicing: Do not attempt to service this product yourself. Refer all servicing to qualified service personnel.

Figure 2.1: Side view of the projector highlighting the ventilation grilles, crucial for heat dissipation.
3. Package Contents
Carefully unpack the box and ensure all items listed below are present and undamaged. If any items are missing or damaged, contact your dealer immediately.
- ViewSonic LS950WU Laser Projector Unit
- Power Cord
- Remote Control
- Batteries for Remote Control (if included)
- Quick Start Guide
- Warranty Card (region dependent)
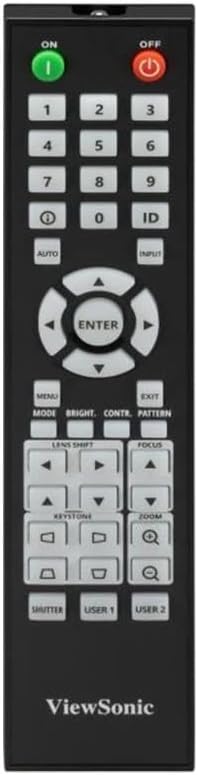
Figure 3.1: The included remote control for operating the projector.
4. Setup
4.1 Projector Placement
The LS950WU can be placed on a table, mounted on the ceiling, or used for rear projection. Ensure the projector is placed on a stable, level surface or securely mounted.
- Dimensions: 43.3 cm (W) x 48.6 cm (D) x 18.6 cm (H)
- Weight: 12.8 kg
- Maintain adequate clearance around the projector for ventilation (at least 30 cm from walls).
4.2 Connecting Power
- Connect the power cord to the projector's AC inlet.
- Plug the other end of the power cord into a grounded electrical outlet.
- Ensure the power switch on the projector (if present) is in the OFF position before connecting.
4.3 Connecting Video Sources
The LS950WU offers various input ports for connecting different video sources.

Figure 4.1: Rear panel of the projector displaying various input and output ports, including HDMI, VGA, and control ports.
- HDMI: Connect HDMI cables from your computer, Blu-ray player, or other HDMI-enabled devices to the HDMI input ports on the projector.
- VGA (Computer In): Use a VGA cable to connect your computer's VGA output to the projector's "COMPUTER IN" port.
- Audio: Connect audio cables to the "AUDIO IN" ports if using analog audio sources.
- Control Ports: Utilize the LAN (RJ45) or RS232 ports for network control and integration into professional AV systems.
5. Operating the Projector
5.1 Powering On/Off
- Power On: Press the ON button on the remote control or the power button on the projector's control panel. The power indicator light will turn on.
- Power Off: Press the OFF button on the remote control or the power button on the projector's control panel. Confirm shutdown if prompted.
5.2 Input Source Selection
To switch between connected devices, press the INPUT button on the remote control or the projector's control panel, then navigate to select the desired source (e.g., HDMI1, VGA).
5.3 Image Adjustments
- Focus: Use the FOCUS buttons on the remote control to sharpen the image.
- Zoom: Use the ZOOM buttons to adjust the image size.
- Keystone Correction: If the image appears trapezoidal, use the KEYSTONE buttons to correct it. The projector supports horizontal/vertical keystone and 4-corner adjustment.
- Lens Shift: For precise image positioning without moving the projector, use the LENS SHIFT controls.
- Aspect Ratio: The projector supports 16:10 native aspect ratio and is compatible with 21:9, ideal for wide-screen content. Adjust this setting in the OSD menu.

Figure 5.1: Front view of the projector, showing the lens and control panel area.
6. Maintenance
Regular maintenance helps ensure optimal performance and extends the lifespan of your projector.
6.1 Cleaning the Projector
- Exterior: Wipe the projector casing with a soft, dry, lint-free cloth. Do not use abrasive cleaners, waxes, or solvents.
- Lens: Gently clean the lens with a lens cleaning cloth or lens paper. Avoid touching the lens directly with your fingers.
- Air Vents: Periodically check and clean the air vents to prevent dust buildup, which can impede airflow and cause overheating. Use a soft brush or compressed air.
6.2 Light Source Life
The LS950WU utilizes a laser-phosphor light source (2nd generation) with an estimated lifespan of up to 30,000 hours in SuperEco mode, significantly reducing maintenance requirements compared to traditional lamp-based projectors.
7. Troubleshooting
If you encounter issues with your projector, refer to the following common problems and solutions.
| Problem | Possible Cause | Solution |
|---|---|---|
| No image on screen |
|
|
| Image is blurry |
|
|
| Image is distorted (trapezoid) |
|
|
| No sound |
|
|
8. Technical Specifications
| Brand | ViewSonic |
| Model Number | LS950WU |
| Product Dimensions | 43.3 x 48.6 x 18.6 cm |
| Product Weight | 12.8 kg |
| Native Resolution | WUXGA (1920 x 1200) |
| Brightness | 7100 ANSI Lumens (7300 central lumens) |
| Contrast Ratio | 3,000,000:1 |
| Projection Size | Up to 300 inches |
| Aspect Ratio | 16:10 (compatible with 21:9) |
| Display Technology | 0.67" DMD chip, DLP |
| Color Representation | 1.07 Billion Colors |
| Light Source | Laser-Phosphor (2nd Generation) |
| Light Source Life | Up to 30,000 hours (SuperEco mode) |
| Keystone Correction | Horizontal/Vertical, 4-Corner Adjustment |
| Projection Features | 360° Rotatable, Vertical Mode (90°) |
| ASIN | B0FCFPNP5J |
9. Warranty and Support
For detailed warranty information, please refer to the warranty card included in your product package or visit the official ViewSonic website.
For technical support, product registration, or service inquiries, please contact ViewSonic customer support through their official channels.
Online Resources:
Related documentsLS950WU


Ask a question about this manual
Ask about setup, troubleshooting, compatibility, parts, safety, or missing instructions. Manuals+ will review the question and use this page’s manual context to help answer it.