1. Introduction
This manual provides essential information for the installation, operation, and maintenance of your Wiltec NW-SOFT-C1 water softener. This device is designed to effectively reduce water hardness by eliminating limescale, thereby protecting your plumbing and household appliances. It operates on an ion exchange principle, replacing calcium and magnesium ions with sodium ions, which helps prevent limescale buildup on heating elements and improves water quality for various uses, including cooking, showering, and appliance operation. The system features automatic resin regeneration, simplifying maintenance.
2. Safety Information
- Read all instructions carefully before installation and operation.
- Ensure the device is installed by a qualified professional if you are unsure about any steps.
- Always disconnect the power supply before performing any maintenance or service.
- Do not operate the device if any parts are damaged. Contact customer support for replacement parts.
- Use only regeneration salt specifically designed for water softeners.
- Keep children and pets away from the device during operation and maintenance.
3. Package Contents
Please check that all items are present in the package:
- Wiltec NW-SOFT-C1 Water Softener Unit
- Brine Tank
- Necessary accessories for installation (e.g., connection fittings, clips)
- User Manual (this document)
4. Product Overview
The Wiltec NW-SOFT-C1 water softener is a compact unit designed for efficient water treatment. Below are key components and dimensions.
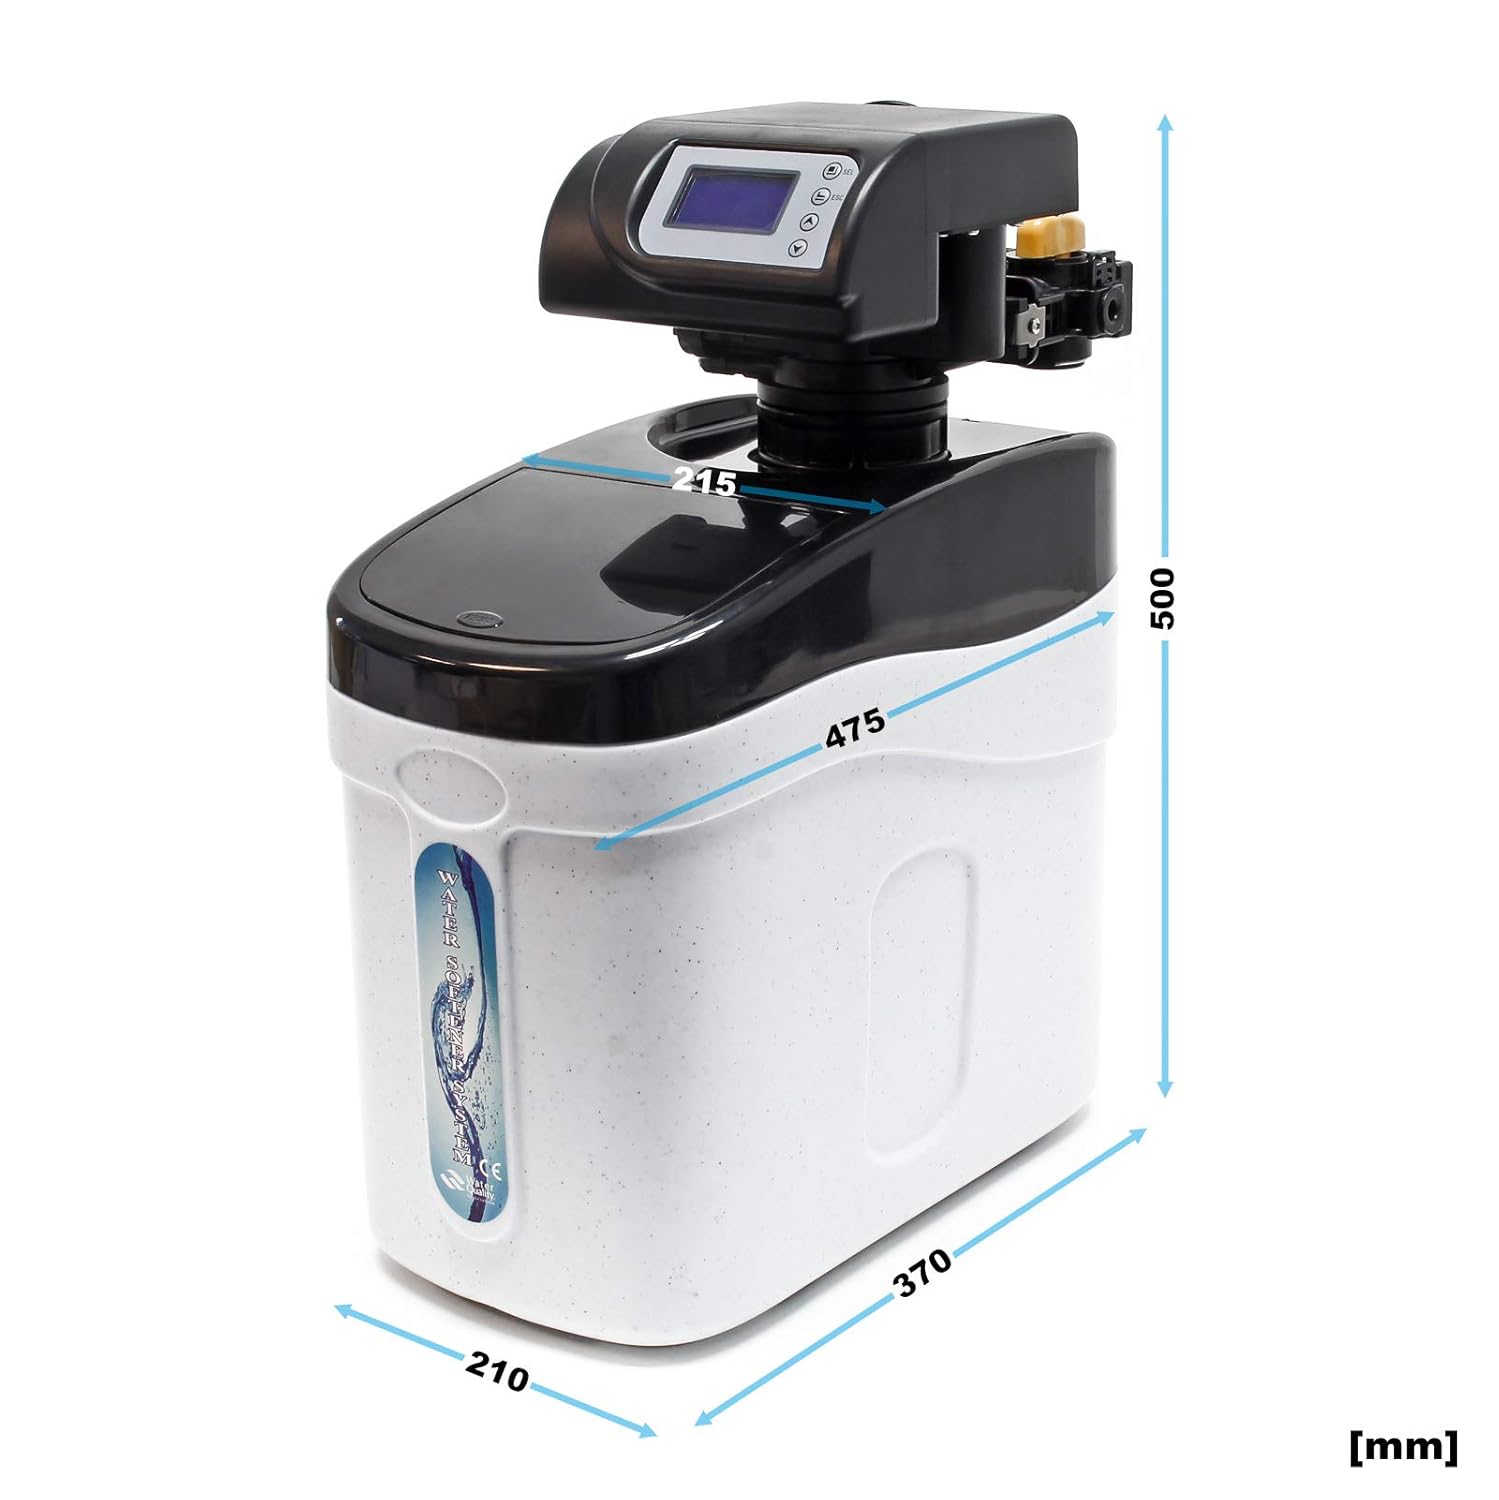
Figure 1: Overall dimensions of the Wiltec NW-SOFT-C1 water softener. The unit measures approximately 215mm in width, 475mm in depth, and 500mm in height.

Figure 2: Internal view of the brine tank, showing the space for regeneration salt. The internal dimensions are approximately 120mm by 175mm.

Figure 3: Side view of the water softener, highlighting the outlet pipe with a diameter of 14mm and a height of 400mm from the base.

Figure 4: Diagram explaining the ion exchange process. Hardness ions (Ca2+, Mg2+) are captured by the resin, and sodium ions (Na+) are released into the water, making it soft.

Figure 5: Detailed cross-section diagram showing the internal components of the water softener, including the automatic central control valve, brine hose, safety brine valve, float, pressure tank, suction lance, exchange resin, regenerated brine salt, softened water outlet, and cabinet container.
5. Setup and Installation
Proper installation is crucial for the optimal performance of your water softener. It is recommended to install the unit in a dry, level area, protected from freezing temperatures and direct sunlight.
5.1 Connection Diagram
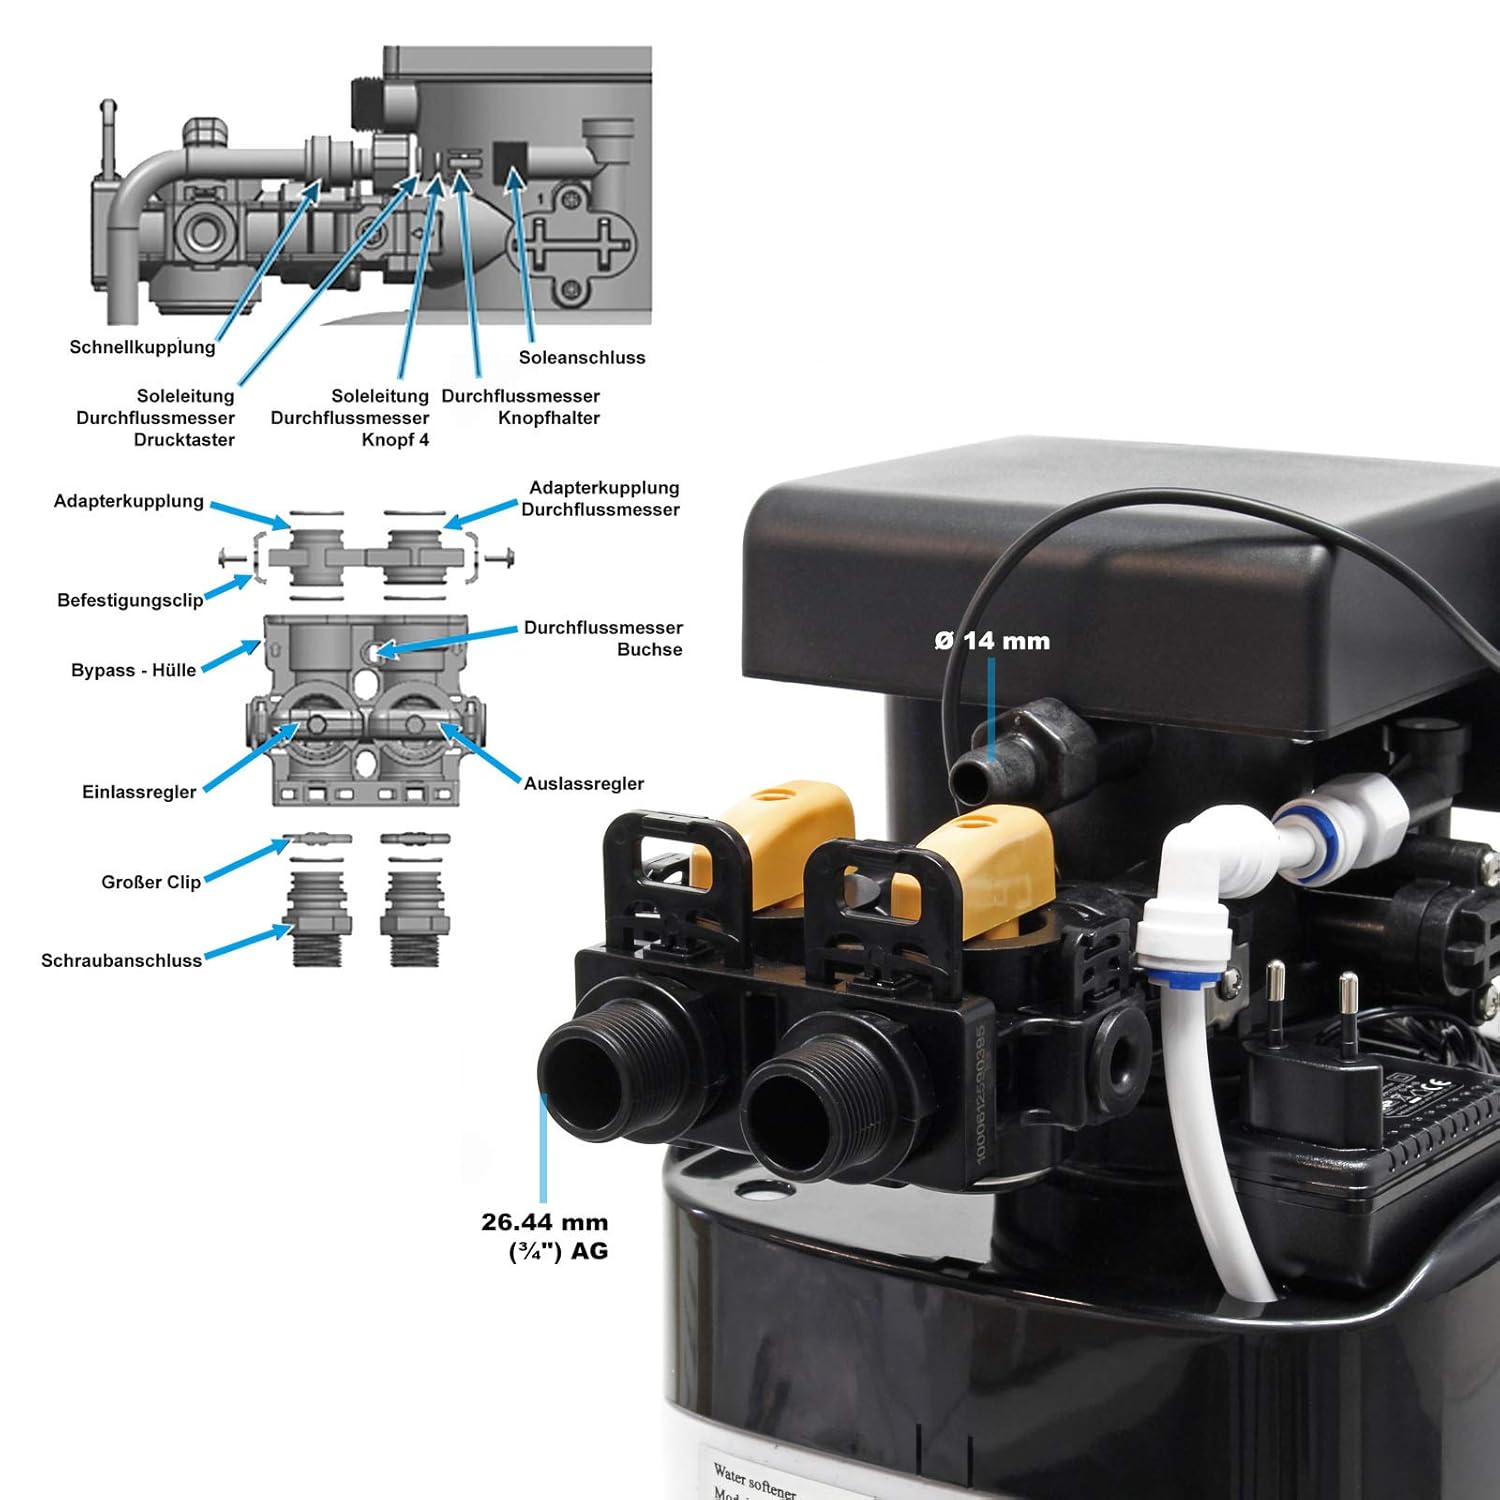
Figure 6: Connection diagram showing the various components and their assembly. This includes quick couplings, brine line, pressure button, adapter couplings, fastening clips, bypass housing, inlet regulator, outlet regulator, large clip, and screw connection. The main connections are 26.44 mm (3/4") AG.
5.2 Installation Steps (General Guidelines)
- Positioning: Place the water softener on a stable, level surface near the main water supply and a drain. Ensure adequate space for maintenance and salt refilling.
- Plumbing Connections: Connect the main water inlet to the softener's inlet and the softener's outlet to your household's water distribution system. Use the provided fittings and ensure all connections are watertight. A bypass valve system is recommended to allow for maintenance without interrupting the main water supply.
- Drain Line: Connect the drain line from the softener to an appropriate drain, ensuring there is an air gap to prevent back-siphonage.
- Brine Line: Connect the brine line from the control valve to the brine tank.
- Electrical Connection: Plug the power cord into a grounded electrical outlet.
- Initial Fill: Slowly open the main water supply valve to fill the softener with water. Check for leaks.
6. Operating Instructions
The Wiltec NW-SOFT-C1 features automatic operation once initial settings are configured.
6.1 Initial Setup and Hardness Setting
- Power On: Once installed and filled with water, connect the power. The control panel will illuminate.
- Set Water Hardness: Use the control panel to set the initial water hardness level. Refer to your local water utility for this information. This setting is crucial for the softener to calculate regeneration cycles accurately.
- Time Setting: Set the current time of day on the control panel.
- Regeneration Cycle: The system will automatically initiate regeneration cycles based on water usage and the set hardness level.
6.2 Ion Exchange Process
The softener uses a resin bed to remove hardness minerals (calcium and magnesium) from your water. As water passes through the resin, these minerals are exchanged for sodium ions. Over time, the resin becomes saturated with hardness minerals and needs to be regenerated.
6.3 Automatic Regeneration
When the resin bed reaches its capacity, the control unit automatically initiates a regeneration cycle. During this cycle, a brine solution (saltwater) from the brine tank is drawn through the resin bed. This brine solution flushes the accumulated hardness minerals from the resin, which are then sent to the drain. The resin is recharged with sodium ions, restoring its softening capacity. The regeneration process typically takes about 30 minutes.
7. Maintenance
Regular maintenance ensures the longevity and efficiency of your water softener.
7.1 Salt Refilling
The brine tank must always contain enough salt for regeneration. Check the salt level regularly (e.g., monthly). When the salt level drops below one-quarter full, refill the tank with water softener salt. Use only high-quality salt pellets or crystals designed for water softeners.
7.2 Resin Cleaning (Automatic)
The NW-SOFT-C1 features an automatic self-cleaning system for the resin, which prevents fouling and extends the life of the installation. The integrated electrolysis produces automatic cleaning, ensuring prolonged efficiency without manual washing.
7.3 General Cleaning
Wipe the exterior of the unit with a damp cloth as needed. Do not use abrasive cleaners or solvents.
8. Troubleshooting
This section addresses common issues you might encounter with your water softener.
- Water is still hard:
- Check salt level in the brine tank. Refill if necessary.
- Ensure the initial water hardness setting on the control panel is correct.
- Verify that the bypass valve is not fully open, allowing untreated water to bypass the softener. Adjust if needed to achieve desired hardness (e.g., 5-8 °f).
- Check for any blockages in the brine line or drain line.
- Excessive salt consumption:
- Review the water hardness setting; it might be set too high.
- Check for leaks in the brine tank or lines.
- Control panel display issues (e.g., incorrect language):
- Consult the detailed manual (if available online) for specific instructions on changing language settings, as generic manuals may not cover this.
- Water pressure drop:
- Check for sediment buildup in the pre-filter (if installed) or the softener's inlet.
- Ensure all valves are fully open.
If problems persist, contact Wiltec customer support.
9. Specifications
Technical data for the Wiltec NW-SOFT-C1 water softener.

Figure 7: Technical information table for various Wiltec water softener models, including the NW-SOFT-C1.
| Feature | Specification |
|---|---|
| Manufacturer | WilTec |
| Model Reference | 52360 |
| Dimensions (L x W x H) | 21.5L x 47.5W x 50H cm |
| Flow Rate | 500 Liters per hour |
| Material | Magnesium, Resin |
| Power Source | Electric Cable |
| Installation Method | Freestanding |
| Purification Method | Ion Exchange |
| Special Feature | Automatic regeneration of exchange resin |
| Weight | 10.5 Kilograms |
| Min. Pressure | 1.0 bar |
| Max. Pressure | 6.0 bar |
| Salt Consumption per Regeneration | 0.8 kg |
| Regeneration Time | 30 min |
10. Warranty and Support
For warranty information, please refer to the terms and conditions provided at the time of purchase or visit the official Wiltec website. For technical support, spare parts, or any inquiries not covered in this manual, please contact Wiltec customer service.
Wiltec Wildanger Technik GmbH
(Contact details typically found on product packaging or official website)


