
YESWELDER MIG-140DS PRO
Contents
YESWELDER MIG-140DS PRO Multiprocess Welder Instruction Manual
Model: MIG-140DS PRO
1. Product Overview
The YESWELDER MIG-140DS PRO is a versatile 4-in-1 multiprocess welding machine designed for various welding applications. It supports Gas MIG, Flux Core MIG (gasless), Lift TIG, and Stick welding modes. This unit operates on dual voltage (110V/220V) and provides a robust 140 Amp output, making it suitable for welding both thin and thick materials such as carbon steel and stainless steel.
Key features include synergic MIG functionality for simplified settings, manual MIG control for experienced users, and an advanced digital display for clear monitoring of welding parameters.

Image: The YESWELDER MIG-140DS PRO welding machine with its MIG torch, ground clamp, and electrode holder.

Image: Visual representation of the four welding processes supported by the MIG-140DS PRO: Gas MIG, Flux Core Welding, Stick Welding, and Lift TIG Welding.
Machine Components

Image: Diagram illustrating the main components of the MIG-140DS PRO, including the digital panel, MIG torch, output terminals, input power cable, gas inlet, power switch, ground screw, and fan.
The machine features a compact design, weighing approximately 13.0 lbs, with dimensions of 11.2" x 5.9" x 15.3", making it portable for various work environments.

Image: The MIG-140DS PRO welder highlighting its compact size and weight for portability.
2. Safety Information
Always prioritize safety when operating welding equipment. The MIG-140DS PRO includes several built-in safety features:
- Overheating Protection: Automatic shutdown if the unit overheats.
- Overload Protection: Automatic shutdown system to prevent damage from excessive load.
- Electrostatic Protection: Unique coating to prevent shock transfer.
- Water Rating: IP21 protection for resistance against dripping water.
Always wear appropriate personal protective equipment (PPE), including a welding helmet, gloves, and protective clothing. Ensure adequate ventilation in your work area.

Image: Diagram illustrating the safety features of the MIG-140DS PRO, including protection against overheating, overload, electrostatic discharge, and its IP21 water rating.
3. Setup and Installation
Before operating the welder, ensure all connections are secure and correct for the desired welding process.
Power Connection
The MIG-140DS PRO supports dual voltage input (110V/220V). Use the appropriate power cord and adapter for your power supply. Ensure the power source meets the welder's requirements as detailed in the specifications section.
Wire Spool Installation
The welder accommodates a 2lb welding wire spool (4" diameter). Open the side panel to access the wire feed mechanism. Install the wire spool, ensuring the wire feeds smoothly through the drive roller and into the MIG gun liner.
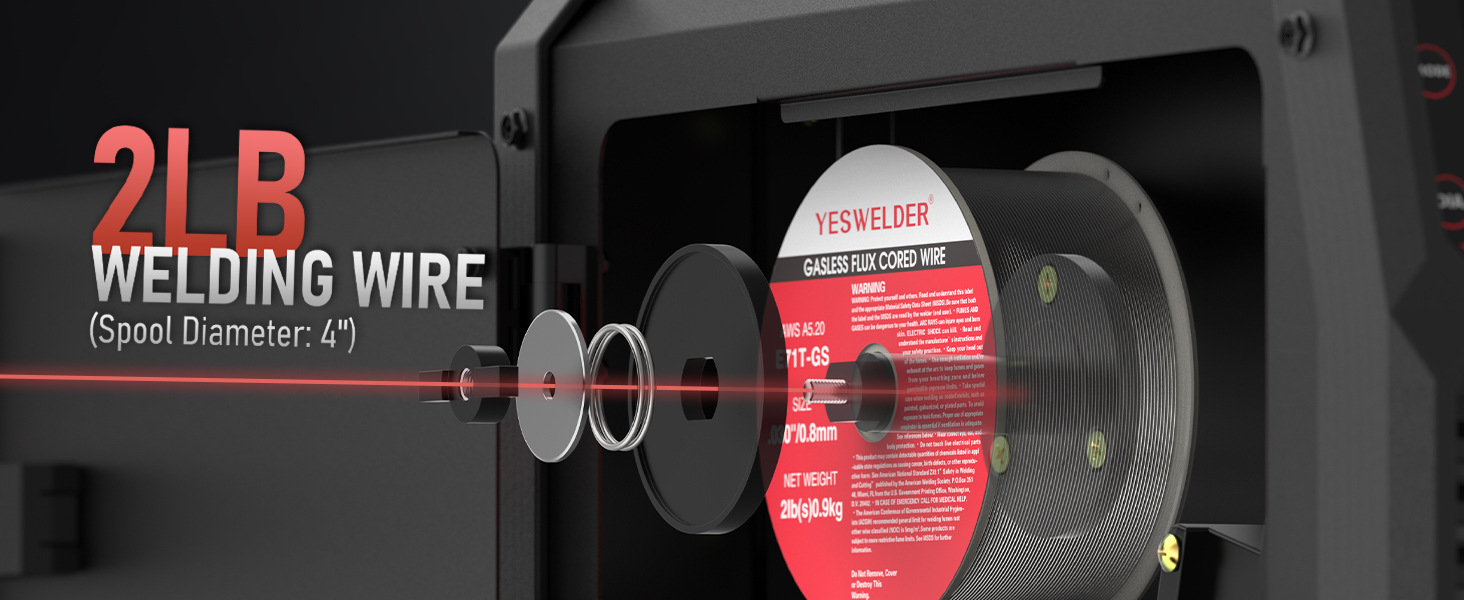
Image: Illustration demonstrating the correct installation of a 2lb welding wire spool inside the welder's wire feed compartment.
Welding Process Connections
Refer to the following diagrams for connecting accessories for each welding mode:
Flux Welding Installation

Image: Diagram showing connections for Flux Core welding: MIG/Flux torch, work clamp, and torch terminal.
MIG Welding Installation

Image: Diagram showing connections for Gas MIG welding: MIG/Flux torch, torch terminal, and work clamp. Requires connection to electric welded gas cylinders.
TIG Welding Installation

Image: Diagram showing connections for Lift TIG welding: work clamp and TIG torch. Requires connection to electric welded gas cylinders.
Stick Welding Installation

Image: Diagram showing connections for Stick welding: electrode holder and work clamp.
4. Operating Instructions
Familiarize yourself with the control panel before beginning any welding operation.
Control Panel Introduction

Image: Detailed view of the MIG-140DS PRO control panel, labeling the Gas Selector Button, Weld Mode Button, Wire Diameter Button, 2T/4T Button, Feed Wire Button, Left Value Knob/Button, Right Value Knob/Button, and Digital Panel.
- Gas Selector Button: Selects between gas and gasless operation.
- Weld Mode Button: Cycles through Stick, Manual MIG, Synergic MIG, and Lift TIG modes.
- Wire Diameter Button: Adjusts settings based on the welding wire diameter.
- 2T/4T Button: Toggles between 2-touch and 4-touch trigger modes for MIG welding.
- Feed Wire Button: Manually feeds welding wire.
- Left Value Knob/Button: Adjusts the left displayed parameter (e.g., amperage).
- Right Value Knob/Button: Adjusts the right displayed parameter (e.g., voltage).
- Digital Panel: Displays current welding parameters and settings.
Synergic MIG Operation
In Synergic MIG mode, the wire feeding speed is adjustable (Min: 80 in/min; Max: 600 in/min). When adjusting the wire feeding speed, the voltage will automatically match a recommended value. You can fine-tune the voltage between -3V and +3V from the automatically set value. This mode simplifies setup for beginners.
Manual MIG Operation
For experienced users, Manual MIG mode allows independent adjustment of both wire feeding speed and voltage, providing greater control over the welding process.
Digital Display
The large LED digital display provides enhanced clarity for monitoring real-time current, voltage, and other operational parameters during welding, ensuring precise control.

Image: Close-up view of the welder's upgraded large LED digital display, showing various welding parameters and mode selections.
5. Maintenance
Regular maintenance ensures the longevity and optimal performance of your welding machine.
- Cleaning: Periodically clean the exterior of the machine with a dry cloth. Ensure cooling vents are free from dust and debris to maintain proper airflow.
- Connections: Regularly inspect all cables, connections, and terminals for wear, damage, or looseness. Tighten any loose connections.
- MIG Gun: Check the MIG gun nozzle, contact tip, and diffuser for spatter buildup. Clean or replace as necessary to ensure consistent wire feed and gas flow.
- Drive Rollers: Inspect the wire drive rollers for wear and ensure they are clean and properly tensioned for the wire size being used.
- Storage: Store the welder in a clean, dry environment away from excessive dust, moisture, and extreme temperatures.
6. Troubleshooting
This section addresses common issues you might encounter during operation. For problems not listed here, contact customer support.
- No Power: Ensure the power cord is securely plugged into a functional outlet and the welder's power switch is on. Check circuit breakers.
- No Arc: Verify that the work clamp is securely attached to the workpiece, the electrode/contact tip is clean, and the welding parameters are correctly set for the material and process.
- Poor Weld Quality: Check for proper wire feed speed, voltage settings, gas flow (if applicable), and correct polarity. Ensure the workpiece is clean and free of rust or paint.
- Wire Feeding Issues: Inspect the wire spool for tangles, ensure the drive rollers are clean and correctly tensioned, and check the MIG gun liner for blockages or kinks.
- Overheat Protection Activated: Allow the machine to cool down. Ensure cooling vents are clear and the ambient temperature is within operating limits. Reduce duty cycle if continuously welding at high amperages.
7. Specifications
Detailed technical specifications for the YESWELDER MIG-140DS PRO.

Image: A table detailing the technical specifications for the MIG-140DS PRO across different welding modes (MIG, Flux, TIG, Stick) and input voltages (110V/220V).
| Feature | Specification |
|---|---|
| Model Number | MIG-140DS PRO |
| Manufacturer | YESWELDER |
| Item Weight | 20.9 pounds |
| Package Dimensions | 17.4 x 13.3 x 7.7 inches |
| Power Source | DC |
| Input Voltage | 110V/220V Dual Voltage |
| Output Current | 140 Amp (Max) |
| Welding Processes | Gas MIG, Flux Core MIG, Lift TIG, Stick |
| Wire Feeding Speed (Synergic MIG) | Min: 80 in/min; Max: 600 in/min |
| Cooling Mode | Fan Cooling |
| Insulation Grade | F |
| Protection Class | IP21S |
8. Warranty and Support
The YESWELDER MIG-140DS PRO comes with a 1-Year Warranty, ensuring coverage for manufacturing defects and malfunctions under normal use. For warranty claims, technical assistance, or any product-related inquiries, please contact YESWELDER customer support.
Contact information can typically be found on the manufacturer's official website or through your purchase platform.
Documents and downloads
Ask a question about this manual
Ask about setup, troubleshooting, compatibility, parts, safety, or missing instructions. Manuals+ will review the question and use this page’s manual context to help answer it.