1. Introduction
This manual provides detailed instructions for the installation, operation, and maintenance of your STUDIOFINIX 6.5 Inch Bluetooth Ceiling Speaker System. Please read this manual thoroughly before using the product to ensure proper setup and optimal performance. Keep this manual for future reference.
2. Safety Information
To prevent fire, electric shock, or product damage, please observe the following safety precautions:
- Do not expose the amplifier or speakers to rain or moisture.
- Ensure proper ventilation for the amplifier to prevent overheating.
- Only use the provided power adapter. Using an incorrect adapter may cause damage or fire.
- Do not attempt to repair or modify the unit yourself. Refer all servicing to qualified personnel.
- Ensure all wiring connections are secure and correctly polarized before powering on the system.
- Avoid installing speakers in locations with excessive vibration or extreme temperatures.
3. Package Contents
Verify that all items listed below are included in your package:
- 4 x 6.5 Inch Ceiling Speakers
- 4 x Speaker Wires
- 1 x 4 Channel Bluetooth Amplifier Box
- 1 x Power Adapter

This image displays all components included in the STUDIOFINIX 6.5 Inch Bluetooth Ceiling Speaker system: four 6.5-inch ceiling speakers, a 4-channel Bluetooth amplifier box, a power adapter, and four sets of speaker wires.
4. Specifications
| Feature | Specification |
|---|---|
| Model Name | ST-HCS628BTX2-US |
| Speaker Type | In-Ceiling |
| Special Feature | Waterproof |
| Recommended Uses | Indoor/Outdoor (Covered Patio) |
| Unit Count | 4 Speakers |
| Product Dimensions (each speaker) | 7.5"D x 7.5"W x 4"H (19cm x 19cm x 10.16cm) |
| Item Weight (total) | 9.77 pounds (4.44 kg) |
| Maximum Bluetooth Range | 30.48 Meters (100 feet) |
| Speaker Size | 6.5 Inches |
| Manufacturer | STUDIOFINIX |
| Speaker Maximum Output Power | 160 Watts (per speaker) |
| Connectivity Technology | Bluetooth |
| Mounting Type | Flush Mount (In-Ceiling) |
| Material | Plastic Or Metal |
5. Installation Guide
5.1 Planning and Preparation
- Choose appropriate locations for your speakers, ensuring they are evenly spaced for optimal sound distribution.
- Ensure there are no obstructions (e.g., electrical wires, plumbing, studs) behind the chosen mounting areas.
- Measure and mark the cutout diameter on the ceiling or wall. The recommended cutout diameter is 6.3 inches (16 cm).

This diagram illustrates the necessary dimensions for installing the STUDIOFINIX 6.5 inch ceiling speaker. It shows a recommended cutout diameter of 6.3 inches (16 cm), a total speaker diameter of 7.5 inches (19 cm), and a mounting depth of 3.15 inches (8 cm).
5.2 Wiring Connections
- Power Off: Ensure the main power to the installation area is turned off before making any electrical connections.
- Prepare Wires: Strip approximately 0.5 inches (1.2 cm) of insulation from the ends of the speaker wires.
- Connect to Speakers: Connect the speaker wires to the spring-loaded terminals on each speaker. Match the positive (+) wire (typically red or marked) to the red terminal and the negative (-) wire (typically black or unmarked) to the black terminal.
- Connect to Amplifier: Connect the other ends of the speaker wires to the corresponding L+ (Left Positive), L- (Left Negative), R+ (Right Positive), and R- (Right Negative) terminals on the 4-channel Bluetooth amplifier box. Ensure correct polarity for each speaker.
- Power Adapter: Connect the provided power adapter to the amplifier's power input.
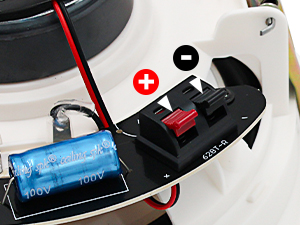
This image shows the spring-loaded terminals on the back of the ceiling speaker, clearly marked for positive (+) and negative (-) wire connections.

This diagram demonstrates the connection process for the STUDIOFINIX speaker system. It shows the 4-channel Bluetooth amplifier connected to mains power and four in-ceiling stereo speakers. A mobile device is depicted successfully paired via Bluetooth to control the amplifier.
5.3 Mounting Speakers
- After cutting the appropriate holes, carefully insert each speaker into its cutout.
- The speakers feature non-slip clamps. Tighten the mounting screws (usually by turning them clockwise) to engage the clamps and secure the speaker firmly in place. Do not overtighten.
- Once the speaker is secured, attach the magnetic grille. The grille will snap into place.
6. Operation Guide
6.1 Amplifier Controls

This image provides a close-up of the STUDIOFINIX 4-channel Bluetooth amplifier box, highlighting its control buttons and their functions.
- 1. Power Button: Press and hold for 3 seconds to power on/off. Short press to play/pause audio.
- 2. Mode Button: Press and hold for 3 seconds to restore factory settings. Short press to switch between Bluetooth, USB, AUX, and MIC input modes.
- 3. VOL- / TWS Button: Press and hold for 3 seconds to turn on/off TWS (True Wireless Stereo) mode. Short press to decrease the volume.
- 4. VOL+ / MONO Button: Press and hold for 3 seconds to turn on/off Mono mode. Short press to increase the volume.
- 5. Previous Track Button: Press and hold for 3 seconds to fast rewind. Short press to go to the previous song.
- 6. Next Track Button: Press and hold for 3 seconds to fast forward. Short press to go to the next song.
6.2 Bluetooth Pairing
- Ensure the amplifier is powered on and in Bluetooth mode (the 'BT' indicator light should be blinking).
- On your mobile device, navigate to Bluetooth settings and search for available devices.
- Select 'STUDIOFINIX' (or similar name) from the list to pair.
- Once connected, the 'BT' indicator light on the amplifier will become solid. You can now stream audio from your device.
6.3 Other Input Modes
- USB Mode: Insert a USB drive containing audio files into the USB port on the amplifier. The amplifier will automatically switch to USB mode and begin playback.
- AUX Mode: Connect an audio source (e.g., TV, CD player) to the AUX input using a 3.5mm audio cable. Press the 'MODE' button until the 'AUX' indicator light is on.
- MIC Mode: Connect a microphone to the MIC input. Press the 'MODE' button until the 'MIC' indicator light is on.
7. Maintenance
7.1 Cleaning
- To clean the speaker grilles, gently remove them by pulling them away from the speaker frame.
- Wipe the grilles and speaker surfaces with a soft, dry cloth. For stubborn dirt, a slightly damp cloth can be used, followed by a dry cloth.
- Do not use harsh chemicals, solvents, or abrasive cleaners, as these can damage the finish or components.
- Ensure the grilles are completely dry before reattaching them.
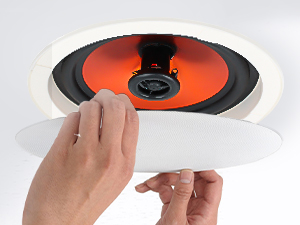
This image illustrates the process of removing the magnetic grille from the ceiling speaker, demonstrating its easy snap-on/snap-off mechanism for installation or maintenance.
7.2 Grille Painting (Optional)
The speaker grilles are paintable to match your room's decor. Use a fine-mist spray paint and apply thin, even coats. Avoid clogging the grille perforations, as this can affect sound quality.
8. Troubleshooting
| Problem | Possible Cause | Solution |
|---|---|---|
| No sound from speakers |
|
|
| Bluetooth connection issues |
|
|
| Distorted or poor sound quality |
|
|
| Amplifier not responding |
|
|
9. Warranty and Support
STUDIOFINIX products are designed for reliability and performance. For warranty information or technical support, please refer to the contact details provided with your purchase or visit the official STUDIOFINIX website. Please have your model number (ST-HCS628BTX2-US) and purchase date available when contacting support.


