1. Introduction
Thank you for choosing the STUDIOFINIX 6.5-inch 300W Bluetooth In-Ceiling Speaker System. This system is designed to provide high-quality, immersive audio for various indoor environments, including homes, offices, and covered terraces. Featuring a space-saving flush-mount design and Bluetooth connectivity, it offers a seamless audio experience. This manual provides essential information for safe installation, operation, and maintenance of your speaker system.
2. Safety Information
- Read all instructions carefully before installation and use.
- Keep this manual for future reference.
- Do not expose the speakers or amplifier to water or excessive moisture. This product is not waterproof.
- Ensure proper ventilation for the amplifier to prevent overheating.
- Disconnect power before performing any installation or maintenance.
- Installation should be performed by qualified personnel if you are unsure about electrical wiring or structural requirements.
- Use only the provided power adapter and speaker cables.
3. Package Contents
Verify that all items are present in the box:
- 2 x 6.5-inch In-Ceiling Speakers
- 1 x 2-Channel Bluetooth Amplifier (AMP-BTX01)
- 1 x Power Adapter
- 1 x 5-meter Speaker Cable
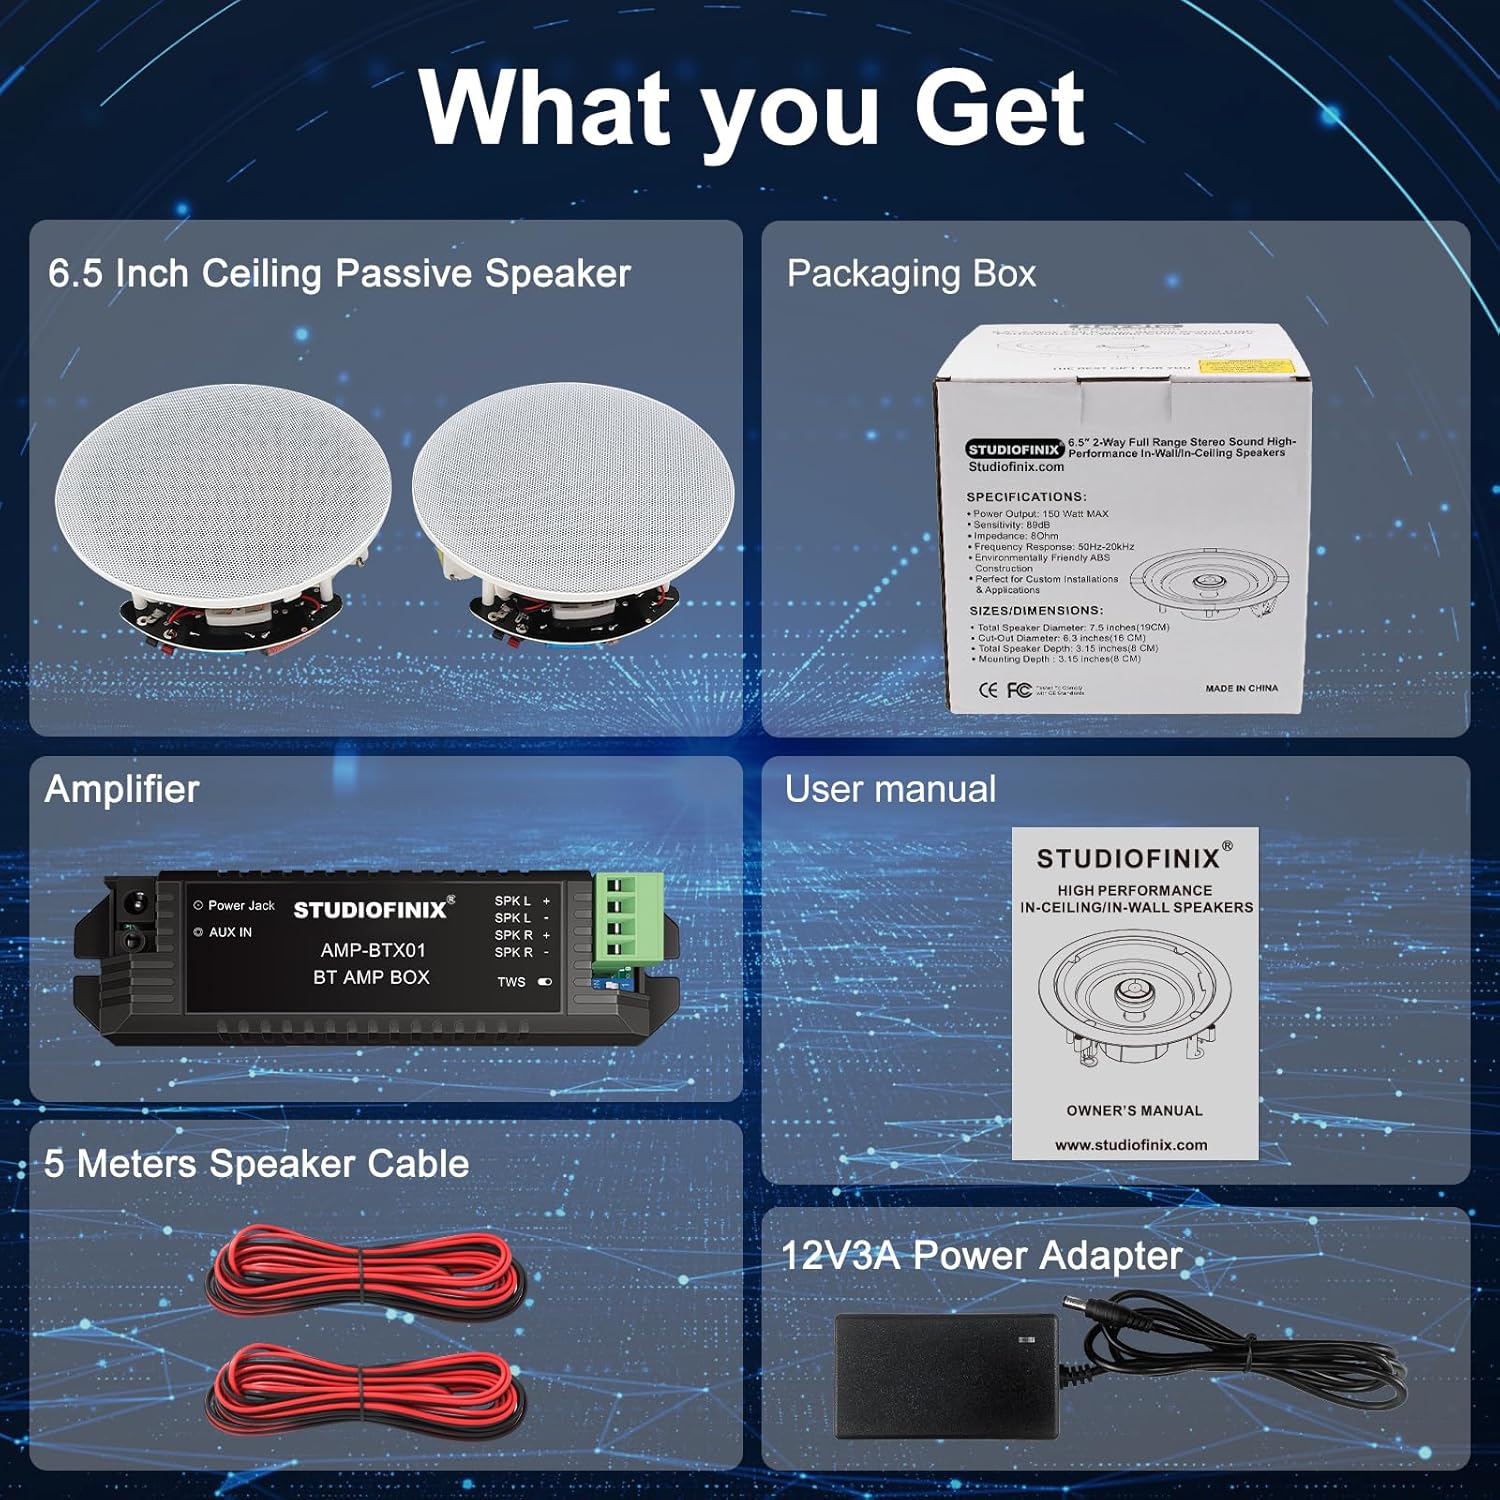
Figure 3.1: Package Contents
4. Product Overview
The STUDIOFINIX In-Ceiling Speaker System features a compact design with powerful audio components. Each speaker includes a 6.5-inch woofer for rich bass and a 1-inch coaxial tweeter for clear highs, delivering a full-range sound experience. The included Bluetooth amplifier allows for wireless audio streaming from your compatible devices.

Figure 4.1: Speaker Internal Components

Figure 4.2: Speaker Features (Grille, Tweeter, Terminals)
5. Installation and Setup
5.1 Speaker Dimensions
Before installation, ensure you have the correct cutout and mounting depth clearances.
- Total Speaker Diameter: 7.5 inches (19 cm)
- Cut-Out Diameter: 6.3 inches (16 cm)
- Mounting Depth: 3.15 inches (8 cm)

Figure 5.1: Speaker Installation Dimensions
5.2 Speaker Installation Steps
- Choose Location: Select a suitable location in your ceiling or wall, ensuring no obstructions (e.g., electrical wires, pipes, studs) behind the surface.
- Cut Hole: Use the provided template (if applicable) or measure carefully to cut a 6.3-inch (16 cm) diameter hole in the chosen surface.
- Wire Speakers: Run the speaker wires from the amplifier location to each speaker cutout. Ensure sufficient length for connections.
- Connect Wires: Connect the speaker wires to the spring-loaded terminals on the back of each speaker. Match positive (+) to positive and negative (-) to negative.
- Mount Speakers: Insert the speaker into the cutout. The mounting clamps will automatically engage and secure the speaker to the surface. Tighten any screws if necessary to ensure a snug fit.
- Attach Grille: Gently press the magnetic grille onto the speaker frame until it is securely in place.

Figure 5.2: Speaker Wire Terminals
5.3 Amplifier Connection
Connect the amplifier to the speakers and power source as follows:
- Connect Speakers to Amplifier: Connect the speaker cables from your in-ceiling speakers to the corresponding terminals on the amplifier (SPK L+ / SPK L- for left speaker, SPK R+ / SPK R- for right speaker). Ensure correct polarity.
- Connect Power: Plug the power adapter into the 'Power Jack' on the amplifier, then plug the adapter into a wall outlet.
- Optional AUX Input: If you wish to connect a non-Bluetooth audio source, use a 3.5mm audio cable (not included) to connect it to the 'AUX IN' port on the amplifier.

Figure 5.3: System Connection Diagram

Figure 5.4: Amplifier Connection Ports
6. Operating Instructions
6.1 Power On/Off
Once the amplifier is connected to power, it will automatically power on. There is no physical power button on the amplifier. Disconnect the power adapter to turn off the system.
6.2 Bluetooth Pairing
- Ensure the amplifier is powered on.
- On your Bluetooth-enabled device (smartphone, tablet, etc.), go to the Bluetooth settings.
- Search for available devices. The amplifier will appear as "STUDIOFINIX" or a similar name.
- Select the amplifier to pair. A confirmation sound or indicator light on the amplifier may signal a successful connection.
- Once paired, you can stream audio from your device to the in-ceiling speakers.
Note: The amplifier can only be connected to one Bluetooth device at a time. If you wish to connect a different device, disconnect the currently paired device first.
6.3 AUX Input Usage
If an audio source is connected via the AUX IN port, the amplifier will automatically switch to the AUX input when a signal is detected. Disconnect the AUX cable to revert to Bluetooth mode (if a Bluetooth device is paired).
7. Maintenance
7.1 Cleaning
- Wipe the speaker grilles and amplifier with a soft, dry cloth.
- Do not use harsh chemicals, cleaning solvents, or abrasive cleaners.
7.2 Paintable Grilles
The speaker grilles are paintable to match your ceiling or wall color. To paint, carefully remove the grille (it is magnetic) and apply paint evenly. Allow to dry completely before reattaching.

Figure 7.1: Removing Speaker Grille
8. Troubleshooting
| Problem | Possible Cause | Solution |
|---|---|---|
| No sound from speakers |
|
|
| Bluetooth device cannot pair |
|
|
| Sound distortion |
|
|
9. Specifications
| Feature | Specification |
|---|---|
| Brand | STUDIOFINIX |
| Model Name | 6.5" 600 Watts Bluetooth Ceiling Speakers |
| Model Number | 06974065533855 |
| Speaker Type | Ceiling / In-Wall |
| Speaker Size | 6.5 Inches (Woofer) |
| Max Speaker Output Power | 300 Watts (per speaker, 600W total system) |
| Connectivity Technology | Bluetooth |
| Wireless Communication Technology | Bluetooth |
| Control Method | Application (via Bluetooth device) |
| Power Source | Corded Electric |
| Product Dimensions | 16P x 8l x 8H centimeters (approx. 6.3D x 3.15W x 3.15H inches) |
| Item Weight | 2.36 Kilograms (approx. 5.2 lbs) |
| Mounting Type | Ceiling Mount |
| Audio Output Mode | Surround |
| Surround Sound Channel Configuration | 2.0 |
| Recommended Uses | Indoor, Kitchen, Home Cinema, Bedroom, Office, Covered Terrace |
| Compatible Devices | Smartphone, Tablet, Laptop, Television, Home Cinema Systems |
| Waterproof | False |
10. Warranty Information
This STUDIOFINIX product comes with a Limited Warranty. For detailed information regarding warranty coverage, terms, and conditions, please refer to the official STUDIOFINIX website or contact customer support.
11. Support
For further assistance, technical support, or inquiries about your STUDIOFINIX In-Ceiling Speaker System, please visit the official STUDIOFINIX website or contact their customer service department. Contact details can typically be found on the brand's website or product packaging.
Official Brand Store: STUDIOFINIX Amazon Store

