
1. Introduction
This manual provides comprehensive instructions for the safe and effective operation, setup, and maintenance of your BEILOCKERY S239246 Hay Cutter Straw Crusher Machine. This machine is designed for cutting and shredding various crops such as grass, corn stalks, sorghum stalks, wheat stalks, and rice straw, making it suitable for farm use and small to medium-sized feed processing plants. Please read this manual thoroughly before operating the machine to ensure proper usage and to prevent injury or damage.
2. Safety Instructions
WARNING: Failure to follow these safety instructions may result in serious injury or damage to the machine.
- Pre-Operation Check: Before starting, carefully inspect the machine to ensure no tools or foreign objects are present that could hinder startup or operation. Verify that the upper casing is securely locked.
- Clear Feeding Table: Before starting, confirm there are no sundries in the machine. Only processing straw is allowed on the feeding table.
- Direction of Rotation: Check that the main shaft's running direction matches the arrow indicated on the casing. If not, immediately adjust and switch off the power to correct the direction before restarting.
- Initial Run: Operate the machine for 2-5 minutes without material before feeding. Verify that the rotating speed meets requirements and avoid overspeeding. Check for any abnormal parts.
- Controlled Feeding: Once normal operation is confirmed, begin feeding. Do not overfeed, as this can lead to overload, potentially damaging the power unit and machine components.
- Hand Safety: Keep hands away from the feeding belt during operation.
- Blockage Procedure: In case of a blockage, immediately stop the machine. After it has completely stopped, open the upper cover, clear the blockage, and then restart.
- Power Disconnection: At the end of each shift, ensure all crops on the feeding table have been processed and no more materials are being discharged from the outlet before cutting off the power supply.
- Secure Compartments: The machine is equipped with locking nuts to ensure the machine compartment is securely locked and sealed, enhancing overall safety. These nuts must be locked when the machine is working.
- Electrical Safety: The machine is equipped with an air switch for enhanced electrical safety. Ensure it is functioning correctly.
3. Product Overview and Components
Familiarize yourself with the main components of the Hay Cutter Straw Crusher Machine.
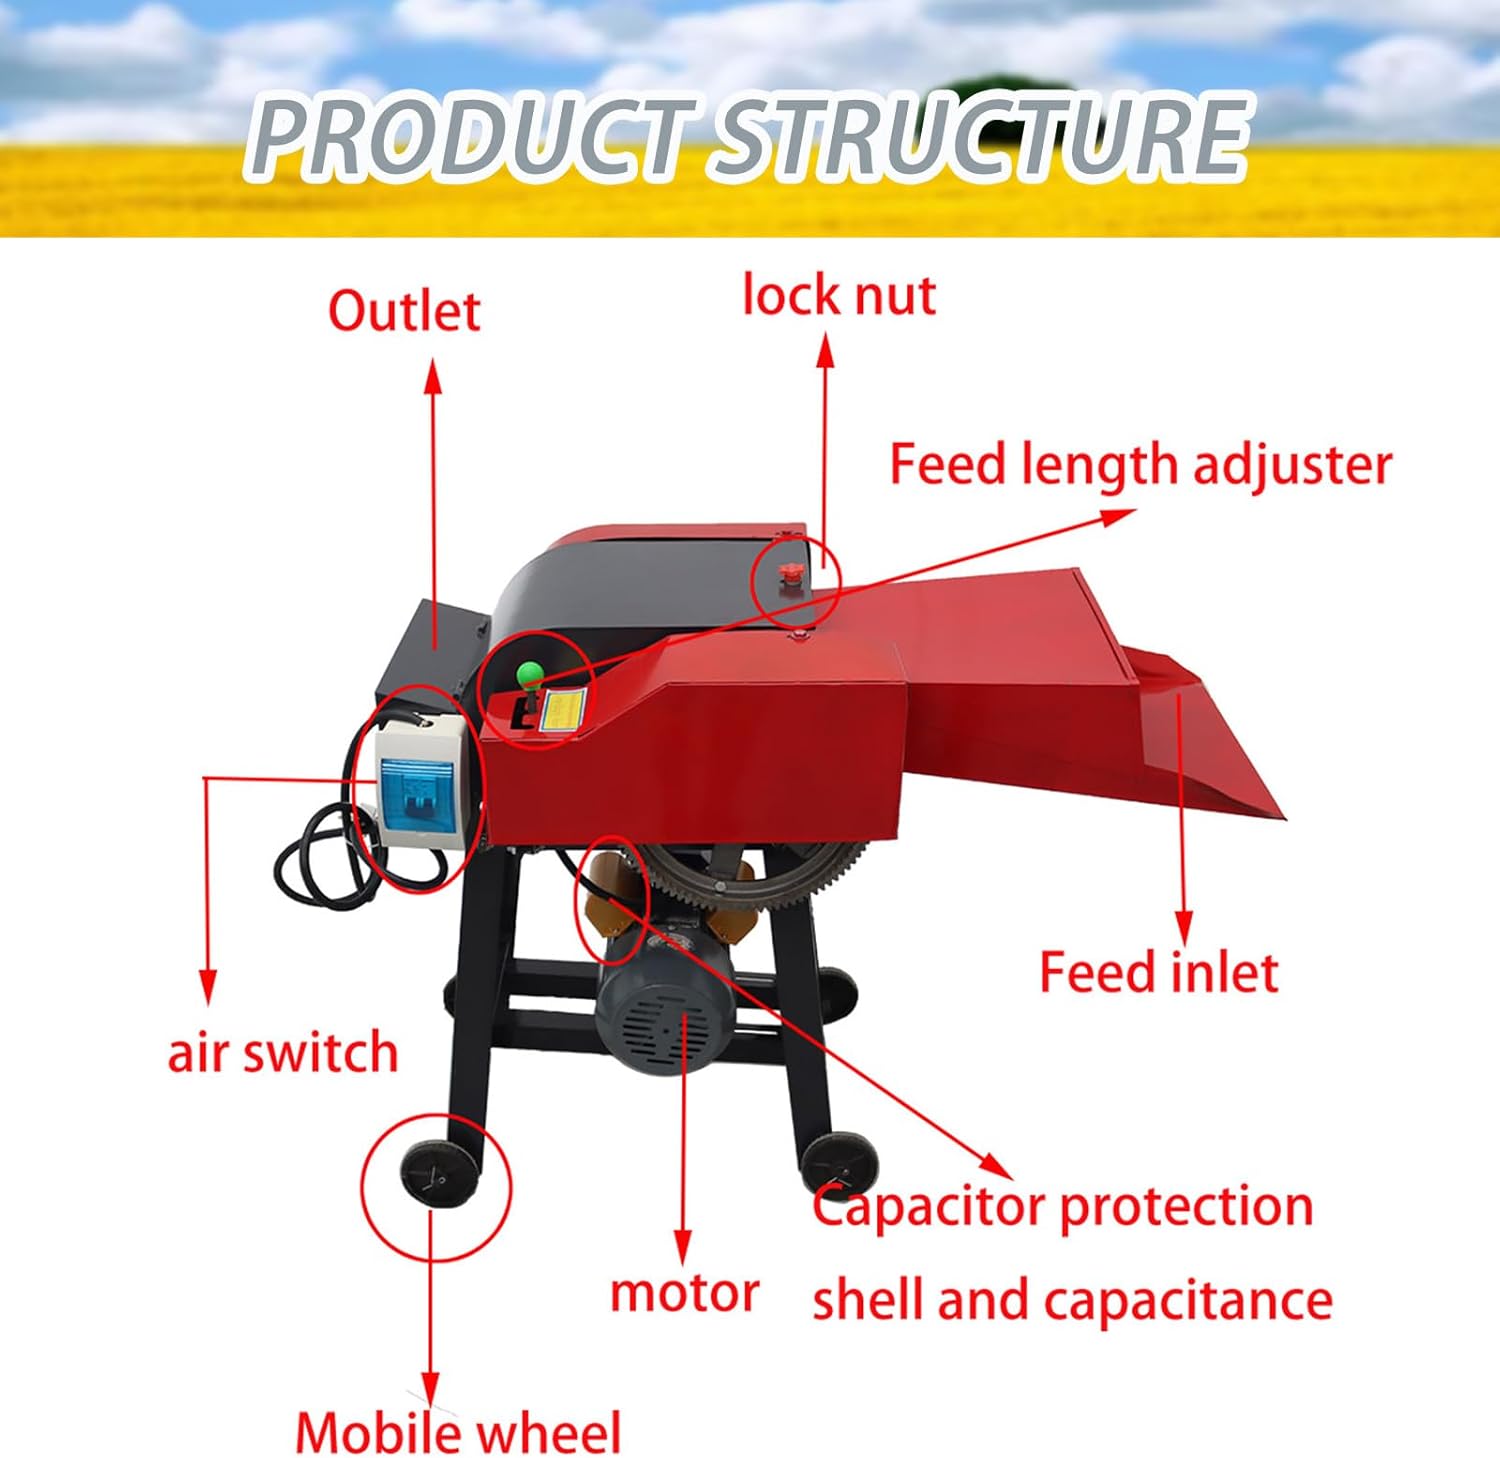
Figure 3.1: Product Structure Diagram. This image illustrates the key components of the machine, including the feed inlet, outlet, motor, air switch, mobile wheels, feed length adjuster, and safety lock nuts.
- Feed Inlet: Where raw materials are introduced into the machine. It can be installed separately and removed for storage.
- Outlet: Where processed materials are discharged.
- Motor: The power unit driving the cutting mechanism.
- Air Switch: An electrical safety device.
- Mobile Wheels: For easy transportation of the machine.
- Feed Length Adjuster: Allows selection of cutting length.
- Lock Nut: Secures the machine compartment.
- Conveyor Rollers: Flexibly adjust to the amount of material for efficient feeding.
- Blades: Six sets of thickened, sharp blades for cutting.
4. Specifications
| Parameter | Value |
|---|---|
| Model Number | S239246 |
| Brand | BEILOCKERY |
| Voltage | 220V |
| Power | 3KW |
| Blade Style | 6-blade |
| Product Material | Cast iron spray painting |
| Production Efficiency | 500-1000KG/H (1100-2200LBS/H) |
| Special Feature | Chain Automatic Feeding |
| Product Dimensions (L x W x H) | 42.5 x 20.47 x 29.9 inches (108 x 52 x 76 cm) |
| Item Weight | 144.4 pounds (65.5 kg) |
| Color | Red |

Figure 4.1: Product Specification Diagram. This image provides detailed dimensions of the hay cutter machine.
5. Setup and Assembly
The BEILOCKERY S239246 machine requires minimal assembly.
- Unpacking: Carefully remove all components from the packaging. Verify that all parts listed in the package content are present.
- Positioning: Place the machine on a stable, level surface in a well-ventilated area. Ensure adequate space around the machine for safe operation and material handling.
- Feed Inlet Installation: The feed inlet can be installed separately. Attach it securely to the main unit if it is not pre-installed. Ensure it is stable and correctly aligned for material feeding.

Figure 5.1: Detachable Feed Inlet. The feed inlet can be installed separately and removed for storage when not in use.
- Secure all Fasteners: Ensure all nuts, especially the locking nuts for the machine compartment, are tightened securely before connecting to power.
- Electrical Connection: Connect the machine to a 220V power supply. Ensure the power source is appropriate for the machine's 3KW power requirement and that the air switch is accessible.
6. Operating Instructions
Follow these steps for safe and efficient operation of the hay cutter.
- Pre-Operation Checks: Perform all safety checks outlined in Section 2. Ensure the machine is clear of obstructions and all safety features, such as locking nuts, are engaged.

Figure 6.1: Safety Features: Locking Nut and Air Switch. The locking nut secures the compartment, and the air switch provides electrical protection.
- Power On: Turn on the power supply to the machine.
- Initial Run: Allow the machine to run for 2-5 minutes without feeding any material. Observe for any unusual noises or vibrations. Confirm the main shaft rotates in the correct direction as indicated by the arrow.
- Adjust Cutting Length: Use the feed length adjuster to select the desired cutting length. The machine offers two settings: Long and Short.

Figure 6.2: Conveyor Rollers and Length Adjustment. The conveyor rollers adapt to material volume, and the feed length adjuster allows selection between long and short cuts.
- Feeding Material: Gradually feed crops such as grass, corn stalks, or straw into the feed inlet. The chain automatic feeding system will draw the material in. Avoid excessive feeding to prevent overloading. The conveyor rollers will adjust flexibly based on the amount of material.
- Monitoring: Continuously monitor the machine's operation. If any blockage occurs, immediately stop the machine and follow the blockage procedure in Section 2.
- Shut Down: Once all material has been processed and no more is being discharged from the outlet, turn off the machine and disconnect the power supply.
7. Maintenance
Regular maintenance ensures the longevity and optimal performance of your machine. Always disconnect power before performing any maintenance.
- Cleaning: After each use, clean any residual material from the feed inlet, cutting chamber, and outlet. This prevents buildup and ensures smooth operation.
- Blade Inspection: Regularly inspect the 6-blade cutting mechanism for wear or damage. The double-sided blade design offers durability, but blades may require sharpening or replacement over time.
- Lubrication: Lubricate moving parts as recommended by the manufacturer (refer to specific lubrication points if detailed in a separate diagram or manual).
- Fastener Check: Periodically check all nuts, bolts, and fasteners for tightness. Re-tighten as necessary to maintain structural integrity and safety.
- Electrical System: Inspect the power cord, air switch, and motor connections for any signs of wear or damage.
- Storage: When not in use, store the machine in a dry, protected area. The feed inlet can be removed for more compact storage.
8. Troubleshooting
This section addresses common issues you might encounter. For problems not listed here, contact customer support.
| Problem | Possible Cause | Solution |
|---|---|---|
| Machine does not start | No power supply; Air switch tripped; Loose electrical connection. | Check power cord and outlet; Reset air switch; Inspect and secure connections (with power off). |
| Machine stops during operation | Overload due to excessive feeding; Material blockage; Motor overheating. | Reduce feeding rate; Clear blockage (refer to Section 2); Allow motor to cool down. |
| Poor cutting performance | Dull or damaged blades; Incorrect cutting length setting; Insufficient power. | Inspect and sharpen/replace blades; Adjust feed length setting; Ensure stable 220V power supply. |
| Unusual noise or vibration | Loose fasteners; Foreign object in cutting chamber; Worn bearings. | Check and tighten all fasteners; Stop machine and clear foreign objects; Contact support for bearing replacement. |
9. Warranty and Support
For warranty information or technical support, please refer to the documentation provided at the time of purchase or contact your retailer. Keep your purchase receipt and model number (S239246) handy when contacting support.
Manufacturer: BEILOCKERY