
Introduction
This manual provides detailed instructions for the assembly, operation, maintenance, and troubleshooting of your Alupssuc 7ft Prelit Artificial Snow Flocked Christmas Tree. Please read this manual thoroughly before assembly and retain it for future reference.

Figure 0: Alupssuc 7ft Prelit Artificial Snow Flocked Christmas Tree.
Important Safety Information
- For indoor use only. Do not expose to rain or moisture.
- Ensure all electrical connections are secure before plugging into a power outlet.
- Do not overload electrical outlets.
- Keep away from heat sources, open flames, and flammable materials.
- Do not attempt to modify or repair the tree or its electrical components. Contact customer support if issues arise.
- Unplug the tree from the power outlet when not in use or before performing any maintenance.
- Keep small children and pets away from the tree during assembly and operation to prevent accidents.
Package Contents
Please verify that all components are present before beginning assembly:
- Tree Sections (A, B, C)
- Metal Tree Stand
- Remote Control (requires 1x CR2025 Lithium Cell, included)
- Power Adapter
Assembly and Setup
- Assemble the Tree Stand: Unfold the metal tree stand and insert the screw to secure it. Place the stand on a flat, stable surface.
- Insert Bottom Section (A): Carefully insert the bottom tree section (marked 'A') into the assembled tree stand. Ensure it is firmly seated.
- Attach Middle Section (B): Place the middle tree section (marked 'B') onto section 'A'. Align the arrows on the electrical plugs and connect them securely. Screw the plastic knobs to ensure a tight fit.
- Attach Top Section (C): Place the top tree section (marked 'C') onto section 'B'. Align the arrows on the electrical plugs and connect them securely. Screw the plastic knobs to ensure a tight fit.
- Fluff the Branches: Starting from the bottom, gently pull and spread out each branch tip to create a full, natural appearance. This process may take 30-45 minutes for optimal shaping.
- Connect Power: Plug the power adapter into a wall outlet.

Figure 1: Tree Assembly Steps. Ensure electrical plugs are aligned and secured.

Figure 2: Product Dimensions and Features. The tree stands 7.5 feet tall with a base diameter of 3.8 feet.
Operating Instructions: Remote Control
Your Alupssuc Christmas tree features pre-installed RGB lights controlled by a remote. The remote requires one CR2025 Lithium Cell (included).
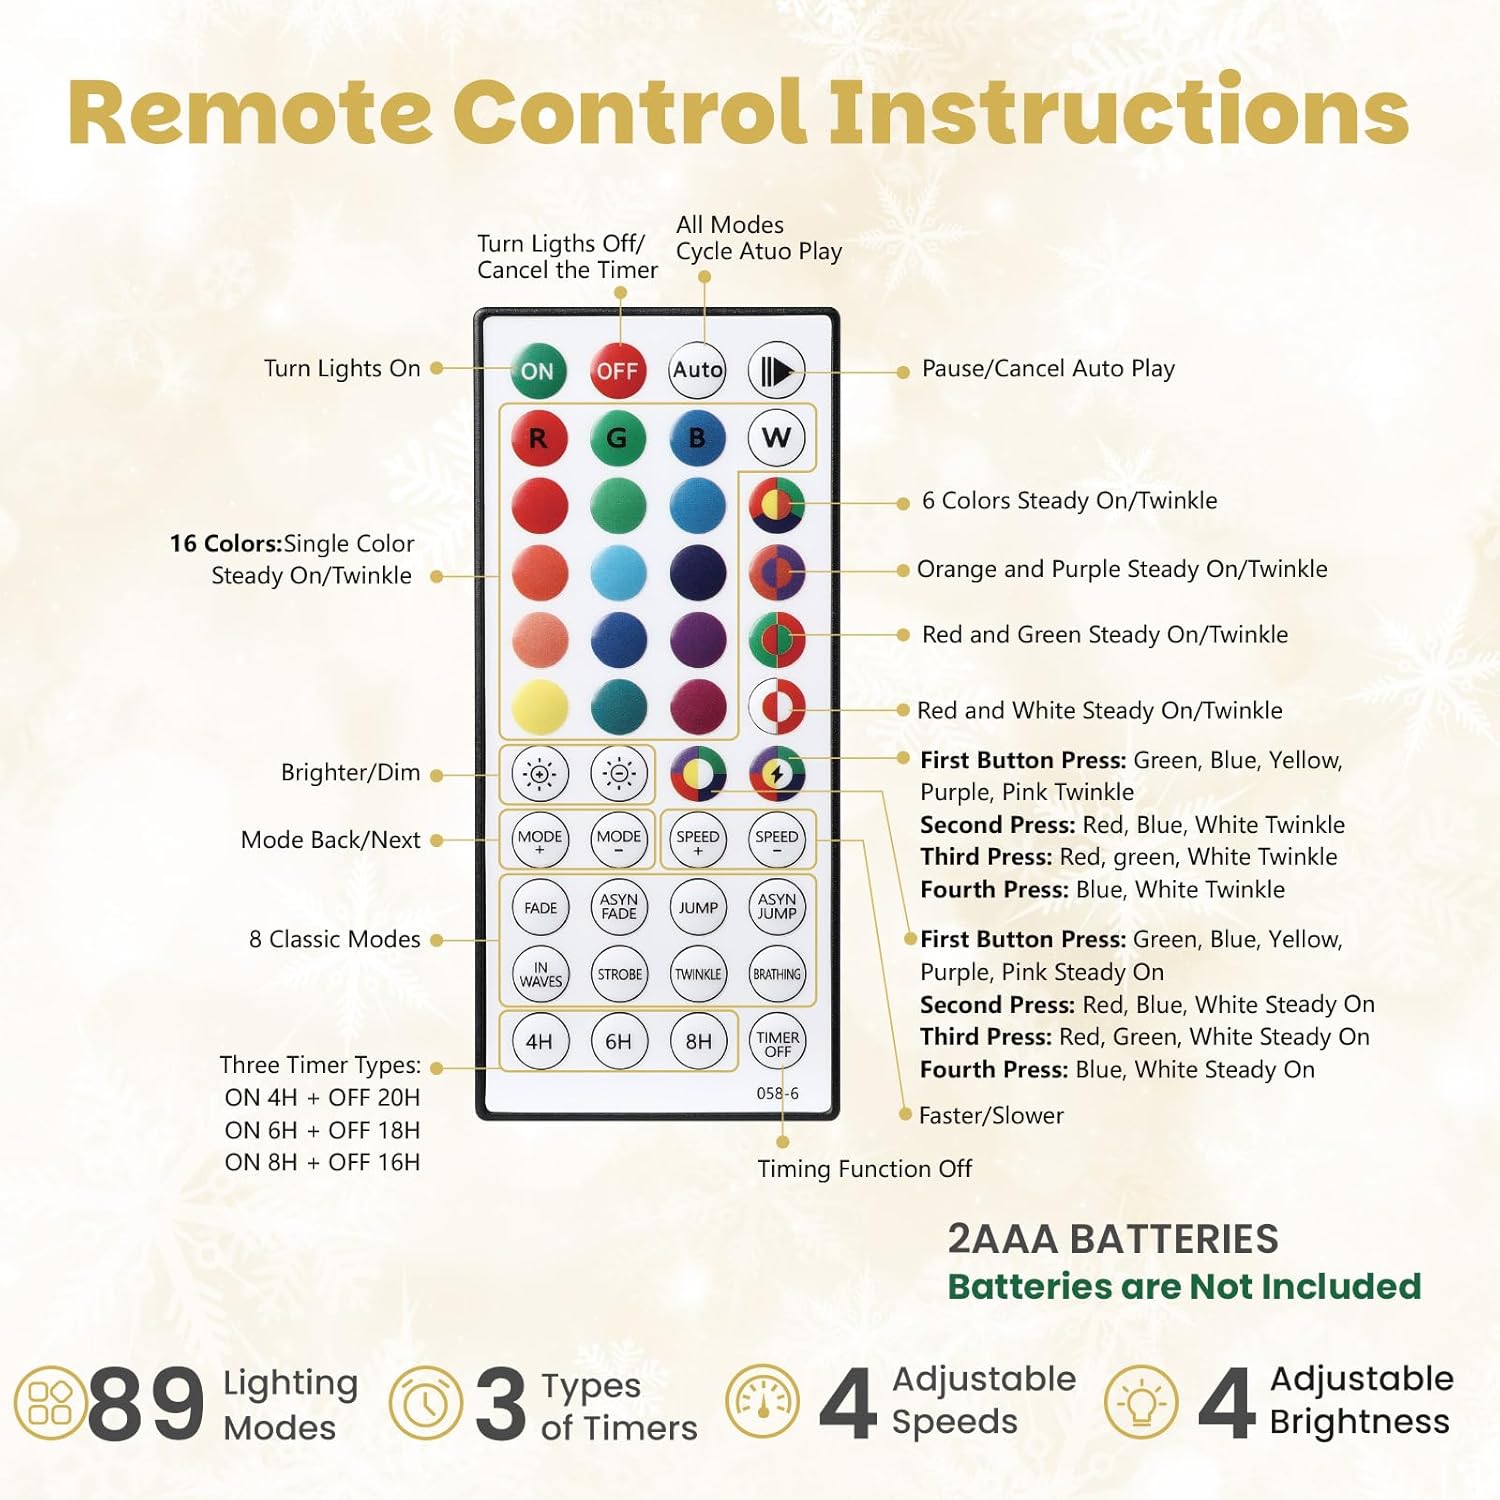
Figure 3: Remote Control Layout. Familiarize yourself with the button functions.
Remote Control Functions:
- On/Off: Press the 'On' button to turn lights on, 'Off' to turn them off.
- Color Selection: Use the color buttons (R, G, B, W, and various color combinations) to select a single color or a multi-color display. There are 16 single colors available.
- Brightness/Dim: Adjust the light intensity using the 'Brighter' and 'Dim' buttons.
- Speed: Control the speed of dynamic lighting modes using the 'Faster' and 'Slower' buttons.
- Lighting Modes: Select from 8 classic modes including In Waves, Strobe, Twinkle, Breathing, Fade, Asyn Fade, Jump, and Asyn Jump.
- Timer Functions: Set the lights to operate on a timer: 4H ON + OFF 20H, 6H ON + OFF 18H, 8H ON + OFF 16H.
- AUTO Function: Press 'AUTO' to cycle through all available lighting modes automatically. Press 'Pause/Cancel Auto Play' to stop.
- Memory Function: The pre-lit RGB lights have a memory function, returning to the last selected mode when turned back on.

Figure 4: Light Color Options. The tree supports unlit, warm white, and multi-color RGB lighting.
Official Product Video:
Video 1: Demonstration of the Alupssuc Prelit Artificial Flocked Christmas Tree, showcasing its features and various light modes.
Maintenance
- Cleaning: To clean the tree, gently wipe the branches with a soft, dry cloth. Do not use liquid cleaners or solvents.
- Light Care: The tree features integrated LED lights. If a section of lights does not illuminate, check all electrical connections between tree sections. Individual bulbs are not user-replaceable.
- Remote Battery: Replace the CR2025 battery in the remote control when its functionality diminishes.
Storage
- Unplug the power adapter from the wall outlet.
- Carefully disconnect the electrical plugs between tree sections.
- Disassemble the tree by removing the top section, then the middle section, and finally the bottom section from the stand.
- Gently compress the branches of each section.
- Store the tree sections, stand, and remote control in a cool, dry place, preferably in the original packaging or a dedicated tree storage bag, to protect them from dust and damage.
Troubleshooting
| Problem | Possible Cause | Solution |
|---|---|---|
| Lights do not turn on. |
|
|
| Remote control is unresponsive. |
|
|
| Only part of the tree lights up. |
|
|
Specifications
| Feature | Detail |
|---|---|
| Brand | Alupssuc |
| Model Number | JT-EL/FC290V0300-BT3 |
| Height | 7.5 feet (84 inches) |
| Base Diameter | 3.8 feet (34 inches) |
| Branch Tips | 1267 (PE & PVC) |
| Lights | 460 Pre-Lit Multi-Color RGB Lights |
| Material | Polyethylene (PE) and Polyvinyl Chloride (PVC) |
| Tree Type | Fir, Spruce (Snow Flocked) |
| Assembly | Hinged sections (3 parts: A, B, C) |
| Remote Control Battery | 1x CR2025 Lithium Cell (included) |
| Item Weight | 35.7 pounds |

Figure 5: Detail of Branch Tips and Lights. The tree features 1267 PE & PVC branch tips and 460 RGB lights.
Warranty and Customer Support
For warranty information, product support, or to report any issues, please contact Alupssuc customer service through the retailer where the product was purchased. Please have your model number (JT-EL/FC290V0300-BT3) and purchase date available.
You can also visit the Alupssuc Store on Amazon for more information.