1. Introduction
This manual provides detailed instructions for the assembly, operation, and maintenance of your Sauder Merton Hall Storage Cabinet. Please read all instructions carefully before beginning assembly and retain this manual for future reference.
The Sauder Merton Hall Storage Cabinet is designed to provide versatile storage solutions for various rooms, including living rooms, kitchens, offices, and utility areas. It features a single door, adjustable shelving, and a durable construction.

Image 1.1: Front view of the Sauder Merton Hall Storage Cabinet in White Finish, with the door closed.
2. Safety Information
WARNING: California Proposition 65 - This product may expose you to chemicals including Formaldehyde, which is known to the State of California to cause cancer. For more information, go to www.p65warnings.ca.gov.
- Always follow assembly instructions carefully.
- A wall anchor kit is provided to help prevent tip-over accidents. It is crucial to install this kit as instructed to ensure stability and safety, especially in households with children or pets.
- Do not exceed the maximum weight capacity of 25 lbs per adjustable shelf.
- Ensure the cabinet is placed on a level surface to prevent wobbling and instability.
- Keep small parts and hardware away from children during assembly.
3. Setup and Assembly
The Sauder Merton Hall Storage Cabinet requires assembly. It is recommended to have two people for assembly due to the weight and size of the components. A power drill on a low torque setting can assist with screw installation, but exercise caution to avoid damaging the wood or stripping hardware.
3.1 Unpacking and Inspection
- Carefully open the packaging and remove all components. The product may arrive in multiple boxes.
- Verify that all parts and hardware listed in the instruction manual are present and undamaged. Contact Sauder customer service immediately if any parts are missing or damaged.
- Lay out all components on a clean, soft surface (e.g., a blanket or carpet) to prevent scratches during assembly.
3.2 Assembly Steps
Follow the detailed, illustrated instructions provided in the separate assembly guide included with your product. Key steps include:
- Panel Construction: Assemble the main frame using the provided cams and dowels/dowel screws. Ensure all cams are tightened firmly, but do not overtighten to avoid stripping.
- Back Panel Installation: The back panel is typically thin pressboard. Ensure it is installed squarely and firmly attached to provide structural rigidity.
- Shelf Installation: Install the fixed shelf first, then position the three adjustable shelves according to your storage needs. Gently tap shelf pins into place if holes are tight.
- Door Installation: Attach the door using the soft-closing hinges. The door can be assembled to open from either the left or right side. Ensure hinges are installed squarely for proper door alignment and closing.
- Wall Anchor Kit: Securely attach the cabinet to a wall using the provided wall anchor kit. This is a critical safety step.
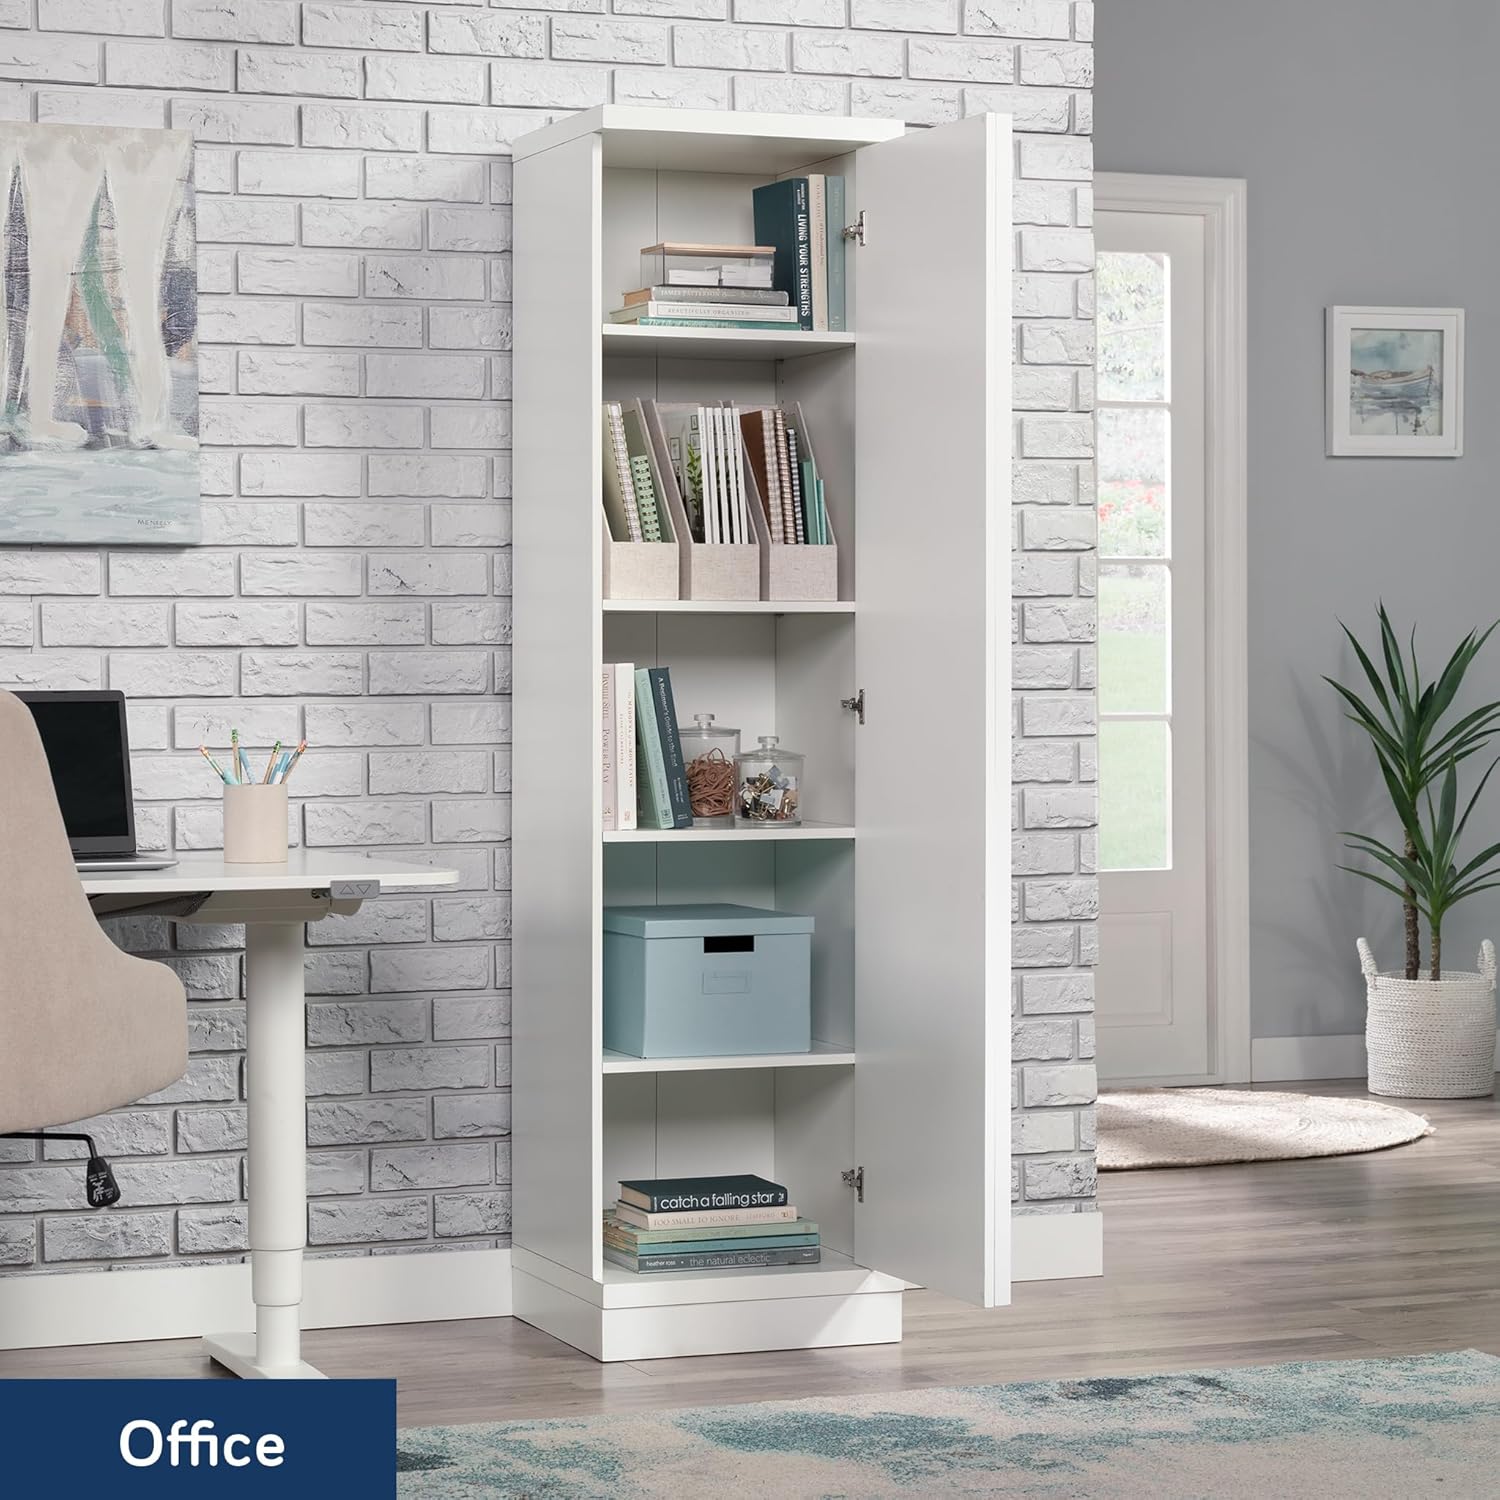
Image 3.1: The Sauder Merton Hall Storage Cabinet with its single door open, revealing multiple shelves for storage.
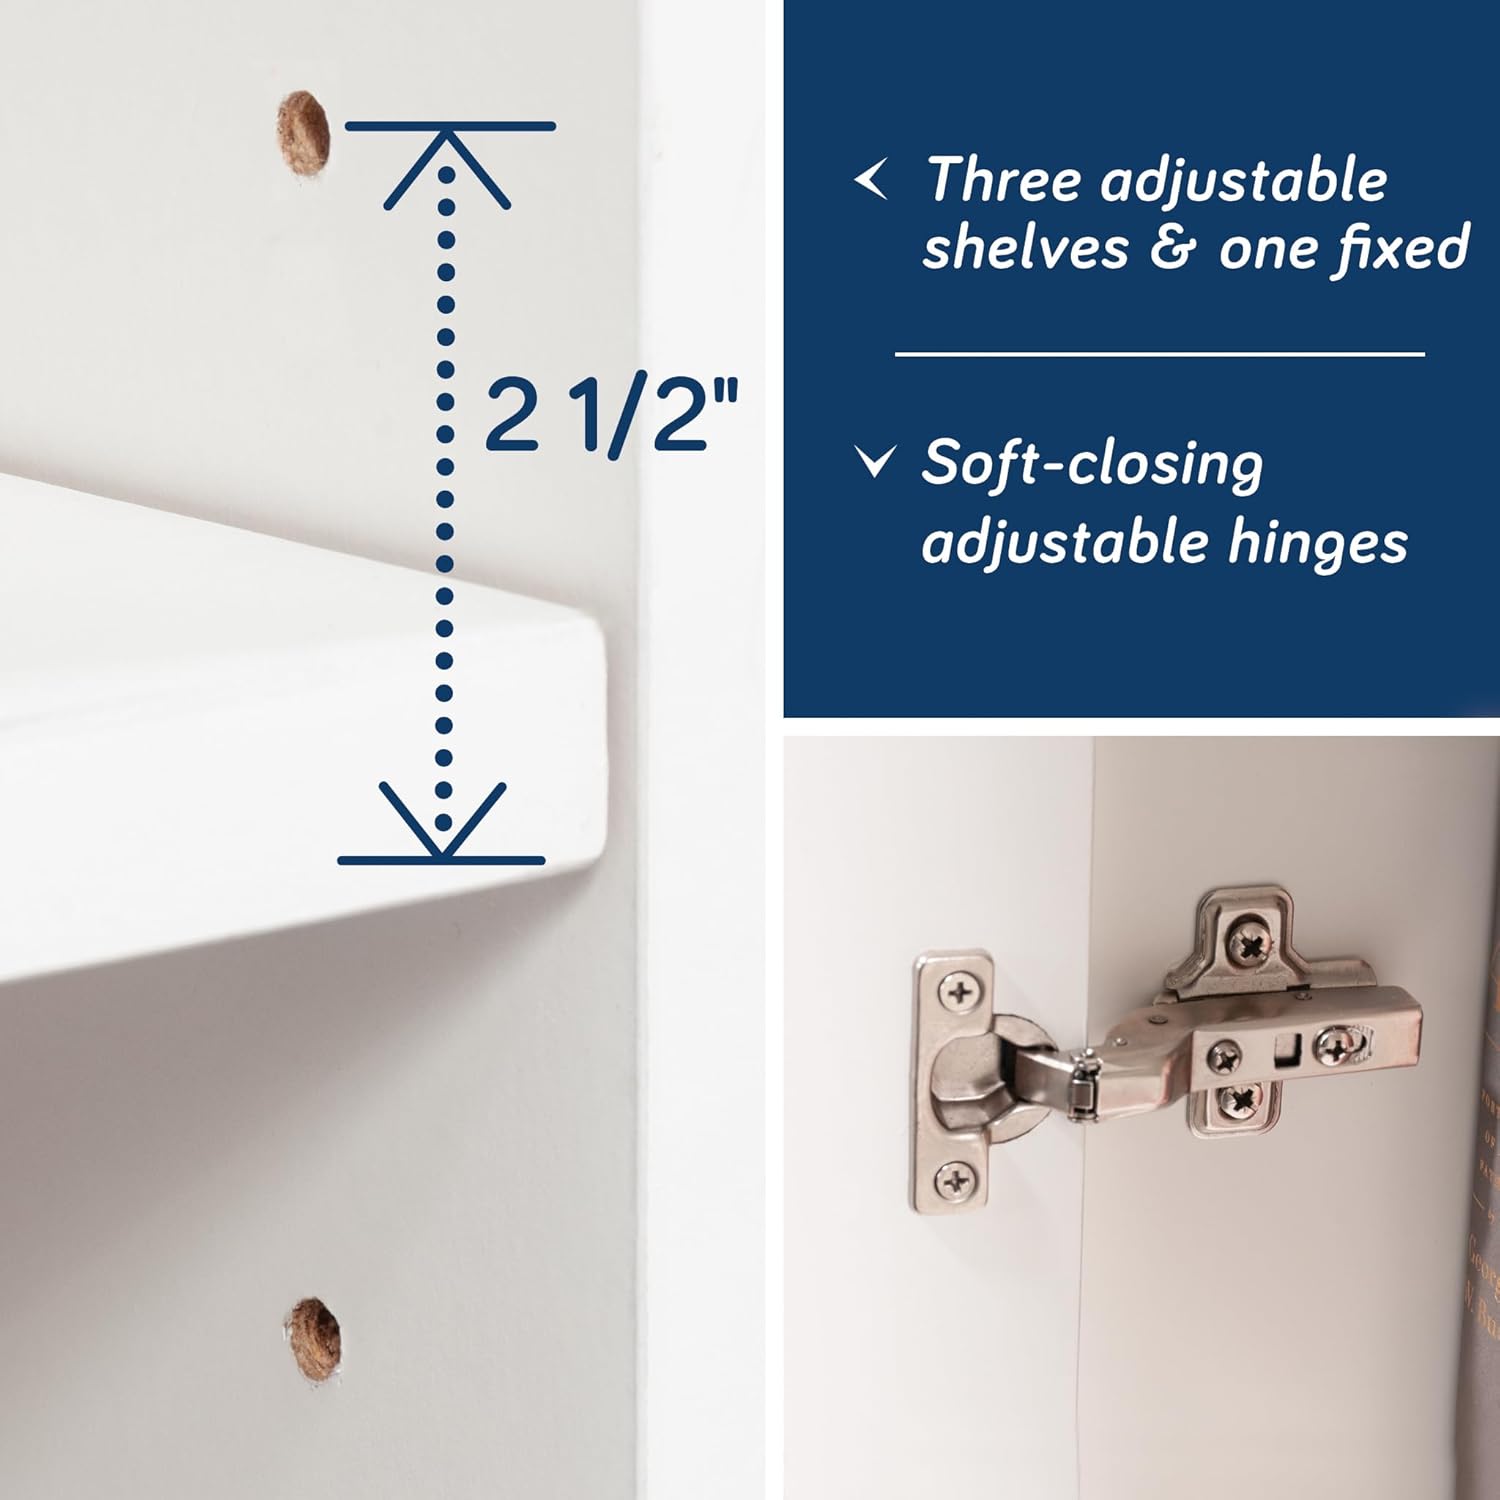
Image 3.2: Detail showing the adjustable shelf pin holes and a soft-closing hinge mechanism.
4. Operating Instructions
4.1 Adjusting Shelves
The cabinet features three adjustable shelves and one fixed shelf. To adjust the height of the movable shelves:
- Empty the shelf you wish to adjust.
- Remove the shelf pins from their current holes.
- Insert the shelf pins into the desired new holes, ensuring they are level on both sides.
- Place the shelf onto the pins, ensuring it is securely seated.
4.2 Door Operation
The single door is equipped with soft-closing hinges, designed for quiet and smooth operation. To open, gently pull the door from its edge. To close, push the door until the soft-closing mechanism engages, allowing it to close smoothly without slamming.

Image 4.1: The Sauder Merton Hall Storage Cabinet integrated into a living room, demonstrating its functional use.
5. Maintenance and Care
- Cleaning: Wipe surfaces with a soft, damp cloth. Avoid harsh chemicals or abrasive cleaners, which can damage the finish.
- Spills: Clean up spills immediately to prevent moisture damage, especially to engineered wood components.
- Hardware: Periodically check all screws and fasteners to ensure they remain tight. Retighten as necessary.
- Placement: Avoid placing the cabinet in areas with extreme temperature fluctuations or high humidity, as this can affect the material integrity.
- Moving: When moving the cabinet, empty it first and lift it carefully. Do not drag the cabinet, as this can damage the base and structure.
6. Troubleshooting
| Problem | Possible Cause | Solution |
|---|---|---|
| Cabinet wobbles or is unstable. | Uneven floor; loose fasteners; wall anchor not installed or improperly installed. | Ensure cabinet is on a level surface. Check and tighten all screws and cams. Install the wall anchor kit as per instructions. |
| Door does not close properly or is misaligned. | Hinges are not installed squarely; hinges are loose or damaged. | Check hinge installation for squareness. Adjust hinges if necessary (refer to assembly guide for hinge adjustment details). Ensure all hinge screws are tight. |
| Shelves sag or bow. | Overloaded shelf; improper installation of shelf pins. | Reduce weight on the shelf, ensuring it does not exceed 25 lbs. Verify shelf pins are fully seated and correctly positioned. |
7. Product Specifications
| Brand | Sauder |
| Model Name | Merton Hall |
| Item Model Number | 443652 |
| Color | Single Door/White |
| Product Dimensions | 16.85"D x 18.5"W x 70.95"H (42.8 cm D x 47.0 cm W x 180.2 cm H) |
| Item Weight | 102.5 Pounds (46.5 kg) |
| Material | Engineered Wood |
| Number of Shelves | 4 (3 adjustable, 1 fixed) |
| Adjustable Shelf Weight Limit | 25 lbs per shelf |
| Special Features | Strong and lightweight panel construction, soft close hinges |
| Assembly Required | Yes |
| UPC | 042666244947 |

Image 7.1: Dimensional diagram of the Sauder Merton Hall Storage Cabinet, indicating height, width, and depth.
8. Warranty and Support
8.1 Limited Warranty
This Sauder product comes with a 5-year limited warranty. Please refer to the warranty documentation included with your product for specific terms and conditions.
8.2 Customer Support
For questions about the product, assembly assistance, or to report missing/damaged parts, please contact Sauder customer service:
- Website: sauder.com/service
- Phone: 800-523-3987
Sauder's domestic call center is ready to assist you.

Image 8.1: Sauder customer service contact details, including website and phone number.


