1. Introduction
Thank you for choosing the Awgem SH1 Handheld Battery Spot Welder. This manual provides essential information for the safe and efficient operation, maintenance, and troubleshooting of your device. Please read it thoroughly before use and retain it for future reference.
1.1 Included Components
- Awgem SH1 Handheld Mini Spot Welder (x1)
- Copper-Aluminum Welding Needles (2 pairs, including those pre-installed)
- Nickel-Plated Sheet (2 meters)
- USB Type-C Charging Cable (x1)
- Sandpaper (x1)
- User Manual (x1)

2. Safety Information
Always prioritize safety when operating electrical tools. Failure to follow these instructions may result in injury or damage to the device.
- Read the Manual: Familiarize yourself with all operating procedures and safety warnings before use.
- Eye Protection: Always wear appropriate eye protection during welding to prevent injury from sparks.
- Ventilation: Use in a well-ventilated area.
- Material Compatibility: This device is designed for spot welding nickel-plated sheets with a thickness of 0.1-0.2mm. Do not attempt to weld materials outside this specification.
- Surface Preparation: Ensure the nickel strip and battery surfaces are clean and free of rust or contaminants. Welding rusty surfaces is not recommended and can lead to poor welds and potential hazards.
- Overheating Protection: The device features a blue light warning if the internal temperature reaches or exceeds 65℃. If this occurs, stop operation immediately and allow the device to cool down before resuming.
- Low Voltage Protection: An automatic red light alarm will activate if the battery cell voltage drops below 3.2V. Recharge the device promptly to prevent over-discharge.
- Burn Hazard: During and immediately after welding, the soldering pins, nickel strip, and battery will generate high heat. Avoid touching them directly to prevent burns.
- Practice First: It is highly recommended to practice on scrap nickel strips and batteries before attempting critical welding tasks to understand the device's behavior and optimal settings.


3. Product Overview
The Awgem SH1 is a compact, handheld spot welder designed for precise welding of battery packs and other small electronic components. Its integrated ergonomic design allows for one-handed operation, enhancing efficiency.
3.1 Key Features
- Integrated Design: Combines the welding pen and host into a single unit for convenient one-handed use.
- 11-Gear Power Adjustment: Allows precise control over welding intensity for various nickel sheet thicknesses (0.1-0.2mm).
- Dual Operating Modes: Features both Automatic and Manual welding modes.
- Replaceable Welding Needles: Modular design allows for easy replacement of welding pins, reducing long-term costs.
- Safety Protections: Includes low voltage alarm and overheat warning for enhanced user safety and device longevity.
3.2 Controls and Indicators

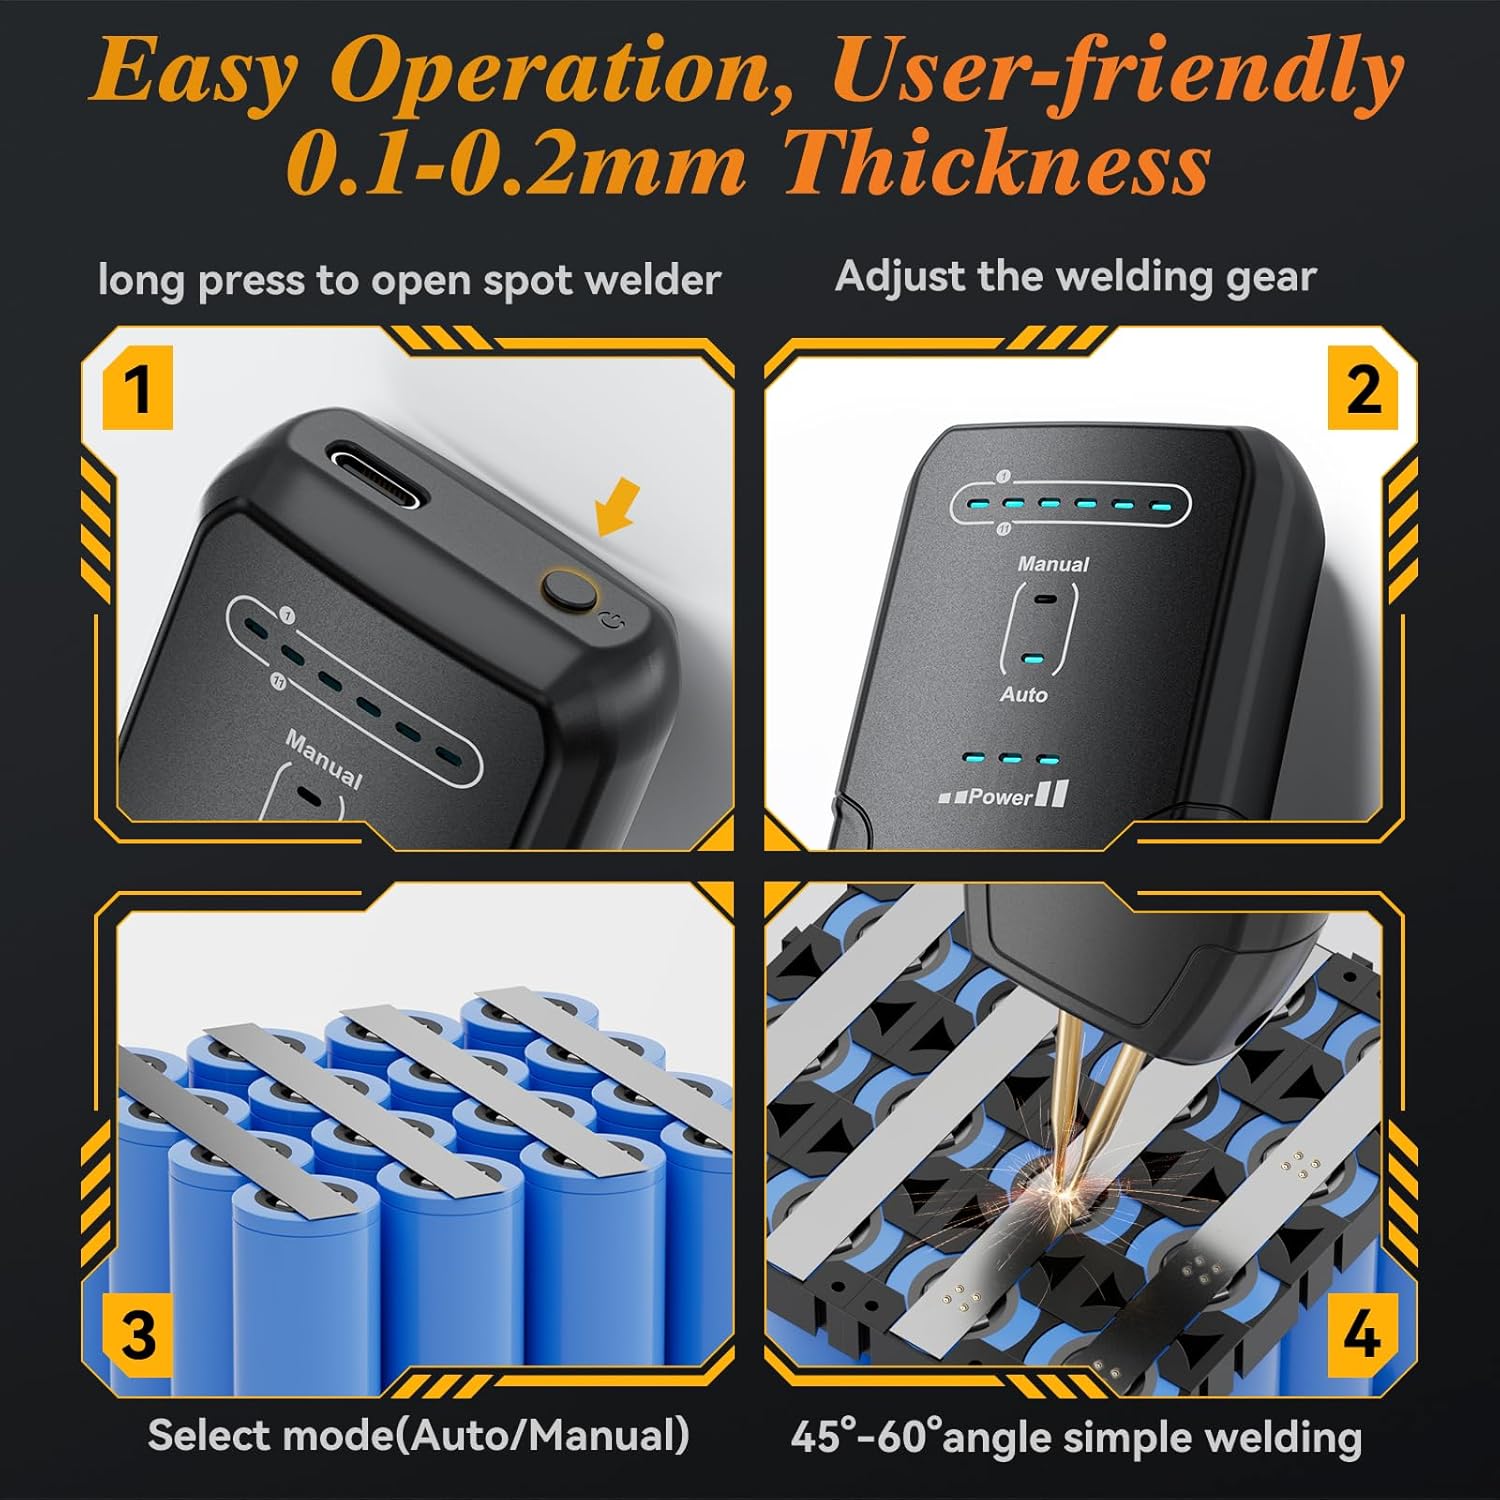
- ON/OFF Key / Manual Mode Button: Long press to power on/off. Short press to activate manual welding in manual mode.
- Gear Adjustment Button: Short press to cycle through 11 welding power levels.
- Gear Indicator Lights: Six LED lights indicate the current welding power level (1-11 gears).
- Mode Indicator Lights: Separate indicators for 'Manual' and 'Auto' modes.
- Battery Indicator: Displays the remaining battery charge.
- Type-C Input Interface: For charging the device.
4. Setup
4.1 Charging the Device
Before first use, fully charge the spot welder using the provided USB Type-C charging cable and a compatible USB power adapter (not included). The battery indicator lights will show charging progress.
4.2 Installing and Adjusting Welding Pins
The Awgem SH1 comes with replaceable welding pins. Ensure they are securely installed and adjusted for optimal performance.
- If replacing, use the included screwdriver to loosen the screws holding the pins.
- Insert the new copper-aluminum welding needles.
- Adjust the spacing between the pins by moving them up or down. A narrower spacing generally improves welding strength, while wider spacing may decrease it.
- Tighten the screws to secure the pins in place. Ensure both pin tips are level and make firm contact with the welding surface.

5. Operating Instructions
5.1 Power On/Off
To power on the device, press and hold the ON/OFF key (located near the Type-C port) for 2 seconds. To power off, repeat the same action.
5.2 Adjusting Welding Gear (Power Level)
The Awgem SH1 offers 11 adjustable welding gears (power levels) to accommodate different nickel sheet thicknesses and desired weld strengths.
- After powering on, short press the Gear Adjustment Button (the same button used for ON/OFF) to cycle through the 11 gears.
- The Gear Indicator Lights will illuminate to show the selected power level.
- Recommendation: Start with a lower gear and gradually increase until a satisfactory weld is achieved. If the weld spot is too black, decrease the gear. If the weld is too weak or not firm, increase the gear.
5.3 Switching Welding Modes (Automatic/Manual)
The device supports both automatic and manual welding modes.
- To switch between modes, long press the Manual Mode Button (the larger button on the front of the device).
- The corresponding 'Manual' or 'Auto' indicator light will illuminate.
5.4 Welding Technique
Follow these steps for effective spot welding:
- Preparation: Ensure the battery terminals and nickel strip are clean. If the welding pins are oxidized, gently polish them with the included sandpaper.
- Placement: Place the nickel strip firmly onto the battery terminal. Ensure the strip does not overhang the battery.
- Positioning: Hold the spot welder at a 45-60 degree angle to the nickel strip, ensuring both welding pins make firm, simultaneous contact with the strip.
- Welding:
- Automatic Mode: The device will automatically detect contact and initiate the weld after a short delay.
- Manual Mode: Press the Manual Mode Button to initiate the weld.
- Inspection: After welding, gently test the connection to ensure it is secure.

5.5 Product Demonstration Video
6. Maintenance
Regular maintenance ensures the longevity and optimal performance of your Awgem SH1 spot welder.
- Cleaning: After each use, wipe the device and welding pins with a clean, dry cloth to remove any residue or debris.
- Pin Condition: Inspect the welding pins regularly. If they become oxidized or worn, use the included sandpaper to gently polish the tips. Severely worn pins should be replaced.
- Storage: Store the device in a cool, dry place away from direct sunlight and moisture.
7. Troubleshooting
If you encounter issues with your Awgem SH1, refer to the following common problems and solutions:
| Problem | Possible Cause | Solution |
|---|---|---|
| Weld spot is too black or burns through the nickel strip. | Welding power (gear) is too high. | Decrease the welding gear (power level) using the gear adjustment button. |
| Weld is too weak, not firm, or doesn't hold. | Welding power (gear) is too low; poor contact; oxidized pins; rusty surface. | Increase the welding gear. Ensure firm contact with both pins. Polish pins with sandpaper. Clean surfaces. |
| Red light alarm activates. | Battery voltage is below 3.2V (low battery). | Recharge the device immediately using the USB Type-C cable. |
| Blue light warning activates. | Device is overheating (temperature ≥65℃). | Stop welding and allow the device to cool down completely before resuming operation. |
| Welding pins become loose. | Screws securing the pins are loose. | Retighten the screws using the provided screwdriver. |
8. Specifications
| Specification | Detail |
|---|---|
| Manufacturer | Awgem |
| Part Number | SH1 |
| Item Weight | 8.3 ounces |
| Product Dimensions | 0.6 x 1.5 x 6 inches |
| Item Model Number | SH1 |
| Batteries | 1 Lithium Polymer battery required (included) |
| Material | Plastic |
| Power Source | Battery Powered |
| Battery Cell Type | Lithium Polymer |
| Weldable Nickel Sheet Thickness | 0.1mm - 0.2mm (MAX) |
9. Warranty and Support
Awgem products are manufactured to high-quality standards. For warranty information, technical support, or service inquiries, please refer to the contact details provided with your purchase or visit the official Awgem website. Please retain your proof of purchase for warranty claims.


