1. Introduction
This user manual provides essential information for the safe and efficient operation of your KEENSTAR 3.5 Bar Espresso Machine. Please read this manual thoroughly before first use and retain it for future reference.

Figure 1: KEENSTAR 3.5 Bar Espresso Machine (Sapphire color)
2. Important Safety Instructions
- Read all instructions before using the appliance.
- Do not immerse the appliance, cord, or plugs in water or other liquid.
- Close supervision is necessary when any appliance is used by or near children.
- Unplug from outlet when not in use and before cleaning. Allow to cool before putting on or taking off parts, and before cleaning the appliance.
- Do not operate any appliance with a damaged cord or plug or after the appliance malfunctions, or has been damaged in any manner.
- The use of accessory attachments not recommended by the appliance manufacturer may result in fire, electric shock, or injury to persons.
- Do not use outdoors.
- Do not let cord hang over edge of table or counter, or touch hot surfaces.
- Do not place on or near a hot gas or electric burner, or in a heated oven.
- Always turn the control knob to the "OFF" position to relieve pressure before opening the water tank cap or removing the portafilter.
- Do not add water immediately after making coffee to prevent burns.
- Do not put accessories in the dishwasher.
3. Product Components

Figure 2: Exploded view of the espresso machine and its parts.
- Steam Espresso Machine (Main Unit)
- Water Tank (integrated)
- Control Knob
- Rotating Steam Wand
- Spoon/Tamper
- Filter Basket
- Funnel (Portafilter)
- Carafe (240ml capacity for 4 cups coffee)
- Detachable Drip Tray
4. Setup and First Use
4.1 Unpacking
Carefully remove all packaging materials and components. Ensure all parts listed in Section 3 are present and undamaged. Keep packaging for future storage or transport.
4.2 Initial Cleaning
Before first use, wash the carafe, filter basket, funnel (portafilter), and spoon in warm, soapy water. Rinse thoroughly and dry. Wipe the exterior of the machine with a damp cloth.
4.3 Priming the Machine
To prime the machine and remove any manufacturing residues, perform a water-only cycle:
- Fill the carafe with clean water up to the 4-cup (240ml) mark.
- Pour the water into the water tank at the top of the machine.
- Place the empty carafe on the drip tray.
- Turn the control knob to the "Coffee" symbol.
- Allow the machine to complete a full cycle, dispensing all water into the carafe.
- Discard the water. Your machine is now ready for use.
5. Operating Instructions
5.1 Making Espresso
- Add Water: Fill the carafe with water up to the desired level (e.g., 2-cup or 4-cup mark, max 240ml). Pour the water into the water tank. Note: Do not exceed 240ml, otherwise the nozzle may leak.

Figure 3: Adding water to the water tank using the carafe.
- Add Coffee Grounds: Place the filter basket into the portafilter. Add medium-ground coffee (recommended >0.5mm) to the filter basket. Do not use too fine coffee ground. Tamp the coffee lightly with the spoon/tamper. Note: Ensure the coffee ground does not exceed the 4-cup mark in the filter.

Figure 4: Adding and tamping medium-ground coffee.
- Install Portafilter: Insert the portafilter into the machine and turn the handle to the "Lock" symbol to secure it. Note: The filter must be fully locked.

Figure 5: Correctly installing and locking the portafilter.
- Place Carafe: Place the carafe on the drip tray directly under the portafilter spout.
- Start Brewing: Turn the control knob to the "Coffee" symbol. The indicator light will illuminate. The machine will begin brewing espresso. Brewing typically takes 2-3 minutes for 4 cups.
Video 1: Demonstration of espresso brewing process.
- Stop Brewing: Once the desired amount of espresso is brewed, turn the control knob to the "OFF" position.
- Relieve Pressure: Before removing the portafilter, ensure the control knob is in the "OFF" position to relieve any remaining pressure.
5.2 Frothing Milk (for Cappuccino/Latte)
- Prepare Milk: Fill a pitcher with cold milk (dairy or non-dairy). Do not fill more than one-third full to allow for expansion.
- Preheat Steam Wand: Turn the control knob to the "Steam" symbol. Wait for the indicator light to illuminate, indicating the machine has reached steaming temperature (approx. 40 seconds).
- Purge Steam Wand: Briefly open the steam valve to release any condensed water. Close the valve.
- Froth Milk: Immerse the steam wand tip just below the surface of the milk. Turn the control knob to the "Steam" symbol. Move the pitcher up and down slowly to create micro-foam. Continue until the milk reaches desired temperature and consistency.

Figure 6: Using the professional steam wand to froth milk.
- Stop Steaming: Turn the control knob to the "OFF" position.
- Clean Steam Wand: Immediately wipe the steam wand with a damp cloth to remove any milk residue. Briefly open the steam valve again to clear any milk from inside the wand.
6. Maintenance and Cleaning
Regular cleaning ensures optimal performance and extends the life of your espresso machine.
6.1 Daily Cleaning
- Portafilter and Filter Basket: After each use, remove the portafilter and discard used coffee grounds. Rinse the filter basket and portafilter under running water. Ensure no coffee grounds remain on the edge of the filter.

Figure 7: Proper cleaning of the filter basket.
- Steam Wand: As mentioned in Section 5.2, clean the steam wand immediately after frothing milk to prevent blockages.
- Drip Tray: The drip tray is removable for easy cleaning. Empty and rinse it regularly.
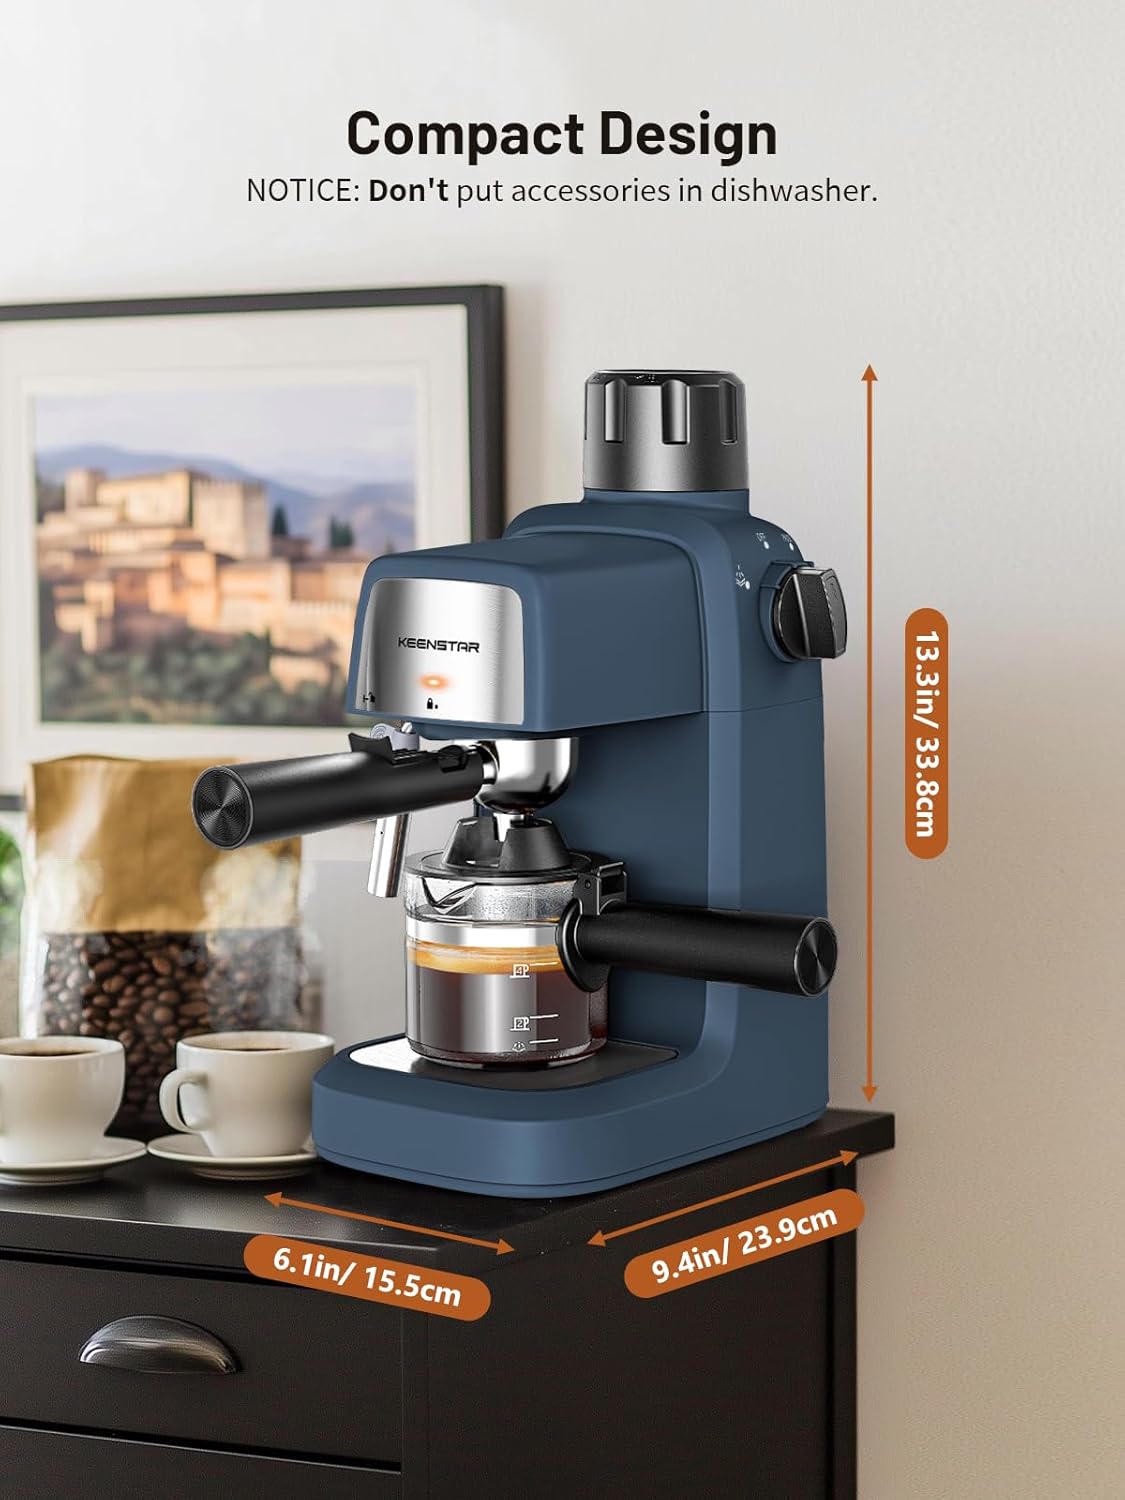
Figure 8: Detachable drip tray for easy cleaning.
- Exterior: Wipe the exterior of the machine with a soft, damp cloth. Do not use abrasive cleaners or scouring pads.
6.2 Descaling
Over time, mineral deposits (limescale) can build up in the machine, affecting performance. Descale your machine every 2-3 months, or more frequently if you have hard water.
- Prepare a descaling solution according to the descaler manufacturer's instructions (e.g., white vinegar and water, or a commercial descaling agent).
- Pour the solution into the water tank.
- Place a large container under the portafilter and steam wand.
- Run a brewing cycle with the descaling solution until half of the solution has passed through.
- Turn the control knob to the "Steam" symbol and let the remaining solution pass through the steam wand.
- Rinse the water tank thoroughly and fill with fresh water.
- Run two full cycles with fresh water to rinse out any remaining descaling solution.
7. Troubleshooting
| Problem | Possible Cause | Solution |
|---|---|---|
| No coffee dispenses. | No water in tank; portafilter not locked; coffee too fine/tamped too hard; machine clogged. | Fill water tank; ensure portafilter is locked; use medium ground coffee and tamp lightly; descale machine. |
| Water leaks from nozzle. | Too much water added to tank. | Ensure water added is max 240ml (4 cups). |
| Steam wand not producing steam or weak steam. | Steam wand clogged with milk residue; machine not hot enough. | Clean steam wand immediately after use; allow machine to fully preheat for steaming. |
| Coffee tastes weak or watery. | Insufficient coffee grounds; coffee too coarse; machine needs descaling. | Use adequate amount of coffee; use medium ground coffee; descale machine. |
8. Specifications
- Brand: KEENSTAR
- Model Name: BCM2201N
- Pressure: 3.5 Bar
- Power: 800W
- Capacity: 4 Cups (240ml)
- Product Dimensions: 9.4"D x 6.1"W x 13.3"H
- Item Weight: 4 pounds
- Coffee Input Type: Ground Coffee
- Filter Type: Reusable
- Operation Mode: Manual
- Special Feature: Milk Frother, Preheating Function
9. Warranty and Support
For warranty information and customer support, please refer to the warranty card included with your product or visit the official KEENSTAR website. You can also contact the seller, xFTech Inc, for assistance.
Seller: xFTech Inc