1. Introduction
This manual provides essential instructions for the safe and effective operation of your FNNEMGE 6500A Jump Starter with integrated Air Compressor. Please read this manual thoroughly before using the device and retain it for future reference. This device is designed to provide emergency jump-starting for 12V vehicles, inflate tires, and serve as a portable power bank.
2. Package Contents
Upon unpacking, please verify that all items listed below are present and in good condition:
- FNNEMGE Jump Starter Power Bank
- Jump Leads (Smart Clamps)
- Inflator Hose
- USB-C Cable
- 3 Valve Adapters (for various inflatables)
- EVA Carrying Case
- User Manual

Image: The FNNEMGE Jump Starter device shown with its complete set of accessories, including jump leads, inflator hose, USB-C cable, valve adapters, and carrying case.
3. Product Features
- High-Performance Jump Starter: 6500A peak current for starting 12V vehicles, compatible with all gasoline engines and up to 10.0L diesel engines. Features a dual-start guarantee for deeply discharged batteries.
- Integrated Air Compressor: 160PSI maximum pressure, inflates tires from 0 to 36 PSI (2.5 bar) in minutes. Includes automatic memory mode for preset pressure and 3 additional nozzles for various inflatables.
- Portable Power Bank: 26800mAh capacity with USB outputs and a charging port for smartphones, tablets, cameras, and other devices.
- HD LCD Display: Clearly shows battery level, input/output parameters, and operating status, including warnings for temperature extremes.
- Dual LED Light Sources: Features a 400-lumen white light panel for general illumination and an upper small lamp with Lighting, SOS, and Strobe modes for emergencies.
- 10 Intelligent Protection Systems: Comprehensive safety mechanisms against overcharging, short circuits, reverse polarity, overvoltage, and sparking. Smart cables prevent overheating and deep discharge.
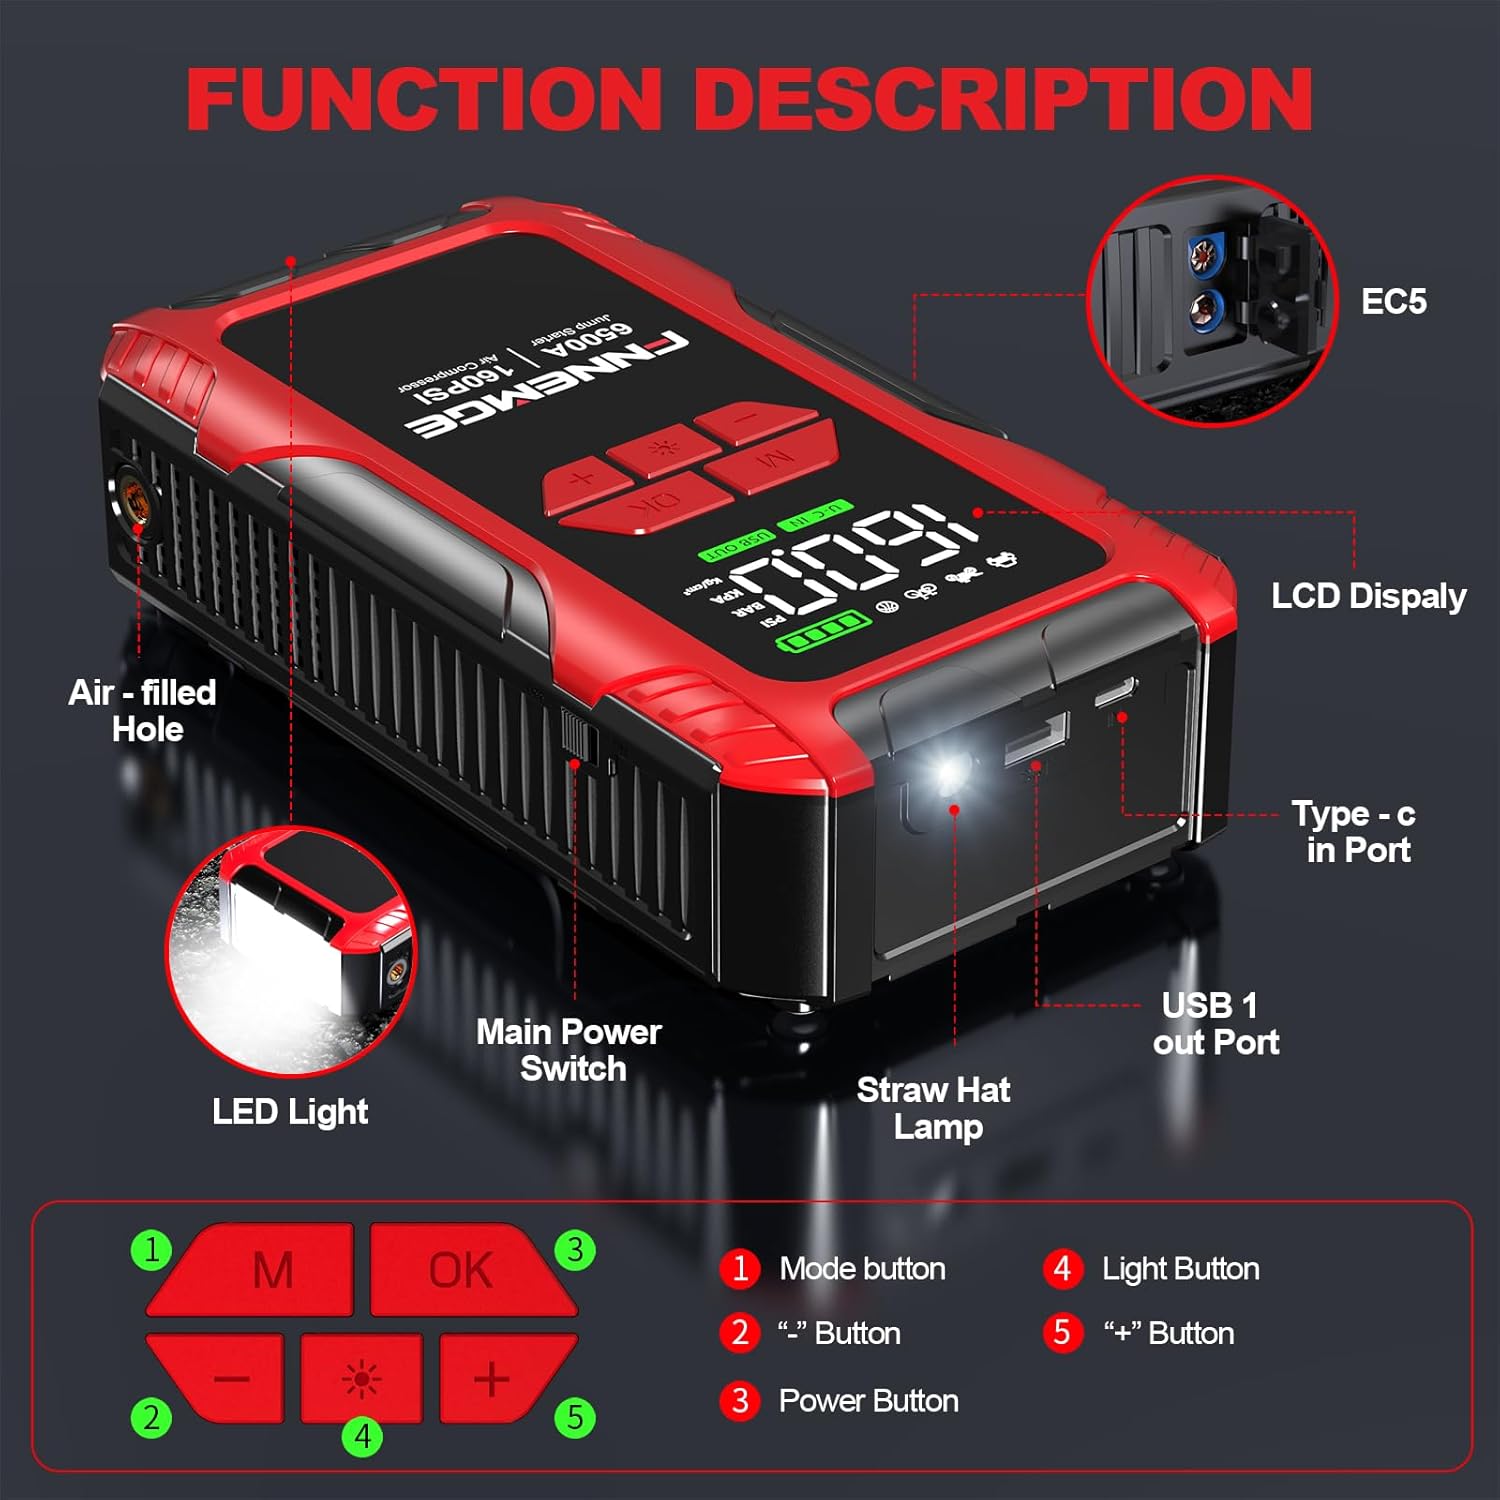
Image: A detailed diagram illustrating the various ports, buttons, and display features of the FNNEMGE Jump Starter, including the EC5 port, LCD display, Type-C input, USB output, LED light, and control buttons (M, OK, Light, +,-).
4. Safety Information
Always adhere to the following safety guidelines to prevent injury or damage to the device:
- Do not disassemble the device. Servicing should only be performed by qualified personnel.
- Keep out of reach of children.
- Do not expose the device to extreme temperatures (above 60°C or below -20°C) or direct sunlight for extended periods.
- Avoid contact with water or other liquids.
- Ensure proper ventilation during use and charging.
- Do not jump-start a frozen battery.
- Always connect the jump leads correctly (red to positive, black to negative) to avoid reverse polarity.
- Remove jump leads from the vehicle battery within 30 seconds after starting the engine.
- The device is equipped with 10 intelligent protection mechanisms: Spark Proof, Zero Damage, Low Voltage, High Temperature, Short Circuit, Reverse Polarity, Reverse Overcharge, Over Voltage, Reverse Current, and Overcharge Protection.

Image: Visual representation of the 10 advanced safety protections integrated into the FNNEMGE Jump Starter, including spark proof, short circuit, reverse polarity, and overcharge protection.
5. Setup and Charging
5.1 Initial Charging
Before first use, fully charge the FNNEMGE Jump Starter. Connect the provided USB-C cable to the device's Type-C input port and the other end to a USB wall adapter (not included). The LCD display will show the charging status. A full charge is indicated when the battery icon is completely filled.
5.2 Device Overview
Familiarize yourself with the device's components and controls:
- EC5 Port: For connecting jump leads.
- LCD Display: Shows battery status, pressure, and operational information.
- Type-C In Port: For charging the device.
- USB Out Port: For charging external devices.
- Air-filled Hole: For connecting the inflator hose.
- LED Light: Main illumination source.
- Main Power Switch: To turn the device on/off.
- Control Buttons (M, OK, Light, +, -): For mode selection, confirmation, light control, and value adjustment.
6. Operating Instructions
6.1 Jump Starting a Vehicle
- Ensure Device is Charged: Check the LCD display to confirm the jump starter has sufficient charge.
- Connect Jump Leads: Insert the blue end of the jump leads into the EC5 port on the jump starter.
- Attach Clamps to Battery:
- Connect the RED clamp to the vehicle's positive (+) battery terminal.
- Connect the BLACK clamp to the vehicle's negative (-) battery terminal.
- Start the Engine: Return to your vehicle and start the engine.
- Remove Clamps: Once the engine starts, immediately remove the jump leads from the car battery, then disconnect them from the jump starter. Do not leave the jump starter connected for more than 30 seconds after the engine starts.

Image: The FNNEMGE Jump Starter with its smart clamps connected to a car battery, demonstrating the jump-starting process.
6.2 Using the Air Compressor
- Assemble Hose: Screw the inflator hose onto the "Air-filled Hole" port on the jump starter.
- Connect to Tire/Inflatable: Attach the other end of the inflator hose to the valve stem of the tire or inflatable item. Ensure a tight seal.
- Power On and Set Pressure: Turn on the jump starter. The LCD will display the current pressure. Use the 'M' button to select the desired unit (PSI, BAR, KPA, Kg/cm²) and the '+' and '-' buttons to set the target inflation pressure. The device has an automatic memory mode for the last set pressure.
- Start Inflation: Press the 'OK' button to begin inflation. The compressor will automatically stop once the preset pressure is reached.
- Disconnect: Remove the inflator hose from the tire/inflatable and then from the jump starter.

Image: A person kneeling beside a car, using the FNNEMGE Jump Starter's integrated air compressor to inflate a tire, with the digital display showing pressure readings.
6.3 Using as a Power Bank
The FNNEMGE Jump Starter can charge various electronic devices:
- Connect Device: Use a compatible USB cable (e.g., the provided USB-C cable or your device's charging cable) to connect your smartphone, tablet, or other electronic device to the USB output port on the jump starter.
- Start Charging: The jump starter will automatically begin charging the connected device. Monitor the charging status on your electronic device.
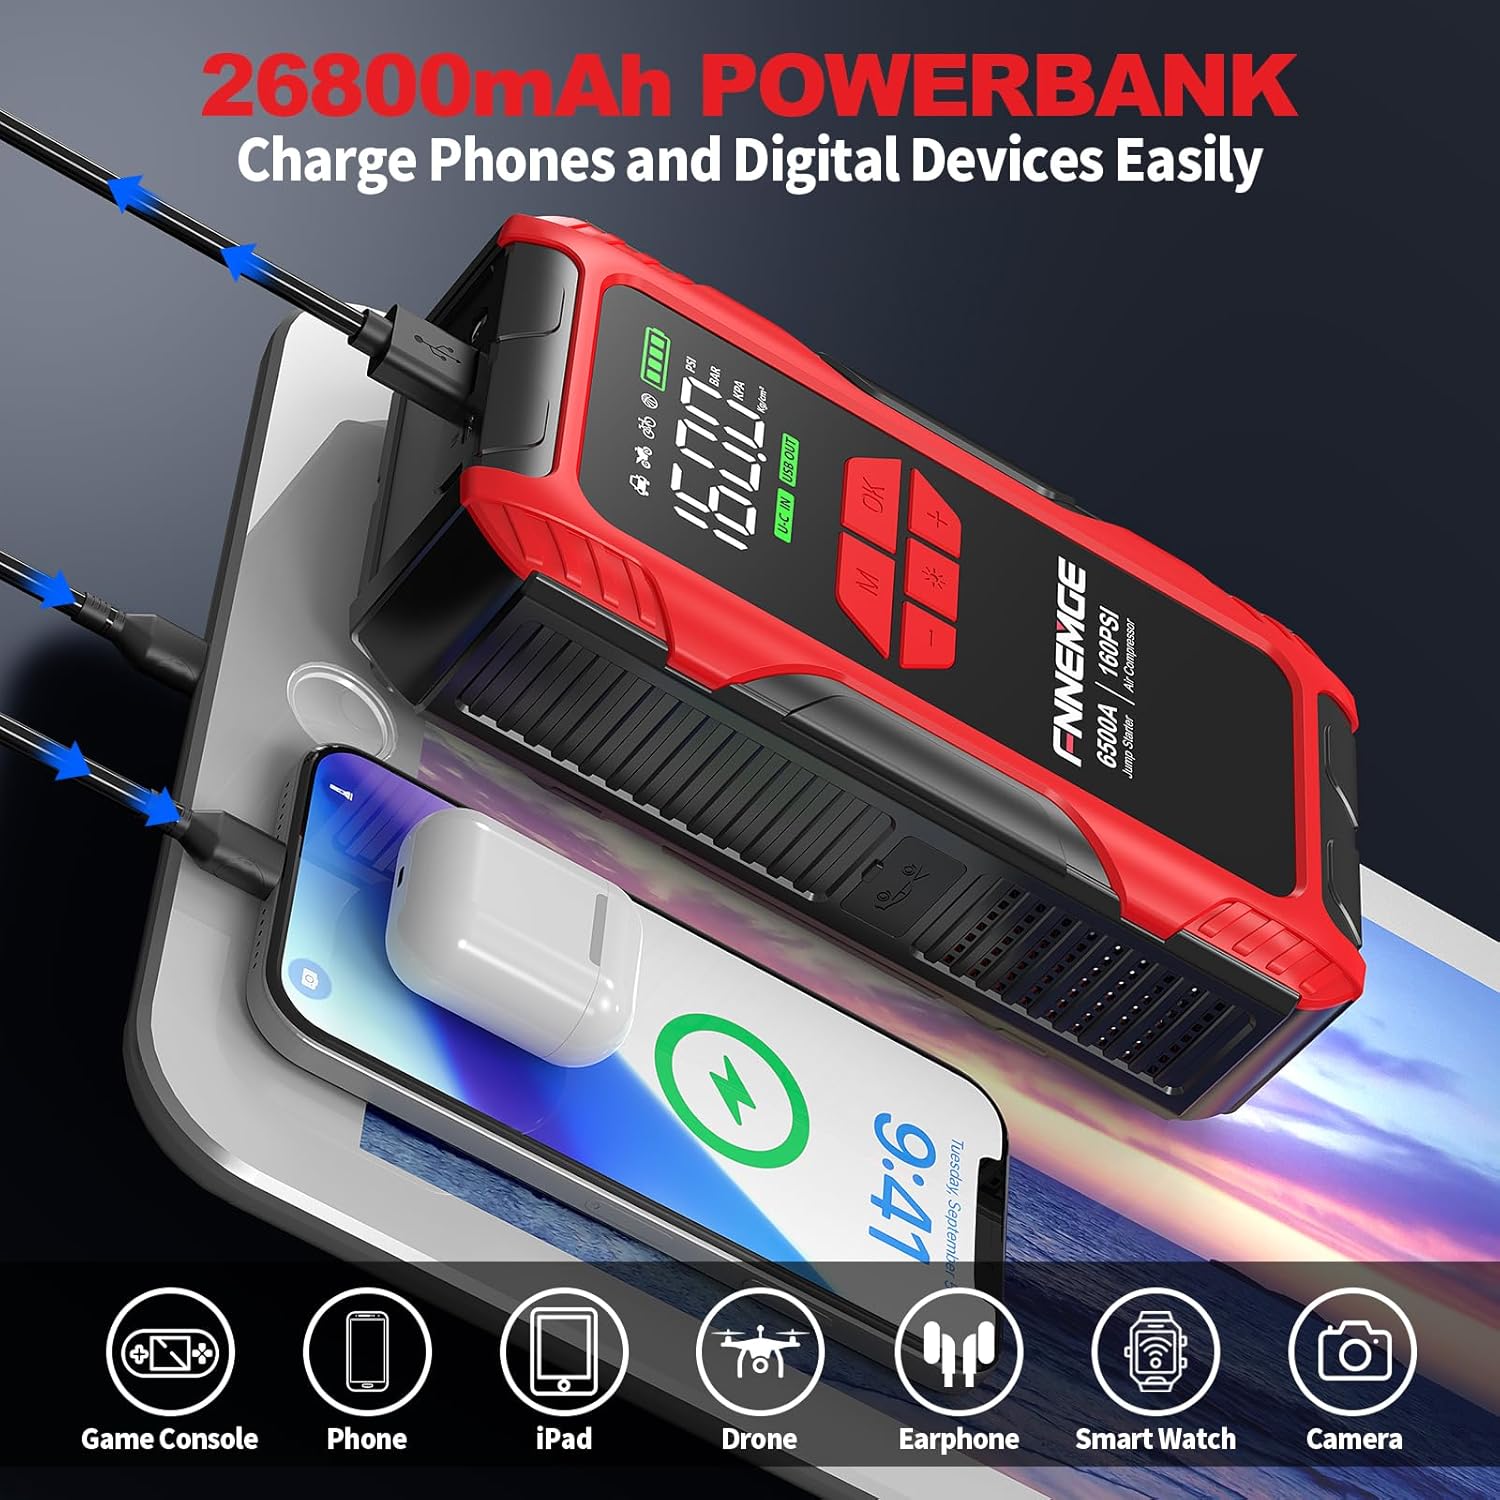
Image: The FNNEMGE Jump Starter connected via USB cables to charge various digital devices such as a smartphone, tablet, and wireless earbuds, demonstrating its power bank functionality.
6.4 LED Light Functions
The device features dual LED light sources for various situations:
- Lower White Light Panel (400 lumens): A short press of the 'Light' button activates this panel, providing broad illumination for tasks in dark environments.
- Upper Small Lamp Beads (Multiple Modes): Press and hold the 'Light' button to activate the upper lamp beads and cycle through the following modes:
- Lighting Mode: Continuous steady light for general use.
- SOS Mode: Flashes the international Morse code signal for distress (three short, three long, three short).
- Strobe Mode: Rapid flashing light for signaling or attracting attention.

Image: The FNNEMGE Jump Starter's powerful LED light illuminating a dark, rocky outdoor setting, demonstrating its utility as a light source.
7. Maintenance
- Recharge Regularly: To maintain battery health, recharge the jump starter every 3-6 months, even if not used.
- Storage: Store the device in a cool, dry place, away from direct sunlight and extreme temperatures. Ensure it is stored in its EVA carrying case to protect it from dust and physical damage.
- Cleaning: Wipe the device with a soft, dry cloth. Do not use harsh chemicals or abrasive cleaners.
- Inspect Cables: Periodically check the jump leads and inflator hose for any signs of damage or wear. Replace if necessary.
8. Troubleshooting
| Problem | Possible Cause | Solution |
|---|---|---|
| Device does not turn on. | Battery is depleted. | Charge the device fully using the USB-C cable. |
| Vehicle does not start after jump-starting. | Incorrect clamp connection; Vehicle battery is severely damaged; Vehicle has other mechanical issues. | Ensure clamps are connected correctly (red to +, black to -). Try again. If still unsuccessful, consult a mechanic. |
| Air compressor does not inflate. | Hose not securely attached; Target pressure not set; Device battery low. | Ensure hose is tightly screwed on. Set target pressure using '+' and '-' buttons. Charge the device. |
| LCD shows error message. | Safety protection activated (e.g., reverse polarity, over-temperature). | Refer to the safety section. Disconnect and reconnect correctly. Allow device to cool down if temperature warning is displayed. |
| External device not charging from USB port. | USB cable faulty; Device battery low; External device not compatible. | Try a different USB cable. Charge the jump starter. Ensure your device is compatible with standard USB charging. |
9. Specifications
| Feature | Specification |
|---|---|
| Model | FG606 |
| Peak Current | 6500 Amps |
| Battery Capacity | 26800 mAh (Lithium Polymer) |
| Vehicle Compatibility | 12V (All Gas, up to 10.0L Diesel) |
| Air Compressor Max Pressure | 160 PSI |
| Air Flow | 35 L/min |
| USB Output | 5V/2.4A (typical) |
| Type-C Input | 5V/2A or 9V/2A |
| LED Light Output | 400 Lumens |
| Dimensions | 6.5 x 12 x 25 cm |
| Weight | 1.1 kg |
10. Warranty and Support
Your FNNEMGE Jump Starter comes with a 24-Month Warranty from the date of purchase. This warranty covers manufacturing defects and workmanship under normal use. It does not cover damage caused by misuse, accidents, unauthorized modifications, or natural disasters.
For technical support, warranty claims, or any questions regarding your product, please contact FNNEMGE customer service. Our 24/7 Friendly Customer Service team is available to assist you.
Please retain your proof of purchase for warranty validation.


