
1. Product Overview
The GKU D700 Dash Cam is a dual-channel recording system designed to capture high-quality video footage from both the front and rear of your vehicle. It features a 3.18-inch touchscreen for easy operation, built-in GPS for route tracking, and 5.8GHz WiFi for seamless app connectivity. The system supports 4K resolution for the front camera and 1080P for the rear, ensuring clear and detailed recordings.
Package Contents

Figure 1: Included components of the GKU D700 Dash Cam system.
- 1 x GKU D700 4K Dash Cam (Front Unit)
- 1 x 1080P Rear Camera
- 1 x 64GB MicroSD Card (pre-installed)
- 1 x 11.5ft Power Supply Cable with Car Charger
- 1 x 18ft Rear Camera Cable
- 2 x 3M Adhesive Mounts
- 2 x Electrostatic Films
- 1 x User Manual
- 1 x Pry Tool
- 5 x Cable Stickers
2. Setup and Installation
2.1 Preparing for Installation
- Ensure the vehicle's engine is off.
- Clean the windshield area where the dash cam will be mounted to ensure proper adhesion.
- Insert the provided 64GB MicroSD card into the main dash cam unit.
2.2 Front Dash Cam Installation
- Apply one of the electrostatic films to the chosen area on your windshield. This allows for easier removal of the dash cam mount later.
- Attach the front dash cam to the electrostatic film using the pre-installed 3M adhesive on the bracket. Ensure the camera lens has a clear view of the road.
- Connect the 11.5ft power supply cable to the Type-C port on the dash cam.
- Route the power cable neatly along the edge of the windshield and dashboard, using the provided pry tool to tuck it under trim panels. Secure the cable with the included cable stickers if necessary.
- Plug the car charger end of the power cable into your vehicle's 12V power outlet (cigarette lighter socket).
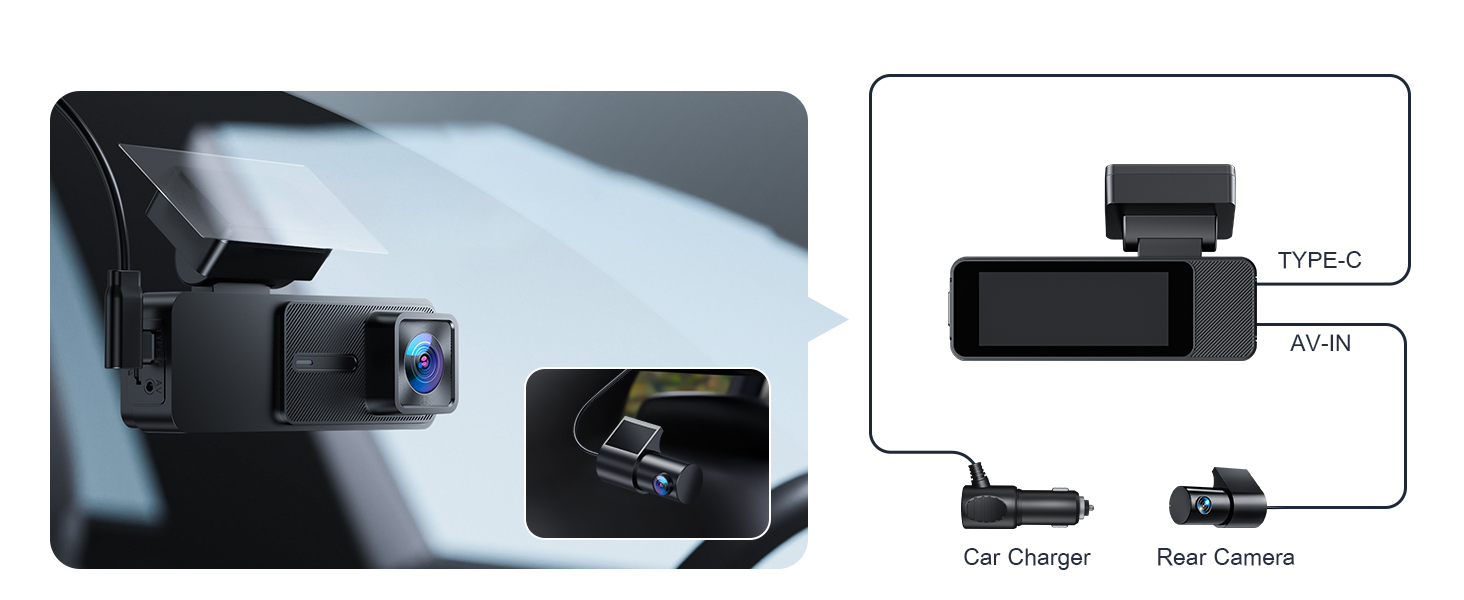
Figure 2: Connection points for the GKU D700 Dash Cam.
2.3 Rear Camera Installation
- Mount the 1080P rear camera on the inside of your rear windshield, ensuring a clear view. The rear camera is not waterproof and must be installed inside the vehicle.
- Connect the 18ft rear camera cable to the AV-IN port on the main dash cam unit.
- Route the rear camera cable from the front unit to the rear camera, carefully tucking it under the vehicle's headliner and side panels. Use the pry tool for assistance.
- Adjust the angle of the rear camera for optimal coverage. The rear camera offers 360° adjustability.

Figure 3: Recommended cable routing for a clean installation.

Figure 4: Front dash cam's compact view and adjustable rear camera.
3. Operating Instructions
3.1 Powering On/Off
- The dash cam will automatically power on and begin recording when your vehicle's engine starts.
- It will automatically power off when the engine is turned off.
3.2 Touchscreen Operation
The GKU D700 features a 3.18-inch HD touchscreen for intuitive control. You can access recording, Wi-Fi, playback, and settings directly from the screen.

Figure 5: Navigating the dash cam's touchscreen interface.

Figure 6: The responsive 3.18-inch touchscreen for direct control.
3.3 Wi-Fi and App Control
The dash cam features built-in 5.8GHz WiFi for faster data transfer and seamless connection to the GKU GO app on your smartphone. This allows for easy viewing, playback, and downloading of recorded footage.
- Download the "GKU GO" app from the App Store or Google Play.
- On the dash cam's touchscreen, tap the Wi-Fi icon to enable Wi-Fi.
- On your smartphone, connect to the dash cam's Wi-Fi network (SSID and password usually displayed on the dash cam screen).
- Open the GKU GO app to access live view, playback recordings, and manage settings.

Figure 7: GKU GO app interface for remote control and file management.

Figure 8: Activating Wi-Fi on the dash cam for app connection.

Figure 9: Methods for accessing recorded footage.
3.4 GPS Functionality
The built-in high-precision GPS records your driving route, speed, and location in real-time. You can review your journey on a map using the GKU GO app or a dedicated GPS player for Windows and Mac.

Figure 10: Visual representation of GPS tracking and route playback.

Figure 11: Detailed GPS route tracking on a map interface.
3.5 Parking Monitoring (Requires Hardwire Kit)
For 24-hour parking monitoring, a separate hardwire kit (not included) is required. Once connected, the dash cam offers two parking modes:
- G-Sensor Parking Mode: Automatically activates recording if any impact is detected while parked, locking the footage to prevent overwriting.
- Time-Lapse Parking Mode: Continuously records at a low frame rate (FPS), saving power and storage while providing continuous surveillance.

Figure 12: G-sensor and Time-lapse parking modes.

Figure 13: Parking monitoring features and hardwire kit requirement.

Figure 14: G-Sensor activated recording in emergencies.
3.6 Loop Recording
The loop recording feature ensures continuous recording by automatically overwriting the oldest footage when the memory card is full. Critical footage detected by the G-sensor is locked and protected from being overwritten.
- Adjustable segment lengths: 1-minute, 3-minute, or 5-minute.

Figure 15: Loop recording functionality and segment options.
4. Maintenance
4.1 MicroSD Card Management
- Regularly format the MicroSD card (at least once a month) to maintain optimal performance and prevent data corruption.
- The dash cam supports up to a 512GB MicroSD card.
- Replace the MicroSD card if you experience frequent recording errors or degraded performance.
4.2 Cleaning the Device
- Use a soft, dry cloth to clean the dash cam's lens and screen.
- Avoid using abrasive cleaners or solvents that could damage the device.
5. Troubleshooting
Common Issues and Solutions:
- Dash Cam Not Powering On:
- Check the power cable connection to both the dash cam and the car's power outlet.
- Ensure the vehicle's 12V power outlet is functioning.
- Recording Errors/Skipped Frames:
- Format the MicroSD card.
- Ensure the MicroSD card is a high-speed card (Class 10 or higher recommended).
- Try a different MicroSD card.
- Wi-Fi Connection Issues:
- Ensure Wi-Fi is enabled on the dash cam.
- Restart both the dash cam and your smartphone.
- Verify you are connecting to the correct Wi-Fi network.
- GPS Not Tracking:
- Ensure the dash cam has a clear view of the sky for satellite reception.
- Verify GPS is enabled in the dash cam settings.
- Screen Unresponsive:
- Restart the dash cam.
- If the issue persists, contact customer support.
6. Specifications
| Feature | Detail |
|---|---|
| Model Name | D700 |
| Brand | GKU |
| Video Capture Resolution | Front: 4K 2160p@30fps, Rear: 1080P@25fps |
| Screen Size | 3.18-inch HD Touch Screen |
| Connectivity Technology | 5.8GHz/2.4GHz Wi-Fi |
| Special Features | Built-in GPS, App Control, Automatic Incident Detection (G-Sensor), Compact Design, WDR, Night Vision, Loop Recording, Parking Monitor (requires hardwire kit) |
| Storage Support | Includes 64GB SD card, Supports up to 512GB Max |
| Product Dimensions | 1.18 x 4.3 x 1.96 inches |
| Item Weight | 1.34 pounds |
| Mounting Type | Windshield Mount |
| Vehicle Service Type | Car, Minivan, SUV, Truck |
7. Warranty and Support
The GKU D700 Dash Cam comes with a 12-month guarantee. This guarantee can be extended to 24 months upon product registration within 7 days of purchase. GKU also provides lifetime technical support and 24/7 customer support.
For technical assistance or warranty claims, please contact GKU customer support at support@gkutech.com.


