
Lenco CR-606BK Compact DAB+/FM Radio Alarm Clock User Manual
Model: CR-606BK | Brand: Lenco
Introduction
Welcome to the user manual for your Lenco CR-606BK Compact DAB+/FM Radio Alarm Clock. This guide provides essential information for setting up, operating, and maintaining your device. Please read these instructions carefully before use to ensure proper functionality and to maximize your experience with the product.
Package Contents
- Lenco CR-606BK Radio Alarm Clock
- Power Adapter
- Multi-language User Manual (DE/EN/NL/FR/ES/DK/SE/PT)
Key Features
- DAB+/FM Radio with 40 Presets (20 DAB+, 20 FM)
- Bluetooth 5.3 for Wireless Music Streaming
- Large Dimmable LCD Display
- Dual Alarm Function
- Snooze Function
- Sleep Timer
- USB Charging Port for External Devices
- 3.5mm Audio Output
- Compact Design
Controls and Display Overview
Familiarize yourself with the buttons and display indicators on your CR-606BK.
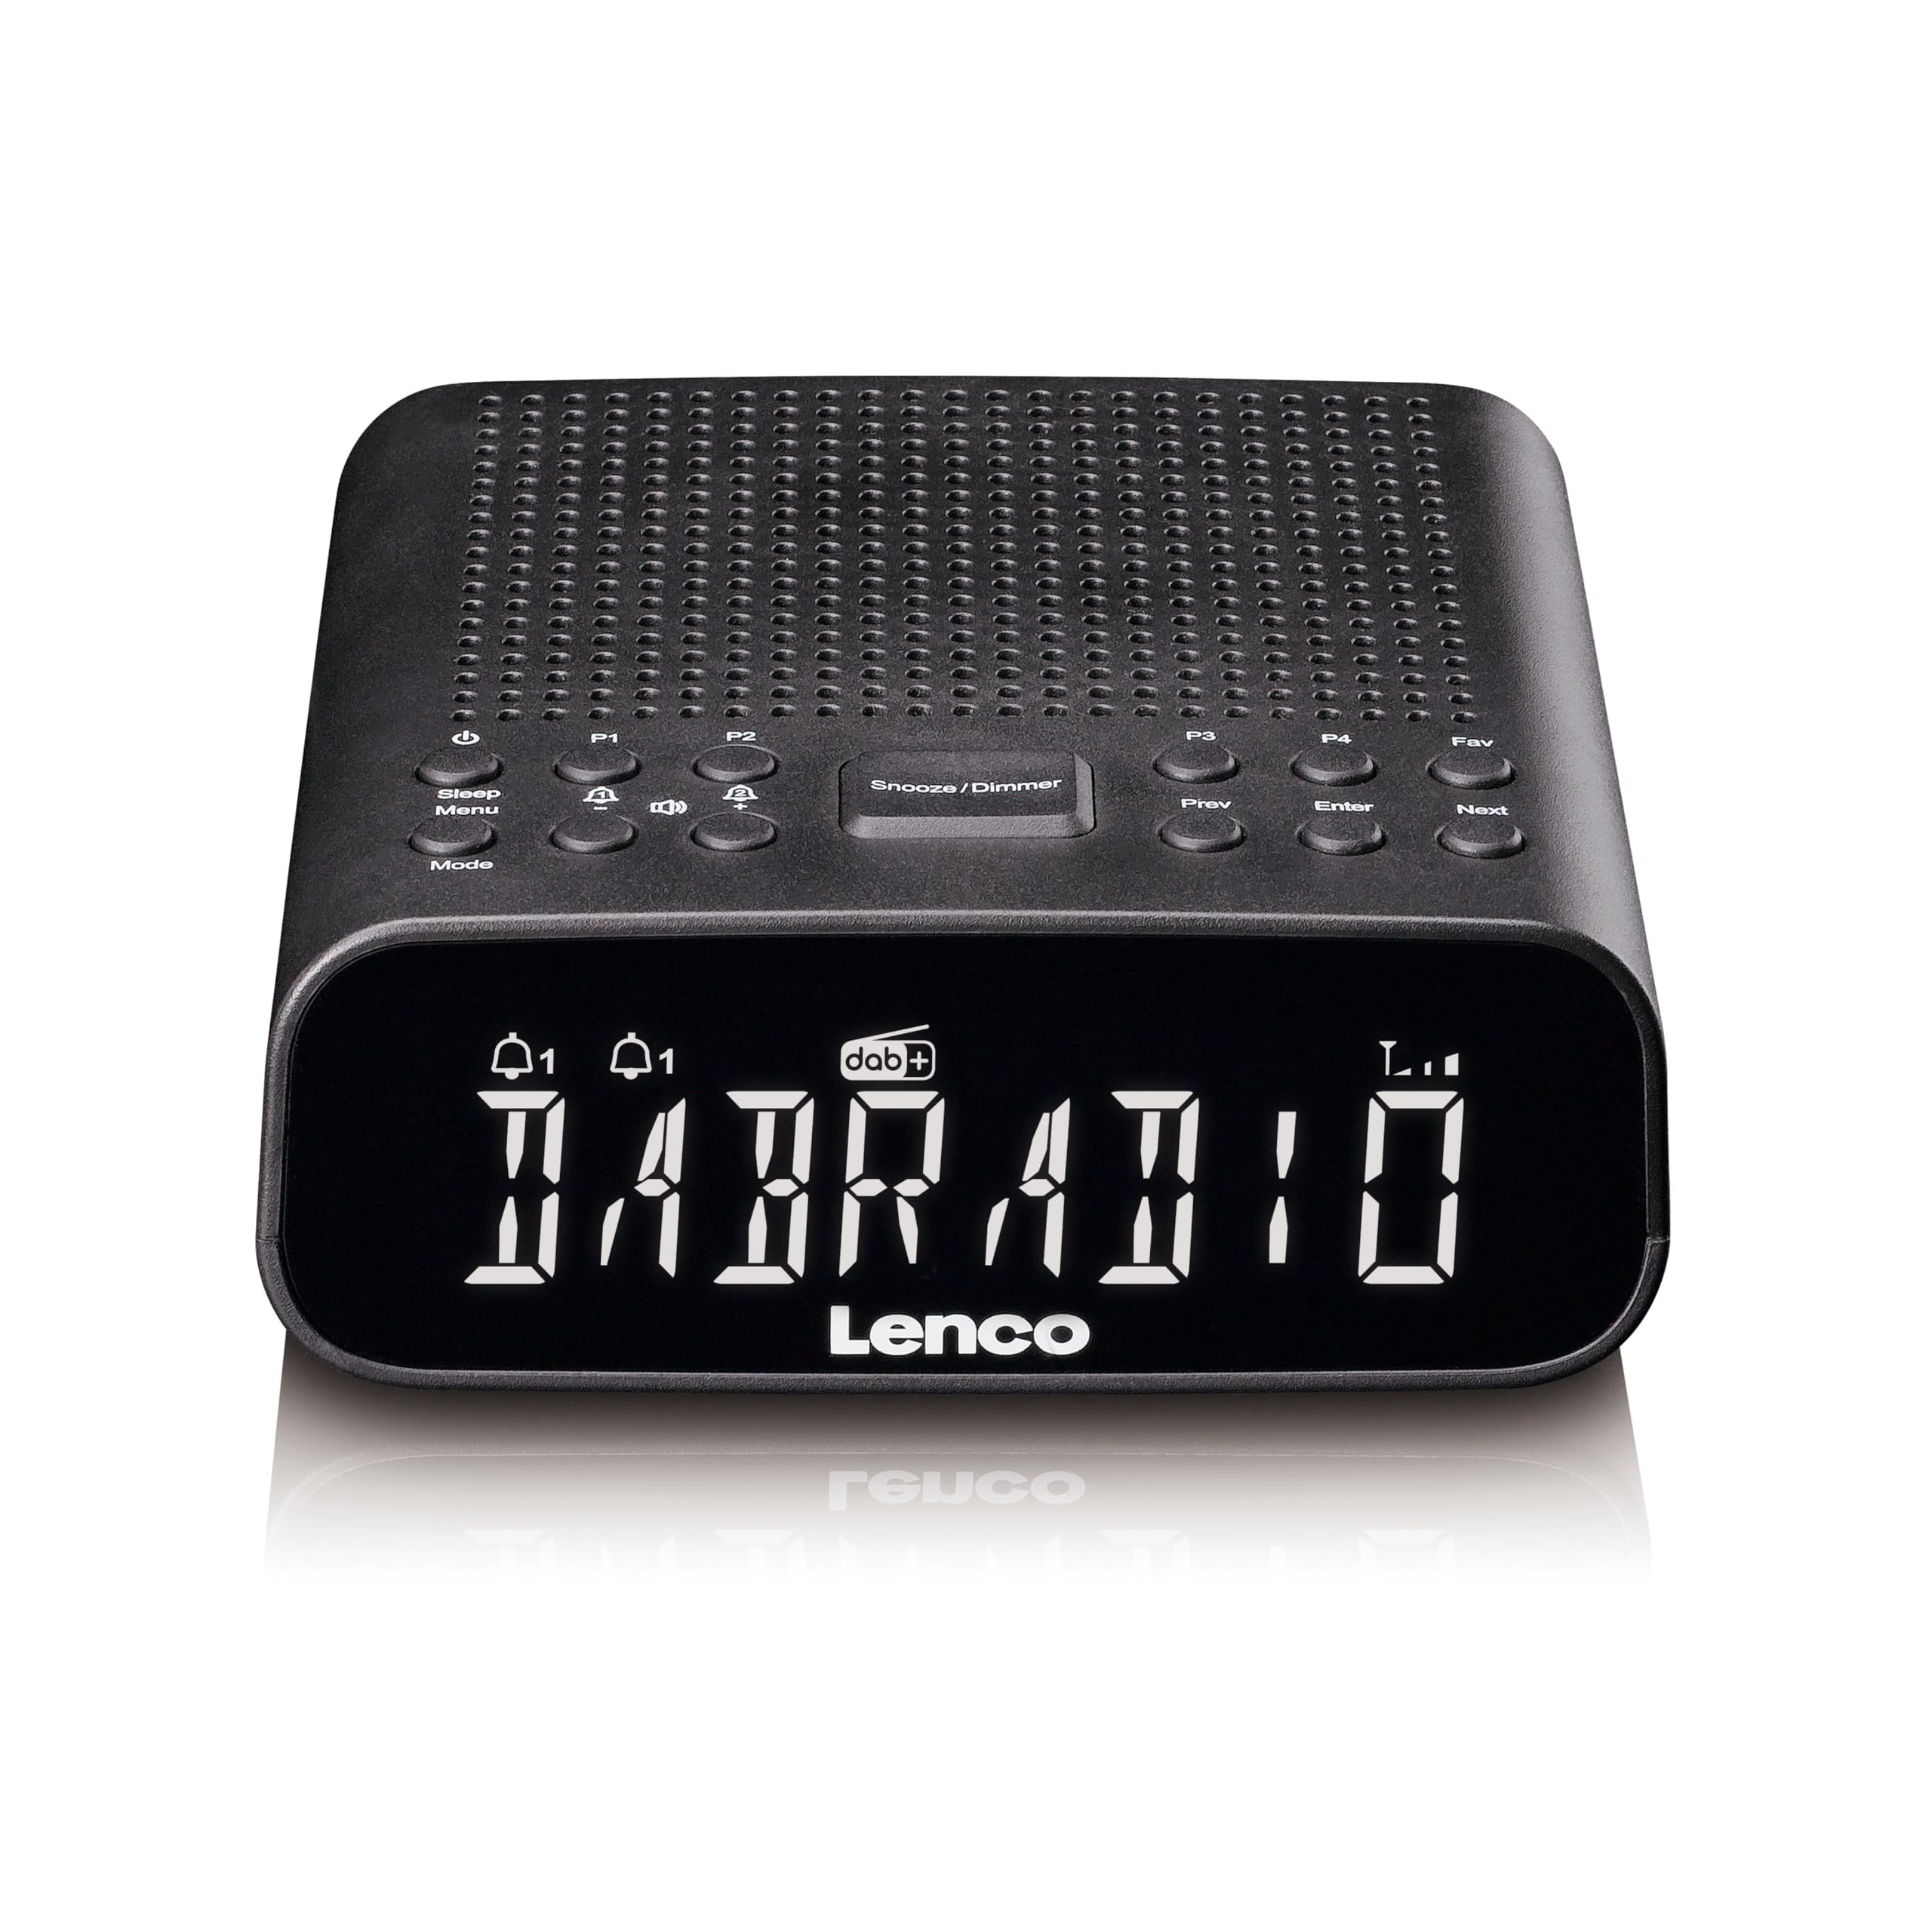
Image Description: A top-down view of the Lenco CR-606BK radio alarm clock. The device is black with a perforated speaker grille on top. Below the grille are two rows of control buttons. The front features a large, black LCD display showing "DAB RADIO" and "Lenco" in white text, along with alarm icons (bell 1, bell 2) and a DAB+ logo. The display also shows a signal strength indicator.
Top Panel Controls
- Power Button (⏻): Turns the unit on or off.
- Sleep/Menu Button: Activates sleep timer; long press to enter menu settings.
- Mode Button: Switches between DAB+, FM, and Bluetooth modes.
- P1 / Alarm 1 Button: Short press for preset 1; long press to set Alarm 1.
- P2 / Alarm 2 Button: Short press for preset 2; long press to set Alarm 2.
- Snooze/Dimmer Button: Activates snooze during an alarm; short press to adjust display brightness.
- P3 / Previous Button: Short press for preset 3; navigates backward in menus or tunes frequency down.
- P4 / Enter Button: Short press for preset 4; confirms selections in menus.
- Fav / Next Button: Short press for favorite station; navigates forward in menus or tunes frequency up.
Front Display Indicators
- Time Display: Shows current time.
- Alarm 1 Icon (🔔1): Indicates Alarm 1 is active.
- Alarm 2 Icon (🔔2): Indicates Alarm 2 is active.
- DAB+ Logo: Indicates DAB+ radio mode.
- Signal Strength Indicator: Shows radio signal reception quality.
- Bluetooth Icon: Indicates Bluetooth mode is active and connection status.
Initial Setup
1. Power Connection
Connect the supplied power adapter to the DC IN port on the back of the CR-606BK and then plug it into a standard wall outlet. The unit will power on automatically or enter standby mode.
2. Antenna
For optimal DAB+ and FM radio reception, fully extend the telescopic antenna located at the back of the unit. Adjust its position for the best signal quality.
Operating Your CR-606BK
Power On/Off
Press the Power Button (⏻) to turn the unit on or off.
Mode Selection
Press the Mode Button repeatedly to cycle through DAB+, FM, and Bluetooth modes.
Volume Adjustment
Use the P3/Prev and Fav/Next buttons to adjust the volume level when the unit is playing audio.
Setting Time and Date (Automatic/Manual)
The time and date are usually set automatically via DAB+ or FM signal. If manual adjustment is needed:
- In standby mode, long press the Sleep/Menu Button to enter the menu.
- Use P3/Prev or Fav/Next to navigate to "Time/Date" and press P4/Enter.
- Select "Set Time" or "Set Date" and adjust values using P3/Prev or Fav/Next, confirming each with P4/Enter.
DAB+ Radio Operation
- Press Mode to select DAB+ mode.
- The radio will automatically scan for available DAB+ stations on first use. To perform a full scan manually, long press Sleep/Menu, navigate to "Full Scan" and press P4/Enter.
- Use P3/Prev or Fav/Next to browse through available stations.
- To save a station as a preset, long press P1, P2, P3, or P4, then use P3/Prev or Fav/Next to select a preset number (1-20) and press P4/Enter to confirm.
- To recall a preset, short press P1, P2, P3, P4, or Fav (for other presets, use Fav then P3/Prev or Fav/Next to select).
FM Radio Operation
- Press Mode to select FM mode.
- Long press P4/Enter to auto-scan and save available FM stations.
- Use P3/Prev or Fav/Next to manually tune the frequency or short press to jump to the next available station.
- Saving and recalling FM presets follows the same procedure as DAB+ presets (20 FM presets available).
Bluetooth Streaming
- Press Mode to select Bluetooth mode. The display will show "Bluetooth" and the Bluetooth icon will flash, indicating pairing mode.
- On your smartphone, tablet, or other Bluetooth device, enable Bluetooth and search for "CR-606BK".
- Select "CR-606BK" to pair. Once connected, the Bluetooth icon on the display will stop flashing.
- You can now stream audio from your device to the CR-606BK. Use your connected device or the CR-606BK's volume controls.
Setting Alarms (Dual Alarm)
The CR-606BK features two independent alarms.
- Long press P1/Alarm 1 or P2/Alarm 2 to enter alarm setup for the respective alarm.
- Use P3/Prev or Fav/Next to adjust the hour, then press P4/Enter. Repeat for minutes.
- Set the alarm source (Buzzer, DAB+, or FM) and volume using P3/Prev or Fav/Next, confirming with P4/Enter.
- Set the alarm frequency (Daily, Weekdays, Weekends, Once) and confirm.
- To enable/disable an alarm, short press P1/Alarm 1 or P2/Alarm 2 repeatedly until the desired alarm icon (🔔1 or 🔔2) appears or disappears from the display.
Snooze Function
When an alarm sounds, press the Snooze/Dimmer Button to temporarily silence the alarm for a few minutes (default is typically 9 minutes, may be adjustable in menu). The alarm will sound again after the snooze period.
Sleep Timer
The sleep timer allows the radio to play for a set duration before automatically turning off.
- While the radio is playing, short press the Sleep/Menu Button repeatedly to cycle through available sleep timer durations (e.g., 15, 30, 45, 60, 90 minutes, or OFF).
- The selected duration will be displayed briefly.
Display Dimmer
To adjust the brightness of the LCD display, short press the Snooze/Dimmer Button repeatedly to cycle through different brightness levels.
USB Charging Port
Connect your smartphone or other USB-powered device to the USB port on the back of the CR-606BK to charge it. This port is for charging only and does not support data transfer.
Care and Maintenance
To ensure the longevity of your Lenco CR-606BK:
- Disconnect the power adapter before cleaning.
- Use a soft, dry cloth to clean the unit. Do not use abrasive cleaners, waxes, or solvents.
- Avoid exposing the unit to direct sunlight, extreme temperatures, dust, or moisture.
- Do not attempt to open the unit or perform repairs yourself. Refer all servicing to qualified personnel.
Troubleshooting Guide
| Problem | Possible Cause | Solution |
|---|---|---|
| No power | Power adapter not connected or faulty outlet. | Ensure the power adapter is securely connected to the unit and a working power outlet. |
| Poor radio reception (DAB+/FM) | Antenna not extended or poor signal area. | Fully extend and adjust the telescopic antenna. Try repositioning the unit. Perform a full scan for stations. |
| Bluetooth pairing fails | Bluetooth not in pairing mode, device too far, or already connected to another device. | Ensure the CR-606BK is in Bluetooth mode and the icon is flashing. Move your device closer. Disconnect from other Bluetooth devices. |
| Alarm does not sound | Alarm not enabled or volume too low. | Check if the alarm icon (🔔1 or 🔔2) is displayed. Verify alarm time, source, and volume settings. |
Technical Specifications
- Model Number: CR-606BK
- Brand: Lenco
- Display Type: Digital LCD
- Radio Tuner: DAB+, FM
- Bluetooth Version: 5.3
- Connections: 3.5mm Audio Output, USB Charging Port
- Dimensions (L x W x H): 12.5 cm x 3.81 cm x 4.5 cm
- Weight: 300 grams
- Power Source: AC Adapter (included)
- Batteries Required: No
Warranty and Support
For warranty information and technical support, please refer to the warranty card included with your product or visit the official Lenco website. You may also contact your retailer for assistance.


