
Fortdows Fortdows Car Radio 4G+64G
Contents
Fortdows 9.7-inch Car Radio User Manual
For Cadillac ATS, XTS, SRX, CTS (2013-2018)
1. Introduction
This manual provides detailed instructions for the installation, operation, and maintenance of your Fortdows 9.7-inch Car Radio. Please read this manual thoroughly before installation and use to ensure proper function and to maximize your driving experience. Keep this manual for future reference.
Safety Information
- Ensure the vehicle is turned off and the battery is disconnected before beginning installation.
- Professional installation is recommended to avoid damage to the unit or vehicle.
- Do not operate the device in a way that distracts you from driving. Always prioritize road safety.
- Avoid exposing the unit to extreme temperatures, direct sunlight for prolonged periods, or excessive moisture.
2. Vehicle Compatibility
This Fortdows car radio is designed for specific Cadillac models and years:
- Cadillac ATS (2013-2018)
- Cadillac XTS (2013-2018)
- Cadillac SRX (2013-2018)
- Cadillac CTS (2013-2018)
Before installation, compare your vehicle's original central control panel with the adaptation diagrams provided to ensure compatibility. Inconsistent configurations may prevent proper installation or functionality.

Image 2.1: This image illustrates the compatibility of the Fortdows car radio with various Cadillac models (ATS, XTS, SRX, CTS) from 2013 to 2018. It shows examples of compatible and incompatible original car central control units, highlighting the "After" installation appearance.
3. Package Contents
Verify that all items listed below are included in your package:
- Fortdows 9.7-inch Car Radio Unit
- Power Cable
- Backup Camera
- Radio Antenna
- RCA Cable
- CanBus Decoder
- USB Cables (x2)
- Reversing Line
- External Microphone
- Crowbar (Disassembly Tool)
- GPS Antenna

Image 3.1: This image displays the complete package contents, including the main car radio unit, various cables (power, RCA, USB, reversing line), antennas (radio, GPS), a backup camera, CanBus decoder, external microphone, and a crowbar tool for installation.
4. Setup & Installation
The Fortdows car radio is designed for plug-and-play installation. However, professional installation is recommended. The package includes disassembly tools and step-by-step instructions for setup.
General Installation Steps:
- Preparation: Turn off the vehicle and disconnect the battery.
- Remove Original Unit: Carefully remove the original car radio and trim using the provided crowbar tool.
- Connect Wiring: Connect the new car radio's wiring harness to the vehicle's existing connectors. Ensure all connections are secure. This includes the power cable, RCA cables, USB cables, radio antenna, GPS antenna, and backup camera wiring.
- CanBus Decoder: Install the CanBus decoder as per the wiring diagram to ensure proper communication with the vehicle's systems, especially for steering wheel controls and A/C functions.
- Mounting: Secure the new Fortdows car radio unit into the dashboard opening.
- Test: Reconnect the battery and test all functions before fully reassembling the dashboard.
For specific wiring details, refer to the included wiring diagram. If you encounter any difficulties, contact technical support.
5. Basic Operation
Power On/Off
The unit will typically power on automatically when the vehicle's ignition is turned on. To manually power off or restart, use the designated power button on the unit or within the software interface.
Touch Screen Interface
The 9.7-inch IPS touchscreen provides a clear and responsive interface. Navigate through menus and applications by tapping, swiping, and pinching gestures, similar to a smartphone or tablet.
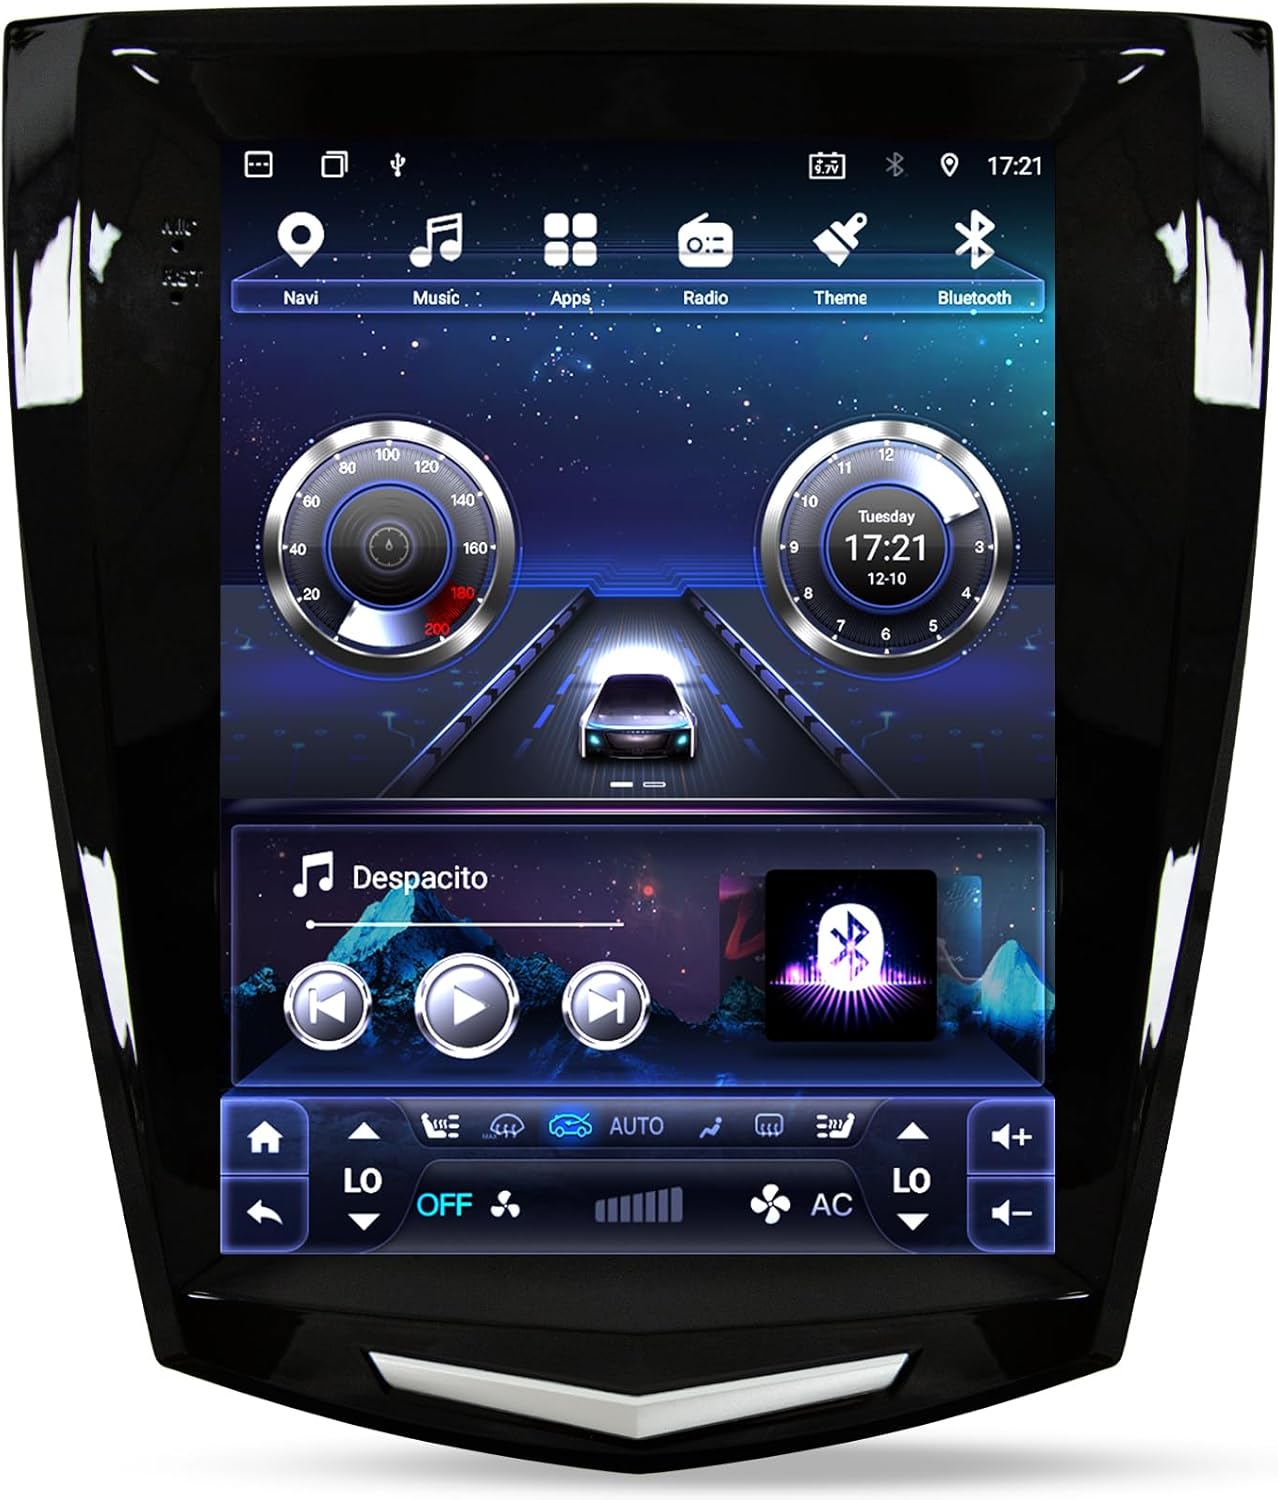
Image 5.1: This image shows the main user interface of the Fortdows 9.7-inch car radio, displaying navigation, music, apps, radio, theme, and Bluetooth icons, along with a digital speedometer and clock widget.
6. Key Features & Functions
6.1. Wireless CarPlay & Android Auto
Connect your iOS or Android device wirelessly or via USB to access your smartphone's features directly on the car radio screen. This includes navigation, music, messages, calls, and news. Activate Siri or Google Assistant for hands-free control.

Image 6.1.1: This image illustrates the Wireless CarPlay and Android Auto interfaces, showing how smartphone applications like navigation, music, and communication tools are mirrored and controlled on the car radio display.
6.2. Bluetooth 5.0 & FM/RDS Audio
The unit features Bluetooth 5.0 for fast and stable connections, enabling seamless music streaming and hands-free calling. The built-in FM/RDS radio supports multiple preset stations for news, music, and talk shows. A 36-band EQ allows for fine-tuning of audio output.

Image 6.2.1: This image shows the Equalizer (EQ) settings interface, demonstrating the ability to adjust sound frequencies for a customized audio experience.

Image 6.2.2: This image displays the FM RDS radio interface, indicating the frequency range and visual elements for radio station selection.
6.3. GPS Navigation
The built-in GPS offers accurate navigation with support for both online and offline maps. Real-time traffic updates can be accessed when connected to the internet, assisting with route planning and destination arrival.

Image 6.3.1: This image shows the GPS navigation interface, demonstrating map display and route guidance features for precise positioning.
6.4. 1080P Rear Camera
The included 1080P HD rear view camera provides a wide and clear field of view, reducing blind spots and offering real-time monitoring for safer parking and reversing. The display automatically switches to the camera feed when the vehicle is in reverse.

Image 6.4.1: This image illustrates the functionality of the 1080P rear view camera, showing the wide-angle display with auxiliary line guidance for parking assistance.
6.5. Steering Wheel Controls (SWC)
The unit supports integration with your vehicle's existing steering wheel controls, allowing you to manage audio, calls, and other functions without diverting your attention from the road. Ensure the CanBus decoder is correctly installed and configured.

Image 6.5.1: This image demonstrates the steering wheel control learning function interface, showing how various buttons on the steering wheel can be programmed to control the car radio's functions.
6.6. 5G WiFi Connectivity
The integrated 5G WiFi module provides enhanced network speed and stability, allowing for faster app downloads, online streaming, and real-time data access. Connect to a mobile hotspot or home WiFi network.

Image 6.6.1: This image highlights the 5G WiFi functionality, illustrating improved network speed and its benefits for various applications like social media and streaming.
7. Troubleshooting
This section addresses common issues you might encounter. For more complex problems, please contact technical support.
7.1. No Sound from the Radio After Installation
- Ensure the AUX audio cable is properly connected. If your vehicle has a USB-A or Type-C port, contact support for the appropriate adapter.
- Using the SEL button (original car function selection button) on the steering wheel, select Radio Media, then use the scroll up/down buttons to locate AUX input/USB, enable AUX input/USB.
7.2. Steering Wheel Controls Do Not Work After Installation
- Verify that the steering wheel control adapter cable is correctly connected.
- Ensure the CANBUS setting is correctly configured in the unit's system settings.
7.3. How to Listen to FM/AM?
After installing the new head unit, the original factory CD unit remains in place. If you wish to listen to FM/AM radio, open the 'Car UI' application to access the factory system and listen to the broadcast.
7.4. How to Control Factory Features After Installation?
To access and control your vehicle's original factory functions, follow these steps:
- Ensure all connections are made correctly according to the wiring diagram.
- Select the correct CANBUS type based on the size of your original screen.
- Connect the radio to a stable Wi-Fi network or mobile hotspot. Then, open the App Store and update the following apps: Car-UI, Service, Canbus-Set, Canbus, and Canbus-Card. Be sure to pull down the page to refresh it before updating. Once the updates are complete, please reboot the radio.
- After installation and updates, locate and open the 'Car UI' app on the system interface. From there, you will be able to control and adjust factory-related functions.
7.5. Why Are Some A/C Buttons Not Working?
For vehicles equipped with the 8-inch factory display, open the 'Car UI' application on the head unit. You can operate the A/C functions that are not responding directly within this application.

Image 7.5.1: This image provides visual aids for troubleshooting common issues such as no sound, non-functional steering wheel controls, and A/C button issues, along with instructions for accessing factory features via the 'Car UI' app.
8. Specifications
| Feature | Detail |
|---|---|
| Model Name | Fortdows Car Radio 4G+64G |
| Operating System | Android 12 |
| RAM | 4GB |
| ROM | 64GB |
| Screen Size | 9.7 Inches |
| Display Resolution | 1024*768P IPS Touchscreen |
| Connectivity | Bluetooth 5.0, USB, 5G Wi-Fi |
| Special Features | Wireless CarPlay & Android Auto, 1080P Backup Camera, DSP, Split Screen, Airplay, Secondary Video Window, SWC Support |
| Audio Output Mode | Stereo (36-band EQ) |
| Map Type | Worldwide (Online/Offline) |
| Item Weight | 4.17 pounds |
| Manufacturer | Fortdows |

Image 8.1: This image highlights the internal specifications, detailing the 4-core processor, 4GB RAM, and 64GB ROM, emphasizing performance improvements and stable operation.

Image 8.2: This image compares the 1024x768P IPS touchscreen resolution and color saturation with lower resolution displays, illustrating the enhanced visual clarity and vibrant color representation of the Fortdows unit.
9. Maintenance
- Cleaning: Use a soft, dry cloth to clean the screen and exterior. Avoid abrasive cleaners or solvents.
- Software Updates: Periodically check for software updates through the unit's settings to ensure optimal performance and access to new features.
- Environmental Conditions: Protect the unit from extreme heat, cold, and direct prolonged sunlight.
10. Support & Warranty
For technical assistance, troubleshooting beyond this manual, or warranty inquiries, please contact Fortdows customer support. Refer to your purchase documentation for specific warranty terms and contact information.
Our professional technical support team is available to assist you with any questions regarding installation or operation.
Ask a question about this manual
Ask about setup, troubleshooting, compatibility, parts, safety, or missing instructions. Manuals+ will review the question and use this page’s manual context to help answer it.