Introduction
Thank you for choosing the HEVAVW L810 64GB Magnetic Digital Voice Recorder. This device is designed for high-quality audio recording with features such as voice activation, AI noise reduction, and smartphone connectivity. This manual provides detailed instructions to help you get the most out of your recorder.

Image: The HEVAVW L810 digital voice recorder shown next to a smartphone displaying its file management interface. The recorder is compact and gray, highlighting its portability and ease of use with mobile devices.

Image: An infographic highlighting key features of the HEVAVW L810 recorder, including 64GB large memory, 40 hours continuous recording, 0.19 inch ultra-slim design, and 1520 hours of audio storage capacity. The recorder is depicted in a meeting room setting.
Package Contents
Please check the box for the following items:
- 1x HEVAVW L810 Digital Voice Recorder
- 1x USB-C Charging Cable
- 1x Headphones
- 1x User Manual
- 1x Playback Controller
- 1x OTG Adapter for iPhone
- 1x OTG Adapter for Android Phone

Image: A visual representation of all items included in the product package, such as the voice recorder, USB-C cable, headphones, user manual, playback controller, and OTG adapters for both iPhone and Android devices.
Setup
1. Charging the Device
Before first use, fully charge the recorder. Connect the device to a USB power source (e.g., computer, wall adapter) using the provided USB-C cable. A full charge typically takes approximately 2 hours and provides up to 40 hours of continuous recording time. The device can record while charging.
2. Power On/Off
Locate the ON/OFF/VA switch on the side of the recorder. Slide the switch to the 'ON' position to power on the device and begin continuous recording. Slide to 'OFF' to save the current recording and power off the device. For voice-activated recording, slide to 'VA'.
3. Connecting to Computer or Smartphone
The L810 recorder supports direct connection to computers (Windows/Mac) and smartphones (Android/iPhone) for file management.
- For Computers: Connect the recorder to your computer using the USB-C cable. The device will appear as a removable drive.
- For Smartphones: Use the appropriate OTG adapter (for iPhone or Android) to connect the recorder to your smartphone. Ensure the recorder is turned OFF before connecting to a smartphone to ensure it is recognized as a USB drive.

Image: The HEVAVW L810 recorder connected to both a laptop and a smartphone using an OTG adapter, demonstrating its compatibility with various devices for file management, including renaming and deleting files.
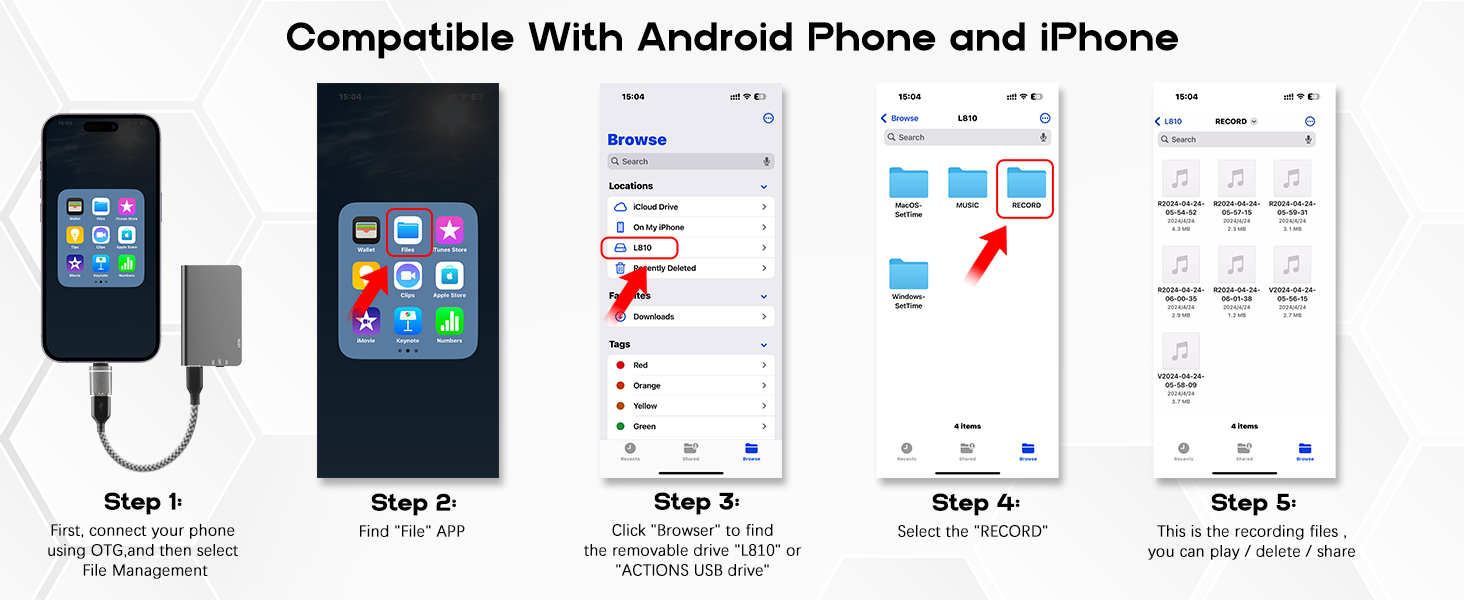
Image: A step-by-step guide illustrating how to connect the HEVAVW L810 recorder to an iPhone using an OTG adapter and manage recording files through the phone's 'Files' app.
Operating Instructions
1. Basic Recording (Continuous Mode)
To start continuous recording, slide the ON/OFF/VA switch to the 'ON' position. The device will immediately begin recording all audio. To save the recording and stop, slide the switch to the 'OFF' position.
2. Voice Activated Recording (VA Mode)
To enable voice-activated recording, slide the ON/OFF/VA switch to the 'VA' position. The recorder will only begin recording when it detects sound above 45dB. It will pause recording during silent periods, saving storage space and battery life. To save the recording and stop, slide the switch to the 'OFF' position.

Image: A close-up view of the HEVAVW L810 recorder's switch, showing it being set to the 'VA' position for voice-activated recording, with a background of people in a meeting.

Image: A diagram illustrating the functionality of the VA (Voice Activation), OFF (Save), and ON (Continuous Recording) switch positions on the HEVAVW L810 recorder, with explanations for each mode.
3. AI-Intelligent Triple Noise Reduction
The L810 features advanced microphones and AI noise reduction technology to filter out background noise, ensuring clear audio recordings. This technology is active in both continuous and voice-activated recording modes.

Image: A visual representation of the AI-Intelligent Triple Noise Reduction feature, showing a 'Before' state with various noise types (traffic, industrial, domestic, construction, engine) and an 'After' state with crystal-clear sound.
4. Playback
Connect the provided headphones to the recorder using the headphone adapter. You can adjust volume, switch tracks, and control playback speed directly through the playback controller on the headphone cable.

Image: The HEVAVW L810 recorder connected to headphones, illustrating the playback functionality and the inline playback controller for volume, track switching, and pause/play.
5. File Management
Once connected to a computer or smartphone, you can access the recorded audio files. Files can be renamed, forwarded, or deleted as needed. The 64GB storage capacity allows for up to 768 hours of audio files at 192kbps quality.
6. Customizing Settings
The recorder allows for customization of various settings, such as voice control sensitivity (VOR), bit rate (BIT), recording sensitivity (GAIN), and recording file segmented time (PART). These settings can typically be adjusted by connecting the device to a computer and modifying a configuration file.
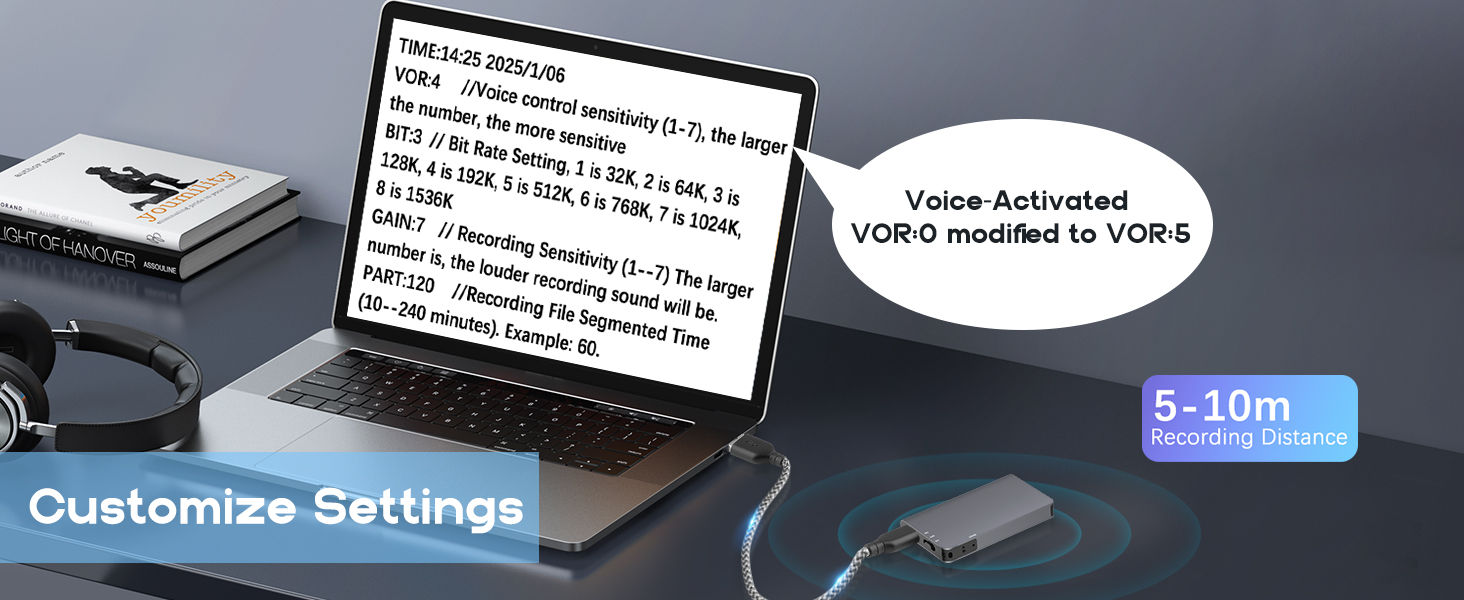
Image: A laptop screen displaying customizable settings for the HEVAVW L810 recorder, including VOR (Voice Control Sensitivity), BIT (Bit Rate Setting), GAIN (Recording Sensitivity), and PART (Recording File Segmented Time).
7. Magnetic Attachment
The L810 features a strong magnetic base, allowing it to be securely attached to any metal surface. This helps reduce friction noise and ensures stable, clear audio recordings. Common uses include attaching it under a desk, to a car seat, or on a refrigerator.

Image: The HEVAVW L810 recorder shown magnetically attached to the underside of a table, under a car seat, and on a refrigerator, demonstrating its versatile magnetic suction function.
Maintenance
1. Battery Management
The device automatically saves recordings when the battery level is low, preventing data loss. To ensure optimal battery life, charge the device regularly and avoid fully depleting the battery frequently.
2. Storage Management
The 64GB internal storage can hold a significant amount of audio. Regularly transfer important recordings to a computer or cloud storage to free up space and prevent data loss. Delete unnecessary files from the device to maintain optimal performance.
3. Cleaning
Wipe the device with a soft, dry cloth. Avoid using liquid cleaners or abrasive materials, as these can damage the device's surface or internal components.
Troubleshooting
- Device not turning on: Ensure the battery is charged. Connect to a power source and try again.
- Cannot connect to computer/smartphone: Ensure the recorder is switched to 'OFF' before connecting. Try a different USB port or cable. For smartphones, ensure the OTG adapter is correctly connected and recognized.
- Poor recording quality: Check the recording environment for excessive background noise. Ensure the device is placed optimally. Verify custom settings like GAIN and BIT rate are appropriate for your needs.
- Voice activation not working: Ensure the switch is set to 'VA'. Check the VOR sensitivity settings if customized. Ensure ambient sound levels are above 45dB for activation.
- Recordings not saving: Always slide the switch to 'OFF' to properly save recordings before disconnecting power or turning off.
Specifications
| Feature | Specification |
|---|---|
| Model Number | L810 |
| Storage Capacity | 64 GB |
| Continuous Recording Time | Up to 40 hours |
| Charging Time | Approx. 2 hours |
| Product Dimensions | 1.37 x 2.16 x 0.39 inches (3.48 x 5.49 x 0.99 cm) |
| Item Weight | 4.2 ounces (0.12 kg) |
| Battery Type | 1 C battery (included) |
| Hardware Interface | USB 3.0 Type C |
| Microphone Form Factor | Built-In |
| Headphones Jack | 3.5 millimeters |
| Compatible Devices | Smartphone, PC |
Warranty and Support
Specific warranty information and direct support contact details are not provided in the product description. For warranty claims or technical assistance, please refer to the contact information provided with your purchase documentation or visit the official HEVAVW website.


