Introduction
This user manual provides detailed guidance for the FOPO 15.6" Quad Monitor Laptop Screen Extender, Model S888. Please read these instructions carefully before using the product to ensure proper setup and optimal performance. This device is designed to expand your laptop's display capabilities, offering a multi-screen workspace for enhanced productivity.
Package Contents
Verify that all items listed below are included in your package:
- 1x FOPO 15.6" Quad Monitor Laptop Screen Extender
- 1x Power Adapter
- 1x Carry Bag
- 1x Dual USB-A to USB-C Cable (Video & Power)
- 1x USB-C to USB-C Cable (60 cm, Video & Power)
- 1x USB-C to USB-C Cable (120 cm, Power Only)
- 1x PD Power Supply (30W)
- 1x U Disk (Including Driver)
- 1x Quick Guide
- 1x User Manual

Figure 1: FOPO 15.6" Quad Monitor Laptop Screen Extender in use.

Figure 2: Visual representation of included accessories.
Setup Instructions
1. Unboxing and Initial Product Setup
Carefully remove all components from the packaging. The monitor unit is designed to unfold and attach to your laptop. Ensure the kickstand is properly extended for stability.
Video 1: FOPO Quad Monitor Installation Guide. This video demonstrates the unboxing and initial physical setup of the monitor.
2. Driver Installation
Driver installation is crucial for the monitor to function correctly. The included U Disk contains the necessary drivers for both Windows and macOS.

Figure 3: Driver installation steps for Windows and macOS.
For Windows (Win10 and later):
- Connect the U Disk to your laptop.
- Open "This PC" and locate the U Disk drive.
- Navigate to the "Win10 & 11" folder.
- Run the installer software (e.g., "RacerDisplayDriver.exe").
- Follow the on-screen prompts to complete the installation. Do not change the default installation location.
- Restart your laptop after installation.
For macOS (2019 or later Macbooks including M1, M2, M3 chipsets):
- Connect the U Disk to your laptop.
- Open the U Disk and locate the "mac OS" folder.
- Open the driver installation package (e.g., "RacerUSB_1.0_Installer.pkg").
- Follow the installation process. You may need to enter your password to unlock the installation.
- After installation, go to "System Settings" > "Privacy & Security" > "Screen & System Audio Recording".
- Enable "UsbDisplay" and "MacUsbDisplay" by toggling them on. Enter your password if prompted.
- Click "Quit & Reopen" if prompted.
- Restart your laptop after installation.
3. Connecting the Monitor
The FOPO Quad Monitor supports various connection methods. Ensure your laptop is compatible with video transfer via USB-C or USB-A.
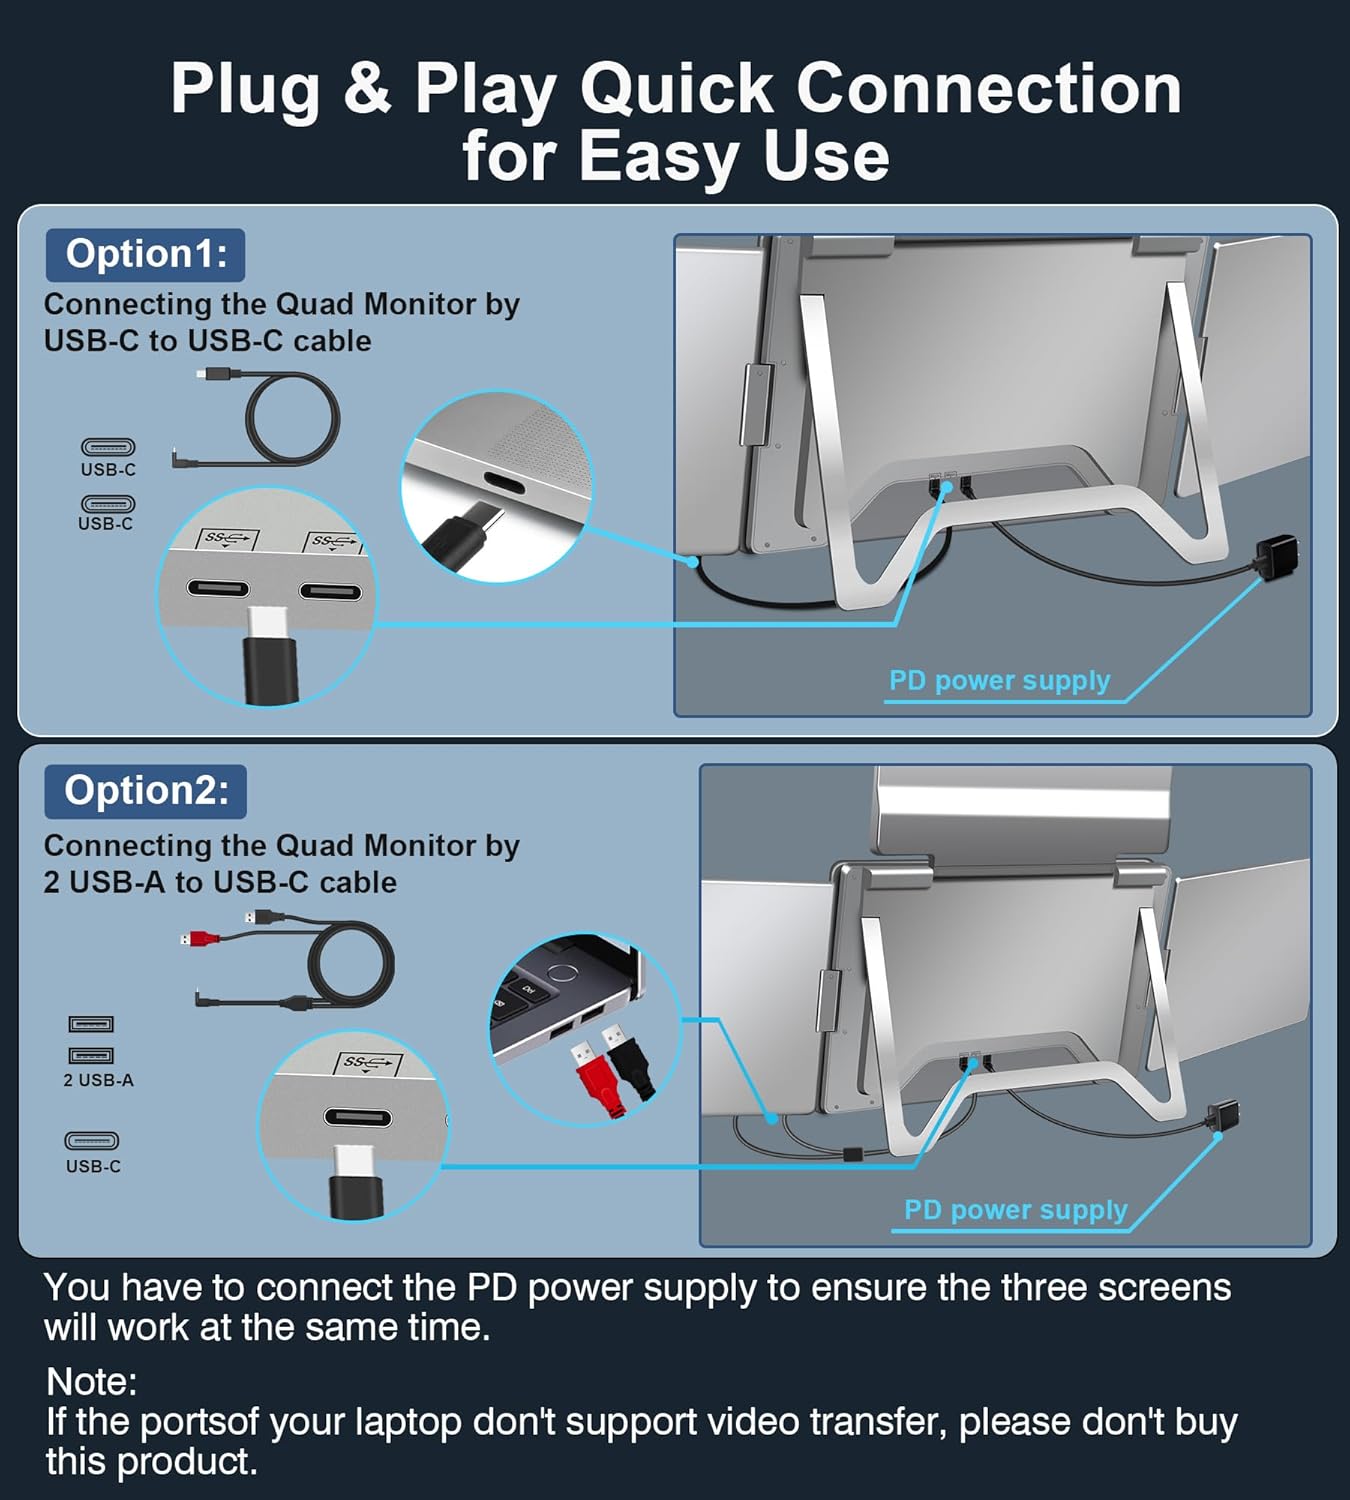
Figure 4: Diagram of USB-C and USB-A connection options.
Option 1: USB-C to USB-C Cable (Recommended for full functionality)
- Connect one end of the USB-C to USB-C cable (Video & Power) to your laptop's USB-C port (Thunderbolt 3/4 compatible).
- Connect the other end to the monitor's USB-C port.
- Important: Connect the PD Power Supply to the monitor's dedicated PD port to ensure all three screens receive sufficient power and function simultaneously.
Option 2: Dual USB-A to USB-C Cable
- Connect the two USB-A ends of the Dual USB-A to USB-C cable (Video & Power) to your laptop's USB-A ports.
- Connect the USB-C end to the monitor's USB-C port.
- Important: Connect the PD Power Supply to the monitor's dedicated PD port to ensure all three screens receive sufficient power and function simultaneously.
Note: If your laptop's ports do not support video transfer, this product may not be compatible. Please ensure your laptop meets the requirements.
Operating Instructions
1. Display Settings Configuration
After connecting the monitor and installing drivers, you may need to configure display settings to arrange the screens as desired.
For Windows:
- Right-click on your desktop and select "Display settings".
- In the "System > Display" window, click "Identify" to see which number corresponds to each screen.
- Drag and drop the display boxes to match the physical arrangement of your monitors.
- Select "Extend desktop to this display" for a multi-screen workspace or "Duplicate these displays" for mirroring.
- Click "Apply" to save changes.
For macOS:
- Go to "System Settings" > "Displays".
- Click "Arrange Displays".
- Drag and drop the display icons to match the physical arrangement of your monitors. A red border will appear around the selected screen.
- Choose between "Extend" or "Mirror" mode as needed.
- Click "Done" to save changes.
2. Display Modes
The FOPO Quad Monitor supports various display modes to suit your workflow:
- Extended Mode: Each screen displays independent content, maximizing your workspace.
- Mirror Mode: All screens display the same content, useful for presentations or sharing.
- Portrait Mode: Screens can be rotated to a vertical orientation for specific tasks like coding or document review.

Figure 5: Extended Mode setup, showing different content on each screen.

Figure 6: Mirror Mode setup, showing identical content on all screens.
3. Multi-Angle Adjustment
The monitor features 0-360° rotation for the side screens and 0-180° for the top screen, allowing for flexible viewing angles and collaborative work.

Figure 7: Demonstrates the multi-angle adjustment capabilities of the screens.
4. Reverse Charging
The monitor's PD power cable supports reverse charging for your laptop with a 60W adapter, helping to keep your devices powered during use.

Figure 8: Illustration of the reverse charging function.
Maintenance
- Cleaning: Use a soft, lint-free cloth slightly dampened with water or a screen cleaner to wipe the display surfaces. Avoid harsh chemicals.
- Storage: When not in use, fold the monitor securely and store it in the provided carry bag to protect it from dust and scratches.
- Handling: Avoid applying excessive force to the screens or hinges. Handle the device carefully to prevent damage.
Troubleshooting
- No Display on Screens:
- Ensure all cables are securely connected to both the laptop and the monitor.
- Verify that the PD Power Supply is connected to the monitor and an active power source.
- Check if the correct drivers are installed and enabled (refer to Driver Installation section).
- Restart your laptop after connecting the monitor and installing drivers.
- Confirm your laptop's USB-C or USB-A ports support video output.
- Incorrect Display Arrangement/Resolution:
- Adjust display settings in your operating system (refer to Display Settings Configuration section).
- Ensure the screens are physically arranged to match the software settings.
- Screens Not Powering On:
- Confirm the PD Power Supply is functioning and properly connected.
- Try a different power outlet or USB-C port on your laptop if available.
- Flickering or Unstable Display:
- Ensure all cables are high-quality and securely connected.
- Check for updated drivers on the manufacturer's website.
- Reduce the display resolution if necessary.
Specifications
| Product Dimensions | 1.6 x 15.5 x 9.6 inches |
| Item Weight | 8.75 pounds |
| Item Model Number | S888 |
| Standing Screen Display Size | 15.59 Inches |
| Aspect Ratio | 16:9 |
| Resolution | 1920 x 1080 Pixels (FHD 1080p) |
| Screen Surface Description | LCD |
| Compatibility | Windows (Win10 and later), macOS (2019 or later Macbooks including M1, M2, M3 chipsets) for 13.6" - 17.3" Laptops. Not applicable to Microsoft Surface series and Chromebook. |
Warranty and Support
For any questions regarding compatibility, connections, or other product-related inquiries, please contact FOPO customer support. Contact information can typically be found on the product packaging or within the included user manual. Please refer to your purchase documentation for specific warranty details.


