1. Introduction
This manual provides detailed instructions for the installation, operation, and maintenance of your Uniclife 71 Position Key Box. This secure key cabinet features multiple access methods including fingerprint recognition, a digital code, and traditional key entry. Designed for organizing and safeguarding a large number of keys, it is suitable for various environments such as offices, hotels, and property management.
2. Safety Information
- Read all instructions carefully before installation and use.
- Do not store emergency override keys inside the key box. Keep them in a secure, separate location.
- Ensure the key box is securely mounted to a stable wall structure to prevent unauthorized removal.
- This product is designed for indoor use only. Avoid exposure to moisture or extreme temperatures.
- Use only specified battery types (4 AA alkaline batteries) and replace them promptly when indicated.
3. Package Contents
Verify that all items are present in the package:
- Uniclife 71 Position Key Box
- Colorful Key Tags (71 pieces)
- Metal Key Racks
- Number Stickers
- User Manual (this document)
- Expansion Bolts (for wall mounting)
- Spare Keys (2 pieces)
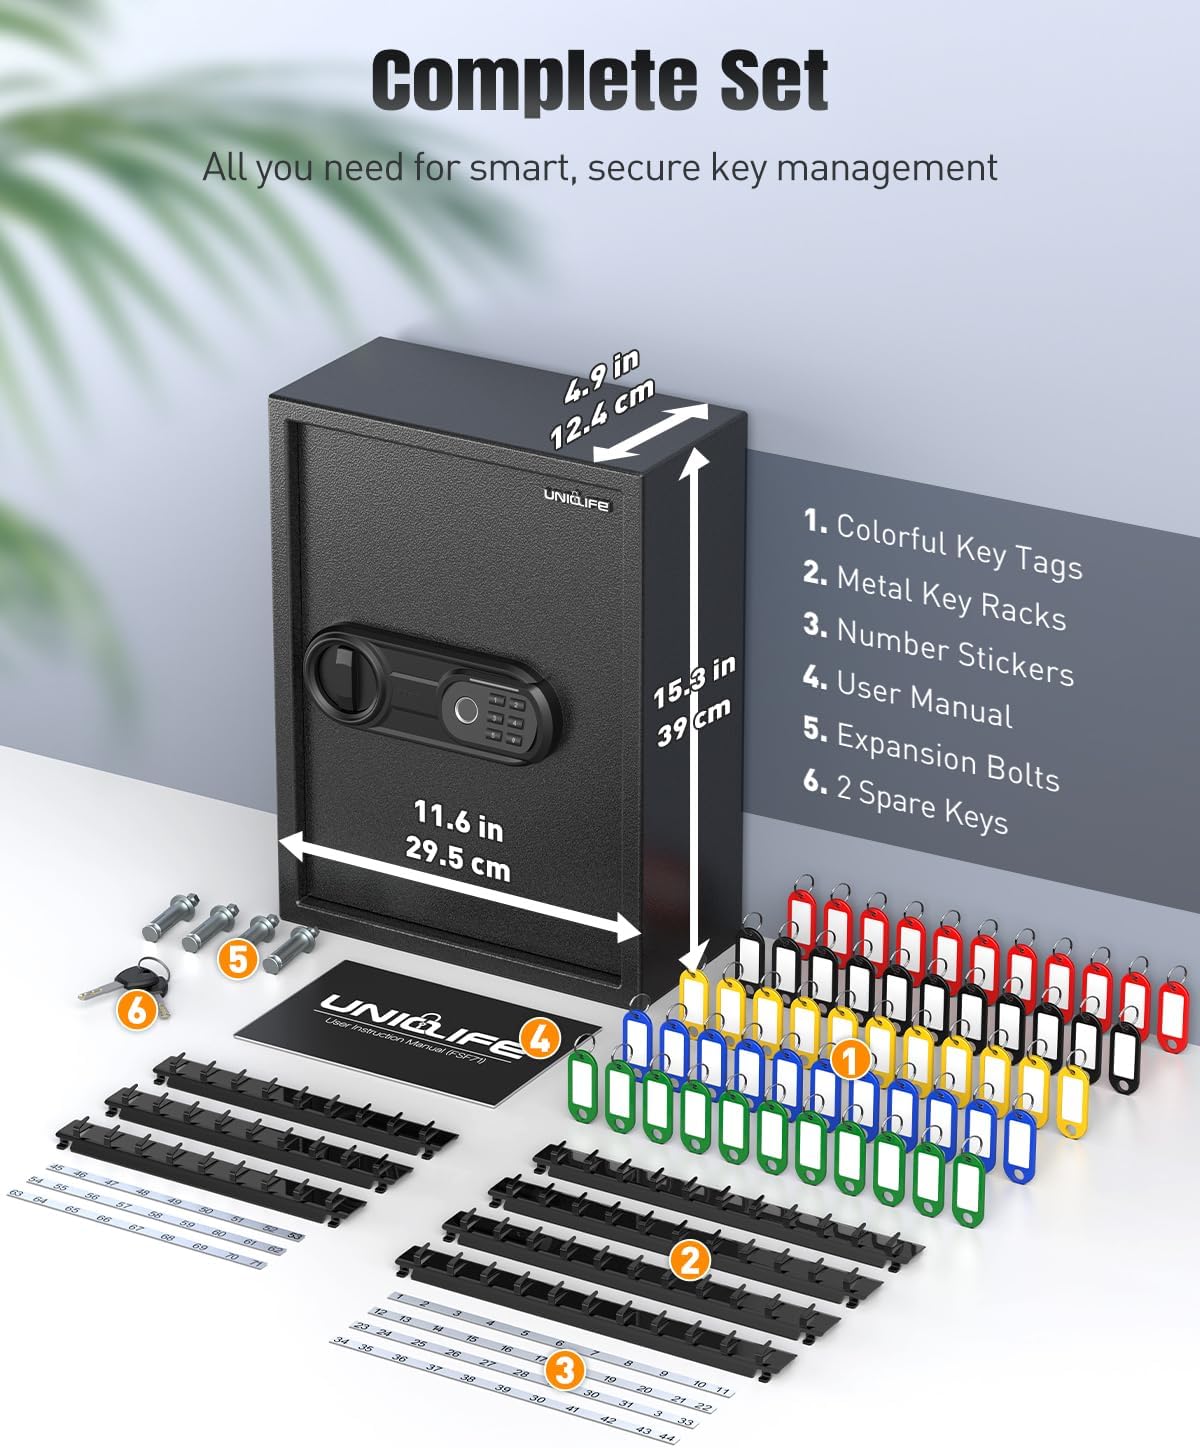
Figure 3.1: Included Components
4. Product Overview
The Uniclife 71 Position Key Box is constructed from heavy-duty 3mm steel, providing robust security. It features a sophisticated locking mechanism that supports fingerprint recognition, a customizable digital code, and traditional key access. The interior is designed for efficient key organization with 71 sturdy hooks.

Figure 4.1: Uniclife 71 Position Key Box
Key Features:
- Advanced Security: Fingerprint sensor, digital keypad, and backup key lock.
- Durable Construction: Made from 3mm heavy-duty steel to resist tampering.
- High Capacity: 71 sturdy hooks for extensive key organization.
- Emergency Power: External 9V battery port for power in case internal batteries are depleted.
- Anti-Theft Drop Slot: Allows quick and secure key deposit without opening the main door.
- Internal Light: Illuminates the interior for visibility.
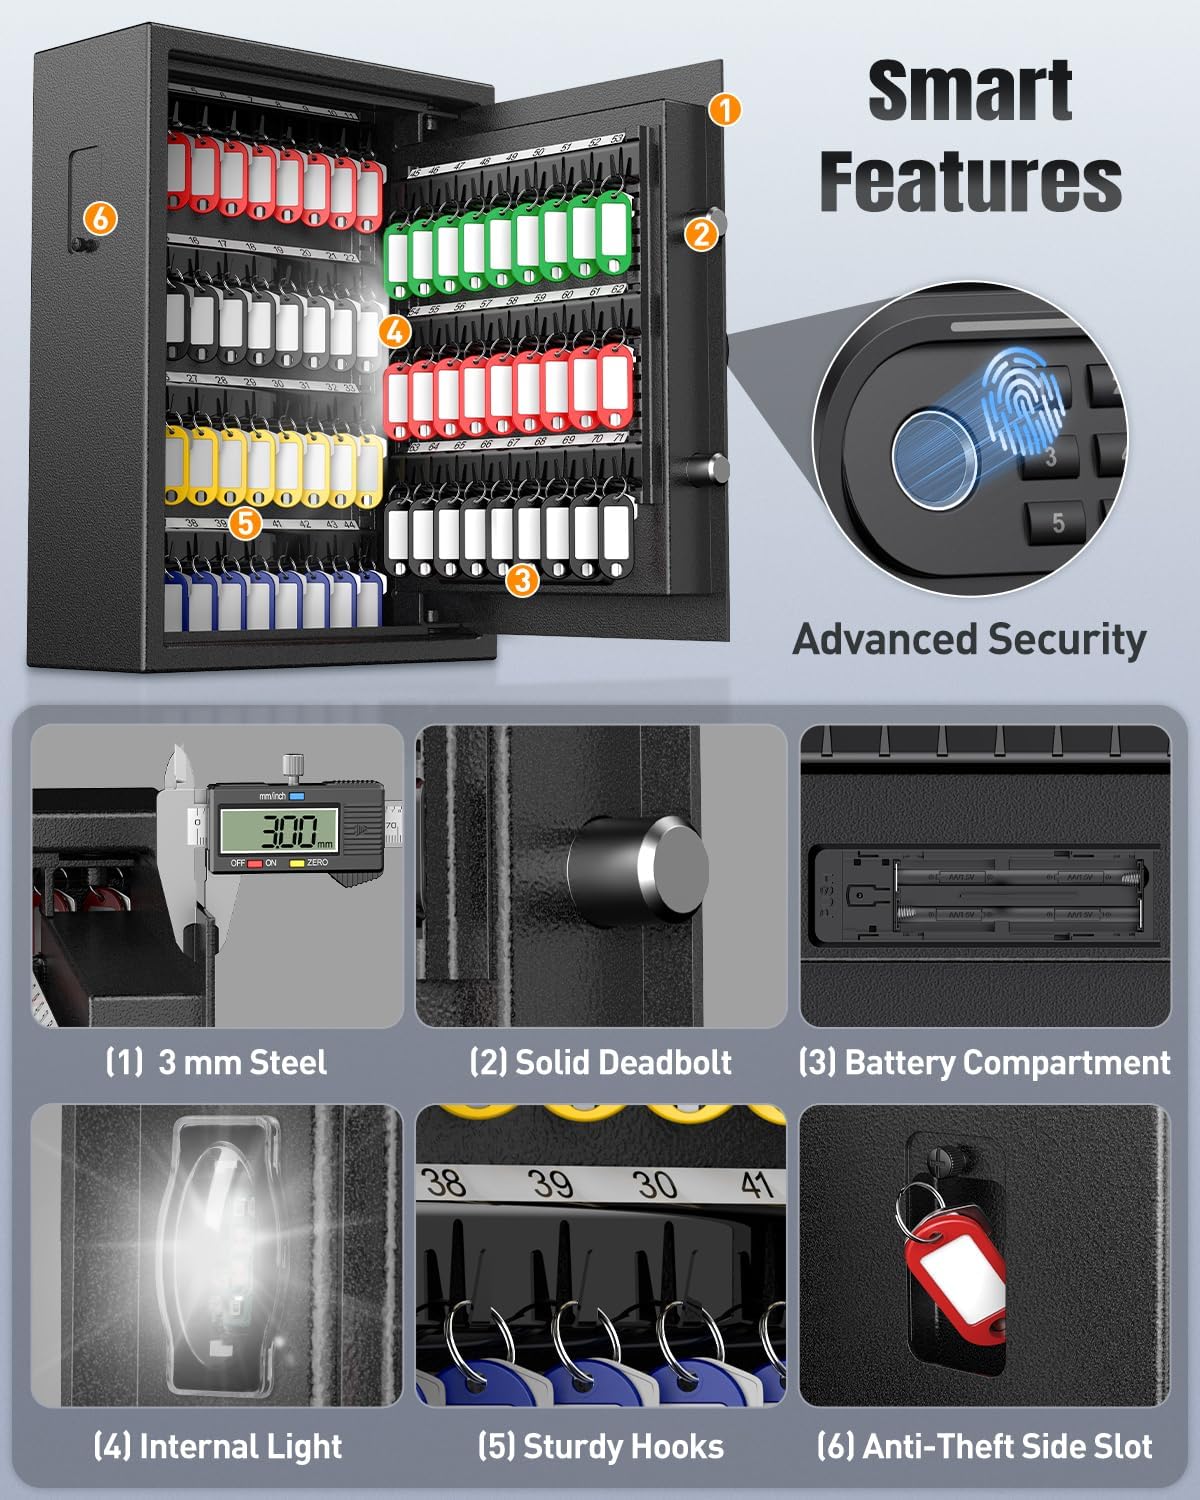
Figure 4.2: Smart Features Overview

Figure 4.3: 3-in-1 Secure Access Panel
5. Setup
5.1 Battery Installation
The key box requires 4 AA alkaline batteries (not included) for the electronic lock. Ensure the door is open before installing batteries.
- Open the key box door using one of the spare keys (refer to Section 6.1).
- Locate the battery compartment on the inside of the door.
- Remove the battery case cover.
- Insert 4 AA alkaline batteries, ensuring correct polarity.
- Restore the battery case cover.
Video 5.1: Battery Installation (0:06-0:11)
5.2 Wall Mounting
The key box is designed for wall mounting. Ensure the chosen location is a solid structure capable of supporting the weight of the box and its contents. This product is for indoor use only.
- Choose a suitable location on a wall.
- Hold the key box against the wall and mark the positions of the pre-drilled mounting holes.
- Drill holes in the wall at the marked positions.
- Insert the expansion bolts into the drilled holes.
- Align the key box with the holes and tighten the expansion bolts securely.
Video 5.2: Wall Mounting (0:32-0:38)

Figure 5.1: Wall Mounting Components
5.3 Key Organization
The key box includes adjustable racks, colorful key tags, and number stickers to help you organize your keys efficiently.
- Attach the metal key racks to the designated slots inside the key box. You can arrange them in numerical order using the provided stickers.
- Use the colorful key tags to label individual keys or key sets. Write identification information on the tags.
- Hang the tagged keys onto the hooks on the racks.
Video 5.3: Key Rack Installation and Organization (0:25-0:31, 0:39-0:53)

Figure 5.2: Organized Key Interior

Figure 5.3: Key Organization Accessories
6. Operating Instructions
6.1 Unlocking with the Key
The key box can be opened using one of the provided spare keys.
- Press the left side of the lock panel to reveal the keyhole.
- Insert the key into the keyhole and turn it left.
- Turn the locking knob to the far right to open the door.

Figure 6.1: Unlocking with Key
Video 6.1: Unlocking with Key (0:02-0:05)
6.2 Setting and Unlocking with a Code
The key box supports a 4-8 digit code. You can set up to 2 separate admin codes.
Setting a New Code:
- With the door open, locate the red reset button inside the battery compartment.
- Press the reset button. The blue light on the keypad will blink.
- Enter your desired new 4-8 digit code on the keypad.
- Press the "#" key to confirm. The blue light will turn green, indicating success.
Unlocking with Code:
- Enter your programmed 4-8 digit code on the keypad.
- Press the "#" key to confirm. The blue light will turn green.
- Turn the locking knob to the far right to open the door.

Figure 6.2: Unlocking with Code
Video 6.2: Setting and Unlocking with Code (0:41-0:55)
6.3 Adding and Unlocking with Fingerprint
The fingerprint lock supports up to 30 fingerprints.
Adding a Fingerprint:
- With the door open, locate the reset button inside the battery compartment.
- Press the reset button. The blue light on the keypad will blink.
- Place your finger on the fingerprint sensor, lift, and repeat several times until the blue light turns green, indicating successful registration.
Unlocking with Fingerprint:
- Place your registered finger on the fingerprint sensor.
- The blue light will turn green upon successful recognition.
- Turn the locking knob to the far right to open the door.

Figure 6.3: Unlocking with Fingerprint
Video 6.3: Adding Fingerprint (0:21-0:40)
6.4 Using the Anti-Theft Key Drop Slot
The anti-theft side slot allows for quick and secure key deposits without needing to open the main door.
- Locate the key drop slot on the side of the key box.
- Insert keys through the slot. They will drop into the bottom of the key box.

Figure 6.4: Anti-Theft Drop Slot
Video 6.4: Using the Key Drop Slot (0:15-0:20)
7. Maintenance
7.1 Cleaning
Wipe the exterior of the key box with a soft, damp cloth. Avoid using abrasive cleaners or solvents that could damage the finish or electronic components.
7.2 Battery Replacement
When the batteries are low, the indicator light may flash or the keypad may not respond. Replace all 4 AA alkaline batteries as described in Section 5.1. If the batteries are completely depleted, use the external 9V battery port for emergency power or the spare keys to open the box.

Figure 7.1: 9V Battery Emergency Power
8. Troubleshooting
- Keypad not responding: Check battery levels. Replace batteries if necessary. Use the external 9V battery port for temporary power.
- Forgotten code: Use the spare keys to open the box and reset the code as described in Section 6.2.
- Fingerprint not recognized: Ensure your finger is clean and dry. Try re-registering your fingerprint if the issue persists.
- Door not opening: Ensure the correct code or fingerprint is entered, or use the spare keys. Check for any obstructions.
9. Specifications
| Feature | Detail |
|---|---|
| Brand | Uniclife |
| Model Name | Uniclife-5142 |
| Product Dimensions (L x W x H) | 11.6" x 4.9" x 15.3" (29.5 cm x 12.4 cm x 39 cm) |
| Material | Heavy-duty 3mm Steel |
| Color | Black |
| Lock Type | Fingerprint, Digital Code, Key |
| Fingerprint Capacity | Up to 30 fingerprints |
| Code Length | 4-8 digits |
| Key Hooks | 71 positions |
| Power Source | 4 AA alkaline batteries (not included) |
| Emergency Power | External 9V battery port |
| Mounting Type | Wall Mount |
| Item Weight | 1.87 pounds (0.85 Kilograms) |
10. Warranty and Support
For warranty information or technical support, please refer to the contact details provided with your purchase or visit the official Uniclife website. Keep your purchase receipt for warranty claims.


