1. Important Safeguards
Please read all instructions carefully before using this appliance to ensure safe and efficient operation. Keep this manual for future reference.
- Always place the dispenser on a flat, stable surface.
- Do not operate the dispenser without water in the bottle.
- Ensure the power cord is not pinched or damaged.
- Keep the dispenser away from direct sunlight and heat sources.
- Unplug the dispenser before cleaning or maintenance.
- The hot water spout features a child safety lock. Always engage this lock when not in use, especially in households with children.
- This appliance is designed for indoor use only.
2. Product Overview

Figure 2.1: Front view of the SOOPYK Water Cooler Dispenser with a 5-gallon water bottle.
2.1 Components
- Water Bottle Support
- Control Panel (Touch Screen)
- Hot Water Spout
- Warm Water Spout
- Cold Water Spout
- Ice Maker Compartment
- Removable Drip Tray
- Power Cord
2.2 Key Features
- Integrated Ice Maker: Produces bullet-shaped ice, up to 27 lbs daily, with a storage capacity of 5.3 lbs. Note: The unit does not keep ice frozen; ice will melt if not transferred to a freezer.
- Three Temperature Settings: Provides hot, cold, and room-temperature water for various needs.
- Intuitive Touch Screen Controls: Easy-to-use interface with indicator lights for ice making, water cooling, and heating status.
- Nightlight Feature: Illuminates water spouts for visibility in low-light conditions.
- Child-Safety Lock: Two-step dispensing mechanism on the hot water spout prevents accidental burns.
- Auto Shut-Off System: Automatically stops operation when the ice bin is full or water level is low.
- Removable Drip Tray: Easy to clean and maintain.

Figure 2.2: Child Safety Lock on the hot water dispenser.

Figure 2.3: Nightlight feature for enhanced visibility.
3. Setup Guide
3.1 Unpacking
Carefully remove the dispenser from its packaging. Inspect for any damage during transit. Retain packaging for future transport or storage.
3.2 Placement
Place the dispenser on a firm, level surface in a cool, shaded location. Ensure there is at least 4 inches (10 cm) of clearance from the wall for proper ventilation. Do not place near direct sunlight, heat sources, or in areas with high humidity.
3.3 Water Bottle Installation
- Clean the exterior of the water bottle.
- Remove the cap from the water bottle.
- Carefully lift the water bottle and place it onto the water bottle support on top of the dispenser. Ensure it is seated firmly.
- Allow water to fill the internal reservoirs for approximately 5 minutes before plugging in the unit.
- Plug the dispenser into a grounded electrical outlet.
4. Operating Instructions
4.1 Control Panel
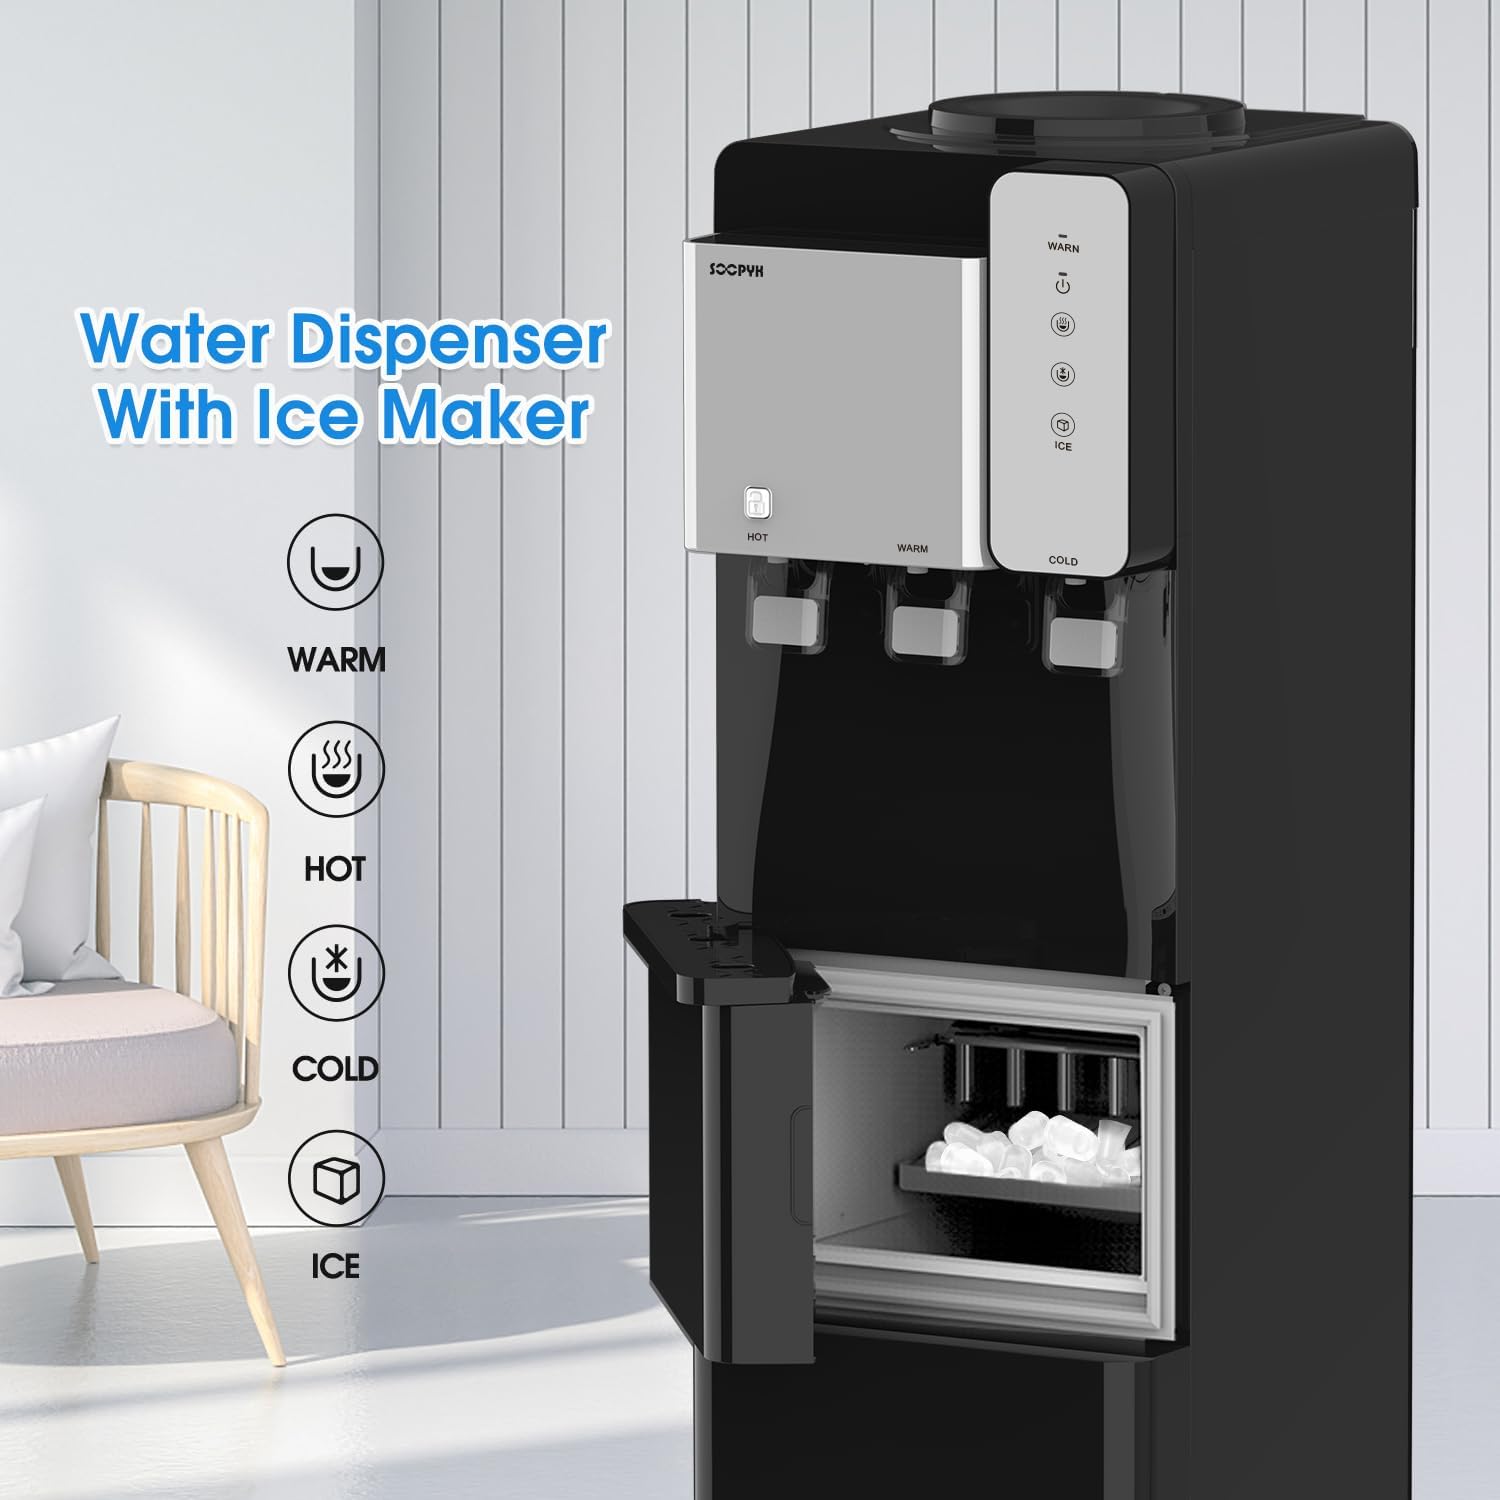
Figure 4.1: Control panel and ice maker compartment.
The touch screen control panel allows you to manage the dispenser's functions. Indicator lights will show the status of heating, cooling, and ice production.
4.2 Dispensing Water
- Cold Water: Place a cup under the cold water spout and press the cold water button/lever.
- Room Temperature Water: Place a cup under the room temperature water spout and press the corresponding button/lever.
- Hot Water: To dispense hot water, first press and hold the child safety lock button (usually located above the hot water spout), then press the hot water button/lever. Release both to stop dispensing.
4.3 Ice Making Function
The integrated ice maker produces bullet-shaped ice cubes. Ensure the water bottle has sufficient water for ice production.
- Press the 'ICE' button on the control panel to activate the ice making function. The indicator light will illuminate.
- The dispenser will begin producing ice within 5-7 minutes.
- Ice cubes will drop into the internal storage bin. The unit will automatically stop making ice when the bin is full.
- Open the ice maker compartment door to access the ice.
- For best results, transfer ice to a freezer for long-term storage as the unit does not maintain freezing temperatures in the ice bin.
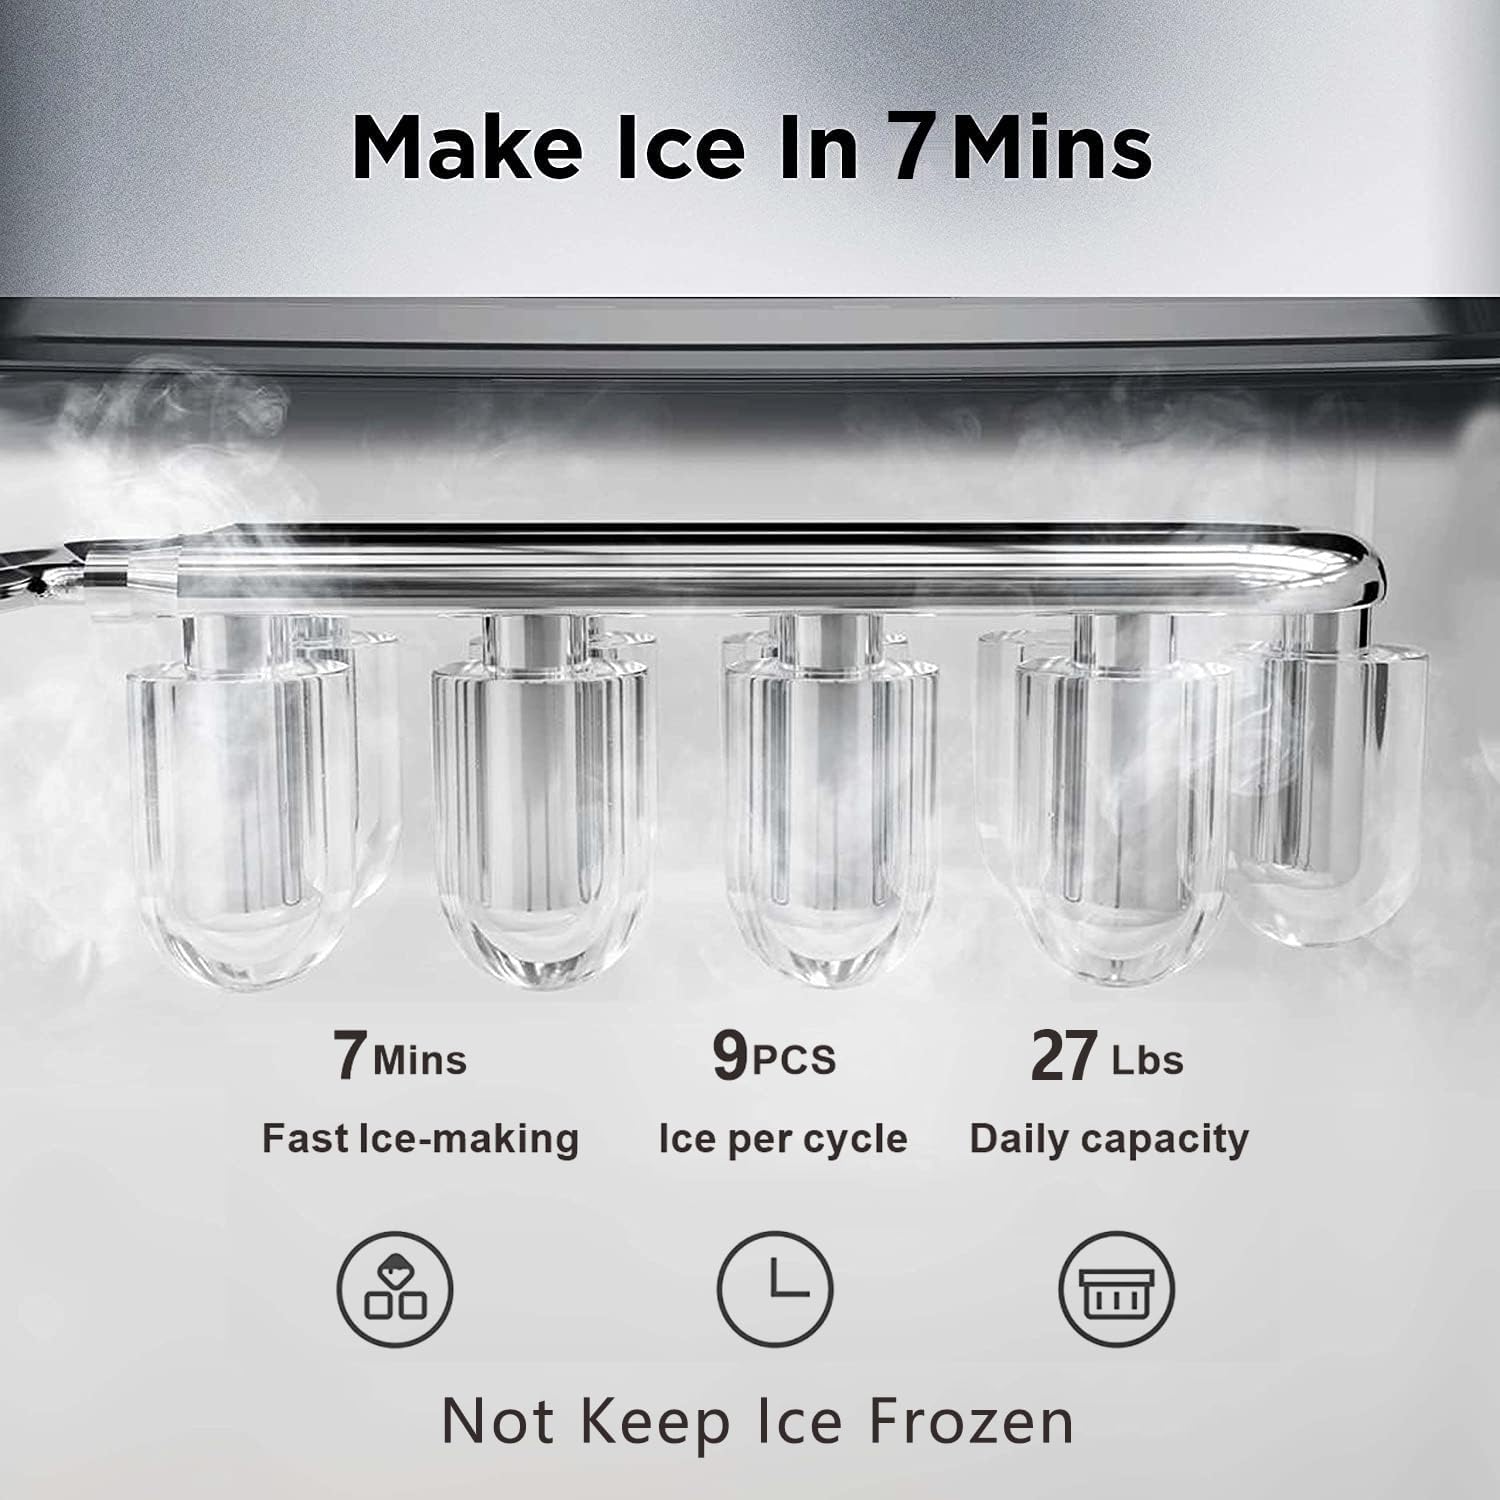
Figure 4.2: Ice making process and capacity.
Video 4.1: Demonstration of the SOOPYK Water Cooler Dispenser's ice making function and overall operation.
5. Maintenance and Cleaning
Regular cleaning and maintenance will ensure the longevity and hygiene of your water dispenser.
5.1 Regular Cleaning
- Exterior: Wipe the exterior with a soft, damp cloth. Do not use abrasive cleaners.
- Drip Tray: The drip tray is removable for easy cleaning. Empty and clean it regularly to prevent overflow and bacterial growth.
- Water Spouts: Clean the spouts with a soft brush or cloth to remove any mineral buildup.
5.2 Descaling
Over time, mineral deposits (scale) can build up inside the hot and cold water tanks. Descaling is recommended every 3-6 months, depending on water hardness.
- Unplug the dispenser and remove the water bottle.
- Drain all water from the hot and cold tanks using the drain plugs located at the back of the unit.
- Prepare a descaling solution (e.g., citric acid solution or a commercial descaling agent according to its instructions).
- Pour the solution into the water bottle support opening.
- Allow the solution to sit for 30 minutes to 1 hour.
- Drain the solution completely.
- Rinse the tanks thoroughly by filling with clean water and draining several times until no residue or taste remains.
5.3 Draining
To drain the unit completely (e.g., for storage or transport):
- Unplug the dispenser.
- Remove the water bottle.
- Place a bucket under the drain plugs at the back of the unit.
- Open the drain plugs and allow all water to empty.
- Close the drain plugs securely before re-installing a water bottle.
6. Troubleshooting
Refer to the table below for common issues and their solutions.
| Problem | Possible Cause / Solution |
|---|---|
| Water tastes unusual (plastic taste) | This can occur with new appliances. Clean the water cooler with citric acid and completely drain it. If the taste persists, contact customer support. |
| Ice does not stay frozen | This unit is a water dispenser with an ice maker, not a freezer. It produces ice but does not maintain freezing temperatures. Transfer ice to a freezer for storage. The unit will make more ice as existing ice melts. |
| Dispenser is not working | Ensure the unit is plugged in and the power switch is on. Check if the water bottle is empty or if the ice bin is full (auto shut-off). If the issue persists, specify the problem and contact customer support. |
7. Specifications
Detailed specifications for your SOOPYK Water Cooler Dispenser.
| Attribute | Value |
|---|---|
| Brand | SOOPYK |
| Model Number | BYCZ565BK-SO |
| Color | Glossy Black |
| Material | Plastic |
| Capacity | 3 or 5 Gallons (Water Bottle) |
| Product Dimensions (D x W x H) | 12.2"D x 14.5"W x 40.8"H |
| Ice Production Capacity | Up to 27 lbs per 24 hours |
| Ice Storage Capacity | 5.3 lbs |
| Ice Cube Production Time | 9 cubes per 5-7 minutes |
| Installation Type | Freestanding |
| Power Source | Corded Electric |

Figure 7.1: Product Dimensions.
8. Warranty and Support
For warranty information, technical support, or service inquiries, please contact SOOPYK customer service through the retailer where the product was purchased or visit the official SOOPYK store on Amazon:
Visit the SOOPYK Store on Amazon
Please have your model number (BYCZ565BK-SO) and purchase date available when contacting support.


