
1. Introduction
This manual provides detailed instructions for the installation, operation, and maintenance of your JOYING JY-TT167N8 Android 13 Car Radio. Please read this manual thoroughly before using the product to ensure proper functionality and safety. This unit is designed for specific Toyota Tundra (2007-2013) and Toyota Sequoia (2008-2018) models.
2. Product Overview
The JOYING JY-TT167N8 is an advanced Android 13 car stereo featuring a 10.1-inch touch screen. It offers seamless integration with your vehicle's existing systems and provides modern connectivity options.
Key Features:
- Android 13 Operating System
- 10.1-inch Capacitive Touch Screen
- Built-in Wireless Apple CarPlay & Android Auto
- GPS Navigation with Offline Map Support
- Fast Boot Functionality (2 seconds after initial boot)
- Optical Fiber and Coaxial Digital Audio Output
- Built-in 4G Module for Internet Access (SIM card required)
- Steering Wheel Control (SWC) compatibility
- AM/FM Radio
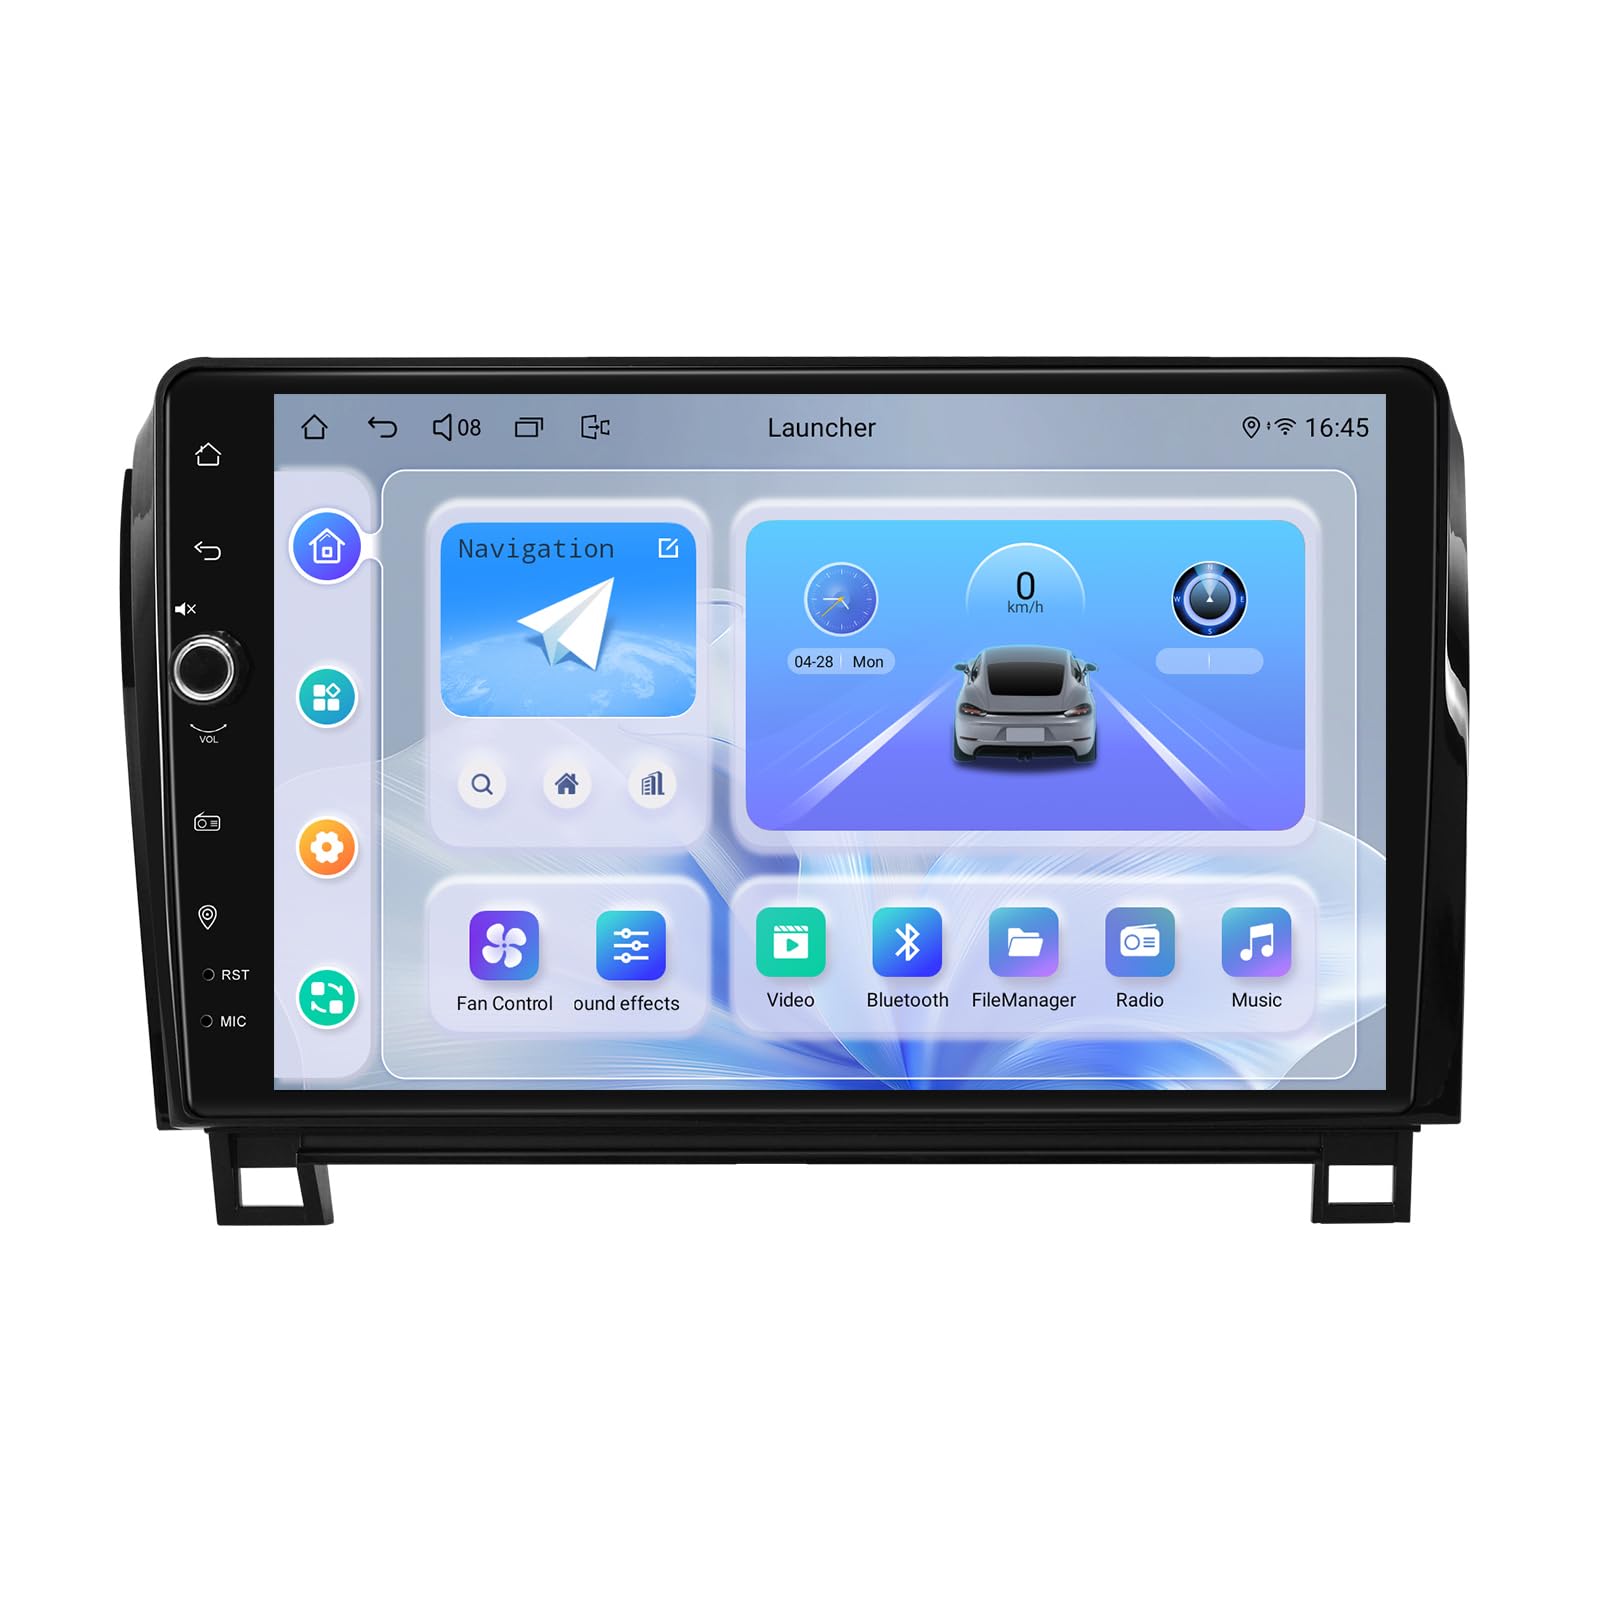
Image: The JOYING JY-TT167N8 car radio display, highlighting its Android 13 operating system and compatibility with Toyota Tundra (2007-2013) and Toyota Sequoia (2008-2018) models. It also indicates support for factory USB, JBL amplifier, reverse camera, and steering wheel controls.
3. Setup and Installation
The JY-TT167N8 is designed for plug-and-play installation in compatible vehicles. Proper wiring harness selection is crucial for correct functionality.
3.1 Wiring Harness Selection Guide
There are several wiring harnesses available for this model. To ensure you select the correct one, identify your factory radio type. If you are unsure, consult a professional or contact customer support with a photo of your factory radio.
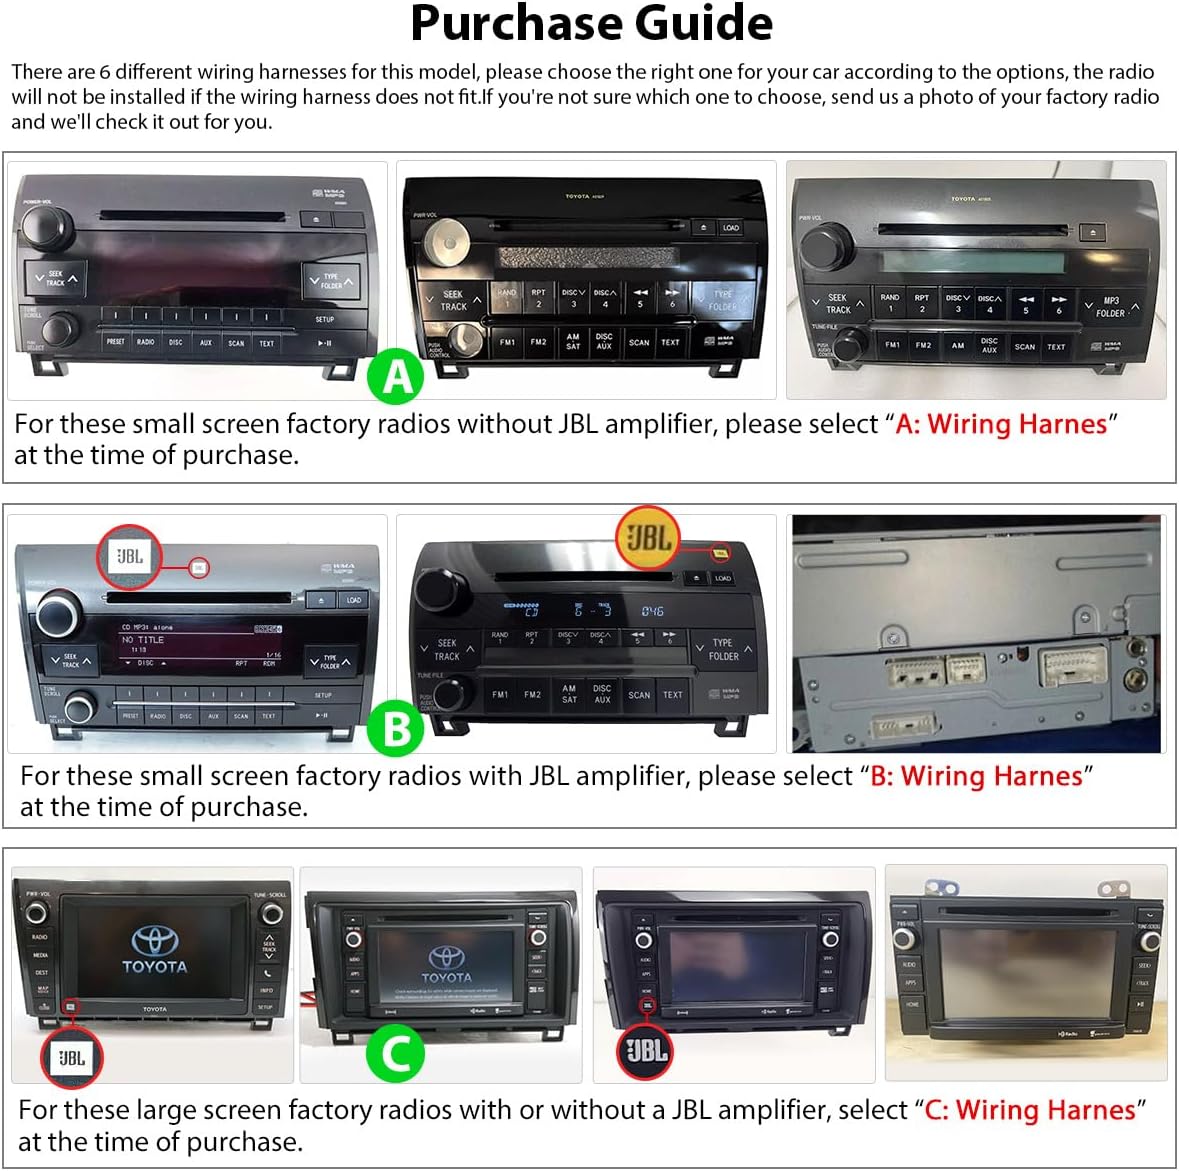
Image: This guide illustrates three types of factory radios (A, B, C) and their corresponding wiring harness selections. Type A is for small screen radios without a JBL amplifier. Type B is for small screen radios with a JBL amplifier. Type C is for large screen factory radios, with or without a JBL amplifier.
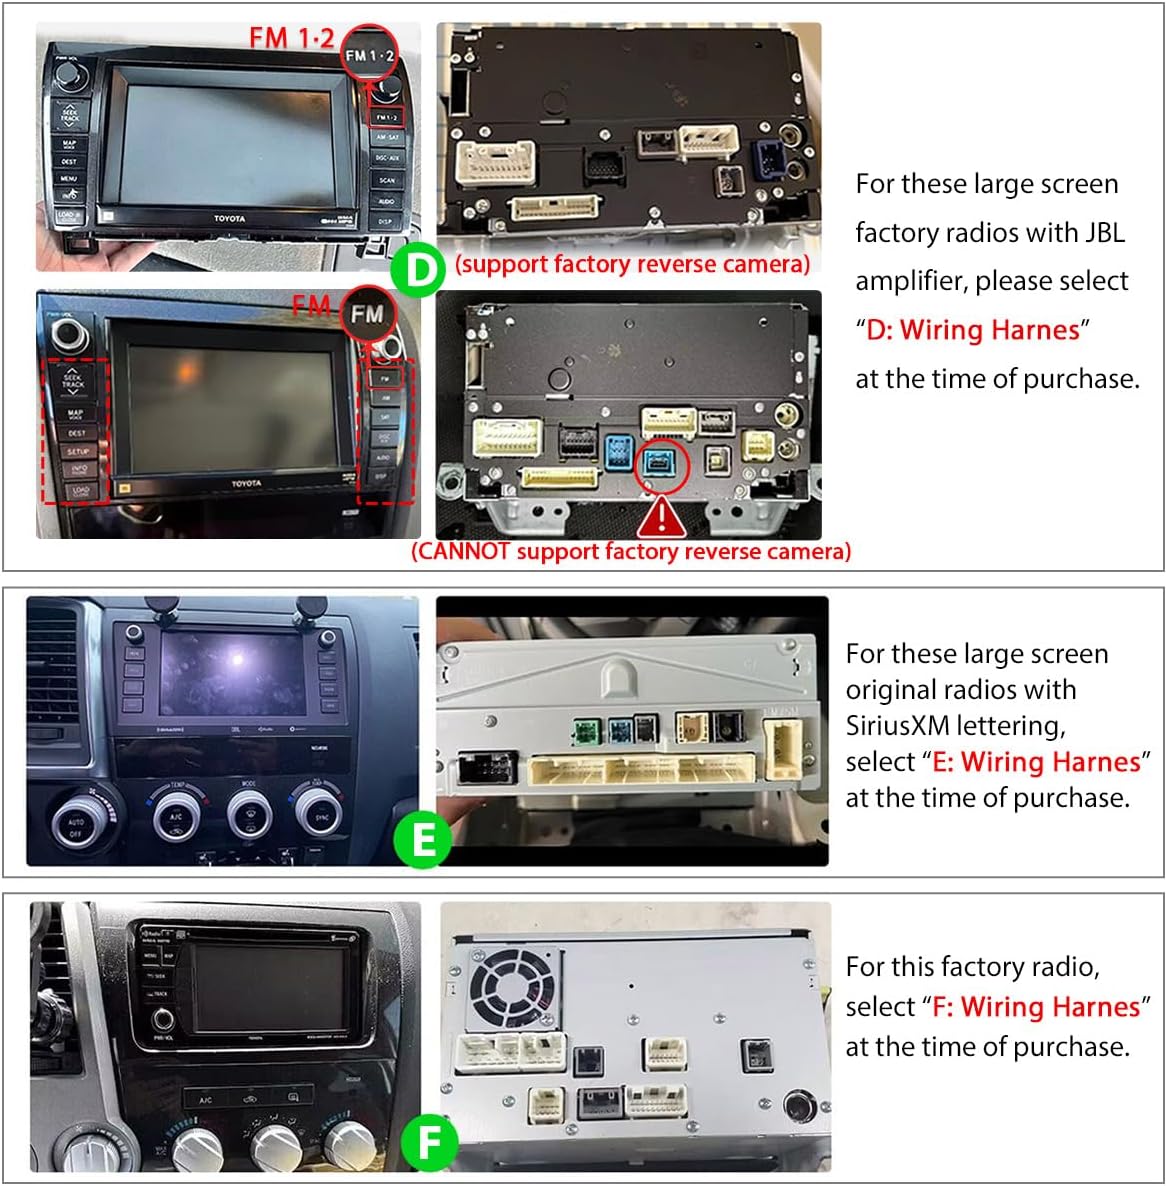
Image: This guide continues with three more factory radio types (D, E, F) and their wiring harness selections. Type D is for large screen radios with a JBL amplifier (supports factory reverse camera). Type E is for large screen original radios with SiriusXM lettering. Type F is for another specific factory radio configuration.
3.2 Installation Steps (General)
- Prepare Vehicle: Disconnect the vehicle's battery before starting installation.
- Remove Factory Radio: Carefully remove the existing factory radio and trim panels.
- Select Harness: Choose the correct wiring harness based on your vehicle's factory radio configuration (refer to the guide above).
- Connect Wiring: Connect the new head unit's wiring harness to the vehicle's wiring. Ensure all connections are secure.
- Install Antennas: Connect the GPS antenna, WiFi antenna, and 4G antennas (if applicable) and route them to optimal locations for signal reception.
- Mount Head Unit: Secure the JOYING head unit using the provided Single Din Cage and Left & Right Brackets.
- Test Functionality: Reconnect the battery and test all functions (radio, navigation, audio, steering wheel controls, etc.) before fully reassembling the dashboard.
- Reassemble: Carefully reassemble all trim panels.

Image: This image displays the JOYING car radio seamlessly integrated into different Toyota Tundra and Sequoia dashboards, showcasing its factory-look design and fit.
4. Operating Instructions
4.1 Fast Boot
After the initial boot-up (which takes approximately 30-40 seconds), the unit will enter user interface within 2 seconds when the car key is turned on, allowing for quick access to functions.
4.2 GPS Navigation
The unit features precise GPS engines and includes a GPS antenna for accurate positioning and faster real-time navigation. It supports offline maps; you can download map data for specific areas to use without an internet connection. Mobile phone map data can also be synchronized via CarPlay or Android Auto.
4.3 Optical Fiber and Coaxial Digital Output
For enhanced audio quality, this unit provides Optical Fiber and Coaxial Digital Outputs. If your external amplifier supports these inputs, you can achieve superior sound directly from the head unit.
4.4 Built-in 4G Module
Insert a compatible SIM card into the unit to enable 4G internet access. Note that this module supports data services only and cannot be used for phone calls or SMS messages. Supported FDD-LTE types include B2/B4/B5/B7/B12/B13/B14/B17/B25/B26/B38/B66/B71, and TDD-LTE type B41.
4.5 Split-screen Multitasking
The unit supports split-screen functionality, allowing you to run two applications simultaneously.
- Tap the recent apps icon on the screen.
- Find the app you wish to run in split-screen mode. Tap the split-screen icon (usually two rectangles) next to the app to bring up the split-screen button, then tap it.
- The first selected app will display on the left side. Choose the second app from your recent apps list to display on the right.

Image: A visual guide demonstrating the steps to enable split-screen multitasking, allowing two applications to be viewed side-by-side on the 10.1-inch display.
4.6 HDMI Output
The unit features an HDMI output for full digital image and sound transmission. This allows for synchronous output of audio and video signals to external displays, such as headrest monitors, without manual adjustment.
- Projection Screen Display: Passengers can watch movies on rear displays while the driver uses the main screen for navigation.
- On-screen Display: Provides clear 1080P picture quality with no delays or stuttering.
Note: The HDMI cable is not included with the unit.
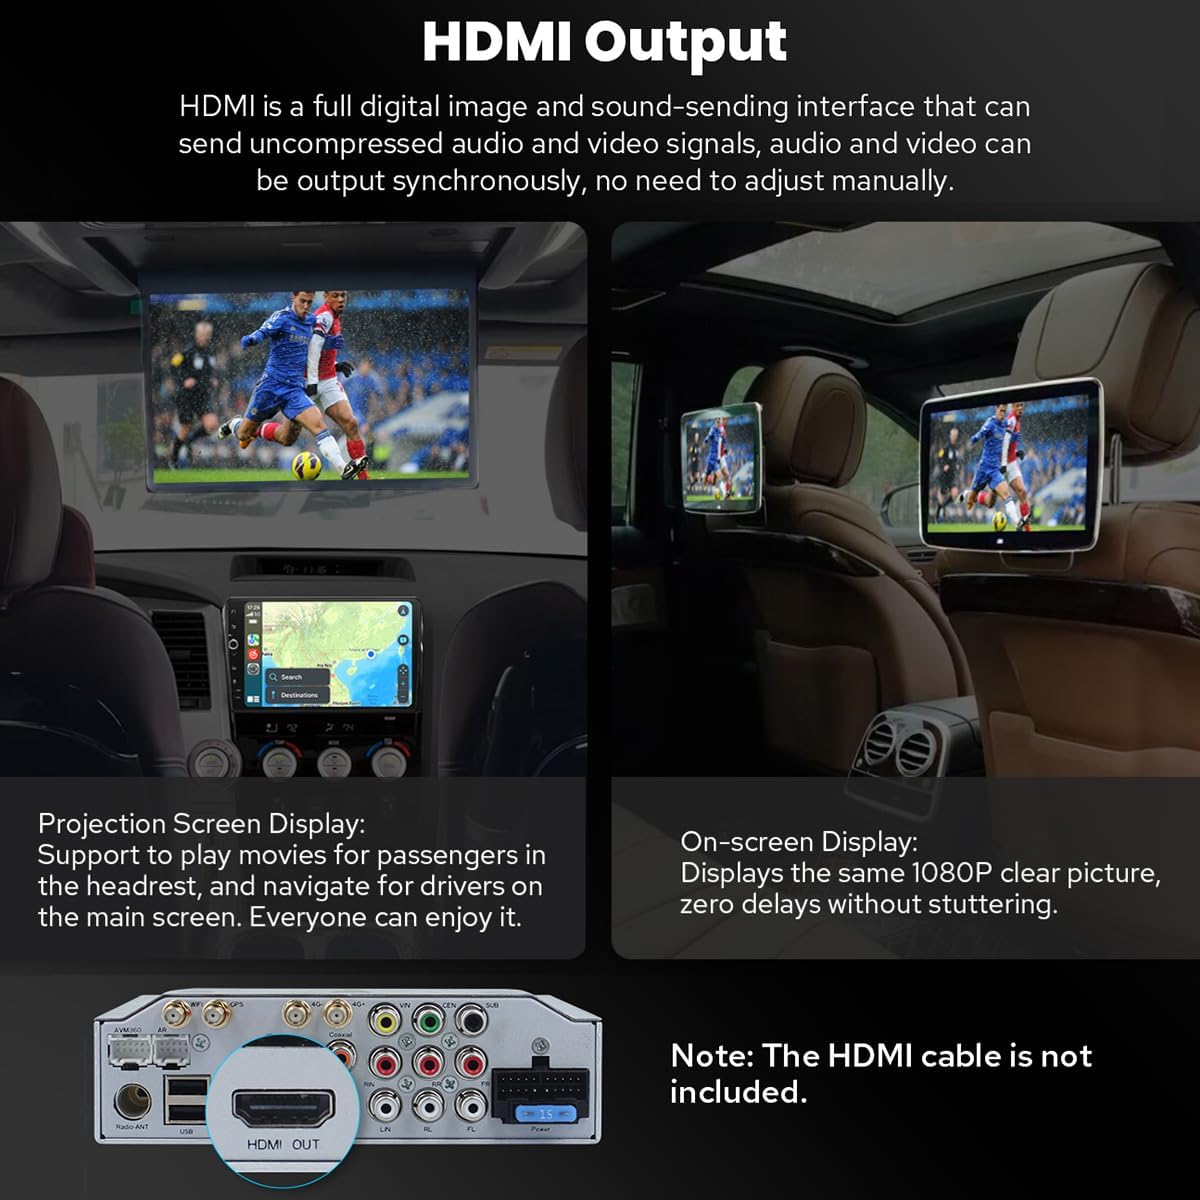
Image: This image demonstrates the HDMI output feature, showing how the car radio can connect to external monitors for rear-seat entertainment. It also highlights the HDMI OUT port on the back of the unit.
4.7 Personalized Settings
Customize your user experience with various personalization options:
- Car Boot Logo: Set a custom logo to display when the unit starts up.
- Customizable Wallpapers: Choose from a selection of wallpapers or upload your own.
- Adjustable Screen Brightness: Modify the display brightness to suit ambient light conditions.
- Changeable Button Color: Customize the color of the physical buttons on the unit.

Image: This graphic illustrates the personalized settings available, such as custom boot logos, wallpaper options, adjustable screen brightness, and the ability to change button illumination colors.
4.8 High-Quality Sound Enjoyment
The unit is equipped with a TDA7851 DSP chip and a 48-band graphic equalizer, delivering a maximum output power of 4x50W. It supports aftermarket amplifiers and offers multiple audio outputs for a comprehensive sound system.
- 4 Audio Outputs
- 1 Subwoofer Output
- Fiber Optical Output
- SPDIF Coaxial Output
- Center Channel Output

Image: This graphic highlights the audio capabilities of the unit, including the TDA7851 DSP chip, 48-band graphic equalizer, 4x50W maximum output power, and support for aftermarket amplifiers with multiple audio output options.
4.9 Built-in CarPlay & Android Auto
Connect your mobile phone to the car radio via USB cable or Bluetooth to access CarPlay or Android Auto. This allows you to use your phone's navigation, make calls, and listen to music directly on the larger screen.

Image: This image displays the user interfaces for both Apple CarPlay and Android Auto, demonstrating how smartphone applications are mirrored and controlled on the car stereo's screen.
4.10 Other Features
- Picture-in-Picture: View a smaller video or navigation window while using another application.
- 3 USB Ports: For connecting various USB devices.
- Micro SD Card Slot: For additional storage or media playback.
- 4G SIM Card Slot: For inserting a SIM card for internet connectivity.

Image: A collection of icons representing various additional features of the car radio, including fast boot, GPS navigation, AM/FM radio, hands-free calling, picture-in-picture, multiple USB ports, micro SD card slot, and a 4G SIM card slot.
5. Maintenance
5.1 Cooling System
The unit features a dual heat sink design for superior heat dissipation and improved temperature control. An internal fan automatically activates if the CPU temperature or radio volume exceeds a set warning value, preventing overheating and ensuring stable performance.

Image: This diagram illustrates the upgraded cooling system, featuring a dual heat sink design and an internal fan that activates to manage CPU temperature and prevent overheating.
5.2 WiFi Signal
An independent WiFi antenna ensures stable signal quality and provides fast, smooth internet access. The unit supports 802.11a/b/g/n/AC standards across 2.4GHz and 5GHz spectral bands.

Image: This graphic highlights the upgraded WiFi signal capability, showing the independent WiFi antenna and its connection point on the rear of the head unit, ensuring stable and fast internet access.
6. Troubleshooting
If you encounter issues with your JOYING JY-TT167N8 car radio, please refer to the following common troubleshooting steps:
- No Power: Check all power connections and ensure the vehicle's battery is properly connected. Verify the fuse is intact.
- No Sound: Check speaker connections. Ensure the volume is not muted or set too low. Verify external amplifier connections if used.
- Android Auto/CarPlay Issues: Ensure your phone's operating system is up to date. Try connecting with a different USB cable or via Bluetooth. Restart both the head unit and your phone.
- Navigation Audio Problems: If experiencing issues with navigation voice prompts, check the unit's audio settings and ensure navigation audio is enabled and not conflicting with other audio sources.
- Volume Knob Malfunction: If the volume knob becomes unresponsive, try restarting the unit. If the issue persists, it may indicate a hardware fault requiring service.
- Day/Night Mode Issues: If the display's day/night mode does not switch correctly, check the unit's display settings and ensure the automatic brightness or time-based switching is configured properly.
- Unit Freezes/Slow Performance: Restart the unit. Clear cache for frequently used apps. Ensure sufficient storage space is available.
- Poor Signal (GPS/WiFi/Radio): Ensure antennas are properly connected and positioned away from obstructions.
If these steps do not resolve the issue, please contact JOYING customer support for further assistance.
7. Specifications
| Feature | Specification |
|---|---|
| Brand | JOYING |
| Model Name | TT167N8 |
| Model Number | JY-TT167N8 |
| Vehicle Service Type | Car, Truck (Toyota Tundra 2007-2013, Toyota Sequoia 2008-2018) |
| Screen Size | 10.1 inches |
| Operating System | Android |
| Memory Storage Capacity | 128 GB |
| Touch Screen Type | Capacitive |
| Display Type | LED |
| Connectivity Technology | Bluetooth, Ethernet, HDMI, USB, Wi-Fi |
| Connectivity Protocol | Bluetooth, Wi-Fi |
| Supported Satellite Navigation System | BeiDou, GLONASS, GPS |
| Audio Output Mode | Stereo |
| Special Features | DSP, Front View Camera Input, RCA, RDS, SD Card Input |
| Mounting Type | Dashboard Mount |
| Item Weight | 5 pounds |
| Manufacturer | JOYING |
8. Package Contents
The following items are included in your product package:
- 10.1" Radio Unit
- Single Din Cage
- Left & Right Brackets
- WiFi Antenna
- GPS Antenna
- 4G Antennas (x2)
- External Microphone
- USB Cables (x2)
- AR Cable
- Screen Ribbon Cable
- Power Cable
- User Manual

Image: This image provides the dimensions of the 10.1-inch radio unit and a detailed view of its rear panel, illustrating all available ports and connections.

Image: A comprehensive display of all items included in the package, such as the single DIN cage, mounting brackets, various antennas, cables, external microphone, and the user manual.
9. Optional Accessories
The following accessories are not included in the standard package but can be purchased separately to enhance your experience:
- OBD2 Scanner: Connects via Bluetooth to retrieve real-time vehicle data and diagnostic trouble codes. (ASIN: B076CD78HT)
- AR Front Camera: Records the front road automatically while driving. (ASIN: B0CBX4N6V8)
- AR Rear Camera: Provides a view of the area behind the vehicle, automatically switching when reversing. (ASIN: B0CBX39S8M)
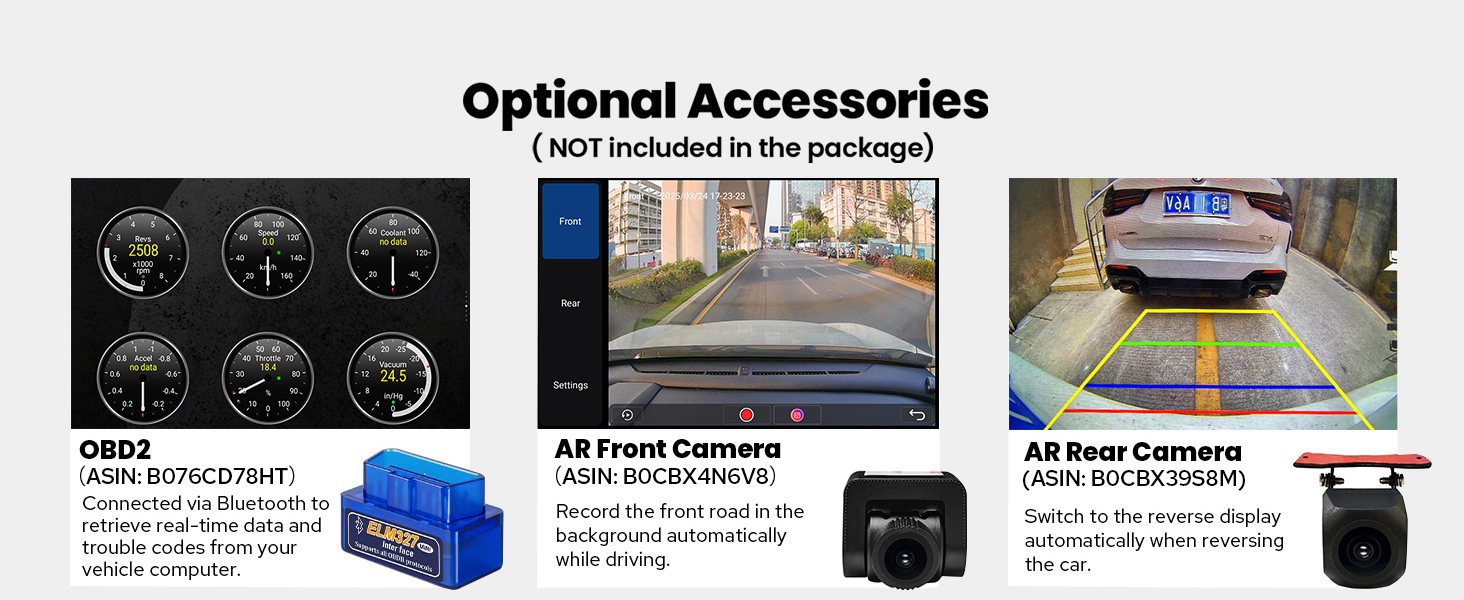
Image: This graphic showcases optional accessories available for purchase, including an OBD2 scanner, an AR front camera, and an AR rear camera, along with their respective product identification numbers (ASINs).
10. Warranty and Support
10.1 Warranty Information
The JOYING JY-TT167N8 Car Radio comes with a 2-year warranty from the date of purchase. This warranty covers manufacturing defects and malfunctions under normal use. Please retain your proof of purchase for warranty claims.
10.2 Customer Support
For technical assistance, troubleshooting, or warranty inquiries, please contact JOYING customer support. Refer to the contact information provided with your product packaging or visit the official JOYING website for support resources.

