
ESSGOO B0FB8DNJ89
Contents
ESSGOO 5.1-inch IPS HD Touchscreen Car Radio User Manual
Model: B0FB8DNJ89
1. Introduction
Thank you for choosing the ESSGOO 5.1-inch IPS HD Touchscreen Car Radio. This device is designed to enhance your driving experience with advanced features such as Wireless CarPlay, Android Auto, Bluetooth connectivity, FM/RDS radio, and multimedia playback. This manual provides detailed instructions for installation, operation, maintenance, and troubleshooting to ensure optimal performance and user satisfaction.

Figure 1: ESSGOO 5.1-inch Car Radio unit showing its full-touch IPS display with various application icons.
2. Safety Information
Please read all safety instructions carefully before installation and operation. Failure to follow these instructions may result in injury or damage to the device or vehicle.
- Professional Installation Recommended: Due to the complexity of car electrical systems, professional installation is highly recommended to prevent damage to the unit or vehicle.
- Power Supply: Ensure the unit is connected to a 12V DC power supply with negative grounding.
- Wiring: Do not short-circuit any wires. Insulate all unused wires.
- Driving Safety: Do not operate the unit or watch videos that may distract you while driving. Always prioritize road safety.
- Temperature: Avoid exposing the unit to extreme temperatures or direct sunlight for prolonged periods.
- Cleaning: Use a soft, dry cloth for cleaning. Do not use abrasive cleaners or solvents.
3. Setup and Installation
3.1 Package Contents
Before installation, verify that all components are present:
- 1 x ESSGOO 1Din Car Stereo Radio
- 1 x Remote Control (battery not included)
- 1 x Steering Wheel Control (battery not included)
- 1 x Power Cable
- 1 x Speaker Cable
- 1 x User Manual
3.2 Wiring Diagram (General)
The following is a general guide. Refer to your vehicle's specific wiring diagram and consult a professional if unsure.
- Yellow Wire (B+): Connect to the car's constant 12V power supply.
- Red Wire (ACC): Connect to the car's accessory power supply (switched 12V).
- Black Wire (GND): Connect to the car's chassis ground.
- Speaker Wires: Connect to corresponding vehicle speakers (e.g., White/White-Black for Front Left, Grey/Grey-Black for Front Right, Green/Green-Black for Rear Left, Purple/Purple-Black for Rear Right). Ensure correct polarity.
- Reverse Gear Wire (BACK/REVERSE): Connect to the car's reverse light positive wire for automatic rear camera display.
- Antenna: Connect the car's radio antenna to the unit's antenna input.
- USB Ports: Connect USB devices as needed.
3.3 Installation Steps
- Disconnect the vehicle's negative battery terminal before starting any electrical work.
- Remove the existing car radio from the dashboard.
- Connect the ESSGOO car radio's wiring harness to the vehicle's wiring harness, following the diagram.
- Connect any additional accessories like the rear camera, external microphone, or USB cables.
- Carefully slide the new car radio into the dashboard opening until it clicks into place or is secured with mounting brackets.
- Reconnect the vehicle's negative battery terminal.
- Turn on the vehicle's ignition and test the unit's functions.
4. Operating Instructions
4.1 Basic Operations
- Power On/Off: Press the power button (usually a rotary knob) to turn the unit on. Press and hold to turn off.
- Volume Control: Rotate the knob or use the on-screen controls to adjust volume.
- Main Menu: Tap the Home icon on the screen to return to the main application interface.
- Touchscreen: The 5.1-inch IPS HD touchscreen is capacitive. Tap, swipe, and drag as you would on a smartphone.
4.2 Wireless CarPlay & Android Auto
Connect your iPhone or Android smartphone wirelessly for seamless integration of navigation, music, calls, and messages.
- Ensure Bluetooth and Wi-Fi are enabled on your smartphone.
- On the car radio, navigate to the CarPlay or Android Auto application.
- Search for the car radio's Bluetooth name on your phone and pair them.
- Once paired, the system will automatically connect to CarPlay or Android Auto.

Figure 2: Demonstrates the Wireless CarPlay and Android Auto interfaces on the car radio's screen, mirroring smartphone content.
4.3 Bluetooth Connectivity
Pair your smartphone via Bluetooth for hands-free calling and audio streaming.
- Go to the Bluetooth menu on the car radio.
- Enable Bluetooth on your smartphone and search for available devices.
- Select the car radio's Bluetooth name (e.g., "ESSGOO BT") from your phone's list and confirm pairing.
- Once connected, you can make/receive calls and play music through the car's speakers.
4.4 FM/RDS Radio
Enjoy your favorite radio stations with automatic and manual tuning, and RDS information.
- Select the "FM Radio" application from the main menu.
- Use the on-screen controls to scan for stations (auto-scan) or manually tune to a frequency.
- Press and hold a preset button to save the current station.
- EQ Settings: Access the Equalizer settings to adjust audio output (e.g., Jazz, Classic, Rock, or custom settings).
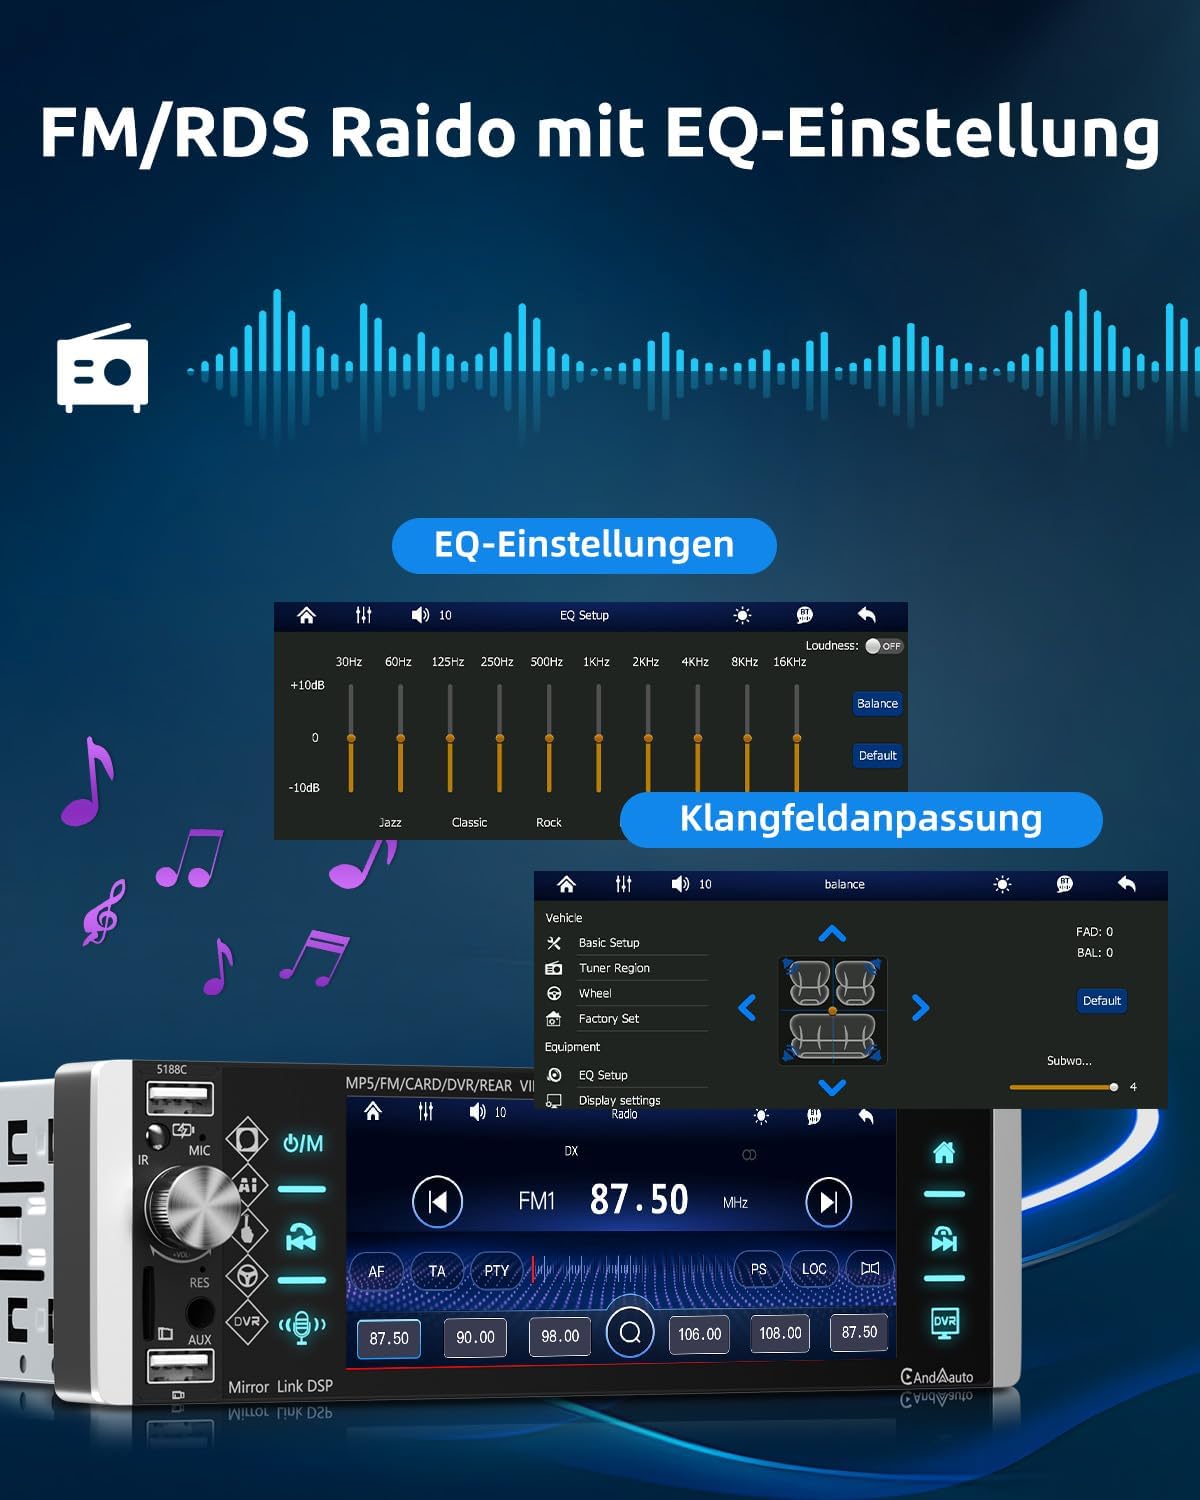
Figure 3: The FM/RDS radio interface showing frequency display and access to detailed EQ (Equalizer) settings for audio customization.
4.5 Mirror Link Function
Display your smartphone's screen directly on the car radio's display.
- Connect your smartphone to the car radio via a USB cable or follow wireless connection prompts.
- Open the "Mirror Link" application on the car radio.
- Follow the on-screen instructions to establish the connection. This may require installing a specific app on your phone.

Figure 4: Illustration of the Mirror Link function, where a smartphone's display content is duplicated onto the car radio's screen.
4.6 Rear Camera Compatibility
The unit automatically displays the rear view when the vehicle is in reverse gear (camera not included).
- Ensure the rear camera is properly installed and connected to the unit's dedicated camera input.
- The reverse trigger wire must be connected to the vehicle's reverse light circuit.

Figure 5: The car radio displaying a rear camera feed with parking assist lines, indicating compatibility with external rearview cameras.
4.7 Steering Wheel Control
Program your vehicle's steering wheel buttons to control the car radio.
- Access the "Steering Wheel Control" settings in the unit's system menu.
- Follow the on-screen instructions to assign functions (e.g., volume up/down, track skip, mode) to your steering wheel buttons.

Figure 6: Demonstrates the integration of steering wheel controls with the car radio, allowing for convenient operation while driving.
4.8 Multimedia Connections
The unit supports various media inputs:
- USB Ports: Connect USB drives for music/video playback or smartphone charging.
- AUX Input: Connect external audio devices via a 3.5mm audio cable.
- TF Card Slot: Insert a TF (MicroSD) card for media playback.
4.9 Voice Control
Utilize voice commands for safer operation while driving.
- When connected to CarPlay or Android Auto, you can activate Siri or Google Assistant by pressing the voice command button on the unit or steering wheel.
- Speak commands clearly (e.g., "Call [Contact Name]", "Play [Song Title]", "Navigate to [Address]").

Figure 7: Visual representation of the voice control feature, highlighting the microphone icon and examples of voice commands for hands-free operation.
4.10 7-Color Keyboard Configuration
Personalize the button backlighting to match your vehicle's interior.
- Navigate to the "Settings" menu and find the "LED Color" or "Button Light" option.
- Choose from the available 7 colors to set your preferred backlighting.
5. Maintenance
- Screen Cleaning: Use a soft, lint-free cloth to gently wipe the touchscreen. For stubborn smudges, slightly dampen the cloth with water or a screen cleaner designed for electronics. Do not spray liquid directly onto the screen.
- General Cleaning: Wipe the unit's body with a dry, soft cloth. Avoid using harsh chemicals, solvents, or abrasive materials.
- Firmware Updates: Check the ESSGOO official website periodically for any available firmware updates to ensure optimal performance and new features. Follow the provided instructions carefully for any update process.
6. Troubleshooting
If you encounter issues, refer to the following common problems and solutions:
| Problem | Possible Cause | Solution |
|---|---|---|
| Unit does not power on | Incorrect wiring (B+, ACC, GND) Blown fuse | Check power connections and grounding. Check and replace the fuse if necessary. |
| No sound | Speaker wires incorrectly connected Volume too low Mute function active | Verify speaker wiring and polarity. Increase volume. Deactivate mute. |
| Bluetooth not connecting | Bluetooth not enabled on phone/unit Device not in pairing mode Interference | Ensure Bluetooth is on. Put unit/phone in pairing mode. Try re-pairing or restarting devices. |
| CarPlay/Android Auto not working | Incorrect connection Phone software issue Wi-Fi/Bluetooth issues | Ensure proper wireless connection. Restart phone and unit. Check phone settings for CarPlay/Android Auto permissions. |
| Rear camera not displaying | Camera not connected Reverse trigger wire not connected | Check camera input connection. Verify reverse trigger wire connection to reverse light. |
| Poor radio reception | Antenna not connected or damaged Weak signal area | Check antenna connection. Consider an antenna booster if in a weak signal area. |
If problems persist, please contact ESSGOO customer support.
7. Specifications
| Feature | Specification |
|---|---|
| Brand | ESSGOO |
| Model Number | B0FB8DNJ89 |
| Display | 5.1-inch IPS HD Full Touch Screen (1120 x 480 resolution) |
| Connectivity | Bluetooth, USB (Type A), 3.5mm AUX, TF Card |
| Special Features | Wireless CarPlay, Wireless Android Auto, Mirror Link, Built-in Bluetooth, Touchscreen, Built-in Wi-Fi |
| Audio Output Type | Speakers, Headphones |
| Surround Sound Channel Configuration | 5.1 |
| Number of Channels | 5 |
| Video Encoding | H.264, H.265/HEVC |
| Item Dimensions (D x W x H) | 11.8 x 18.8 x 5.8 cm |
| Compatible Devices | Smartphone |
8. Warranty and Support
ESSGOO products are manufactured to high-quality standards. This product comes with a limited warranty against defects in materials and workmanship. Please refer to the warranty card included in your package or visit the official ESSGOO website for detailed warranty terms and conditions.
For technical support, troubleshooting assistance, or warranty claims, please contact ESSGOO customer service through their official website or the contact information provided with your purchase. Please have your model number (B0FB8DNJ89) and purchase details ready when contacting support.
Ask a question about this manual
Ask about setup, troubleshooting, compatibility, parts, safety, or missing instructions. Manuals+ will review the question and use this page’s manual context to help answer it.