
YARDCARE E400 Grey-002
YARDCARE Robotic Lawn Mower User Manual
Model: E400 Grey-002 | Brand: YARDCARE
1. General Safety Information
Please read this manual carefully before operating the robotic lawn mower. Failure to follow safety instructions may result in injury or damage.
- Always keep children and pets away from the mowing area when the mower is in operation.
- Do not operate the mower if the blades are damaged or missing.
- Ensure the boundary wire is correctly installed and maintained to prevent the mower from leaving the designated area.
- Disconnect the power supply before performing any maintenance, cleaning, or blade replacement.
- Use only the original charging station and power adapter provided with the product.
- Avoid operating the mower in heavy rain or extreme weather conditions, despite its weather-resistant design.
- Do not lift or carry the mower by its wheels or cutting deck.
2. Product Overview
The YARDCARE Robotic Lawn Mower is an intelligent, app-controlled device designed to maintain your lawn automatically. It features self-charging capabilities, obstacle detection, and adjustable cutting height for a pristine lawn.
Package Contents
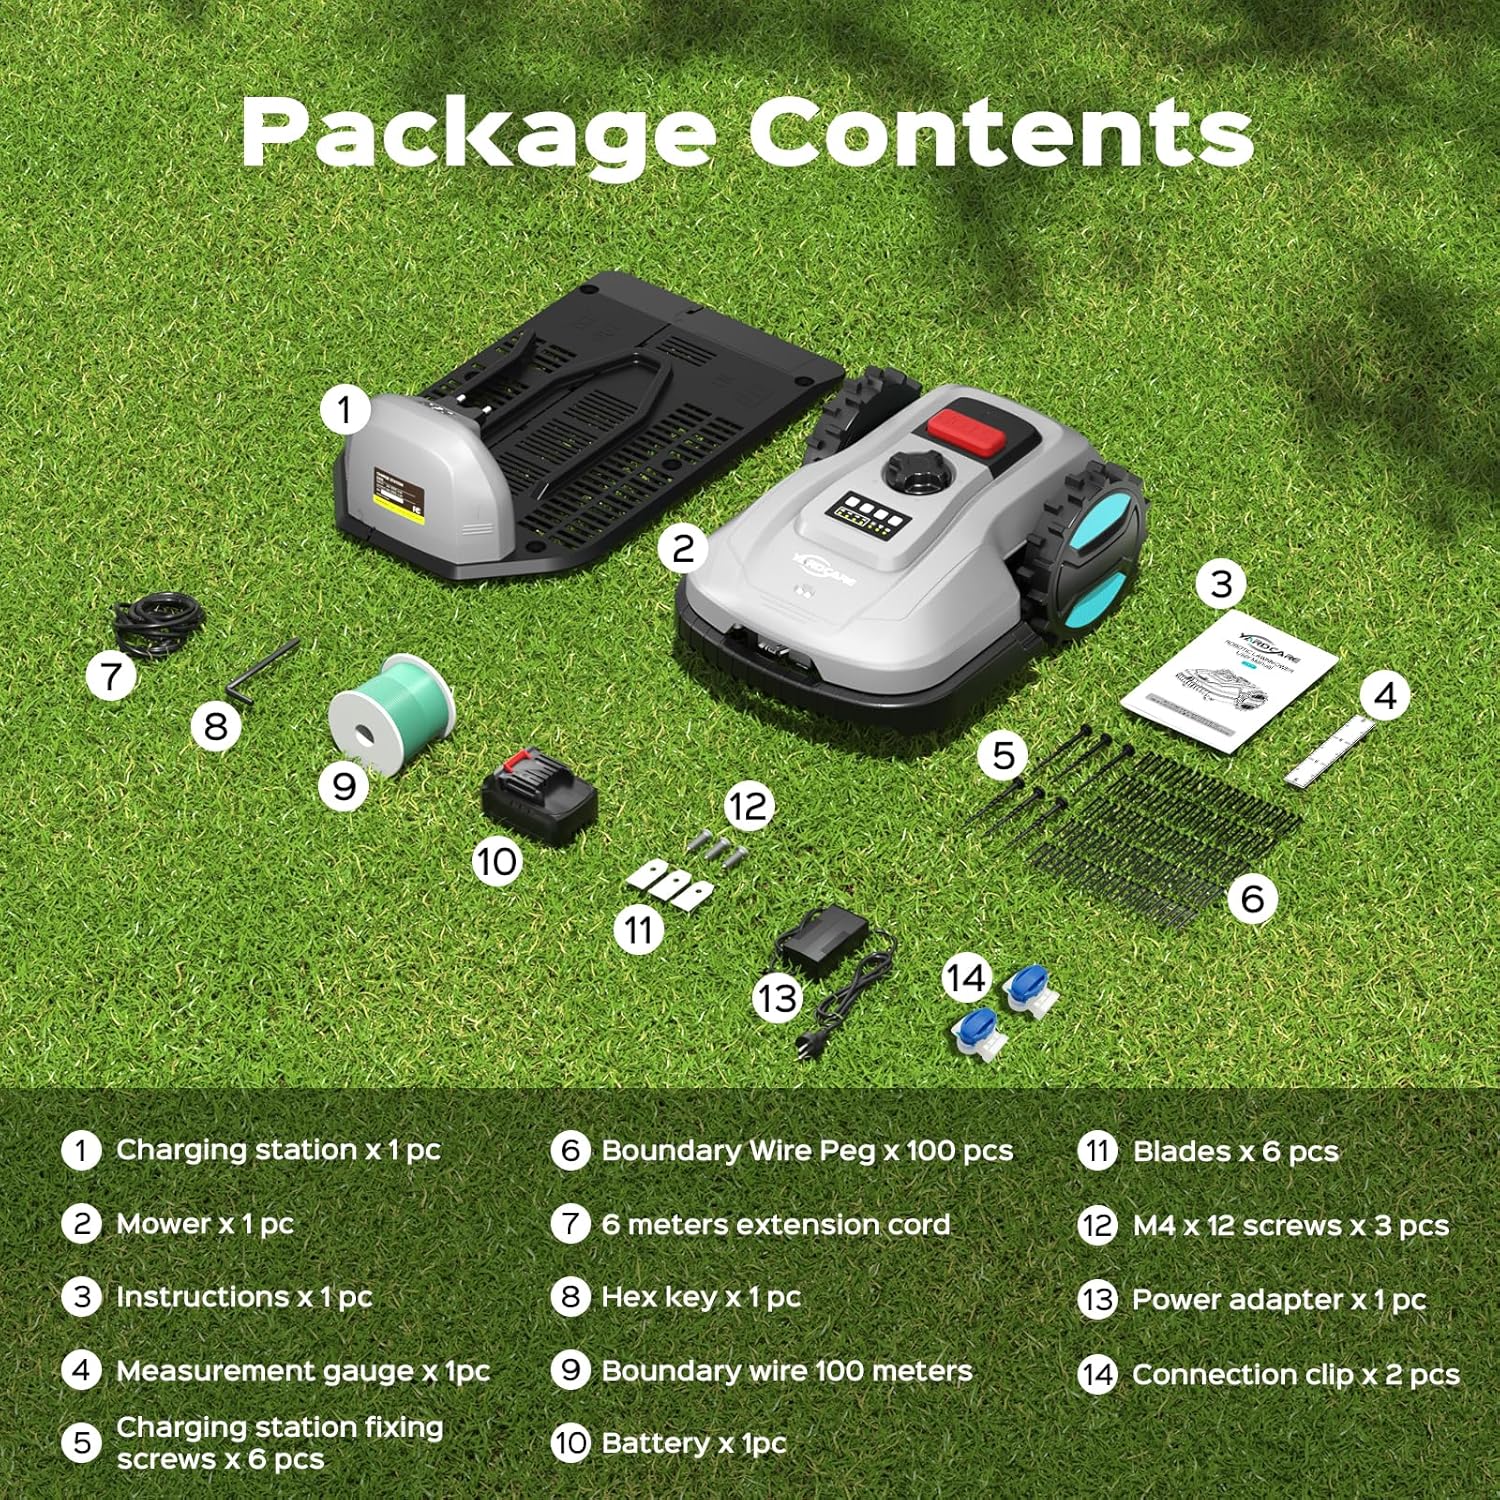
A comprehensive display of all items included in the product package, such as the charging station, mower, instructions, boundary wire, pegs, blades, and power adapter.
- 1. Charging Station: x1 pc
- 2. Mower: x1 pc
- 3. Instructions: x1 pc
- 4. Measurement Gauge: x1 pc
- 5. Charging Station Fixing Screws: x6 pcs
- 6. Boundary Wire Pegs: x100 pcs
- 7. 6-meter Extension Cord: x1 pc
- 8. Hex Key: x1 pc
- 9. Boundary Wire (100 meters): x1 pc
- 10. Battery: x1 pc
- 11. Blades: x6 pcs
- 12. M4 x 12 Screws: x3 pcs
- 13. Power Adapter: x1 pc
- 14. Connection Clip: x2 pcs
3. Setup Guide
3.1 Installation Steps Overview

A visual guide outlining the three primary installation steps: positioning the charging dock, installing the boundary wire, and pairing the mower with the mobile application.
3.2 Charging Station Placement
Select a flat, level area for the charging station, preferably in a shaded spot to protect it from direct sunlight. Ensure there is clear space around the station for the mower to dock easily (at least 1 meter in front and 0.5 meters to the sides).
3.3 Boundary Wire Installation
The boundary wire defines the mowing area. Lay the wire around the perimeter of your lawn, securing it with the provided pegs. Ensure the wire is taut and buried slightly or covered to prevent tripping hazards and damage. Maintain a minimum distance from obstacles as specified in the full manual.

An illustration of the robotic lawn mower operating within a defined area, highlighting its suitability for lawns up to 1/8 acre, managed by the boundary wire.
3.4 Initial Charging
Once the charging station and boundary wire are set up, place the mower onto the charging station. Ensure the charging contacts align. Allow the mower to fully charge before its first operation. The indicator lights on the mower will show charging status.
3.5 App Connection
Download the YARDCARE app from your mobile device's app store. Follow the in-app instructions to pair your robotic lawn mower. This will enable remote control, scheduling, and monitoring.

The mobile application for the YARDCARE Robotic Lawn Mower, illustrating its intuitive interface for setting mowing schedules and controlling the device.
4. Operating Instructions
4.1 Starting and Stopping
To start the mower, press the 'Start' button on the control panel or through the mobile app. To stop, press the 'Stop' button or use the app. For immediate emergency stop, press the large red button on top of the mower.
4.2 Adjusting Cutting Height
The cutting height can be adjusted manually from 0.8 inches to 2.4 inches (2.03 cm to 6.1 cm) to suit your lawn's needs. Refer to the mower's manual for the specific adjustment mechanism, typically a dial or lever.
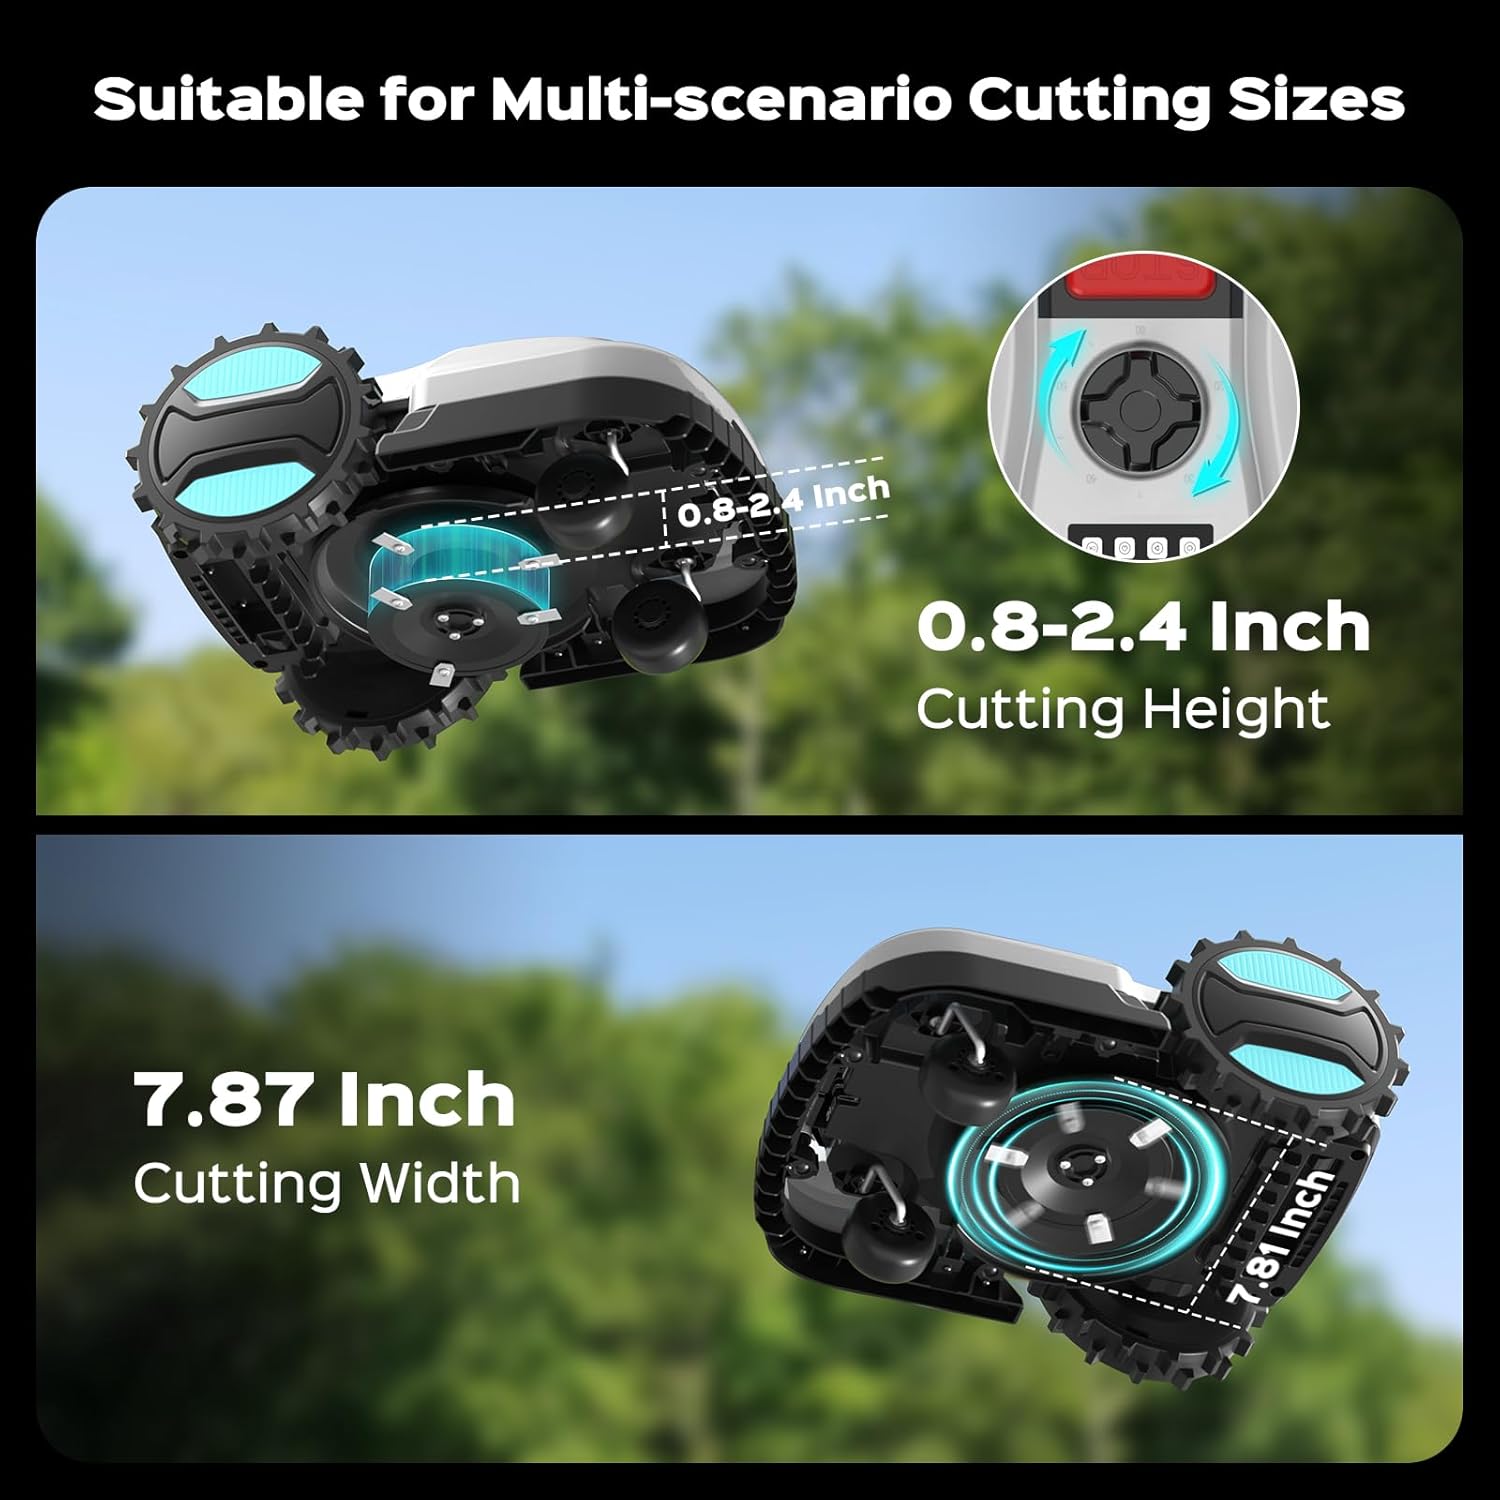
Detailed views of the mower's cutting mechanism, showing the adjustable cutting height range from 0.8 to 2.4 inches and a fixed cutting width of 7.87 inches.
4.3 Scheduling Mowing
Utilize the mobile app to set up a customized mowing schedule. You can define specific days and times for the mower to operate, ensuring your lawn is always well-maintained without manual intervention.
4.4 Obstacle Detection
The mower is equipped with a contact-based bumper sensor. When it encounters a solid object, it will safely redirect its path to avoid collision. This system ensures smooth and efficient operation around your lawn's features.

Visual representation of the mower's contact-based bumper sensor detecting an obstacle and redirecting, alongside an image demonstrating the safety tilt sensor which stops blades when lifted.
4.5 Automatic Recharging
When the battery level drops below 20%, the mower will automatically return to its charging station to recharge. Once fully charged, it will resume mowing from where it left off, ensuring continuous lawn care.

The robotic lawn mower intelligently returning to its charging station for automatic recharging when its battery level drops below 20%, and then resuming its task.
4.6 Weather Detection
The mower is equipped with a weather sensor that detects rain. Upon detecting rain, the mower will automatically return to its charging station to protect itself from adverse weather conditions, resuming operation when conditions improve.
5. Maintenance
5.1 Cleaning the Mower
Regular cleaning is essential for optimal performance. Use a soft brush or cloth to remove grass clippings from the cutting deck, wheels, and chassis. The mower has an IPX5 rating, allowing for easy cleaning with a hose, but avoid direct high-pressure water jets on sensitive components.

The robotic lawn mower being cleaned with a water hose, illustrating its IPX5 waterproof design for easy and safe maintenance.
5.2 Blade Replacement
For best cutting results, inspect the blades regularly and replace them when they become dull or damaged. Always wear protective gloves and disconnect the power before handling the blades. Use the provided hex key to remove and install new blades.
5.3 Battery Care
To prolong battery life, store the mower in a cool, dry place during off-season periods. Ensure the battery is fully charged before storage and recharge it periodically (e.g., every 3 months) to prevent deep discharge.
6. Troubleshooting
This section provides solutions to common issues you might encounter. For more complex problems, please refer to the full user manual or contact customer support.
| Problem | Possible Cause | Solution |
|---|---|---|
| Mower not starting | Low battery; Emergency stop button engaged; Not within boundary. | Charge battery; Release emergency stop; Check boundary wire connection. |
| Mower not charging | Mower not correctly docked; Charging station power issue; Dirty charging contacts. | Ensure proper docking; Check power supply to station; Clean charging contacts on mower and station. |
| Mower stuck or error message | Obstacle detected; Uneven terrain; Blade obstruction. | Clear obstacles; Adjust boundary for difficult areas; Check and clean blades. |
| Uneven cutting results | Dull blades; Incorrect cutting height setting. | Replace blades; Adjust cutting height to desired level. |
| App connectivity issues | Bluetooth/Wi-Fi off; Mower out of range; App not updated. | Ensure Bluetooth/Wi-Fi is on; Move closer to mower; Update app to latest version. |
7. Specifications
| Feature | Detail |
|---|---|
| Brand | YARDCARE |
| Model Number | E400 Grey-002 |
| Power Source | Battery Powered |
| Material | Plastic |
| Color | Gray |
| Item Weight | 29.32 Pounds (13.3 kg) |
| Product Dimensions | 20.47"D x 14.96"W x 8.93"H (52cm x 38cm x 22.7cm) |
| Cutting Width | 7.87 Inches (20 cm) |
| Adjustable Cutting Height | 0.8" - 2.4" (2.03 cm - 6.1 cm) |
| Operation Mode | Automatic |
| Battery Type | Nonstandard Battery (included) |
| Maximum Slope | Up to 25 degrees |
| Waterproof Rating | IPX5 |
8. Warranty and Support
For detailed warranty information, please refer to the warranty card included with your product or visit the official YARDCARE website. Keep your proof of purchase for any warranty claims.
If you encounter any issues not covered in this manual or require technical assistance, please contact YARDCARE customer support. Contact details are typically available on the manufacturer's website or in the product packaging.
You can also refer to the official PDF user manual for more comprehensive details: Download User Manual (PDF)
Related documentsE400 Grey-002

Ask a question about this manual
Ask about setup, troubleshooting, compatibility, parts, safety, or missing instructions. Manuals+ will review the question and use this page’s manual context to help answer it.