1. Introduction
The TP-Link Omada EAP725-Wall BE5000 is a state-of-the-art WiFi 7 Wall Plate Wireless Access Point designed for high-performance wireless networking in demanding environments. It offers advanced features for robust control and a consistent user experience.
Key Features:
- BE5000 Wi-Fi 7: Delivers speeds of 4324 Mbps on the 5 GHz band and 688 Mbps on 2.4 GHz.
- Versatile Port Configuration: Includes 1× 2.5G PoE input port, 1× 2.5G pass-through port, and 2× Gigabit RJ45 downlink ports.
- Enhanced Bandwidth: Supports 240 MHz bandwidth for increased simultaneous transmissions.
- Multi-RU Technology: Ensures high network performance even under heavy traffic.
- Advanced Functions: Centralized management, Mesh networking, and Seamless Roaming capabilities.
2. Package Contents
Verify that all items are present in the package:
- 1x EAP725-Wall Access Point
- 1x Installation Guide
- 1x Mounting Kit
Note: A power adapter is NOT included as this device is primarily designed for Power over Ethernet (PoE) installations.
3. Product Overview

Figure 1: Front view of the TP-Link Omada EAP725-Wall Access Point.

Figure 2: Back view showing the 2.5G PoE input port.
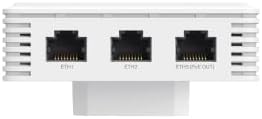
Figure 3: Bottom view displaying the 2.5G pass-through port and two Gigabit RJ45 downlink ports.
4. Setup
4.1 Powering the Device
The EAP725-Wall Access Point is designed to be powered via Power over Ethernet (PoE). It requires a PoE++ (802.3bt) compliant switch or injector for full functionality, especially to utilize the 2.5G PoE input port. Ensure your PoE source can provide adequate power for the device and any downstream devices connected to its PoE pass-through port.
- Connect an Ethernet cable from a PoE++ switch or injector to the 2.5G PoE input port on the back of the EAP725-Wall.
- The device will power on automatically.
4.2 Physical Installation
The EAP725-Wall is designed for wall plate installation. Use the provided mounting kit to secure the access point to a standard electrical wall box.
- Ensure proper cabling is run to the wall box for the PoE connection.
- Attach the mounting bracket to the wall box.
- Slide the EAP725-Wall onto the mounting bracket until it clicks securely into place.
4.3 Initial Configuration
The EAP725-Wall is part of the Omada SDN (Software Defined Networking) solution, offering centralized management. It can be configured via the Omada Controller software or app.
- Omada Controller: For centralized management of multiple Omada devices, download and install the Omada Controller software on a PC or use a dedicated Omada Hardware Controller.
- Omada App: For initial setup and basic management, download the TP-Link Omada app on your mobile device.
- Follow the on-screen instructions in the Omada Controller or app to discover and adopt the EAP725-Wall into your network.
- Configure your desired Wi-Fi network (SSID, password, security settings).
Video 1: Product Overview - A brief visual guide to the EAP725-Wall and its features.
5. Operating the Access Point
5.1 Basic Usage
Once configured, the EAP725-Wall will broadcast your Wi-Fi network. Client devices (smartphones, laptops, tablets, etc.) can connect to the network using the configured SSID and password.
- The access point supports dual-band operation (2.4 GHz and 5 GHz) for optimal performance across various devices.
- The 2.5G pass-through port and 2x Gigabit RJ45 downlink ports can be used to provide wired network access to devices such as IP phones, computers, or other network-enabled equipment directly from the wall plate.
5.2 Advanced Features
- Centralized Management: Manage all your Omada EAPs, switches, and routers from a single interface via the Omada Controller.
- Mesh Networking: Extend Wi-Fi coverage seamlessly by adding more Omada Mesh-compatible access points.
- Seamless Roaming: Client devices automatically switch to the access point with the strongest signal as you move around, ensuring uninterrupted connectivity.
- VLAN Support: Create separate virtual networks for different user groups or traffic types for enhanced security and network management.
- Guest Network: Provide secure Wi-Fi access for guests with customizable login options and bandwidth limits.
6. Maintenance
6.1 Firmware Updates
Regular firmware updates are crucial for maintaining optimal performance, security, and access to new features. Firmware updates can be performed via the Omada Controller.
- Access the Omada Controller interface.
- Navigate to the firmware update section for your EAP725-Wall.
- Follow the instructions to download and install the latest firmware.
6.2 Troubleshooting
If you encounter issues, refer to the troubleshooting section in the Omada Controller's help documentation or the TP-Link support website.
7. Specifications
| Feature | Value |
|---|---|
| Model Number | EAP725-Wall |
| Wireless Standard | 802.11be (Wi-Fi 7), 802.11ax, 802.11ac, 802.11n, 802.11g |
| Frequency Band Class | Dual-Band |
| Wi-Fi Speeds | 5 GHz: 4324 Mbps, 2.4 GHz: 688 Mbps |
| Ethernet Ports | 1× 2.5G PoE Input, 1× 2.5G Pass-Through, 2× Gigabit RJ45 Downlink |
| PoE Standard | 802.3bt (PoE++) |
| Special Features | Access Point Mode, Beamforming, Guest Mode, Internet Security, QoS |
| Dimensions | 7.28 x 4.53 x 2.13 inches |
| Item Weight | 12.5 ounces (0.78 Pounds) |
8. Warranty and Support
The TP-Link Omada EAP725-Wall comes with a 5-Year Warranty.
For technical support, warranty claims, or additional resources, please visit the official TP-Link support website or contact their customer service.