
Introduction
The KRAUS CleanMate Glass Rinser is designed to simplify your kitchen routine by providing a quick and convenient method for rinsing various drinkware. This manual outlines the installation, operation, and maintenance procedures to ensure optimal performance and longevity of your glass rinser.
Key Features
- 9 powerful jets for thorough cleaning.
- 5-inch wide opening accommodates various glass sizes, including wine glasses, mugs, and baby bottles.
- Integrated 1/8-turn safety lock prevents accidental activation.
- 6 soft silicone-coated prongs protect delicate glassware.
- Sloped design for efficient drainage, keeping counters dry.
- Spot-Free Brushed Brass finish resists water spots and fingerprints.
- Easy installation into a standard 1-1/4 inch accessory hole.
Package Contents
Verify that all components are present before beginning installation.
- Glass Rinser Unit
- Quick-Connect Water Line (42 inches)
- Tee Connector
- Mounting Shank
- Washer / Spacer
- Mounting Nut
- Optional Spacer for sinks with raised ledges

Image: Exploded view of the KRAUS CleanMate Glass Rinser components, including the glass rinser, quick-connect water line, mounting shank, washer/spacer, mounting nut, and tee adapter.
Installation Instructions
Prepare the Installation Area: Ensure you have a 1-1/4 inch accessory hole available in your countertop or sink deck. The rinser is designed to fit countertops up to 2-1/4 inches thick. If replacing an existing accessory like a soap dispenser, remove it first.
Position the Rinser: Place the glass rinser unit into the prepared hole. Ensure the sloped drainage area extends over the sink basin.
Secure the Rinser: From underneath the sink, slide the washer/spacer onto the mounting shank, followed by the mounting nut. Tighten the mounting nut securely to hold the rinser in place. Use the optional spacer if your sink has a raised ledge.
Connect the Water Line: Attach the quick-connect water line to the inlet on the underside of the glass rinser. This line works with both hot and cold water supplies.
Connect to Water Supply: Install the tee connector to your existing cold or hot water supply line (typically the cold water line for a faucet). Then, connect the other end of the quick-connect water line from the glass rinser to the tee connector.
Test for Leaks: Turn on the water supply and check all connections for leaks. Activate the rinser briefly to ensure proper water flow and drainage.

Image: A KRAUS CleanMate Glass Rinser in Spot-Free Stainless Steel finish installed on a kitchen counter next to a sink. A hand is shown holding an inverted glass over the rinser, with water spraying and draining into the sink.
Operating Instructions
Position Drinkware: Invert the glass, bottle, or tumbler over the rinser's central spray head. Ensure the opening of the drinkware is centered over the spray jets.
Activate Rinsing: Gently press down on the drinkware. This action will activate the 9 powerful spray jets, which are angled to provide a thorough rinse inside the item. A slight turn motion can help ensure full coverage.
Deactivate Rinsing: Release pressure from the drinkware. The spray will stop automatically. The sloped design of the rinser will direct the water into your sink for easy drainage.
Safety Lock: The rinser features an integrated 1/8-turn safety lock to prevent accidental activation. To engage or disengage, rotate the central spray head slightly.

Image: A detailed view of the KRAUS CleanMate Glass Rinser's central spray head, highlighting the nine powerful spray holes designed for effective rinsing.

Image: A collage of five images illustrating the versatility of the KRAUS CleanMate Glass Rinser. It shows different types of drinkware, such as a large tumbler, a wine glass, and a baby bottle, being rinsed, demonstrating the wide 5-inch opening and effective spray.
Maintenance
Cleaning the Rinser
The KRAUS CleanMate Glass Rinser features a Spot-Free Brushed Brass finish, designed to resist water spots and fingerprints. To maintain its appearance and functionality:
Regular Cleaning: Wipe the surface with a soft, damp cloth and mild soap. Rinse thoroughly with clean water and dry with a soft cloth to prevent water spots.
Avoid Abrasives: Do not use abrasive cleaners, scouring pads, or harsh chemicals, as these can damage the finish and silicone components.
Spray Jet Maintenance: Periodically check the spray jets for any mineral buildup. If necessary, gently clean the jet holes with a soft brush (like a toothbrush) to ensure unobstructed water flow.

Image: A visual comparison demonstrating the effectiveness of the KRAUS Spot-Free finish. One side shows a clean, unblemished surface, while the other side displays visible water spots and fingerprints on a standard finish.
Troubleshooting
- No Water Flow or Weak Spray:
Ensure the water supply valve is fully open.
Check for kinks or obstructions in the water supply line.
Inspect spray jets for mineral buildup and clean if necessary.
- Leaking at Connections:
Verify all connections (water line to rinser, tee connector to supply) are securely tightened.
Ensure rubber washers are properly seated in all connections.
- Rinser Does Not Turn Off:
Check if any debris is preventing the central spray head from returning to its closed position.
Ensure the safety lock is not engaged in the 'on' position.
Specifications
| Feature | Detail |
|---|---|
| Brand | Kraus |
| Model Name | CleanMate™ |
| Model Number | KGR-500SFBB |
| Mounting Type | Deck Mount |
| Finish Type | Brushed |
| Material | Plastic |
| Color | Spot Free Brushed Brass |
| Hole Count | 1 |
| Special Feature | 1/8-turn integrated safety lock |
| Product Dimensions | 5.5"W x 4.88"D x 1.38"H |
| Minimum Drinkware Opening | 1 1/2 inches |
| Maximum Drinkware Opening | 4 1/4 inches |
| Max Flow Rate | 1.2 gpm |
| Water Supply Line Length | 42 inches |
| UPC | 840239627988 |
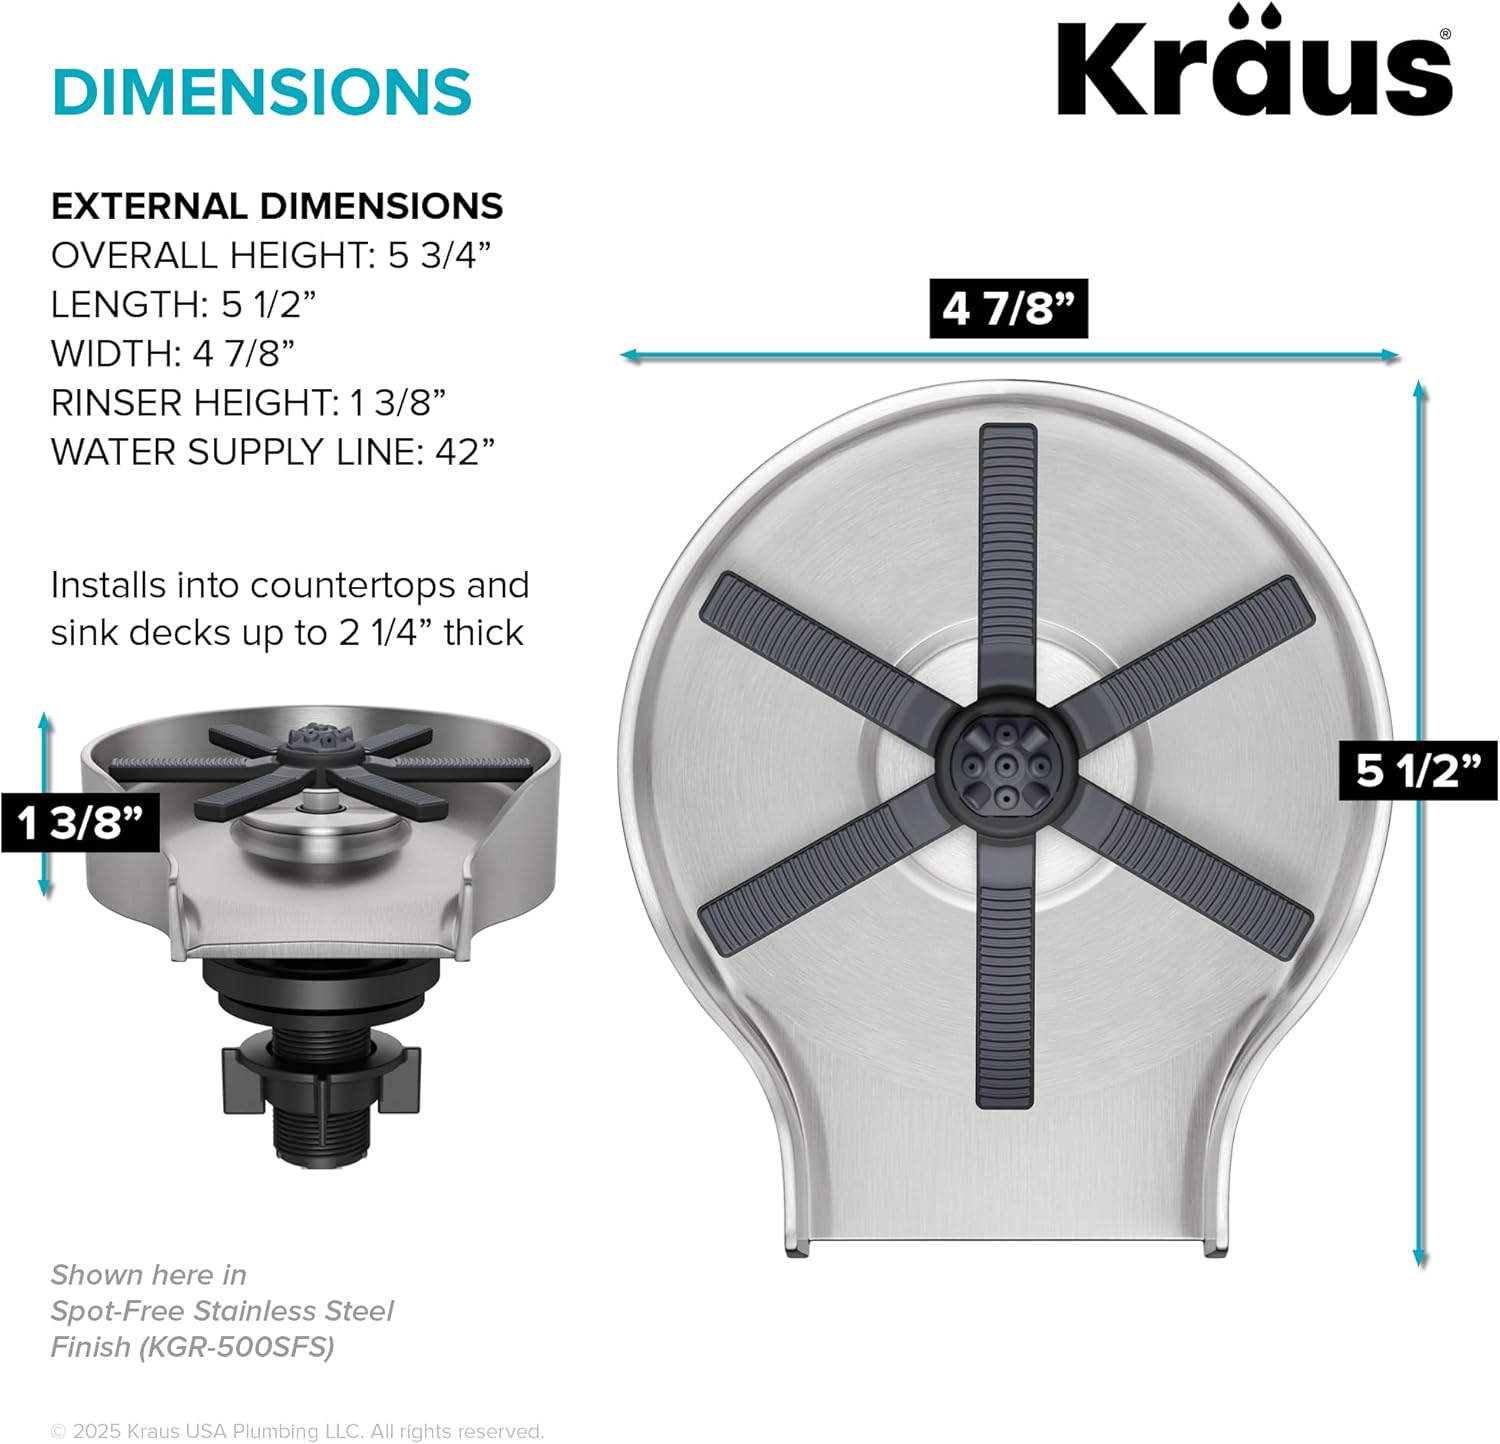
Image: A technical diagram illustrating the external dimensions of the KRAUS CleanMate Glass Rinser, providing measurements for overall height, length, width, and the height of the rinser unit itself.
Warranty and Support
For warranty information and customer support, please visit the official Kraus website or contact their customer service department.
You can also find additional resources and contact information on the Kraus Brand Store on Amazon.


