1. Introduction
This manual provides essential information for the safe and effective operation of your HITBOX HIM250DPP MIG 200A Pulse 7-in-1 Welder. Please read this manual thoroughly before operating the equipment. Proper understanding and adherence to these instructions will ensure optimal performance and user safety.
The HITBOX HIM250DPP is a versatile welding machine designed for various welding processes, including Gas MIG (GMAW), Gasless Flux Core MIG (FCAW), Stick (MMA), Lift TIG, Single Pulse MIG, and Dual Pulse MIG. It features a user-friendly interface and advanced control for precise welding results.

Image 1.1: The HITBOX HIM250DPP MIG 200A Pulse 7-in-1 Welder with its primary components and accessories.
2. Safety Information
WARNING: Welding can be dangerous. Always follow safety precautions to prevent injury or death.
- Electric Shock: Welding current can cause fatal electric shock. Ensure proper grounding. Do not touch live electrical parts. Wear dry welding gloves and protective clothing.
- Fumes and Gases: Welding fumes and gases can be hazardous to your health. Work in a well-ventilated area. Use an exhaust fan or fume extractor.
- Arc Rays: Arc rays can injure eyes and burn skin. Wear a welding helmet with a proper shade filter. Wear protective clothing (leather gloves, long sleeves, etc.).
- Fire and Explosion: Welding sparks and hot metal can cause fires or explosions. Keep flammable materials away from the welding area. Have a fire extinguisher readily available.
- Burns: Hot metal and equipment can cause severe burns. Allow equipment to cool before handling.
- Noise: Excessive noise can damage hearing. Wear ear protection.
- Pacemakers: Magnetic fields from high currents can affect pacemakers. Consult your doctor before welding.
The HITBOX HIM250DPP includes several safety features:
- Overcurrent Protection: Automatically shuts down the machine if current exceeds safe limits.
- Overvoltage Protection: Protects against damage from excessive input voltage.
- Overheating Protection: Automatic shutdown if internal temperature becomes too high.
- Overload Protection: Prevents damage from sustained high loads.
- VRD (Voltage Reduction Device): Reduces open circuit voltage for increased safety in Stick/MMA mode.
- IP21 Water Resistance: Provides protection against vertically falling water drops.

Image 2.1: Overview of the safety and durability features integrated into the HITBOX HIM250DPP welder.
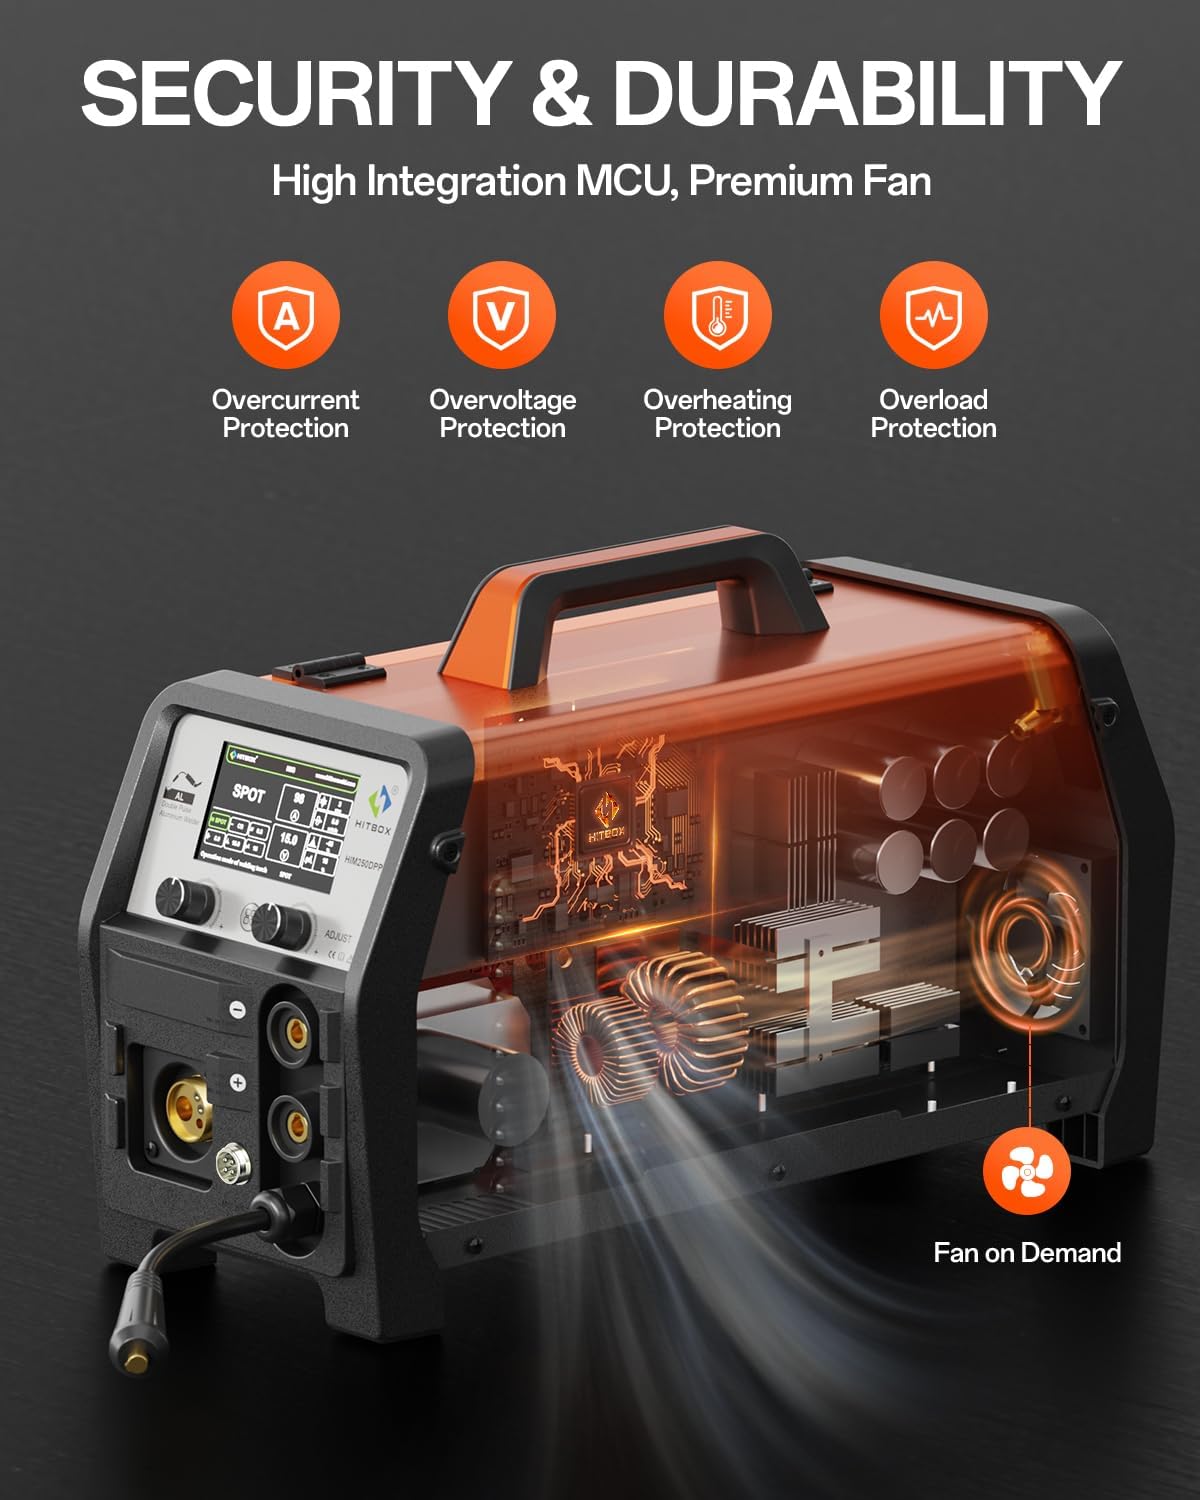
Image 2.2: Internal view illustrating the high integration MCU and premium fan for enhanced security and durability.
3. Product Overview and Features
The HITBOX HIM250DPP is a multi-process welding machine offering 7 distinct welding functions:
- Synergic Gas MIG (GMAW): For welding with shielding gas.
- Spool Gun MIG: Specifically for aluminum welding (spool gun not included).
- Synergic Gasless Flux Core MIG (FCAW): For welding without shielding gas using flux-cored wire.
- Dual Pulse MIG: Advanced MIG mode for reduced heat input and improved weld appearance, especially for aluminum.
- Single Pulse MIG: Provides controlled heat input for cleaner welds.
- MMA (Stick Welding): For welding with coated electrodes.
- Lift TIG: For precise TIG welding (TIG torch not included).
- Spot Welding: Time-adjustable spot welding function.
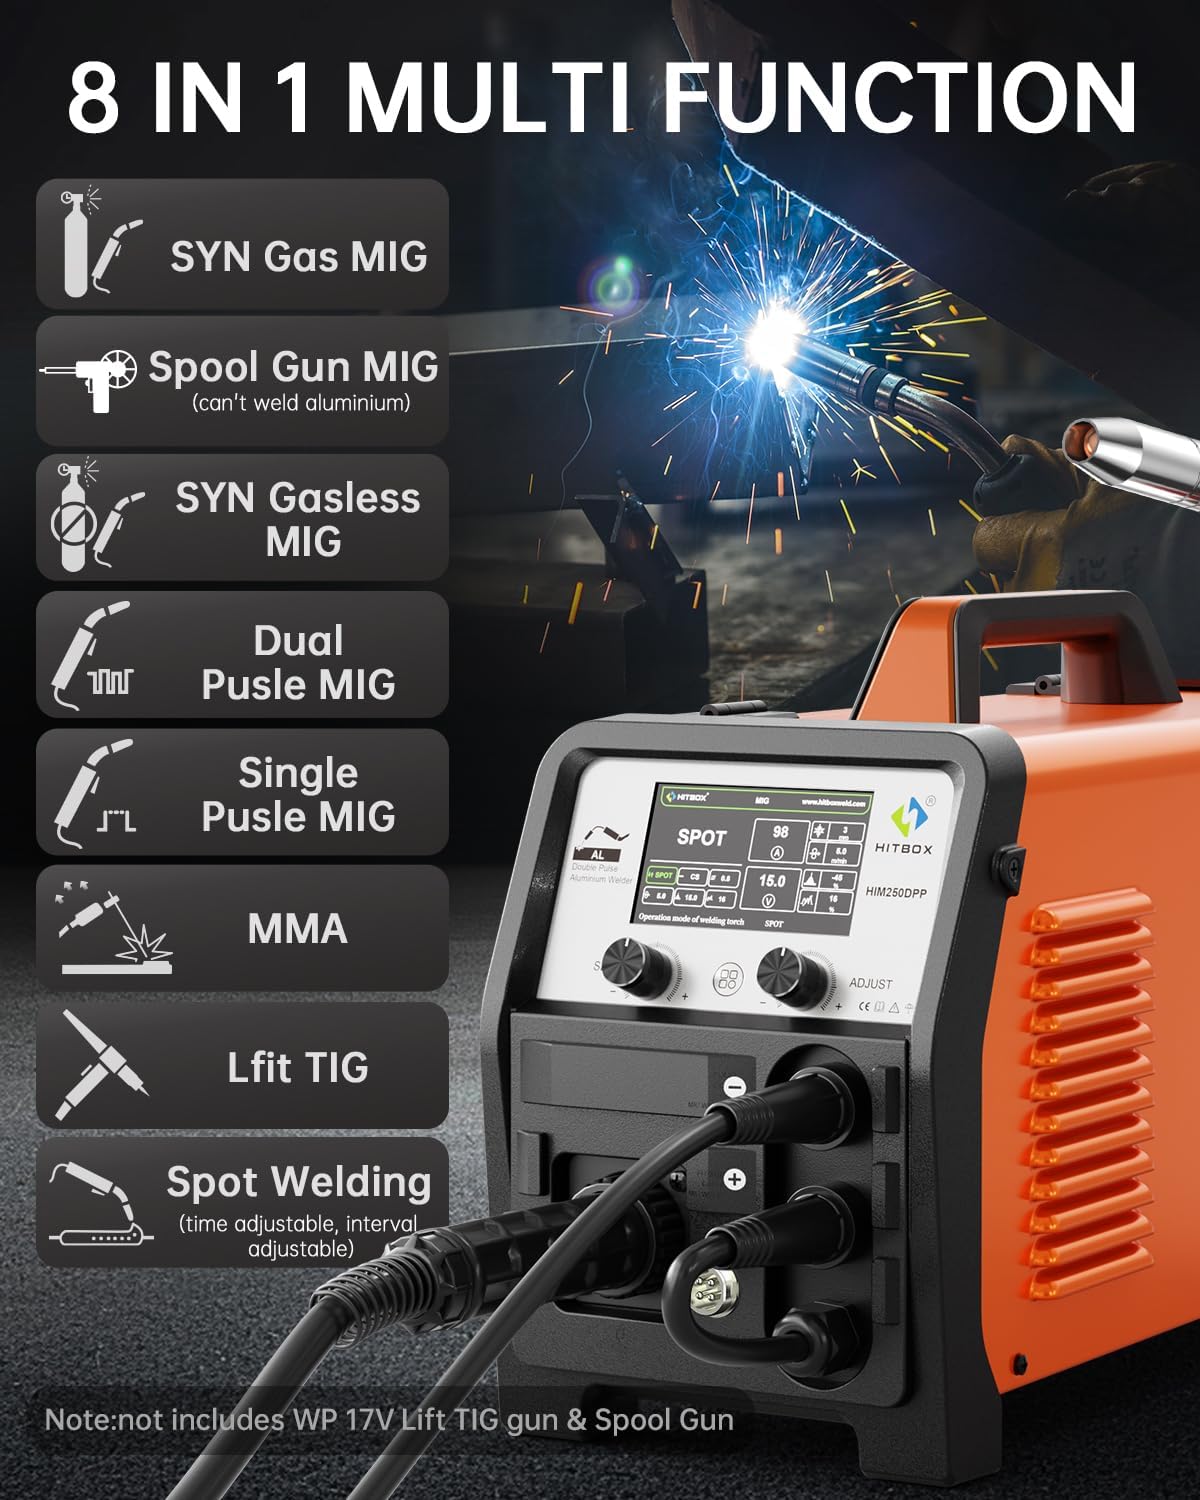
Image 3.1: The 8-in-1 multi-function capabilities of the welder, including various MIG, MMA, Lift TIG, and Spot Welding modes.
3.1 Key Features
- Powerful Double Pulse Welding: Adjustable peak current, base current, frequency, and duty cycle for reduced heat input, minimal distortion, and enhanced weld appearance, particularly for aluminum.
- Synergic MIG Welding: Automatic parameter matching (welding thickness, wire feed speed) based on selected material and wire diameter, simplifying operation for all skill levels. Includes voltage compensation and inductance adjustment.
- Large LED Display: A 4.3-inch high-clear LED screen provides accurate data display for precise welding results. Easy menu navigation via buttons and knobs.
- Smooth Wire Feeding: Equipped with a quality wire feeder compatible with 2-10 lbs welding wire spools.
- Dual Voltage Input: Operates on both 110V and 220V power supplies.
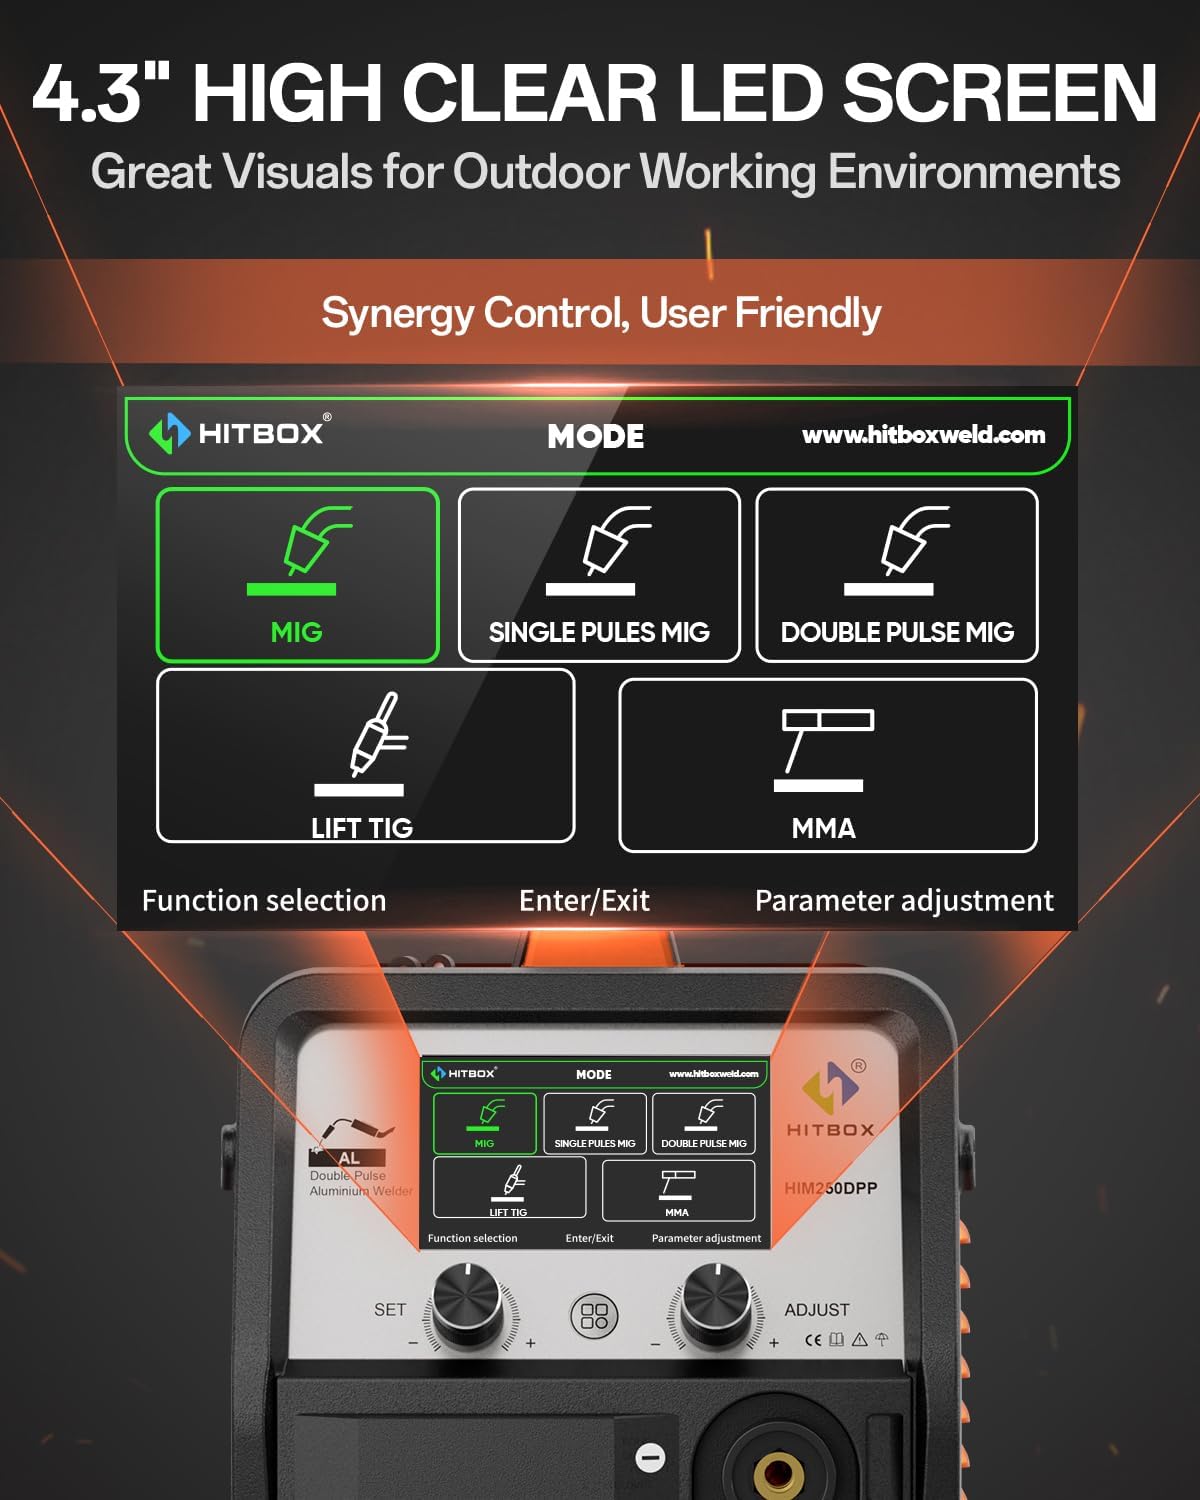
Image 3.2: The 4.3-inch high-clear LED screen for mode selection and parameter adjustment.

Image 3.3: The smooth wire feeding mechanism, designed for 2-10 lbs welding wire spools.
4. Package Contents
The HITBOX HIM250DPP welder package includes the following items:
- Welder HIM250DPPNEW unit
- MB24 MIG Torch (9.8 ft)
- Welding Clamp (4.9 ft)
- Ground Clamp (4.9 ft)
- 24KD Graphene Tube (10.5 ft)
- Aluminum Wires (1 lbs)
- Rollers (V:0.030/0.039, U:0.035/0.039)
- Conductive Nozzle x 2
- Pipe Clamp x 2
- Air Hose (6.5 ft)
- Wrench
- Hammer

Image 4.1: Visual representation of the welder and its included accessories.
5. Setup
5.1 Power Connection
The welder supports both 110V and 220V input. Ensure the correct power cord is used and connected to a suitable power outlet with proper grounding. Verify the input voltage matches the machine's setting if applicable.
5.2 Wire Spool Installation
- Open the wire spool compartment.
- Place the wire spool onto the spindle, ensuring it rotates freely.
- Thread the welding wire through the wire feeder mechanism, ensuring it is seated correctly in the drive rollers.
- Close the compartment and adjust the wire tension as needed.
5.3 Torch and Clamp Connections
Connect the MIG torch, ground clamp, and welding clamp to their respective terminals on the front panel of the welder. Ensure all connections are secure.

Image 5.1: Examples of cable connections for different welding processes.
5.4 Gas Connection (for Gas MIG)
If performing Gas MIG welding, connect the gas hose from your shielding gas cylinder to the gas inlet on the rear of the welder. Ensure the gas regulator is properly installed and set to the recommended flow rate for your application.
6. Operating Instructions
The HITBOX HIM250DPP features a synergic control system, simplifying parameter setup. Follow these general steps for operation:
- Turn on the welder. The LED display will illuminate.
- Use the 'MODE' button and adjustment knob to select the desired welding process (MIG, Single Pulse MIG, Double Pulse MIG, Lift TIG, MMA).
- For MIG modes, select the welding material (e.g., Aluminum, Carbon Steel) and wire diameter. The synergic system will suggest initial parameters.
- Adjust the current (wire feeding speed) and voltage as needed using the adjustment knobs. The display provides real-time feedback.
- For Pulse MIG modes, further adjustments for peak current, base current, frequency, and duty cycle may be available.
- Begin welding, ensuring all safety precautions are observed.

Image 6.1: Synergic MIG Welding process flow.
6.1 Welding Modes
6.1.1 Double Pulse MIG (for Aluminum)
This mode is ideal for aluminum, offering precise control over heat input to minimize distortion and achieve aesthetic welds. Parameters like peak current, base current percentage, dual pulse frequency, and dual pulse duty cycle can be adjusted.

Image 6.1.1: Double Pulse MIG Aluminum Welding display interface.
6.1.2 Single Pulse MIG (for Aluminum)
A novice-friendly mode for aluminum welding, providing intuitive control for simpler operations.

Image 6.1.2: Single Pulse MIG Aluminum Welding display interface.
6.1.3 Gas MIG
Utilizes inert gas to protect the weld, reducing oxidation and improving weld purity and appearance. Suitable for various materials like carbon steel.

Image 6.1.3: Gas MIG welding display interface.
6.1.4 Lift TIG
For precise TIG welding. An additional WP17V TIG torch is required for this mode.

Image 6.1.4: Lift TIG welding display interface.
6.1.5 MMA (Stick Welding)
Features hot start and arc force functions to prevent electrode sticking, making it easier to strike and maintain an arc.

Image 6.1.5: MMA (Stick) welding display interface.
6.2 Applicable Materials
The HITBOX HIM250DPP is suitable for welding various materials, including:
- Aluminum
- Mild Steel
- Cast Iron
- Square Pipe
- Stainless Steel
- Sheet Metal

Image 6.2.1: Examples of materials compatible with the welder.
7. Maintenance
Regular maintenance ensures the longevity and safe operation of your welding machine.
- Cleaning: Periodically clean the internal components of the welder using dry compressed air. Ensure the power is disconnected before cleaning. Keep the air vents clear of dust and debris.
- Torch and Cables: Inspect the welding torch, ground clamp, and welding cables for any damage, fraying, or loose connections before each use. Replace worn parts immediately.
- Consumables: Regularly check and replace MIG torch consumables (contact tips, nozzles, diffusers) as they wear out. Ensure the correct size and type of contact tip for your welding wire.
- Wire Feeder: Clean the wire feeder rollers and guide tubes to prevent wire feeding issues. Ensure proper tension on the drive rollers.
- Storage: Store the welder in a dry, clean environment when not in use. Protect it from dust and moisture.
8. Troubleshooting
This section provides solutions to common issues you might encounter.
| Problem | Possible Cause | Solution |
|---|---|---|
| Welder does not power on | No power supply; Faulty power cord; Internal fault | Check power outlet and circuit breaker; Inspect power cord; Contact support |
| No arc / Weak arc | Poor ground connection; Incorrect settings; Worn consumables; Wire feeding issue | Ensure good ground contact; Adjust current/voltage; Replace contact tip/nozzle; Check wire feed path |
| Wire feeding issues (stuttering, no feed) | Incorrect drive roller tension; Clogged liner; Kinked wire; Wrong size drive roller/contact tip | Adjust drive roller tension; Clean/replace liner; Straighten wire; Use correct consumables |
| Overheat protection activated | Exceeded duty cycle; Blocked ventilation; High ambient temperature | Allow machine to cool down; Clear ventilation openings; Operate in cooler environment |
| Poor weld quality (porosity, spatter) | Incorrect gas flow (MIG); Contaminated workpiece; Incorrect parameters; Worn consumables | Check gas flow/connections; Clean workpiece; Adjust settings; Replace consumables |
If you encounter issues not listed here or if the suggested solutions do not resolve the problem, please contact HITBOX customer support.
9. Specifications
| Feature | Specification |
|---|---|
| Model Number | HIM250DPP |
| Item Weight | 22.5 pounds (approx. 9.8 kg) |
| Product Dimensions | 16.9 x 7.48 x 9.84 inches (43 x 19 x 25 cm) |
| Power Source | AC (110V/220V compatible) |
| Material | Metal |
| Welding Processes | Gas MIG, Gasless Flux Core MIG, Stick (MMA), Lift TIG, Single Pulse MIG, Dual Pulse MIG, Spot Welding |
| MIG Current Range | Up to 200A |
| Wire Compatibility | .030"/.039" solid wire, .030"/.035"/.039" flux-cored wire, .039"/.045" aluminum wire |
| Cooling | Fan on Demand |
| Protection Class | IP21 |

Image 9.1: Physical dimensions and weight of the welder.
10. Warranty and Support
For warranty information and customer support, please refer to the documentation included with your product or visit the official HITBOX website. Keep your purchase receipt as proof of purchase for any warranty claims.
For technical assistance or inquiries, you may contact HITBOX customer service through their official channels. Please have your model number (HIM250DPP) and purchase details ready when contacting support.


