1. Introduction
The ACASIS M001Pro Mac mini M4 Dock & Stand is designed to enhance the functionality and storage capacity of your Mac mini M4 or M4 Pro. This versatile docking station integrates dual-bay NVMe SSD expansion, multiple high-speed ports, and advanced display output capabilities, all within a compact and aesthetically matching design.

Image 1.1: The ACASIS M001Pro Mac mini M4 Dock & Stand, shown with a Mac mini M4 unit.
This manual provides detailed instructions for setting up, operating, maintaining, and troubleshooting your ACASIS M001Pro dock to ensure optimal performance and longevity.
2. Package Contents
Please verify that all items listed below are included in your package:
- ACASIS M001Pro Dock Unit
- 40Gbps Thunderbolt Cable (15cm)
- Power Adapter (30W PD)
- PD Cable (1m)
- Screwdrivers
- SSD Snaps
- Thermal Pads for SSD
- User Manual

Image 2.1: Visual representation of the ACASIS M001Pro package contents.
3. Setup Instructions
3.1. NVMe SSD Installation
The ACASIS M001Pro supports two NVMe SSDs for expanded storage, up to 16TB in RAID 0 mode. Follow these steps carefully:
- Unscrew the Bottom Cover: Use the provided screwdriver to remove the screws securing the bottom cover of the dock.
- Insert SSDs: Gently align the gold finger slot of your NVMe SSD with the M.2 slot in the dock and insert it at approximately a 30-degree angle. Secure the SSD with the provided rubber plug or screw. Apply a thermal pad to the SSD for optimal heat dissipation. The dock supports M-Key and B+M Key NVMe/PCIe SSDs in sizes 2230, 2242, 2260, and 2280. SATA-based M.2 SSDs (B Key) are not supported.
- Replace Bottom Cover: Securely reattach the bottom cover with the screws.

Image 3.1: Important warnings for SSD installation. Always disconnect power before inserting or removing SSDs. Do not force or twist the SSD.

Image 3.2: Visual guide for installing NVMe SSDs and compatible key types.
3.2. Connecting the Dock to Mac mini
- Place Mac mini: Align your Mac mini M4/M4 Pro with the docking station, ensuring the power button on the dock aligns with the Mac mini's power button. The dock is designed to fit the Mac mini perfectly.
- Connect Thunderbolt Cable: Use the provided 40Gbps Thunderbolt cable to connect the dock's 'HOST' port to a Thunderbolt port on your Mac mini.
- Connect Power: Connect the provided power adapter to the 'PD 30W' port on the dock and plug it into a power outlet. This provides stable self-power to the dock and connected SSDs.
- Power On: Press the power button on the front of the dock to turn it on. Your Mac mini should power on simultaneously.
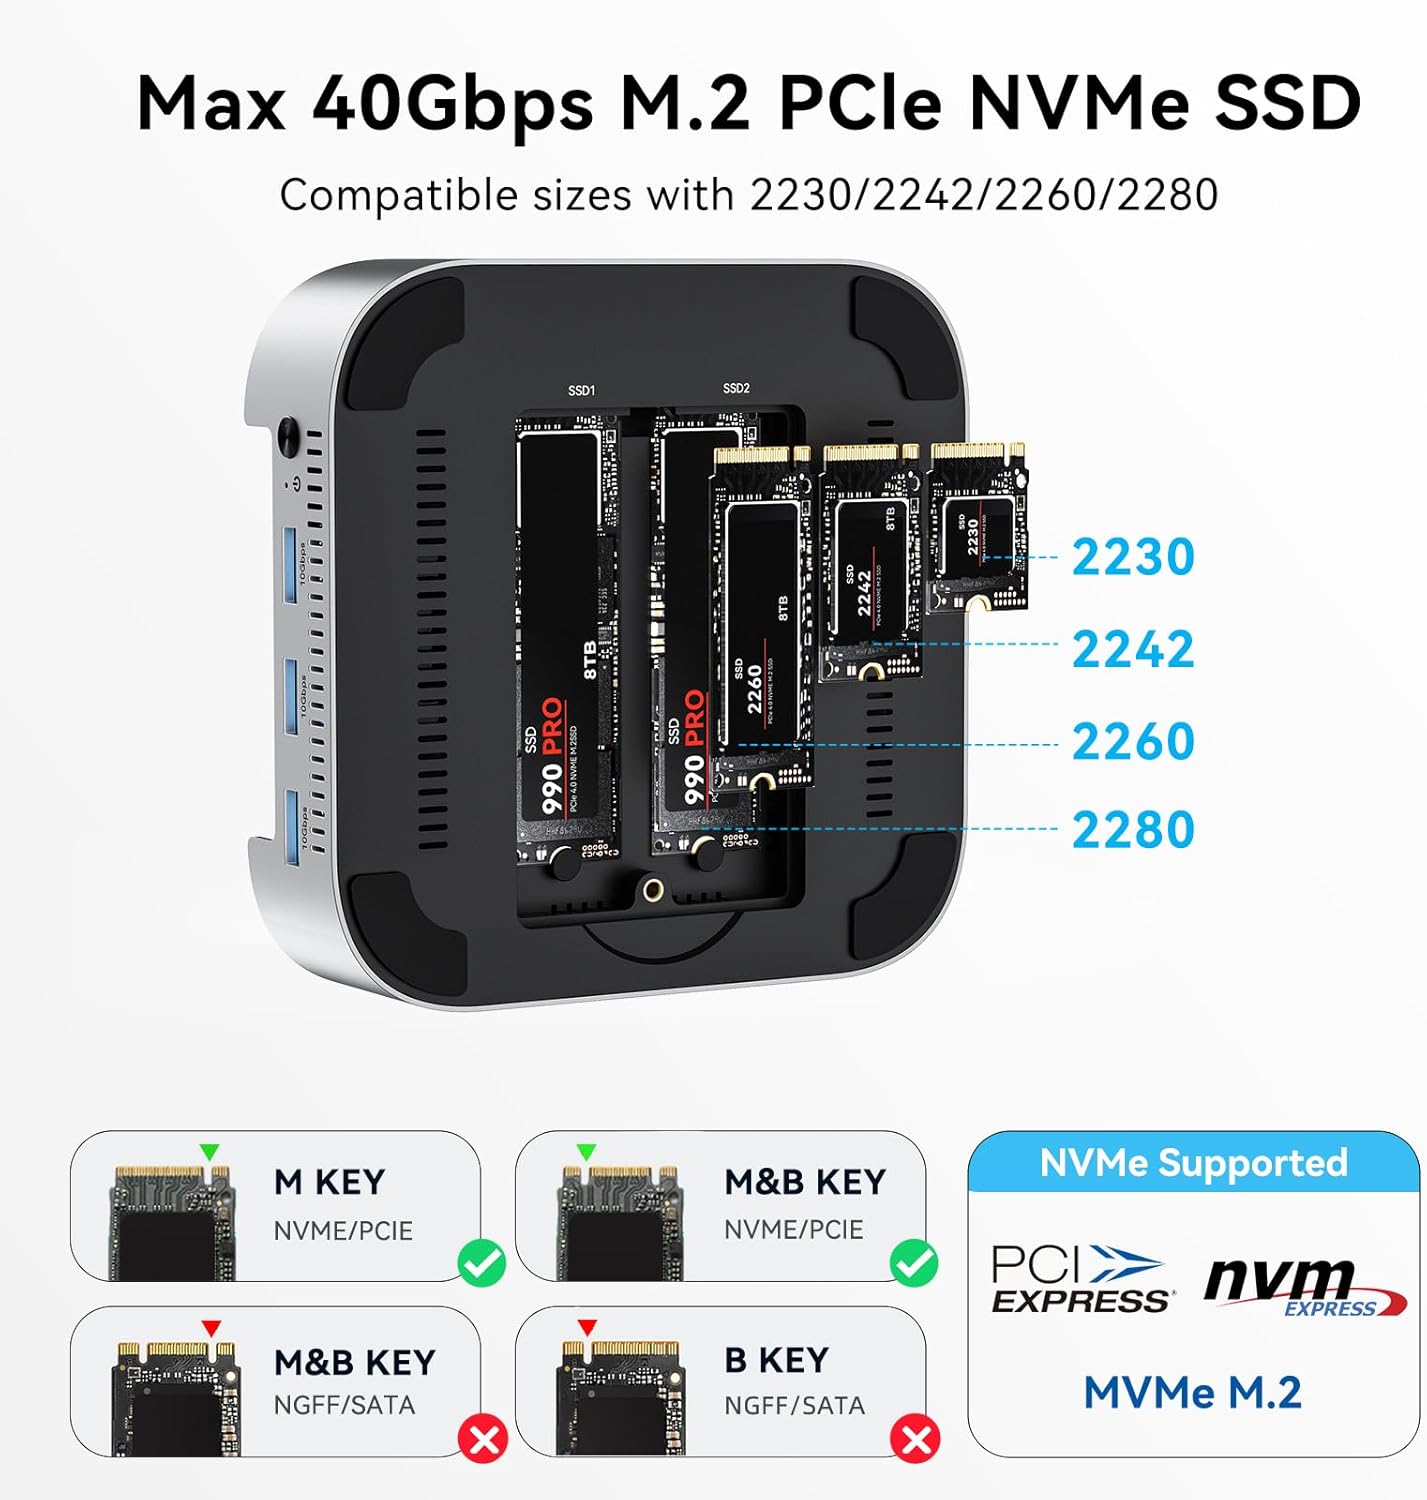
Image 3.3: The Mac mini M4 positioned on the ACASIS M001Pro dock, showing the integrated power button.
4. Operating Instructions
4.1. Port Overview and Connectivity
The ACASIS M001Pro offers a comprehensive array of ports for versatile connectivity:
- 3x USB-A 3.1 (10Gbps): For connecting peripherals like keyboards, mice, and external drives.
- 2x DisplayPort (4K@60Hz): For connecting external monitors.
- SD 4.0 & TF 4.0 Card Readers: For high-speed data transfer from memory cards (up to 312MB/s).
- 2x M.2 NVMe SSD Slots (40Gbps): For internal storage expansion.
- PD 30W Port: For power input to the dock.
- HOST Port (40Gbps): For connection to the Mac mini.

Image 4.1: Detailed view of all ports and their functions on the ACASIS M001Pro dock.

Image 4.2: Example of USB-A ports being used for keyboard and mouse connectivity.
4.2. Display Setup
The dock supports dual or triple display configurations, leveraging its DisplayPort outputs and your Mac mini's built-in HDMI or Thunderbolt ports.
- Single Display (DP x 1): Up to 4K@144Hz.
- Dual Displays (DP x 2): Up to 4K@60Hz for each display.
- Triple Displays (DP x 2 + HDMI or Thunderbolt port on Mac mini): Up to 4K@144Hz + 5K@60Hz + 4K@60Hz.

Image 4.3: Illustration of a triple display setup using the ACASIS M001Pro dock.
4.3. RAID Configuration
The dual NVMe SSD slots support various RAID modes (RAID 0, RAID 1, JBOD) to optimize storage performance or data redundancy. RAID configuration is performed via Disk Utility on your Mac. For detailed instructions, please refer to the tutorial video below.
Video 4.1: Tutorial on setting up RAID mode for the ACASIS M001Pro dock. This video demonstrates how to configure your NVMe SSDs for Striped (RAID 0), Mirrored (RAID 1), or Concatenated (JBOD) modes using Disk Utility on macOS.
Note: RAID 0 mode can achieve speeds up to 40Gbps (2869MB/s read/write) with two identical M.2 SSDs. Other modes offer up to 1594MB/s. The theoretical running speed of a single M.2 disk is 20Gbps.

Image 4.4: SSD speed test results for various hard disk modes under Scenario 1 (DP external 1*4K monitor + USB to keyboard and mouse + M.2 to SSD hard drive).

Image 4.5: SSD speed test results for various hard disk modes under Scenario 2 (DP external 2*4K monitor + USB to keyboard and mouse + M.2 to SSD hard drive). Note that SSD speed may decrease when the dock is connected to dual monitors.
4.4. Product Overview Video
Video 4.2: A detailed overview of the ACASIS Mac mini M4 Dock & Stand (M001Pro), showcasing its features and design.
Video 4.3: An additional video highlighting the ACASIS 40Gbps Mac mini M4 Dock Dual-Bay NVMe SSD Enclosure features.
5. Maintenance
The ACASIS M001Pro is designed with efficient cooling to maintain optimal performance:
- Aluminum Alloy Construction: The aluminum alloy casing and side vents facilitate excellent heat dissipation.
- Dual Silent Cooling Fans: Two integrated fans activate automatically to keep the device at a safe operating temperature (approximately 60°C) even during extended use. The fans operate at a low noise level (≈52dB).
To ensure proper airflow, keep the side vents clear of obstructions. Periodically clean the exterior with a soft, dry cloth.

Image 5.1: Illustration of the triple heat dissipation system, including aluminum alloy heat dissipation, heat dissipation holes, and dual fan cooling.
6. Troubleshooting
If you encounter issues with your ACASIS M001Pro dock, please follow these troubleshooting steps:
- Monitor Doesn't Display or SSD Disconnects:
- Disconnect other USB devices to reduce power consumption.
- Use a 65W or higher power adapter for stable power supply.
- Try replacing the DisplayPort (DP) cable.
- Unplug and reconnect the PD port and the computer-marked (HOST) port to ensure proper contact.
- General Connectivity Issues: Ensure all cables are securely connected.
- SSD Not Recognized: Verify SSD installation (refer to Section 3.1). Ensure the SSD is NVMe/PCIe compatible (M-Key or B+M Key).

Image 6.1: Visual troubleshooting guide for common issues like monitor display problems or SSD disconnections.
If problems persist after following these steps, please contact ACASIS customer support for further assistance.
7. Specifications
| Feature | Specification |
|---|---|
| Product Dimensions | 8.27 x 5.31 x 1.97 inches |
| Item Weight | 1.12 pounds |
| Item Model Number | M001Pro |
| Brand | ACASIS |
| Color | Silver |
| Hardware Interface | Thunderbolt 4 |
| Compatible Devices | Mac mini M4, Mac mini M4 Pro |
| Total USB Ports | 5 (3x USB-A 3.1, 1x Thunderbolt 4 Host, 1x PD) |
| Number of Ports | 14 (including internal SSD slots, card readers, display ports) |
| Display Ports | 2x DisplayPort (4K@60Hz) |
| Wattage (PD) | 30W |
| SSD Support | Dual M.2 NVMe SSDs (up to 16TB, RAID 0/1/JBOD) |
| Card Reader | SD 4.0, TF 4.0 (up to 312MB/s) |
| Cooling | Aluminum alloy heat dissipation, Dual silent cooling fans |
8. Warranty and Support
The ACASIS M001Pro Dock & Stand is covered by a warranty for repair or replacement in case of non-user-related quality defects. For warranty claims or technical support, please contact ACASIS customer service through your purchase platform or the official ACASIS website. Please retain your proof of purchase for warranty validation.


