1. Introduction
Thank you for purchasing the SUNVIVI Electric Indoor Pizza Oven, Model ZPO003. This countertop appliance is designed to bake a variety of pizzas and other dishes with precision and efficiency, reaching temperatures up to 750°F. Please read this manual thoroughly before operating the oven to ensure safe and optimal performance. Keep this manual for future reference.
2. Important Safety Instructions
- Read all instructions before using the appliance.
- Do not touch hot surfaces. Use handles or knobs. Always use oven mitts or gloves when handling hot materials.
- To protect against electrical shock, do not immerse the cord, plugs, or appliance in water or other liquid.
- Close supervision is necessary when any appliance is used by or near children.
- Unplug from outlet when not in use and before cleaning. Allow to cool before putting on or taking off parts.
- Do not operate any appliance with a damaged cord or plug, or after the appliance malfunctions or has been damaged in any manner. Contact customer support for assistance.
- The use of accessory attachments not recommended by the appliance manufacturer may cause injuries.
- Do not use outdoors unless specifically designed for outdoor use and protected from elements.
- Do not let the cord hang over the edge of a table or counter, or touch hot surfaces.
- Do not place on or near a hot gas or electric burner, or in a heated oven.
- Extreme caution must be used when moving an appliance containing hot oil or other hot liquids.
- Always attach plug to appliance first, then plug cord into the wall outlet. To disconnect, turn any control to "off", then remove plug from wall outlet.
- Do not use the appliance for other than intended use.
- Oversized foods or metal utensils must not be inserted in a pizza oven as they may create a fire or risk of electric shock.
- A fire may occur if the oven is covered or touching flammable material, including curtains, draperies, walls, and the like, when in operation.
- Do not place any materials other than manufacturer's recommended accessories in this oven.
- Do not place cardboard, plastic, paper, or similar materials in the oven.
- Do not store any materials, other than manufacturer's recommended accessories, in this oven when not in use.
- Always wear protective, insulated oven gloves when inserting or removing items from the hot oven.
3. Package Contents
Verify that all items are present and in good condition upon opening the package:
- SUNVIVI Electric Pizza Oven (Model ZPO003)
- Pizza Stone
- Pizza Peel
- User Manual (this document)
- Cleaning Sponge
4. Product Overview
The SUNVIVI Electric Indoor Pizza Oven features a compact design suitable for various settings, offering precise temperature control and multiple cooking presets.

Image 4.1: Front view of the SUNVIVI Electric Indoor Pizza Oven with a pizza baking inside.
4.1 Components
- Oven Body: Main housing with heating elements.
- Pizza Stone: Removable ceramic stone for crispy crusts.
- Glass Door: Transparent door for monitoring cooking progress without heat loss.
- Control Panel: Features an LED digital display and a rotary knob for settings.
- Pizza Peel: Tool for safely inserting and removing pizzas.
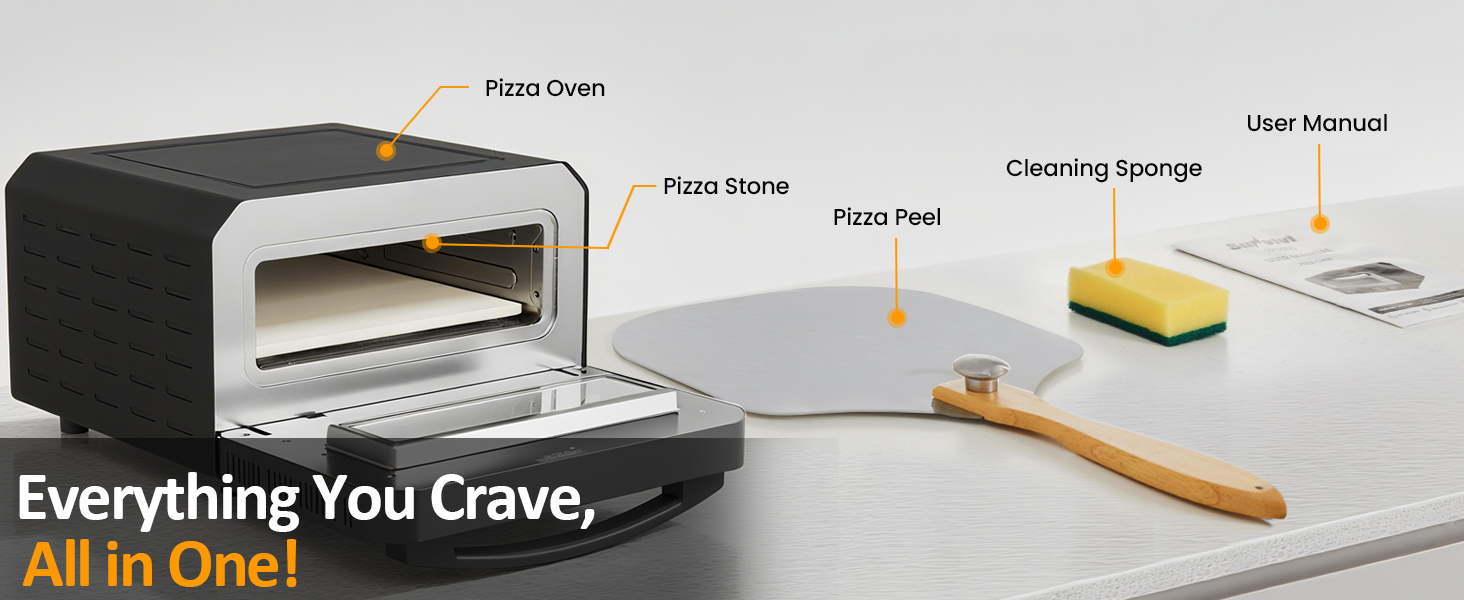
Image 4.2: All included components: pizza oven, pizza stone, pizza peel, user manual, and cleaning sponge.
4.2 Control Panel
The control panel allows for easy selection of cooking modes and manual adjustments.

Image 4.3: Detailed view of the control panel with preset buttons and digital displays for temperature and time.
- Preset Buttons: Select from 6 optimized cooking programs (Neapolitan, DIY, Thin & Crispy, Pan Pizza, New York, Frozen).
- Digital Display: Shows current temperature and remaining cooking time.
- Rotary Knob: Used to adjust temperature and time in manual mode, and to confirm selections.
- Power Button: Turns the oven on/off.
- Start/Stop Button: Initiates or pauses the cooking cycle.
5. Setup and First Use
5.1 Unpacking
- Remove all packaging materials from the oven and its accessories.
- Inspect the oven for any damage. Do not operate if damaged.
- Wipe down the exterior of the oven with a damp cloth.
- Wash the pizza stone and pizza peel with warm, soapy water, rinse thoroughly, and dry completely.
5.2 Placement
- Place the oven on a stable, heat-resistant, and level surface.
- Ensure adequate clearance (at least 6 inches) on all sides and above the oven for proper ventilation. Do not place near flammable materials.
- Plug the power cord into a grounded electrical outlet.
5.3 Initial Burn-Off
Before first use, perform an initial burn-off to eliminate any manufacturing odors.
- Insert the pizza stone into the oven.
- Turn on the oven and set the temperature to maximum (750°F) for 15-20 minutes.
- Ensure the area is well-ventilated during this process.
- Allow the oven to cool completely before proceeding.
6. Operating Instructions
This oven is designed for baking pizzas up to 12-14 inches in diameter.

Image 6.1: Demonstrating the insertion of a pizza into the oven using the pizza peel, highlighting its 14-inch capacity.
6.1 General Operation
- Place the pizza stone inside the oven.
- Plug in the oven and press the Power button.
- Select a preset or set the temperature and time manually.
- Press the Start button to begin preheating. The oven will beep when preheating is complete.
- Carefully open the oven door and use the pizza peel to place the pizza onto the hot pizza stone. Close the door immediately.
- Monitor cooking through the glass door. The internal light can be activated if needed.
- When cooking is complete, the oven will beep. Carefully remove the pizza using the pizza peel.
- Allow the oven to cool before cleaning.
6.2 Using Presets
The oven includes 6 automatic programs for various pizza styles. These presets optimize temperature and time for specific results.
Image 6.2: The control panel displaying the 6 preset options for pizza cooking.
- Neapolitan: For traditional Neapolitan-style pizzas with a soft, airy crust.
- DIY: Allows for full manual control of temperature and time.
- Thin & Crispy: Optimized for thin-crust pizzas.
- Pan Pizza: Suitable for thicker crusts and deeper dishes.
- New York: For classic New York-style pizzas.
- Frozen: Designed for cooking pre-made frozen pizzas.
To use a preset:
- Press the desired preset button. The display will show the default temperature and time.
- Press the Start button to begin preheating and cooking.
6.3 Manual Control (DIY Mode)
For custom baking, use the DIY mode to independently adjust top and bottom heating elements, temperature, and time.

Image 6.3: Internal view illustrating the customizable dual heating elements for precise cooking.
- Select the "DIY" preset.
- Use the rotary knob to adjust the desired temperature (range 175°F - 750°F). Press the knob to confirm.
- Use the rotary knob to adjust the desired cooking time. Press the knob to confirm.
- Press the Start button to begin preheating and cooking.
6.4 Versatile Cooking
Beyond pizza, this oven can be used for baking various items such as pastries, casseroles, and pies, utilizing its wide temperature range.

Image 6.4: The pizza oven used for versatile cooking, preparing items such as fish, Portuguese egg tarts, cookies, and grilled steak.
7. Cleaning and Maintenance
Regular cleaning ensures the longevity and optimal performance of your pizza oven.
7.1 General Cleaning
- Always unplug the oven and allow it to cool completely before cleaning.
- Wipe the exterior surfaces with a damp cloth and mild detergent. Do not use abrasive cleaners or scouring pads.
- Clean the glass door with a glass cleaner or damp cloth.
- Do not immerse the oven body in water or any other liquid.
7.2 Pizza Stone Care
- Allow the pizza stone to cool completely before handling. Rapid temperature changes can crack the stone.
- Scrape off any excess food residue with a plastic scraper or stiff brush.
- For stubborn stains, use the provided cleaning sponge with warm water. Avoid soap, as it can be absorbed by the porous stone and affect future food flavors.
- Ensure the stone is completely dry before storing or reusing.
7.3 Pizza Peel Care
- Wash the pizza peel with warm, soapy water after each use.
- Rinse thoroughly and dry completely to prevent warping or mold growth, especially for wooden peels.
8. Troubleshooting
Refer to the table below for common issues and their solutions.
| Problem | Possible Cause | Solution |
|---|---|---|
| Oven does not turn on. | Not plugged in; Power outage; Faulty outlet. | Ensure the oven is securely plugged into a working outlet. Check circuit breaker. |
| Oven not heating up. | Start button not pressed; Incorrect temperature setting. | After selecting a preset or manual settings, press the Start button. Verify temperature setting. |
| Pizza not cooking evenly. | Oven not fully preheated; Uneven pizza thickness; Too many toppings. | Ensure oven is fully preheated. Distribute toppings evenly. Rotate pizza halfway through cooking if necessary. |
| Pizza crust is too soft/soggy. | Not enough preheating time for the stone; Too much moisture in toppings. | Allow longer preheating time for the pizza stone. Reduce moisture in toppings. Try a 'Thin & Crispy' preset. |
| Excessive smoke during cooking. | Food residue on pizza stone or inside oven; Excess oil/grease. | Clean the pizza stone and oven interior thoroughly. Avoid excessive oil on pizza. |
If the problem persists after attempting these solutions, please contact SUNVIVI customer support.
9. Specifications
| Feature | Detail |
|---|---|
| Model Number | ZPO003 |
| Brand | SUNVIVI |
| Power Source | AC (1700W) |
| Maximum Temperature | 750°F (400°C) |
| Pizza Capacity | Up to 12-14 inches |
| Product Dimensions (D x W x H) | 16.92" x 18.89" x 10.83" |
| Item Weight | 22 pounds |
| Control Type | Button Control, Rotary Knob |
| Special Features | Adjustable Thermostat, 6 Presets, Dual Heating Elements, LED Display, Glass Door, Internal Light |
10. Warranty and Customer Support
10.1 Product Warranty
SUNVIVI products typically come with a warranty ranging from 1 to 5 years, depending on the specific product and region. Please refer to the warranty card included with your purchase or visit the official SUNVIVI website for detailed warranty information applicable to your ZPO003 Electric Indoor Pizza Oven.
10.2 Free Replacement Policy
A 365-day free replacement policy may apply to certain components or in specific circumstances. For eligibility and details, please contact SUNVIVI customer support directly.
10.3 Customer Support
For any questions, technical assistance, or warranty claims, please contact SUNVIVI customer support through the following channels:
- Website: Visit the official SUNVIVI website for support resources and contact forms.
- Email: Refer to your warranty card or product packaging for the customer service email address.
- Phone: Check the SUNVIVI website or product documentation for customer service phone numbers.
Please have your model number (ZPO003) and purchase date ready when contacting support.


