
XIXIMENG X2 Plus (256G)
Contents
X2 Plus Retro Gaming Console Game Stick User Manual
Model: 256G Black
1. Introduction
Welcome to the user manual for your new XIXIMENG X2 Plus Retro Gaming Console Game Stick. This guide will assist you in setting up, operating, and maintaining your console to ensure a seamless and enjoyable gaming experience. Please read this manual thoroughly before using the product.
1.1 Package Contents
Please verify that all items listed below are included in your package:
- 1 x 4K Game Stick
- 2 x Wireless Controllers
- 1 x USB Wireless Receiver
- 1 x HDMI Cable
- 1 x TF Card (256GB pre-installed)
- 1 x USB Cable
- 1 x User Manual

Figure 1.1: Package Contents Overview
This image displays the X2 Plus Game Stick, two wireless controllers, USB cable, HDMI cable, USB wireless receiver, TF card, and the user manual, all neatly arranged as they would appear in the product packaging.
2. Setup Guide
2.1 Connecting the Console
Follow these steps to connect your X2 Plus Game Stick to your display device:
- Insert the USB Wireless Receiver (01) into the USB port of the Game Stick.
- Connect the HDMI Cable (02) from the Game Stick to an available HDMI input port on your TV, monitor, or projector.
- Connect the USB Cable (03) to the Game Stick for power.
- Plug the other end of the USB Cable into a 5V2A mobile phone charging plug (04) or a compatible USB power source.
- Adjust your display device's input source to the corresponding HDMI channel.
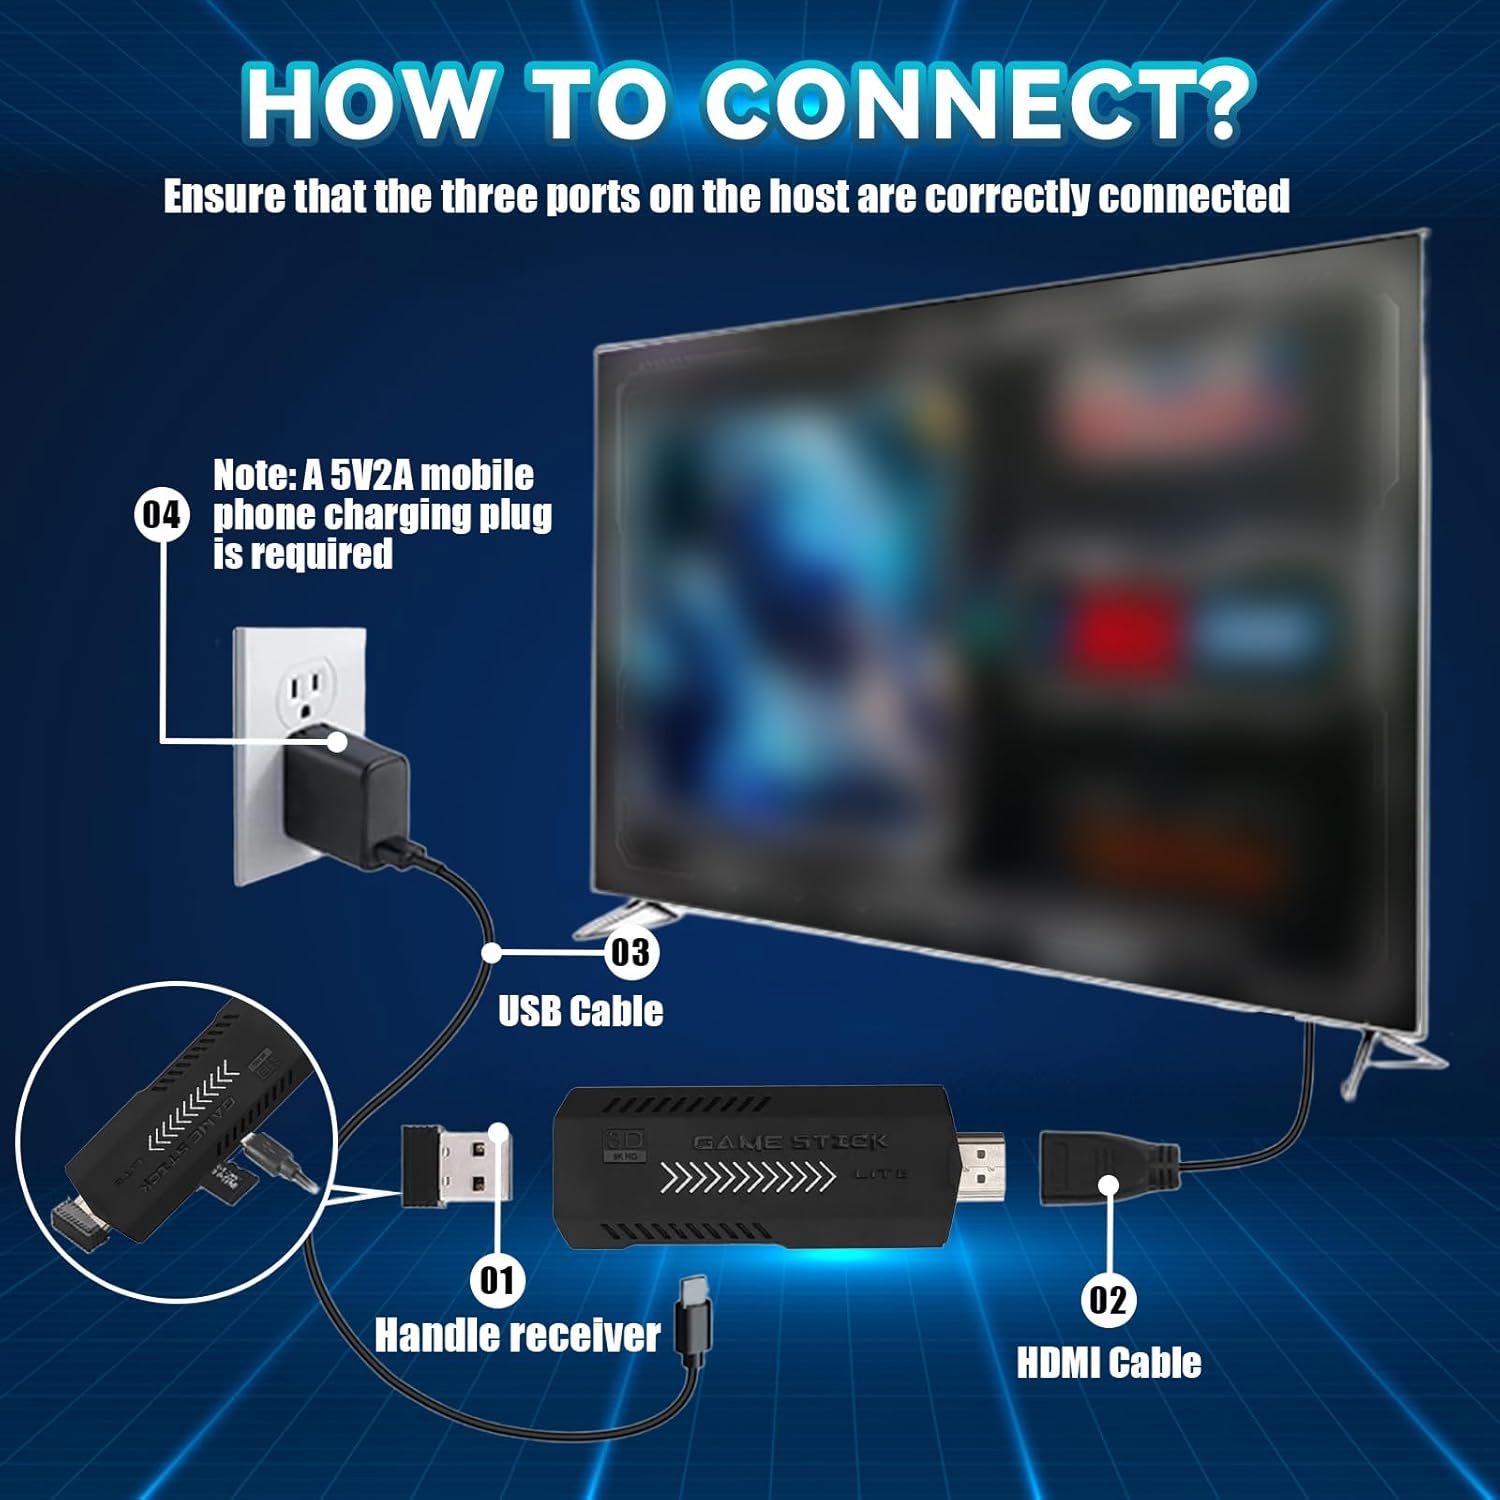
Figure 2.1: Connection Diagram
This diagram illustrates the connection process: the handle receiver plugs into the game stick, the HDMI cable connects the stick to the TV, and the USB cable provides power from a 5V2A adapter to the game stick.
2.2 Controller Setup
The wireless controllers require batteries for operation:
- Each wireless controller requires 2 AAA batteries (not included).
- Open the battery compartment on the back of each controller and insert the batteries, observing the correct polarity.
- The controllers will automatically connect to the console via the USB Wireless Receiver once powered on.

Figure 2.2: Supported Display Platforms
This image highlights the versatility of the X2 Plus, showing its compatibility with various display platforms including projectors, home TV sets, and computer monitors, all controlled wirelessly by the included gamepads.
3. Operating Instructions
3.1 Navigating the System
Once connected and powered on, the console will display the main menu. Use the directional pad (D-pad) on the wireless controller to navigate through options and the 'A' button to select.
3.2 Playing Games
The console comes pre-loaded with over 60,000 classic games across 50+ emulators. To play a game:
- From the main menu, select the desired emulator or game category.
- Browse the game list. You can use the search function to quickly find specific titles.
- Select a game to view its preview.
- Press the 'Start' button to begin playing.
3.3 Game Features
The X2 Plus system offers several convenient features:
- Game Search: Use the search function to locate specific games within the extensive library.
- Game Favorites: Add your preferred games to a favorites list for quick access.
- Save/Load Game Progress: Save your game progress at any point and load it later to continue from where you left off.
- Custom Key Mapping: Customize button layouts according to your operating habits for a personalized gaming experience.
- ROM Expansion: The system supports users to download and add related format games.

Figure 3.1: 4K Ultra HD Gameplay
This image depicts the immersive 4K Ultra HD output of the X2 Plus console, showcasing a game on a television screen while two players engage with the wireless controllers, emphasizing the plug-and-play convenience.
4. Maintenance
4.1 Storage and Care
To ensure the longevity of your X2 Plus console:
- Store the console and accessories in a cool, dry place away from direct sunlight and extreme temperatures.
- Keep the device clean by wiping it with a soft, dry cloth. Avoid using liquid cleaners or abrasive materials.
- Protect the console from drops and impacts.
4.2 TF Card Handling
The TF card contains crucial game and system files. Improper handling can render the console inoperable:
- Do not remove the TF card casually while the console is powered on or in use.
- Do not format the TF card, as this will erase essential system and game data.
- The TF card is pre-installed and ready for use upon receipt.
5. Troubleshooting
5.1 Common Issues and Solutions
| Issue | Possible Cause / Solution |
|---|---|
| Console does not power on. | Ensure the USB power cable is securely connected to a 5V2A power source and the Game Stick. Check if the power outlet is functional. |
| No display on TV/monitor. | Verify the HDMI cable is securely connected to both the Game Stick and the display. Ensure the TV input source is set to the correct HDMI channel. |
| Controllers are unresponsive. | Check if the controllers have fresh AAA batteries installed with correct polarity. Ensure the USB Wireless Receiver is properly inserted into the Game Stick. |
| Game lag or freezing. | Ensure the TF card is securely inserted and has not been removed or formatted. Restart the console. |
| Cannot find specific games. | Use the built-in search function. Verify the game is part of the pre-installed library or has been correctly added via ROM expansion. |
If you encounter any issues not listed above, or if the suggested solutions do not resolve your problem, please contact customer support for assistance.
6. Technical Specifications
| Feature | Specification |
|---|---|
| CPU | Quad-core S905L |
| GPU | ARM Mali-450 |
| System | Emuelec 4.3 |
| TF Card Capacity | 256GB (pre-installed) |
| Games Included | 60,000+ |
| Emulators Supported | 50+ |
| Output | HD 4K (60FPS Max, HD 2.1D output 1280*720 resolutions) |
| Languages | English/Chinese/Korean Game Languages, 20+ system operation languages |
| Controller Type | 2.4G Wireless Controller (supports 1-2 players) |
| Controller Power | 4 x AAA batteries (2 per controller, not included) |
| Product Dimensions | 4.52 x 4.13 x 6.3 inches |
7. Support and Warranty
For any questions, technical support, or warranty inquiries regarding your XIXIMENG X2 Plus Retro Gaming Console Game Stick, please refer to the contact information provided at the point of purchase or on the product packaging. Our professional after-sales team is available to assist you with any issues you may encounter.
Please retain your proof of purchase for warranty purposes.
Ask a question about this manual
Ask about setup, troubleshooting, compatibility, parts, safety, or missing instructions. Manuals+ will review the question and use this page’s manual context to help answer it.