1. Introduction
This manual provides detailed instructions for the installation, wiring, firmware flashing, and configuration of your AERO SELFIE H743 Flight Controller with 45A 8-bit ESC 30x30 Stack. Please read this manual thoroughly before attempting any procedures to ensure safe and correct operation.
2. Product Overview
Key Features
- High-Performance Flight Controller & ESC Combo: Features the AERO SELFIE H743 Flight Controller with STM32H743 processor (480MHz, 2MB Flash) and dual IMUs (BMI088/BMI270), paired with the AERO SELFIE 45A 4in1 ESC for ultra-responsive motor control.
- Versatile & Easy to Configure Firmware Support: Compatible with Betaflight, Ardupilot, PX4, and INAV for enhanced flight performance, stability, and flexibility across various drone types, with simple setup and configuration options.
- Powerful ESC Features: The ESC supports 2S-6S lithium batteries, delivers 45A continuous current per channel, and features high-frequency PWM, DSHOT, and ONESHOT protocols for precise throttle response.
- Easy Integration & Compact Design: The 30.5x30.5mm mounting pattern ensures compatibility with a wide range of drone frames, while the stack’s lightweight (total weight: 21.5g for both the ESC and Flight Controller) and compact design simplifies installation and enhances assembly efficiency.
- Connectivity & Expansion: The H743 Flight Controller offers 7 UART ports, 10 PWM outputs, CAN, I2C, and an OSD for additional sensor and peripheral integration, making it a flexible solution for complex drone builds.
Specifications
| Attribute | Value |
|---|---|
| Brand | AERO SELFIE |
| Model Name | H743 + 45A ESC Stack |
| Item Weight | 21.5 Grams |
| Connectivity Technology | Radio Frequency, UART, USB |
| Skill Level | Advanced |
| Material | Plastic Or Carbon Fiber |
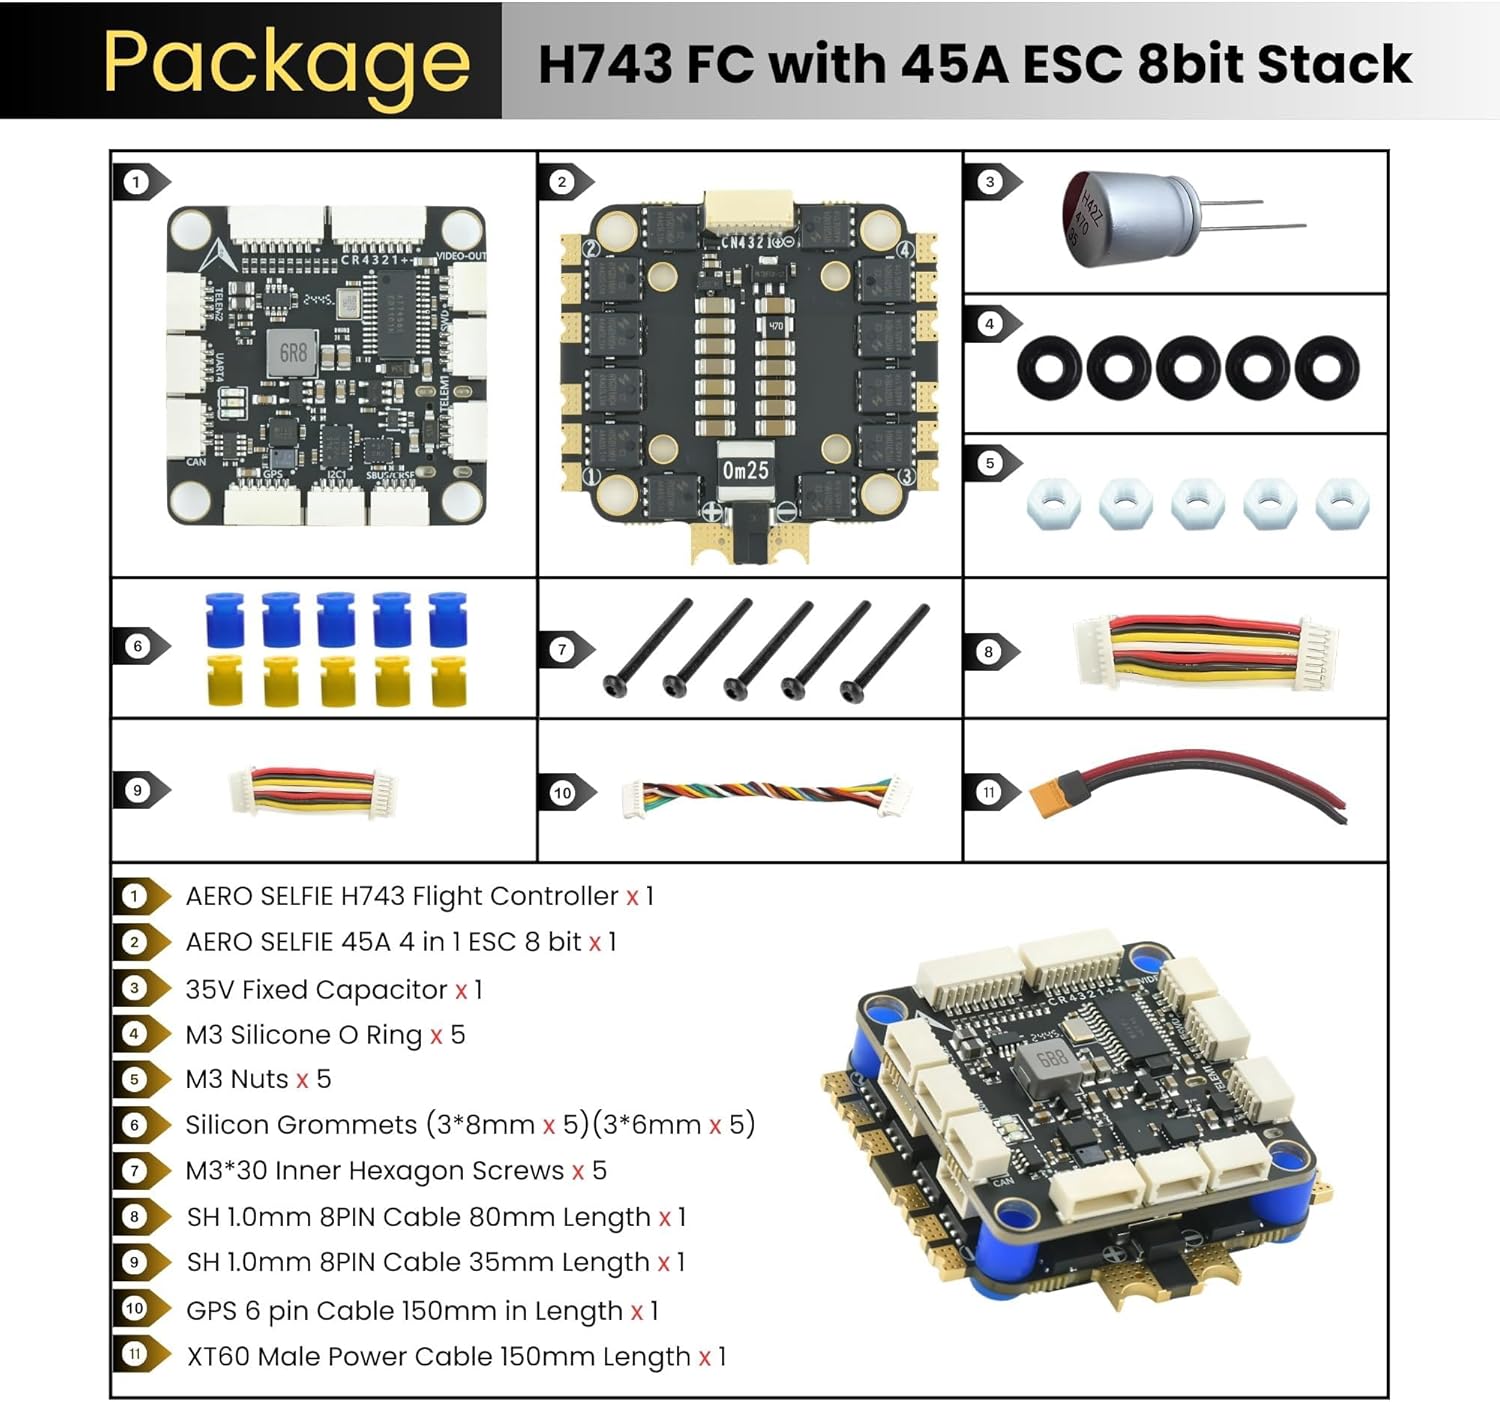
3. Package Contents
The AERO SELFIE H743 Flight Controller with 45A ESC Stack package includes the following items:
- XT60 Male Power Cable 150mm Length x 1
- 35V Fixed Capacitor x 1
- 8PIN 1.0mm Cable 80mm Length x 1
- 8PIN 1.0mm Cable 30mm Length x 1
- GPS 6 pin Cable 150mm in Length x 1
- Nuts, Grommets, Screws and O rings
4. Installation & Wiring
Wiring Diagram
Refer to the diagram below for proper wiring connections between the flight controller, ESC, motors, and other peripherals.

Layout Details
Understand the pinout and component layout of the flight controller for correct connections.

Note: Connecting the flight controller to a computer requires a USB to Type-C cable. For the first-time connection, you must install the necessary drivers. Refer to Betaflight documentation for driver installation if needed.
5. Firmware Flashing
The AERO SELFIE H743 Flight Controller supports various open-source firmwares including Betaflight, INAV, PX4, and Ardupilot. Below are resources and guides for flashing.
General Flashing Instructions
ESC Firmware
Related Flashing Guides
6. Setup & Configuration
After flashing the desired firmware (Betaflight, INAV, PX4, or Ardupilot), connect the flight controller to your computer using a USB Type-C cable. Open the corresponding configurator software (e.g., Betaflight Configurator, INAV Configurator, Mission Planner for Ardupilot, QGroundControl for PX4) to perform initial setup and calibration. Follow the on-screen instructions within the configurator for:
- Sensor calibration (accelerometer, gyroscope, magnetometer)
- Radio setup and calibration
- Motor direction and ESC calibration
- Flight mode configuration
- OSD (On-Screen Display) settings
- PID tuning (advanced users)
7. Troubleshooting
If you encounter issues during setup or operation, consider the following:
- Driver Recognition Issues: If your computer (especially macOS) does not recognize the flight controller, ensure you have installed the correct DFU drivers. Refer to the firmware flashing guide (Video 1) for driver installation steps.
- Firmware/Board Target Mismatch: Ensure you are flashing the correct firmware version for the H743 + 45A ESC Stack. Flashing incorrect firmware can lead to unexpected behavior or bricking.
- No Telemetry/GPS Data: Verify all wiring connections according to the wiring diagram (Figure 2). Check the UART settings in your chosen firmware configurator to ensure the correct ports are enabled and configured for your peripherals.
- Motor Issues: Ensure ESCs are calibrated correctly and motor directions are set in the configurator. Check for any loose motor connections.
- Power Issues: Verify battery voltage and connections. Ensure BEC outputs are providing stable 5V and 9V power to components.
8. Safety Guidelines
Always prioritize safety when working with drone electronics and operating drones. Adhere to the following guidelines:
- Always operate your drone in accordance with local laws and regulations.
- Ensure all connections are secure and insulated to prevent short circuits.
- Never work on the drone with propellers attached or while the battery is connected, unless absolutely necessary for testing and with extreme caution.
- Perform pre-flight checks before every flight, including battery levels, motor function, and control surface response.
- Avoid flying near people, animals, or property.
- Keep the flight controller and ESC away from moisture and extreme temperatures.
9. Warranty & Support
This product is manufactured by Shenzhen Ruijie Innovation Technology Co.,Ltd under the AERO SELFIE brand. For warranty information, technical support, or further assistance, please visit the official AERO SELFIE store on Amazon or contact the manufacturer directly.
Visit the AERO SELFIE Store for more products and support resources.


