1. Introduction
This manual provides comprehensive instructions for the safe and effective operation, maintenance, and troubleshooting of your ROCAM CR1030 Emergency Crank Radio. Please read this manual thoroughly before using the device and retain it for future reference. The ROCAM CR1030 is designed as a multi-functional emergency device, featuring AM/FM radio reception, multiple power sources including solar and hand crank, a flashlight, a reading lamp, and a power bank function.
2. Safety Instructions
- Do not expose the device to extreme temperatures, direct sunlight for prolonged periods (beyond charging), or high humidity.
- Avoid dropping or subjecting the device to severe impacts.
- Keep the device away from water and liquids, despite its IPX6 water resistance, to prevent internal damage.
- Do not attempt to disassemble or modify the device. Repairs should only be performed by qualified personnel.
- Ensure proper ventilation when charging or operating the device.
- Keep out of reach of children.
- Dispose of the device and its battery responsibly according to local regulations.
3. Package Contents
Verify that all items are present in the package:
- 1 x ROCAM CR1030 Emergency Radio
- 1 x Type-C Charging Cable
- 1 x Portable Belt
- 1 x User Manual (this document)
4. Product Overview
Familiarize yourself with the various components and controls of your ROCAM CR1030 radio.
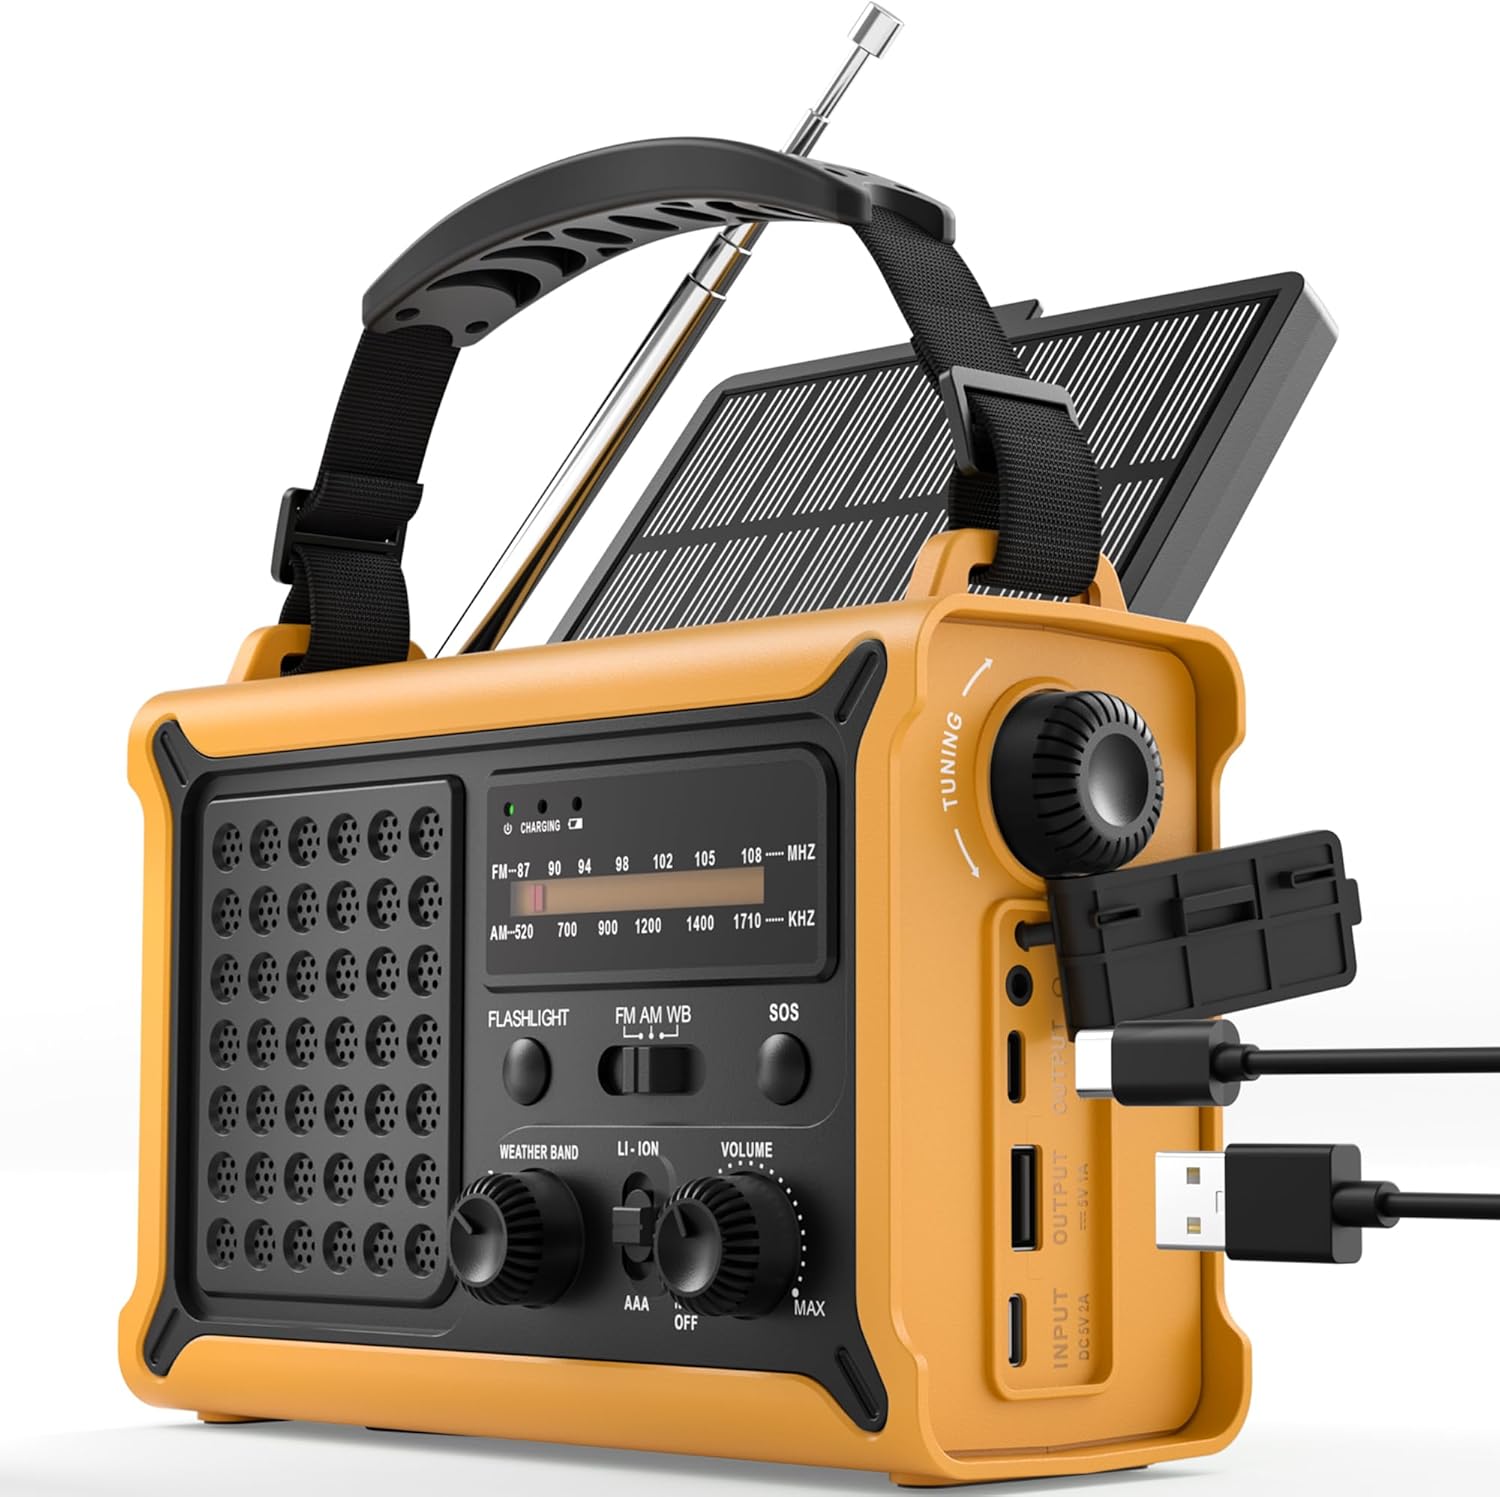
Figure 4.1: Front and side view of the ROCAM CR1030 Emergency Crank Radio, showing the main controls, solar panel, hand crank, and USB charging ports.
- Telescopic Antenna: For AM/FM reception.
- Solar Panel: For solar charging.
- Hand Crank: For manual power generation.
- Flashlight: Front-facing light source.
- Reading Lamp: Top-mounted LED light.
- Tuning Knob: To select radio frequencies.
- Volume Knob/Power Switch: To adjust volume and turn the radio on/off.
- Band Selector Switch: To choose between FM, AM, and Weather Band (if applicable).
- SOS Button: Activates emergency alarm and flashing light.
- USB Output Port: For charging external devices.
- Type-C Input Port: For charging the radio via USB-C cable.
- Battery Compartment: For optional AAA batteries.
- Headphone Jack: 3.5mm port for private listening.

Figure 4.2: The ergonomic design of the ROCAM CR1030, featuring large knobs and a robust casing for easy handling.
5. Setup
5.1 Initial Charging
Before first use, it is recommended to fully charge the internal 12000 mAh battery. Connect the provided Type-C charging cable to the radio's Type-C input port and the other end to a USB power adapter (not included) or a computer USB port. The charging indicator light will illuminate during charging and turn off when fully charged.
5.2 AAA Battery Installation (Optional)
The radio can also be powered by 3 AAA batteries (not included) as an alternative power source. Open the battery compartment cover on the back of the radio, insert 3 AAA batteries according to the polarity markings, and close the cover securely. Ensure the power source switch is set to "AAA" when using these batteries.
6. Operating Instructions
6.1 Radio Operation (AM/FM)
- Extend the telescopic antenna for optimal reception.
- Turn the Volume knob clockwise to power on the radio and adjust the desired volume level.
- Use the Band Selector switch to choose between "FM", "AM", or "WB" (Weather Band, if available on your model).
- Rotate the Tuning knob to scan for radio stations. The frequency display will indicate the current station.
- For best reception, adjust the antenna position and length.
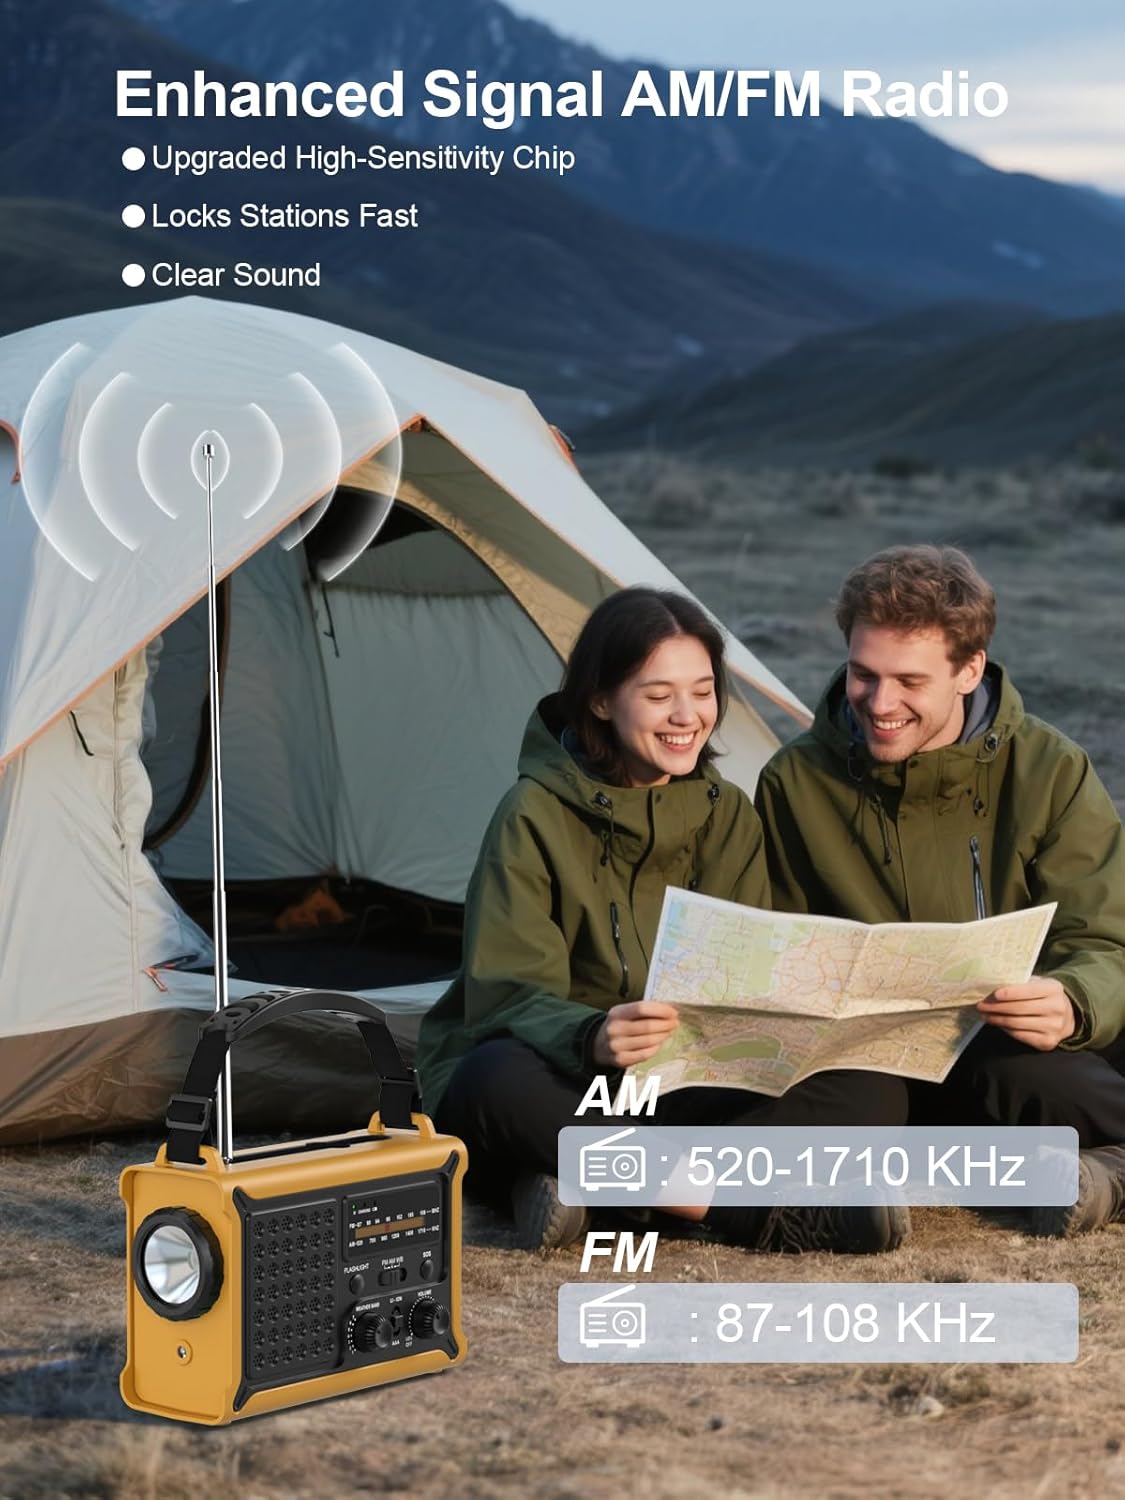
Figure 6.1: The radio in operation, demonstrating the extended antenna and frequency display for AM and FM bands.

Figure 6.2: Illustration of the radio's clear and powerful audio output.
6.2 Power Sources
The ROCAM CR1030 offers multiple ways to power the device and charge its internal battery:
- Internal Rechargeable Battery (12000 mAh): The primary power source, charged via USB-C, solar, or hand crank.
- Hand Crank: Rotate the hand crank clockwise or counter-clockwise at a steady pace (approximately 120-150 RPM) to generate power. A few minutes of cranking can provide power for radio operation or a short burst of light.
- Solar Panel: Place the radio with the solar panel facing direct sunlight. The solar panel charges the internal battery. Charging efficiency depends on sunlight intensity.
- Type-C Input: Connect the radio to a USB power source using the provided Type-C cable.
- AAA Batteries: As described in Section 5.2, 3 AAA batteries can be used as an alternative power source.

Figure 6.3: The radio's dual power generation capabilities: solar panel and hand crank.
6.3 Flashlight and Reading Lamp
The ROCAM CR1030 features two independent light sources:
- Flashlight: Press the "FLASHLIGHT" button to turn on the front-facing 5W flashlight. Press again to turn it off.
- Reading Lamp: Locate the reading lamp switch (often integrated with the flashlight switch or a separate button). Activate it to turn on the top-mounted LED reading lamp.

Figure 6.4: The radio providing illumination with its reading lamp and flashlight.
6.4 SOS Alarm
In an emergency, the SOS alarm can be activated to attract attention:
- Press and hold the "SOS" button for approximately 2 seconds. The radio will emit a loud 120dB siren and a flashing light.
- To deactivate the SOS alarm, press the "SOS" button again.
6.5 Power Bank Function
The ROCAM CR1030 can charge external USB-powered devices using its internal 12000 mAh battery:
- Connect your device's USB charging cable to the radio's USB Output port.
- The radio will begin charging your device. The charging speed may vary depending on the radio's battery level and the connected device.
- This function is intended for emergency charging of small electronic devices.

Figure 6.5: The radio's SOS alarm and power bank capabilities, including charging a smartphone.
7. Maintenance
- Cleaning: Wipe the radio with a soft, damp cloth. Do not use abrasive cleaners or solvents.
- Storage: Store the radio in a cool, dry place away from direct sunlight when not in use. If storing for extended periods, ensure the internal battery is charged to at least 50% and recharge every 3-6 months to maintain battery health.
- Water Resistance: While IPX6 rated, avoid submerging the radio in water. Ensure all port covers are securely closed when exposed to moisture.

Figure 7.1: The radio's design for outdoor use, highlighting its portability and water-resistant features.
8. Troubleshooting
| Problem | Possible Cause | Solution |
|---|---|---|
| Radio does not turn on. | Battery is depleted. Power source switch is incorrect. | Charge the internal battery via USB-C, solar, or hand crank. Ensure the power source switch is set to "LI-ION" for the internal battery or "AAA" if using AAA batteries. |
| Poor radio reception. | Antenna not extended or positioned incorrectly. Weak signal in the area. | Fully extend and adjust the telescopic antenna. Try moving to a different location, preferably outdoors or near a window. |
| Hand crank not charging. | Cranking too slowly or inconsistently. | Ensure a steady cranking motion at a moderate speed. |
| Solar panel not charging. | Insufficient sunlight. Panel is obstructed. | Place the radio in direct, strong sunlight. Ensure the solar panel is clean and unobstructed. |
| External device not charging via USB. | Radio's internal battery is low. USB cable is faulty or incompatible. | Ensure the radio's internal battery has sufficient charge. Try a different USB cable or device. |
9. Specifications
| Feature | Detail |
|---|---|
| Model | CR1030 |
| Radio Reception | AM (520-1710 KHz), FM (87.5-108 MHz) |
| Battery Capacity | 12000 mAh (Internal Li-ion) |
| Hand Crank Power Generation | 650 mA |
| Solar Panel Size | 8500 mm² |
| Solar Energy Power Generation | 350 mA |
| Charging Input | 5V/1A (Type-C) |
| Power Sources | Rechargeable Battery, Hand Crank, Solar Panel, Type-C Input, 3x AAA Batteries |
| Flashlight Power | 5W |
| SOS Alarm Volume | 120 dB |
| Waterproof Level | IPX6 |
| Headphone Jack | 3.5 mm |
| Dimensions | 12.1L x 17.3W x 7.4H cm |
| Weight | 850 g |
| Material | Plastic |
10. Warranty and Support
ROCAM products are manufactured to high-quality standards. For warranty information, technical support, or service inquiries, please refer to the contact information provided with your purchase or visit the official ROCAM website. Please have your model number (CR1030) and purchase details ready when contacting support.


