Introduction
This manual provides detailed instructions for the assembly, operation, and maintenance of your Modway Fortitude 75-inch Fluted Curved Sideboard Buffet. Please read all instructions carefully before beginning assembly and retain this manual for future reference. Proper assembly and care will ensure the longevity and optimal performance of your furniture.
Safety Information
- Always assemble the unit on a soft, clean surface to prevent scratches.
- Ensure all parts are present and undamaged before assembly. Do not proceed with assembly if any parts are missing or damaged.
- Use the correct tools as specified in the assembly instructions.
- Do not overtighten screws or fasteners, as this may damage the material.
- Keep small parts and packaging materials away from children and pets.
- For heavy items, it is recommended to have two people for assembly and moving to prevent injury. This unit weighs approximately 143 pounds.
- Place the sideboard on a level surface to ensure stability and prevent tipping.
- Do not exceed the maximum weight capacity of 254 lbs for the top surface.
Package Contents
Before assembly, verify that all components are present. While a detailed parts list is typically included with the product, expect the following general items:
- Cabinet panels (top, bottom, sides, back)
- Fluted door panels (4 total)
- Adjustable shelves
- Hardware pack (screws, dowels, cam locks, hinges, push-to-open mechanisms, non-marking foot caps)
- Assembly instructions

Image: Overview of key features including timber strip design, adjustable shelf, push-to-open doors, and assembly requirement.
Assembly Instructions
Assembly is required for this product. It is recommended to have two people for assembly due to the size and weight of the unit. Follow the step-by-step instructions provided in the product packaging. The general steps are outlined below:
- Unpack and Organize: Carefully remove all components from the packaging. Lay them out on a clean, soft surface (e.g., a blanket or carpet) to prevent scratches. Identify each part and hardware item using the provided parts list.
- Assemble the Main Frame: Begin by connecting the bottom panel to the side panels using the designated hardware (e.g., cam locks and dowels). Ensure all connections are secure.
- Attach Back Panel: Secure the back panel to the assembled frame. This adds stability and squareness to the unit.
- Install Top Panel: Attach the top panel to complete the main cabinet structure.
- Install Door Hinges: Attach the hinges to the inside of the cabinet frame and to the fluted door panels. Ensure the hinges are aligned correctly for smooth door operation.
- Mount Doors: Carefully attach the fluted doors to the hinges. Adjust the hinges as needed to ensure proper alignment and even gaps between doors.
- Install Push-to-Open Mechanisms: Attach the push-to-open mechanisms to the inside of the cabinet frame, aligning them with the corresponding doors. Test each door to ensure the mechanism functions correctly.
- Insert Adjustable Shelves: Place the shelf pins into the desired holes within the cabinet compartments. Slide the adjustable shelves onto the pins. The center cabinet features a height-adjustable shelf.
- Attach Non-Marking Foot Caps: Secure the non-marking foot caps to the bottom of the sideboard to protect your floors.
- Final Inspection: Double-check all connections and ensure the sideboard is stable and level.

Image: Interior view of the sideboard with all doors open, showing storage compartments and adjustable shelves.
Operating Instructions
- Opening Doors: The sideboard features push-to-open doors. Gently press the center of the door panel to release the latch, and the door will spring open slightly. Pull the door open fully.
- Closing Doors: Push the door firmly until you hear a click, indicating the push-to-open mechanism has engaged and the door is securely closed.
- Adjusting Shelves: To adjust the height of the shelves, remove all items from the shelf. Lift the shelf slightly and remove the four shelf pins. Reinsert the pins into the desired holes at the new height, ensuring they are level, then place the shelf back onto the pins.
- Cable Management: The center cabinet includes a built-in cable management hole. Route power cords and audio/video cables through this opening to keep them organized and out of sight.

Image: Detail of an open door showing the interior storage and adjustable shelf.
Care and Maintenance
- Cleaning: Wipe surfaces with a soft, damp cloth. Avoid using harsh chemicals, abrasive cleaners, or polishes that may damage the finish.
- Spills: Blot spills immediately with a clean, dry cloth.
- Sunlight: Avoid prolonged exposure to direct sunlight to prevent fading or discoloration of the wood grain finish.
- Heat and Moisture: Keep the sideboard away from direct heat sources and areas of high humidity. Use coasters under hot or wet items.
- Inspection: Periodically check all fasteners and tighten them if necessary to maintain structural integrity.
Troubleshooting
- Doors not closing properly: Check if the push-to-open mechanism is correctly installed and aligned with the door. Ensure no obstructions are preventing the door from fully closing. Adjust hinges if doors are misaligned.
- Sideboard wobbles: Ensure the sideboard is placed on a level surface. Check that all assembly fasteners are securely tightened. Adjust the non-marking foot caps if they are adjustable to level the unit.
- Scratches on floor: Verify that the non-marking foot caps are properly installed on all support points.
- Difficulty with assembly: Refer to the detailed assembly instructions provided in the product packaging. If issues persist, contact customer support.
Specifications
| Brand | Modway |
| Model Number | EEI-7359-WAL |
| UPC | 889654182955 |
| Material | Engineered Wood |
| Color | Walnut |
| Product Dimensions (W x D x H) | 75.4 inches x 17 inches x 24.7 inches (16.97 x 75.35 x 24.73 inches) |
| Item Weight | 143 pounds |
| Number of Doors | 4 |
| Number of Shelves | 6 (including fixed and adjustable) |
| Weight Capacity (Top Surface) | Up to 254 lbs |
| Special Features | Adjustable Shelf, Push-to-Open Doors, Cable Management Hole, Non-Marking Foot Caps |
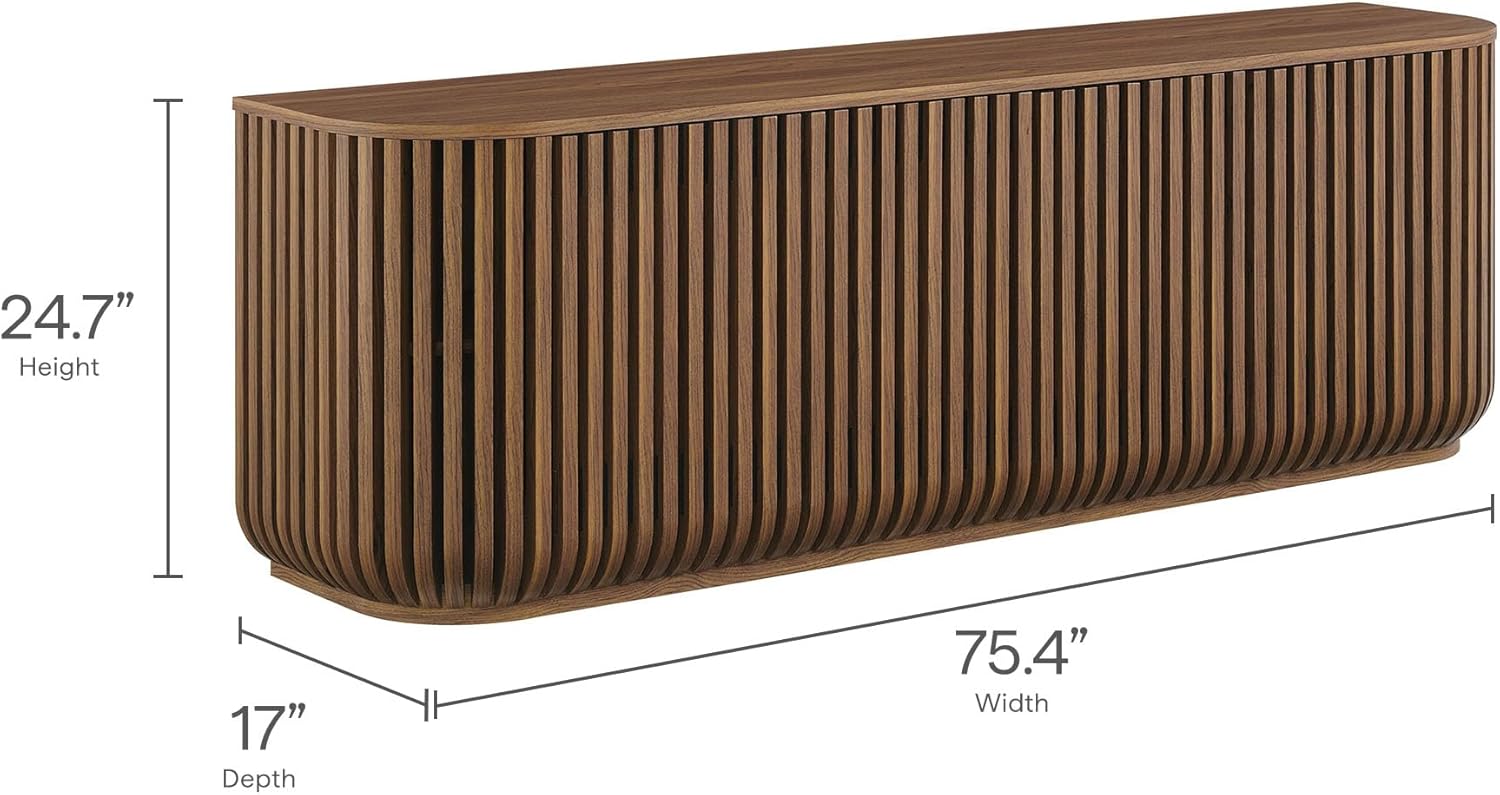
Image: Dimensional drawing of the Modway Fortitude Sideboard.
Warranty and Support
For warranty information, please refer to the documentation included with your product or visit the official Modway website. If you require assistance with assembly, missing parts, or have any questions regarding your Modway Fortitude Sideboard, please contact Modway customer support directly. Contact details can typically be found on the Modway website or in your product packaging.
Modway Official Website: www.modway.com


