
1. Introduction
This manual provides essential information for the setup, operation, and maintenance of your UYXOERA 3D Saga DX 8800 in 1 PCB Game Board. This system is designed to deliver a retro gaming experience with a vast library of classic titles.
2. What's in the Box
Verify that all items are present before proceeding with setup:
- 1x UYXOERA 3D Saga DX 8800 in 1 PCB Game Board
- 1x HDMI Cable
- 1x VGA Cable
- 1x USB-to-USB Cable
- 1x Power Adapter
- 2x Spare Buttons
- 2x Joysticks with Dust Covers
- 1x User Manual (this document)
3. Setup
Follow these steps to set up your 3D Saga DX Game Board:
- Install Joysticks: Carefully screw the provided joysticks into their designated slots on the top panel of the game board. Ensure they are securely fastened.
- Connect Video Output: Connect one end of the HDMI cable to the HDMI port on the game board and the other end to an available HDMI input on your display (TV or monitor). Alternatively, use the VGA cable for VGA-compatible displays.
- Connect Power: Plug the power adapter into the DC12V port on the game board and then into a power outlet.
- Power On: Locate the power switch on the back of the game board and turn it to the 'ON' position. The system will begin to boot up.
- External Controllers (Optional): For 3 or 4 player games, connect compatible USB controllers to the USB ports on the game board.

Figure 3.1: Overview of the game board's connection ports.

Figure 3.2: Detailed view of rear connection ports and power switch.
Setup Video Tutorial
Video 3.1: An unboxing and initial setup guide for a similar Pandora Console system, demonstrating component identification and basic connections.
4. Operating Instructions
Once the system is powered on and connected to your display, you can begin navigating and playing games.
4.1. Menu Navigation
- Use the joysticks to move through the game menus and select options.
- The primary action buttons (A, B, X, Y) are used for selection and confirmation.
- The 'SELECT' and 'START' buttons are typically used to initiate games or access in-game menus.
4.2. Game Selection and Features
The 3D Saga DX features a comprehensive game library with various emulators:
- Emulator Support: Includes support for Nintendo 64, PlayStation, Arcade Classics, Super Nintendo, Game Boy Advance, Mega Drive, Nintendo Entertainment System, Game Boy Color, Neo Geo, Sega Game Gear, Family Computer Disk System, Sega 32X, Sega Master System, MSX2, Amstrad, MAME, Lynx, Atari, Atomiswave, C64, Amiga, FB Alpha, Vectrex, PC Engine, Super Grafx, Hacks, Game & Watch, Super Famicom, Virtual Boy, Pokemon Mini, Neo Geo Pocket, and Dreamcast.
- Game Search: Utilize the search function to quickly find specific titles within the extensive library.
- Favorites List: Add your preferred games to a favorites list for easy access.
- Game Classification: Games are categorized for organized browsing.
- Pause/Exit: Games can be paused or exited using dedicated functions.
- Image Enhancement: The system includes image enhancement capabilities for improved visual quality.

Figure 4.1: Internal components of the game board, including TF card slot and cooling fan.
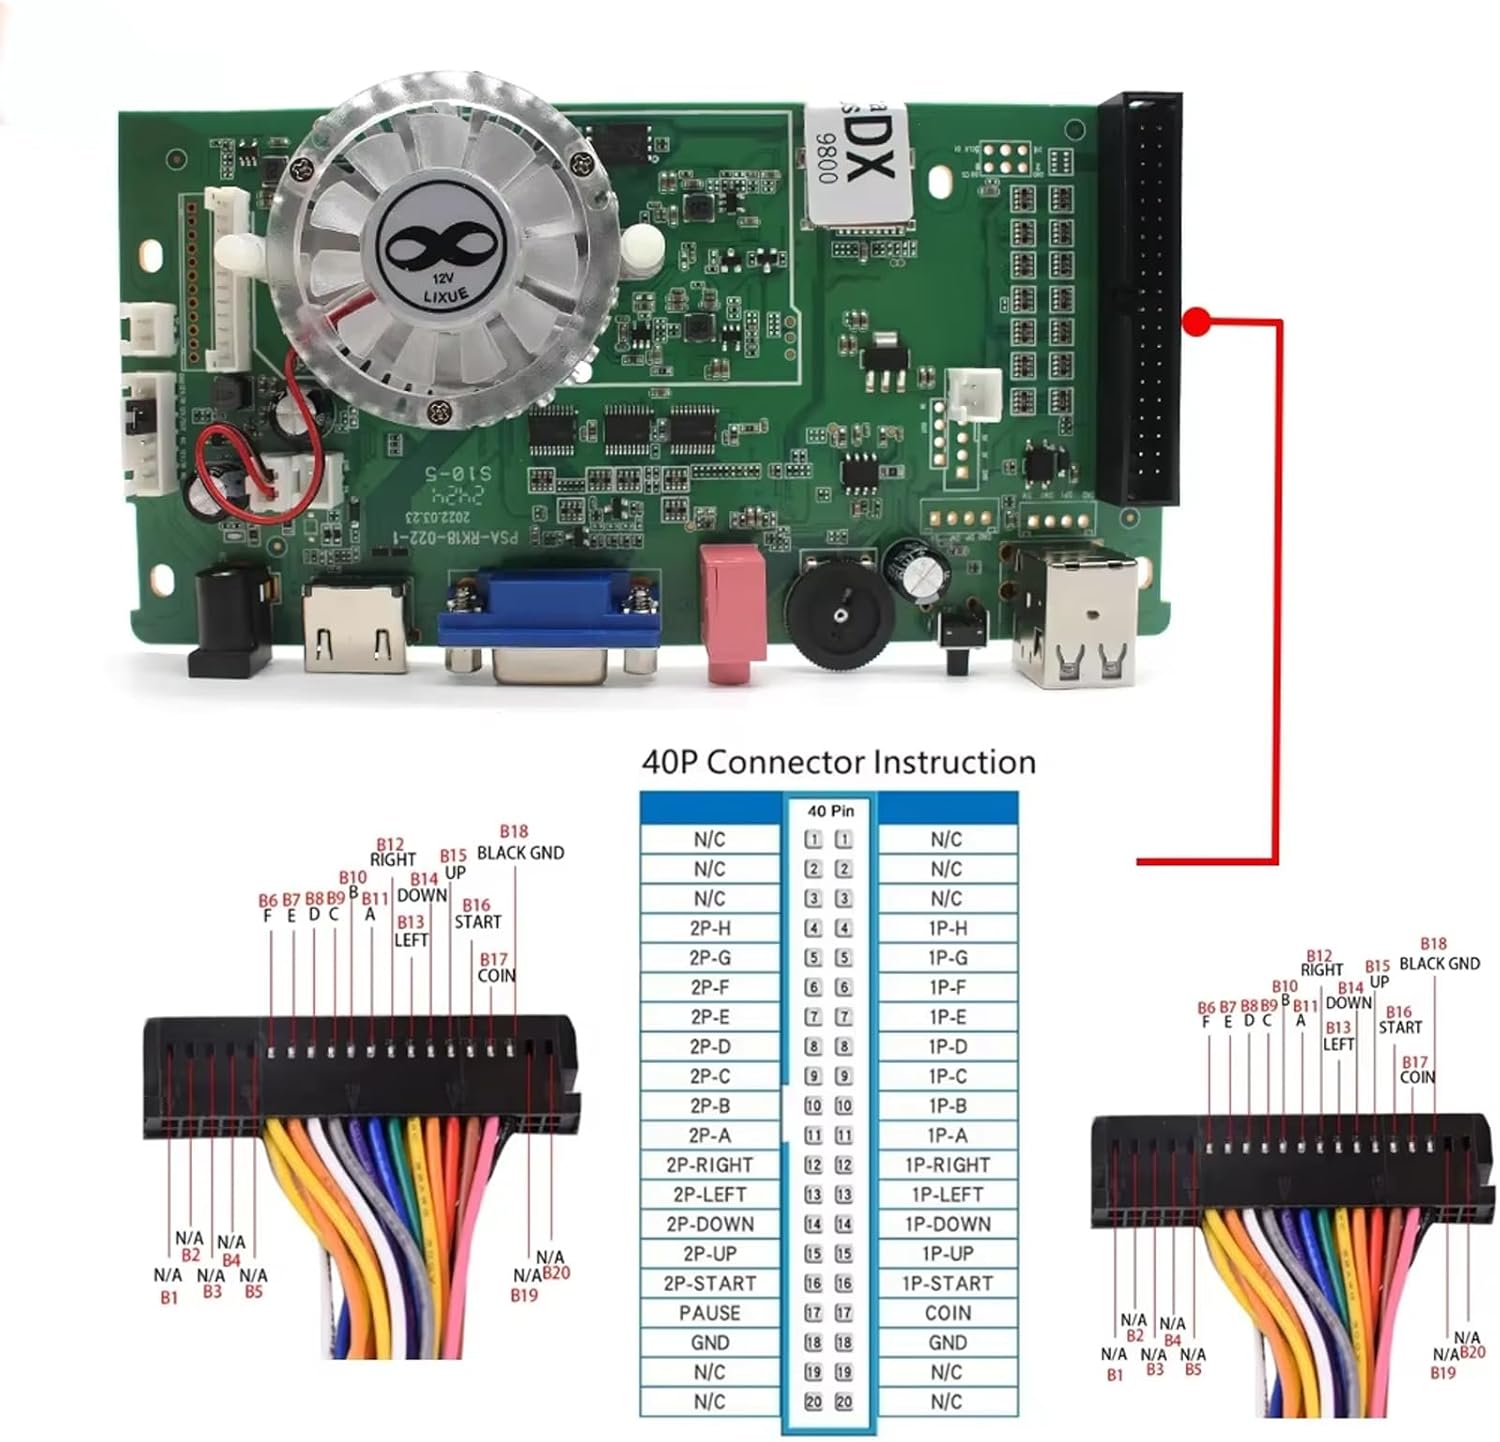
Figure 4.2: 40-Pin Connector Instruction for advanced wiring.
5. Key Features
- Extensive Game Library: Includes 26,800 classic games, including 3D and 4-player titles.
- Multiplayer Support: Supports up to 4 players simultaneously with compatible USB controllers.
- Dual Display Output: Features both HDMI and VGA outputs, supporting HD 1280x720P resolution for versatile monitor connectivity.
- Advanced User Functions: Features include game pause, a favorites list, game search, game classification, and image enhancement.
- Compact Design: Measures 6 x 4 x 1 inches with an integrated cooling fan system for sustained performance.
6. Maintenance
To ensure the longevity and optimal performance of your game board, observe the following:
- Ventilation: Always ensure adequate ventilation around the game board to prevent overheating. Do not block the cooling fan or vent holes.
- Cleaning: Use a soft, dry cloth to clean the exterior of the game board. Avoid liquid cleaners or abrasive materials.
- Storage: Store the game board in a cool, dry place away from direct sunlight and extreme temperatures when not in use.
7. Troubleshooting
If you encounter issues with your game board, try the following steps:
- No Display: Check all HDMI/VGA connections. Ensure your display is set to the correct input source. Verify the power adapter is securely connected and the power switch is on.
- No Power: Ensure the power adapter is correctly plugged into both the game board and a working power outlet. Check the power switch on the back of the unit.
- Controller Issues: If using external USB controllers, ensure they are properly connected. For built-in joysticks/buttons, check for any physical obstructions.
- Game Freezing/Lag: Ensure adequate ventilation. Restart the system.
8. Specifications
- Product Dimensions: 6 x 6.5 x 7 inches
- Item Weight: 7.2 ounces
- Model Number: 8800 IN 1
- Manufacturer: UYXOERA
- Video Output: HDMI, VGA (HD 1280x720P Resolution)
- Multiplayer: Up to 4 players (with external USB controllers)
- Cooling: Integrated cooling fan system
9. Warranty and Support
Specific warranty details and direct support contact information are not provided in the available product data. Please refer to your purchase documentation or contact the seller directly for warranty claims and technical assistance.