1. Introduction
This manual provides comprehensive instructions for the JVC 86-inch Roku TV 4K UHD Model SI86URF. It covers setup, operation, maintenance, and troubleshooting to ensure optimal performance and longevity of your television. Please read this manual thoroughly before using the product and retain it for future reference.

Image 1.1: Front view of the JVC 86-inch Roku TV 4K UHD, showcasing its frameless design and vibrant display capabilities.
2. What's in the Box
Upon unpacking, verify that all the following items are included:
- JVC 86-inch Roku TV (Model SI86URF)
- Remote Control (with batteries)
- TV Stands (2 pieces)
- Screws for TV Stands
- Power Cord
- User Manual (this document)
Note: If any items are missing or damaged, please contact customer support.
3. Product Overview
3.1 Key Features
- 4K Ultra HD Resolution: Delivers sharp and realistic images with four times the detail of Full HD.
- Roku TV Operating System: Provides easy navigation and access to thousands of streaming applications and channels.
- Frameless Design: Maximizes screen space for an immersive viewing experience.
- Multiple Connectivity Options: Equipped with HDMI and USB ports for connecting various external devices.
- Dolby Atmos Audio: Enhanced audio encoding for an immersive sound experience.
- Chromecast Built-in: Allows casting content from compatible devices.
3.2 TV Ports and Connections
The JVC SI86URF TV features various ports for connecting external devices. Refer to the diagram below for port identification.
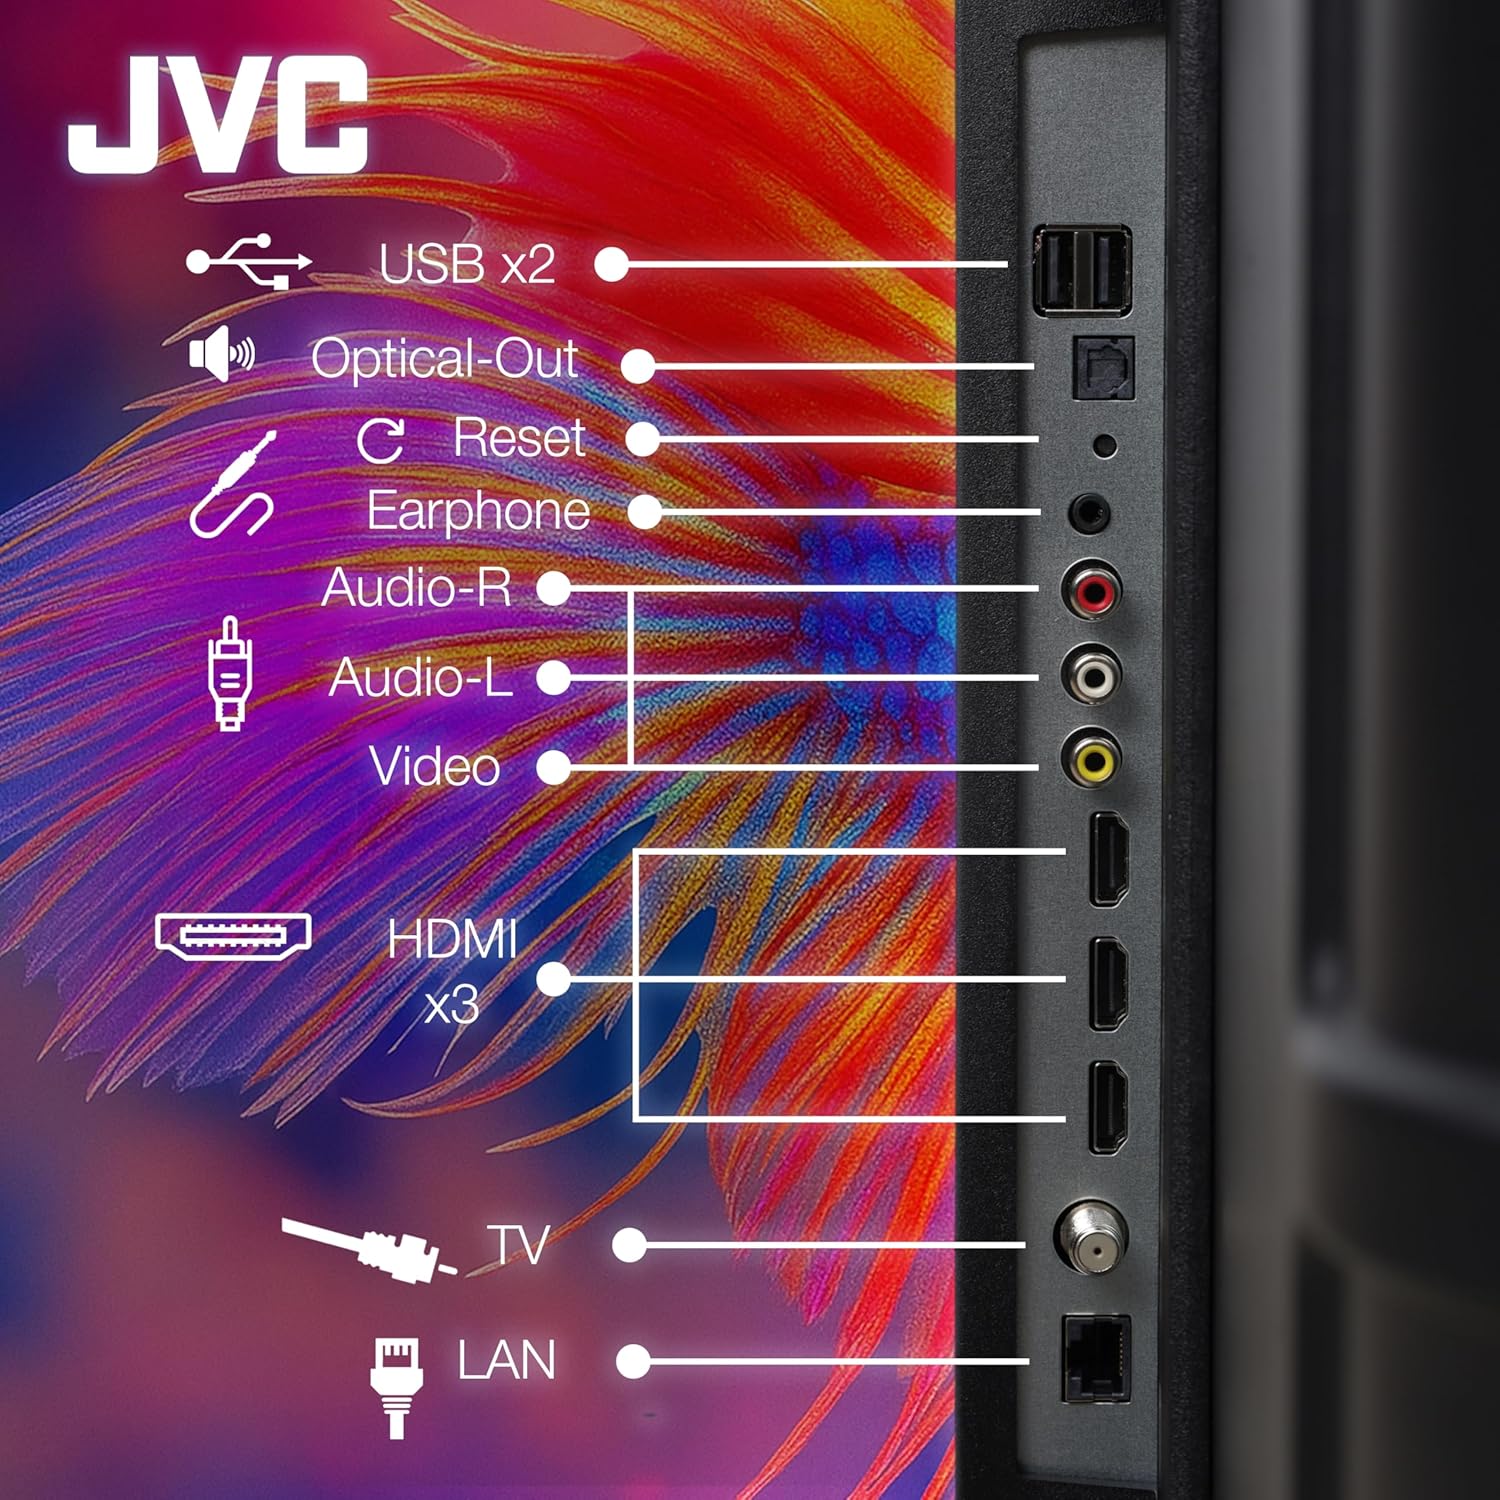
Image 3.2: Rear panel connections of the JVC Roku TV.
| Port | Description |
|---|---|
| USB x2 | Connect USB storage devices for media playback. |
| Optical-Out | Digital audio output for connecting to soundbars or home theater systems. |
| Reset | Button to reset the TV to factory settings. |
| Earphone | 3.5mm audio jack for headphones. |
| Audio-R / Audio-L | Analog audio input (RCA) for older devices. |
| Video | Composite video input (RCA) for older devices. |
| HDMI x3 | High-Definition Multimedia Interface for connecting Blu-ray players, game consoles, etc. |
| TV | Antenna/Cable input for receiving broadcast signals. |
| LAN | Ethernet port for wired internet connection. |
4. Setup
4.1 Physical Installation
You can install your JVC TV using the included stands or by wall-mounting (wall mount kit sold separately).
4.1.1 Installing the TV Stands
- Carefully place the TV face-down on a soft, clean surface to prevent screen damage.
- Align each stand with the corresponding screw holes on the bottom of the TV.
- Secure the stands using the provided screws.
- Carefully lift the TV to an upright position on a stable, level surface.
4.1.2 Wall Mounting (Optional)
If you choose to wall-mount your TV, ensure you use a VESA-compatible wall mount kit appropriate for the TV's size and weight. Follow the instructions provided with your wall mount kit. It is recommended to seek professional installation for wall mounting.
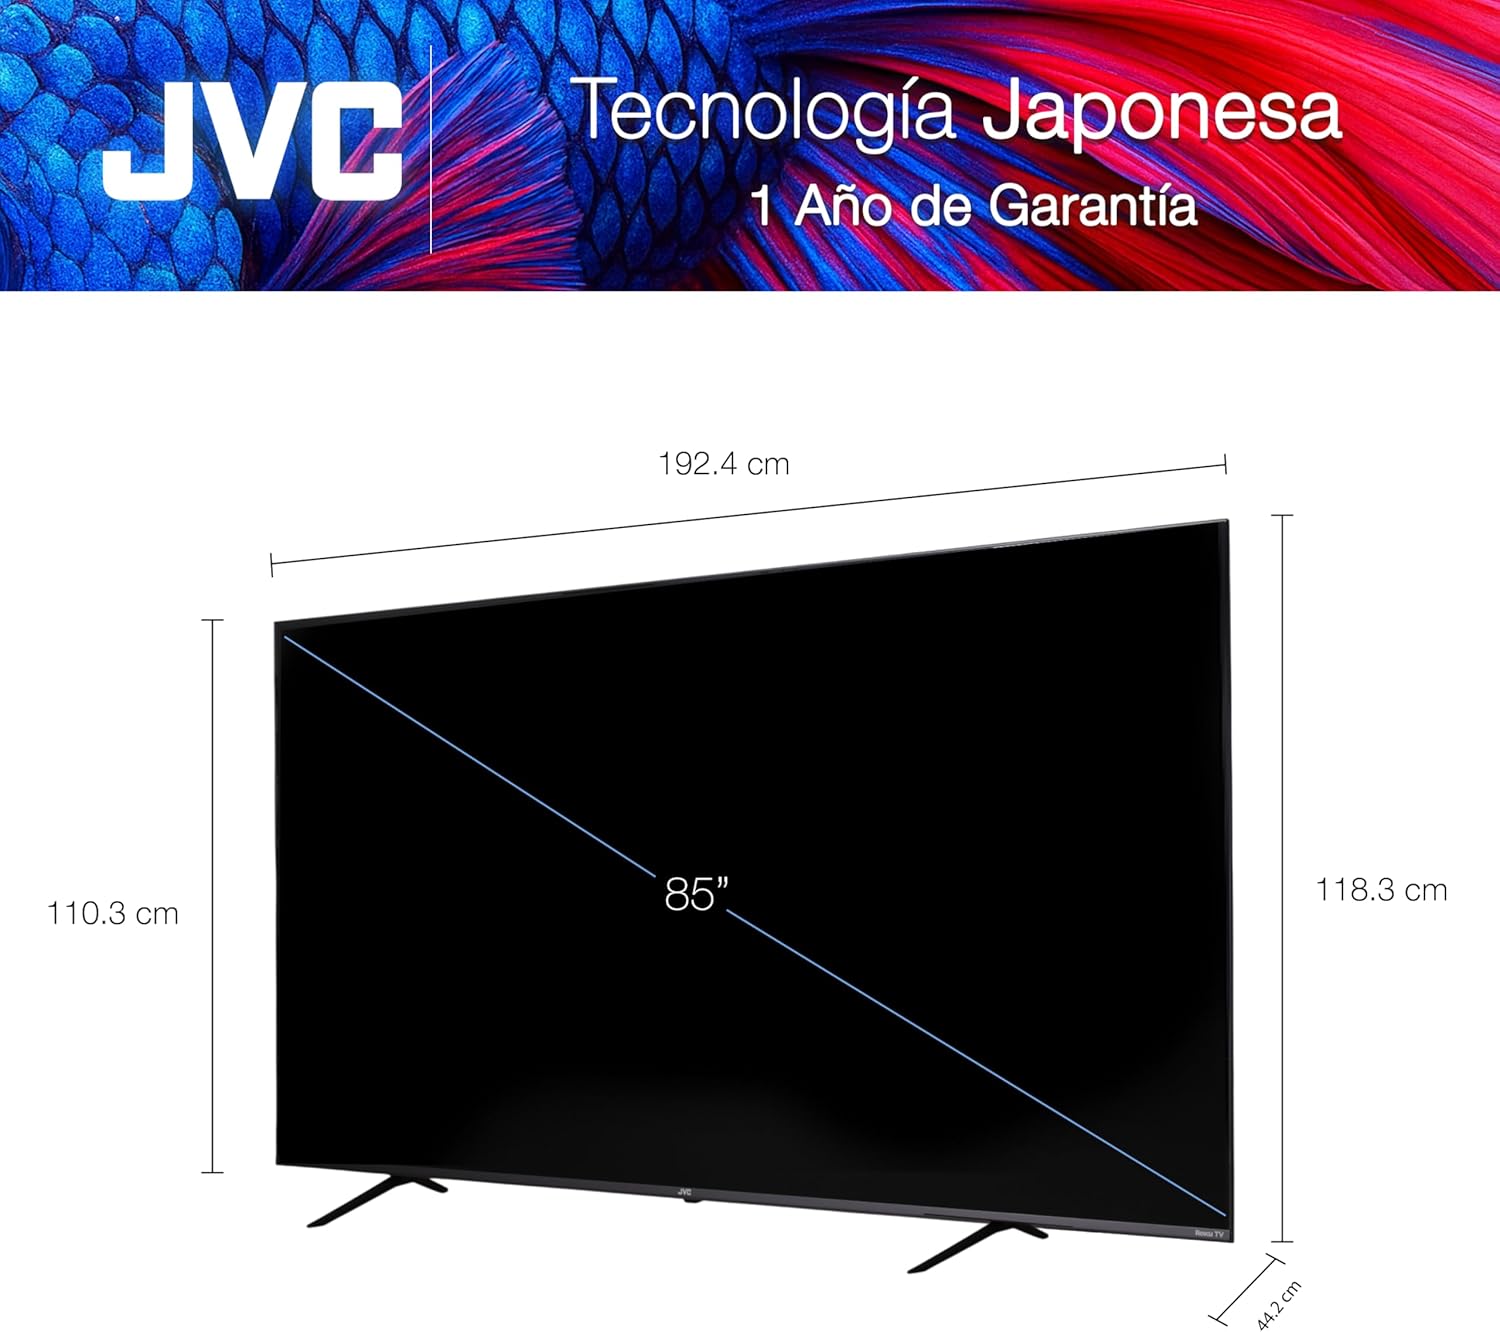
Image 4.1: TV dimensions for placement and mounting considerations.
4.2 Initial Power On and Roku Setup
- Connect the power cord to the TV and then to a power outlet.
- Insert the included batteries into the remote control.
- Press the Power button on the remote control to turn on the TV.
- Follow the on-screen instructions to complete the initial Roku TV setup, including language selection, network connection (Wi-Fi or Ethernet), and channel scanning (if connecting an antenna).
- You will be prompted to activate your Roku account. This is required to access streaming channels and features.

Image 4.2: JVC Roku TV displaying the Roku OS home screen in a living room environment.
4.3 Connecting External Devices
Use the appropriate ports (refer to Section 3.2) to connect your external devices.
- HDMI Devices: Connect Blu-ray players, game consoles, cable/satellite boxes, etc., to the HDMI ports.
- USB Devices: Connect USB flash drives for viewing photos, videos, or listening to music.
- Antenna/Cable: Connect an antenna or cable TV feed to the "TV" port for over-the-air or basic cable channels.
- Audio Systems: Use the Optical-Out port for digital audio or the Audio-R/L ports for analog audio to connect to external sound systems.
5. Operating the TV
5.1 Remote Control
The included remote control allows you to navigate the Roku TV interface and control various functions.

Image 5.1: JVC Roku TV remote control and Roku OS interface.
Key remote functions typically include:
- Power: Turns the TV on or off.
- Directional Pad (D-Pad): Navigates menus and selects items.
- OK/Select: Confirms selections.
- Home: Returns to the Roku TV home screen.
- Back: Returns to the previous screen.
- Volume Up/Down: Adjusts the TV volume.
- Mute: Mutes or unmutes the sound.
- Channel Up/Down: Changes channels (for antenna/cable input).
- Instant Replay: Jumps back a few seconds in video playback.
- Star (*): Accesses options menu for selected content.
- Dedicated App Buttons: Quick access to popular streaming services (e.g., Netflix, Disney+, HBO Max).
5.2 Roku OS Navigation
The Roku TV home screen provides access to all your entertainment options. You can:
- Browse Streaming Channels: Add or remove channels from the Roku Channel Store.
- Switch Inputs: Select connected devices (HDMI 1, HDMI 2, etc.) or the TV antenna input.
- Access Settings: Configure network, display, audio, and system settings.
- Search: Find movies, TV shows, actors, or channels across various streaming services.
5.3 Streaming and Casting
Your JVC Roku TV allows you to stream content from various applications and cast from compatible devices.
5.3.1 Using Streaming Services
Once connected to the internet and logged into your Roku account, you can access pre-installed streaming apps or download new ones from the Roku Channel Store. Navigate to the desired app using the remote and select it to launch.
5.3.2 Chromecast Functionality
The built-in Chromecast feature allows you to cast content (videos, music, photos) from your smartphone, tablet, or computer directly to your TV. Ensure your casting device is connected to the same Wi-Fi network as your TV. Look for the Cast icon within compatible apps on your device.

Image 5.3: Demonstration of screen sharing or casting content to the JVC TV.
5.4 Audio Settings
The TV supports Dolby Atmos audio encoding. You can adjust audio settings through the Roku TV menu:
- Go to Settings > Audio.
- Adjust settings such as volume mode, audio effects, and digital audio output format.
- If using an external sound system, ensure the correct audio output is selected (e.g., Optical or HDMI ARC if supported).
6. Maintenance
6.1 Cleaning the TV
- Always unplug the TV before cleaning.
- Use a soft, dry, lint-free cloth to gently wipe the screen and cabinet.
- For stubborn marks on the screen, lightly dampen the cloth with water or a screen-cleaning solution specifically designed for electronics. Do not spray liquid directly onto the screen.
- Avoid using abrasive cleaners, waxes, or solvents as they can damage the TV's finish.
6.2 Software Updates
Your Roku TV automatically checks for and installs software updates when connected to the internet. This ensures you have the latest features and security enhancements. You can manually check for updates:
- Go to Settings > System > Software update.
- Select Check now.
7. Troubleshooting
If you encounter issues with your JVC Roku TV, refer to the following common problems and solutions:
| Problem | Possible Solution |
|---|---|
| No Power |
|
| No Picture, but Sound is Present |
|
| No Sound, but Picture is Present |
|
| Remote Control Not Working |
|
| Network Connection Issues |
|
For further assistance, please contact JVC customer support.
8. Specifications
| Feature | Specification |
|---|---|
| Brand | JVC |
| Model | SI86URF |
| Screen Size | 86 Inches |
| Display Technology | LED |
| Screen Type | VA |
| Resolution | 4K UHD (3840 x 2160 Pixels) |
| Refresh Rate | 60 Hz |
| Operating System | Roku OS |
| Special Features | Chromecast Built-in |
| Audio Encoding | Dolby Atmos |
| Output Wattage | 20 Watts |
| Connectivity Technology | HDMI, USB, LAN, Bluetooth |
| HDMI Ports | 3 |
| USB Ports | 2 |
| Remote Control Technology | Infrared |
| Product Dimensions (W x H x D) | 208 x 126 x 24 cm (approx. 81.9 x 49.6 x 9.4 inches) |
| Product Weight | 49 kg (approx. 108 lbs) |
| Batteries Included | Yes (for remote control) |
| Mounting Type | Wall Mount, Tabletop Stand |
9. Warranty and Support
9.1 Warranty Information
This JVC TV comes with a 1-year warranty from the date of purchase. This warranty covers manufacturing defects under normal use. It does not cover damage caused by misuse, accidents, unauthorized modifications, or acts of nature. Please retain your proof of purchase for warranty claims.
9.2 Customer Support
For technical assistance, troubleshooting beyond this manual, or warranty inquiries, please contact JVC customer support. Refer to the official JVC website or your purchase documentation for contact details.
Please have your TV model number (SI86URF) and serial number ready when contacting support.


