1. Introduction
This manual provides detailed instructions for the installation, operation, and maintenance of your VASTFIRE 1200-Piece Starlight Headliner Kit. This fiber optic lighting system is designed to create a starry night effect in various environments, including vehicle interiors, RVs, and small rooms. Please read this manual thoroughly before beginning installation or operation to ensure proper use and safety.
2. Safety Information
Observe the following safety precautions to prevent injury or damage to the product:
- Ensure the power supply matches the product's specifications (DC 12V).
- Do not expose the light engine to water or excessive moisture.
- Keep the light engine in a well-ventilated area to prevent overheating.
- Avoid direct eye exposure to the light source.
- Installation should be performed by individuals familiar with basic electrical wiring and vehicle interior work.
- Disconnect power before performing any maintenance or installation.
- Keep out of reach of children.
3. Package Contents
Verify that all components are present in your package:
- 16W RGBW Light Engine
- 1200 pieces of 0.02in (0.5mm) diameter fiber optic cables, 9.8ft (3m) long
- RF Remote Controller
- Power Adapter (DC 12V)
- User Manual (this document)
- Fiber Optic Sleeve (for bundling fibers)
- Extension Cable (2m)

Figure 3.1: Overview of the VASTFIRE Starlight Headliner Kit components. This image displays the main light engine, a coiled bundle of fiber optic cables, the RF remote control, and various power and extension cables, all laid out against a background of a purple starlight ceiling effect.

Figure 3.2: Detailed product analysis showing individual components. This image highlights the light source host with QR code, a metallic fiber optic sleeve, a 2m extension cable connected to a starry light source, and a 24-key LED lamp controller remote.
4. Setup & Installation
This section outlines the steps for installing your starlight headliner kit. Planning is crucial for a successful installation.
4.1 Planning the Layout
- Determine the desired pattern for your stars. Consider density and distribution.
- Identify the optimal location for the light engine. It should be accessible for power and control, and discreetly hidden.
- Measure the area to ensure the 9.8ft (3m) fiber length is sufficient for all desired star points.

Figure 4.1: Visual examples of installed starlight headliners. This image displays several car interiors with different colored fiber optic star effects on the ceiling, alongside coiled bundles of fiber optic cables showcasing various color options.
4.2 Preparing the Surface
- For vehicle headliners, carefully remove the headliner from the vehicle. Refer to your vehicle's service manual for specific instructions.
- Clean the surface where the fibers will be installed to ensure proper adhesion if using adhesive.
4.3 Drilling Holes
- Using a small drill bit (e.g., 0.02in or 0.5mm), carefully drill holes in the headliner according to your planned pattern.
- Ensure holes are clean and free of burrs.
4.4 Inserting Fiber Optic Cables
- Insert individual fiber optic cables through the drilled holes from the front (visible) side of the headliner.
- Secure each fiber on the back side of the headliner. Small dabs of hot glue or a strong adhesive can be used.
- Group the fibers together and trim them to the desired length on the back side, ensuring they can reach the light engine.
- Use the provided fiber optic sleeve to bundle the fibers neatly.
4.5 Connecting the Light Engine
- Insert the bundled fiber optic cables into the light engine's port. Ensure they are securely seated.
- Connect the power adapter to the light engine and then to a 12V power source. For vehicle installations, this typically involves tapping into a switched 12V power source (e.g., accessory power).
- Ensure all connections are secure and insulated.

Figure 4.2: Applicable car types and wiring diagram. This image illustrates various car roof types (without skylight, small skylight, panoramic sunroof) and provides a visual guide for connecting the light engine and associated cables.
5. Operation
Your VASTFIRE Starlight Headliner Kit can be controlled via the included RF remote control or a Bluetooth mobile application.
5.1 RF Remote Control
The 24-key RF remote allows for basic control of the light engine:
- ON/OFF: Power the unit on or off.
- R, G, B, W: Select Red, Green, Blue, or White static colors.
- Color Buttons: Choose from 13 static colors.
- FLASH, STROBE, FADE, SMOOTH: Select dynamic lighting modes.
- Brightness +/-: Adjust the intensity of the light.
5.2 Bluetooth APP Control
For advanced features and customization, download the companion mobile application. Scan the QR code on the light engine or search for "LED LAMP" in your app store.
- Download & Install: Install the "LED LAMP" application on your smartphone.
- Connect via Bluetooth: Ensure Bluetooth is enabled on your device. Open the app, and it should automatically detect and connect to the light engine.
- Color Selection: Use the color wheel or predefined color options to select your desired static color.
- Brightness Adjustment: Adjust the brightness slider for desired intensity.
- Dynamic Modes: Choose from various dynamic modes (fade, jump, flash, breath effects) and adjust their speed.
- Custom Colors: Create and save your own custom color settings.
- Music Sync: Enable music sync mode to have the lights react to audio.
- Timer Function: Set schedules for the lights to turn on or off.
- Meteor Effect Control: Adjust settings for the meteor effect (if applicable to your model).
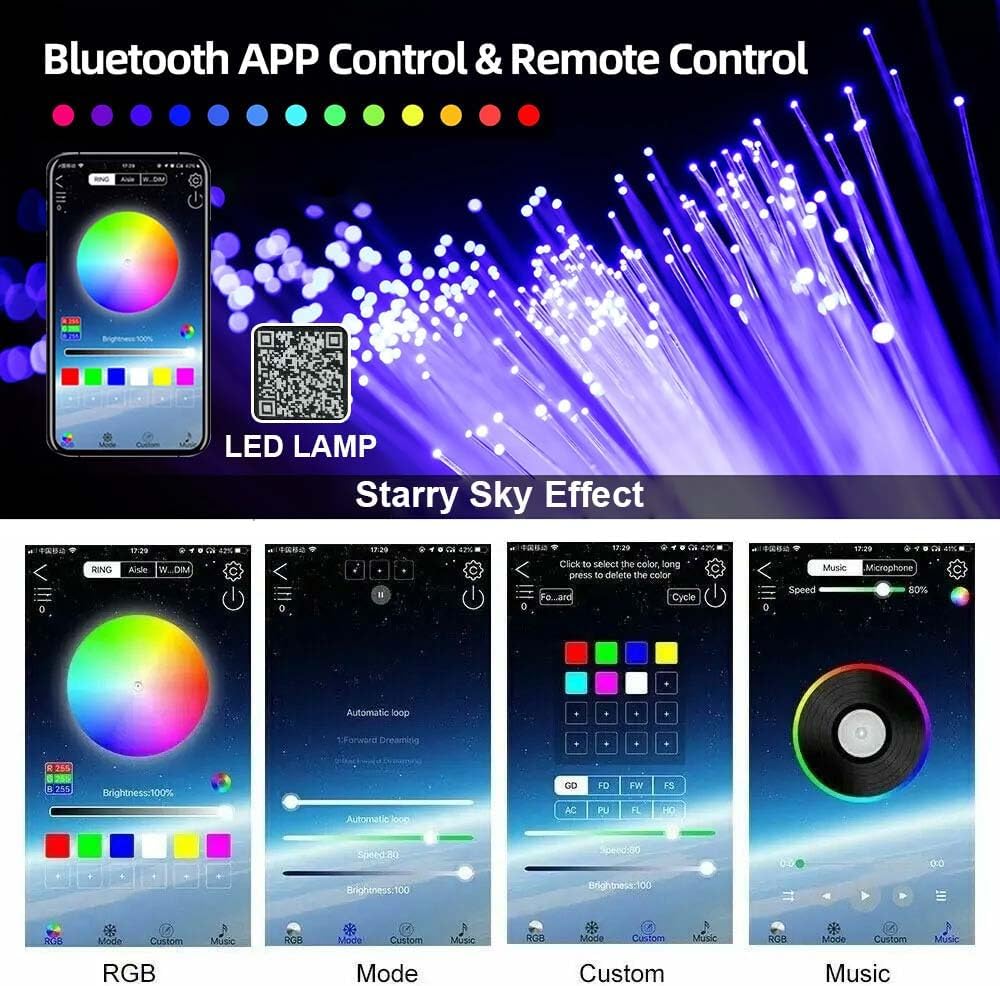
Figure 5.1: Bluetooth APP control interface. This image displays a smartphone screen with the dedicated application for controlling the starlight headliner, showing options for color selection, dynamic modes, custom settings, and music synchronization.

Figure 5.2: Detailed APP interface functions. This image presents a collage of six smartphone screen captures, illustrating various features of the control application including brightness adjustment, mode and speed settings, custom color creation, music synchronization, timer functions, and meteor effect controls.
For the latest app download, visit: http://url.szszjkj.com/79810915950
6. Maintenance
The VASTFIRE Starlight Headliner Kit requires minimal maintenance.
- Cleaning: Gently wipe the light engine and exposed fiber ends with a soft, dry cloth. Do not use abrasive cleaners or solvents.
- Fiber Care: Avoid bending the fiber optic cables sharply, as this can damage them.
- Ventilation: Ensure the light engine's ventilation ports remain clear of obstructions to prevent overheating.
7. Troubleshooting
If you encounter issues with your starlight headliner kit, refer to the following common problems and solutions:
| Problem | Possible Cause | Solution |
|---|---|---|
| Lights do not turn on. | No power supply; loose connection; faulty light engine. | Check power adapter and connections. Ensure 12V power is supplied. Test with another 12V source if possible. |
| Remote control not working. | Dead battery; remote out of range; interference. | Replace remote battery. Ensure remote is pointed towards the light engine. Reduce obstacles between remote and light engine. |
| Bluetooth APP cannot connect. | Bluetooth not enabled; app not installed; light engine not powered; multiple devices connected. | Ensure Bluetooth is on. Reinstall app. Power cycle the light engine. Disconnect other Bluetooth devices. |
| Fibers are dim or unevenly lit. | Fibers not fully inserted into light engine; damaged fibers; light engine issue. | Re-insert fiber bundle securely into the light engine. Inspect fibers for kinks or damage. |
| Light engine overheating. | Poor ventilation; excessive ambient temperature. | Ensure light engine is in a well-ventilated area. Clear any obstructions from vents. |
8. Specifications
| Feature | Detail |
|---|---|
| Brand | VASTFIRE |
| Model Number | Starlight Headliner Kit 1200 Piece |
| Light Engine Power | 16W |
| Input Voltage | DC 12V |
| Fiber Quantity | 1200 pieces |
| Fiber Diameter | 0.02 inches (0.5mm) |
| Fiber Length | 9.8 feet (3m) |
| Control Methods | RF Remote Control, Bluetooth APP |
| Material | Aluminum (Light Engine) |
| Product Dimensions | 4 x 3 x 2 inches (Light Engine) |
| Item Weight | 2 ounces |
9. Warranty & Support
VASTFIRE provides a 2-year warranty for this Starlight Headliner Kit, covering manufacturing defects from the date of purchase. For warranty claims or technical assistance, please contact VASTFIRE customer support. Support is available 24/7.
For further assistance, please visit the VASTFIRE Store on Amazon.


