Introduction
The Libraton Rivet Gun Adapter transforms your standard electric drill into a powerful and efficient pop rivet tool. This adapter is designed for ease of use, offering a convenient solution for various riveting applications, from metal fabrication to DIY projects. It eliminates the need for separate, bulky pneumatic or manual riveters, providing a compact and versatile alternative.
This manual provides essential information on the product's features, package contents, safety guidelines, setup procedures, operating instructions, maintenance tips, and technical specifications to ensure optimal performance and longevity of your Libraton Rivet Gun Adapter.
Product Features
- Instant Drill-to-Riveter Conversion: Converts any standard electric drill (with a maximum RPM of 1500) into a professional pop rivet tool.
- Enhanced Stability: Includes a vertical grip handle for improved control and stability during high-volume riveting tasks.
- Comprehensive Kit: Comes with 4 hardened steel nose pieces (3/32" (2.4mm), 1/8" (3.2mm), 5/32" (4.0mm), 3/16" (4.8mm)) and 40 aluminum blind rivets (10 per size).
- Integrated Wrench: A convenient integrated wrench is included for easy nozzle changes.
- Superior Grip & Fatigue Reduction: Features an aircraft-grade aluminum body with a diamond-textured ergonomic handle designed to reduce slippage and user fatigue.
- Durable Construction: Forged from premium steel and CNC-machined alloys, offering enhanced durability and corrosion resistance.
- Versatile Application: Suitable for various scenarios including RV/trailer maintenance, HVAC systems, aluminum door frames, and assembling grill racks.
- Efficient Operation: Works seamlessly with corded/cordless drills for faster riveting compared to manual tools. Includes a reverse drill function for effortless ejection of broken stems.
- Optimized Speed Range: Operates effectively between 800-3,500 RPM, with optimized ranges for different rivet materials (2,000-3,000 RPM for aluminum/plastic; 1,000-2,000 RPM for steel/stainless steel).
Package Contents
Upon opening the package, please verify that all the following components are present and in good condition:
- Libraton Rivet Gun Adapter main unit
- Vertical grip handle
- 4 x Hardened steel nose pieces (3/32" (2.4mm), 1/8" (3.2mm), 5/32" (4.0mm), 3/16" (4.8mm))
- 40 x Aluminum blind rivets (10 per size)
- 1 x Integrated wrench

Figure 1: All components included in the Libraton Rivet Gun Adapter kit.
Safety Instructions
Always adhere to these safety precautions when using the Libraton Rivet Gun Adapter:
- Wear appropriate personal protective equipment (PPE), including safety glasses, gloves, and hearing protection.
- Ensure your electric drill is unplugged or its battery removed before attaching or detaching the rivet gun adapter or changing nozzles.
- Do not exceed the recommended maximum drill RPM of 1500 RPM for optimal performance and safety.
- Keep hands and loose clothing away from moving parts during operation.
- Ensure the workpiece is securely clamped or stable before riveting.
- Use the correct size nozzle for the rivet being installed.
- Do not force the tool. If resistance is met, stop and inspect the setup.
- Store the adapter and its components in a dry, secure place, out of reach of children.
Setup
1. Attaching the Adapter to Your Drill
- Ensure your electric drill is turned off and unplugged or its battery is removed.
- Open the drill chuck wide enough to accommodate the hexagonal shank of the rivet gun adapter.
- Insert the hexagonal shank of the adapter firmly into the drill chuck.
- Tighten the drill chuck securely to prevent slippage during operation.
- Attach the vertical grip handle to the designated slot on the adapter for enhanced stability.

Figure 2: The rivet gun adapter securely attached to an electric drill with the vertical grip.
2. Exchanging Nozzles
Select the appropriate nozzle size (3/32", 1/8", 5/32", or 3/16") that matches the diameter of the rivets you intend to use.
- Unscrew the outer sleeve at the front of the adapter.
- Remove the current nozzle (if any).
- Insert the desired nozzle into the adapter.
- Screw the outer sleeve back on and tighten it using the integrated wrench.

Figure 3: Step-by-step guide for changing the rivet nozzle.
Operating Instructions
Follow these steps for effective riveting:
- Insert Rivet: Place the rivet into the selected nozzle. Ensure the rivet head is flush against the nozzle.
- Position Tool: Place the rivet into the pre-drilled hole in your workpiece. Hold the drill firmly with both hands, utilizing the vertical grip for stability.
- Activate Drill: Set your drill to a forward rotation. Slowly press the drill trigger to begin pulling the rivet. Maintain steady pressure until the rivet expands and the mandrel (stem) breaks off.
- Eject Mandrel: Once the rivet is set and the mandrel breaks, switch your drill to reverse rotation. This will eject the broken mandrel from the adapter.

Figure 4: Operational steps for using the Libraton Rivet Gun Adapter.
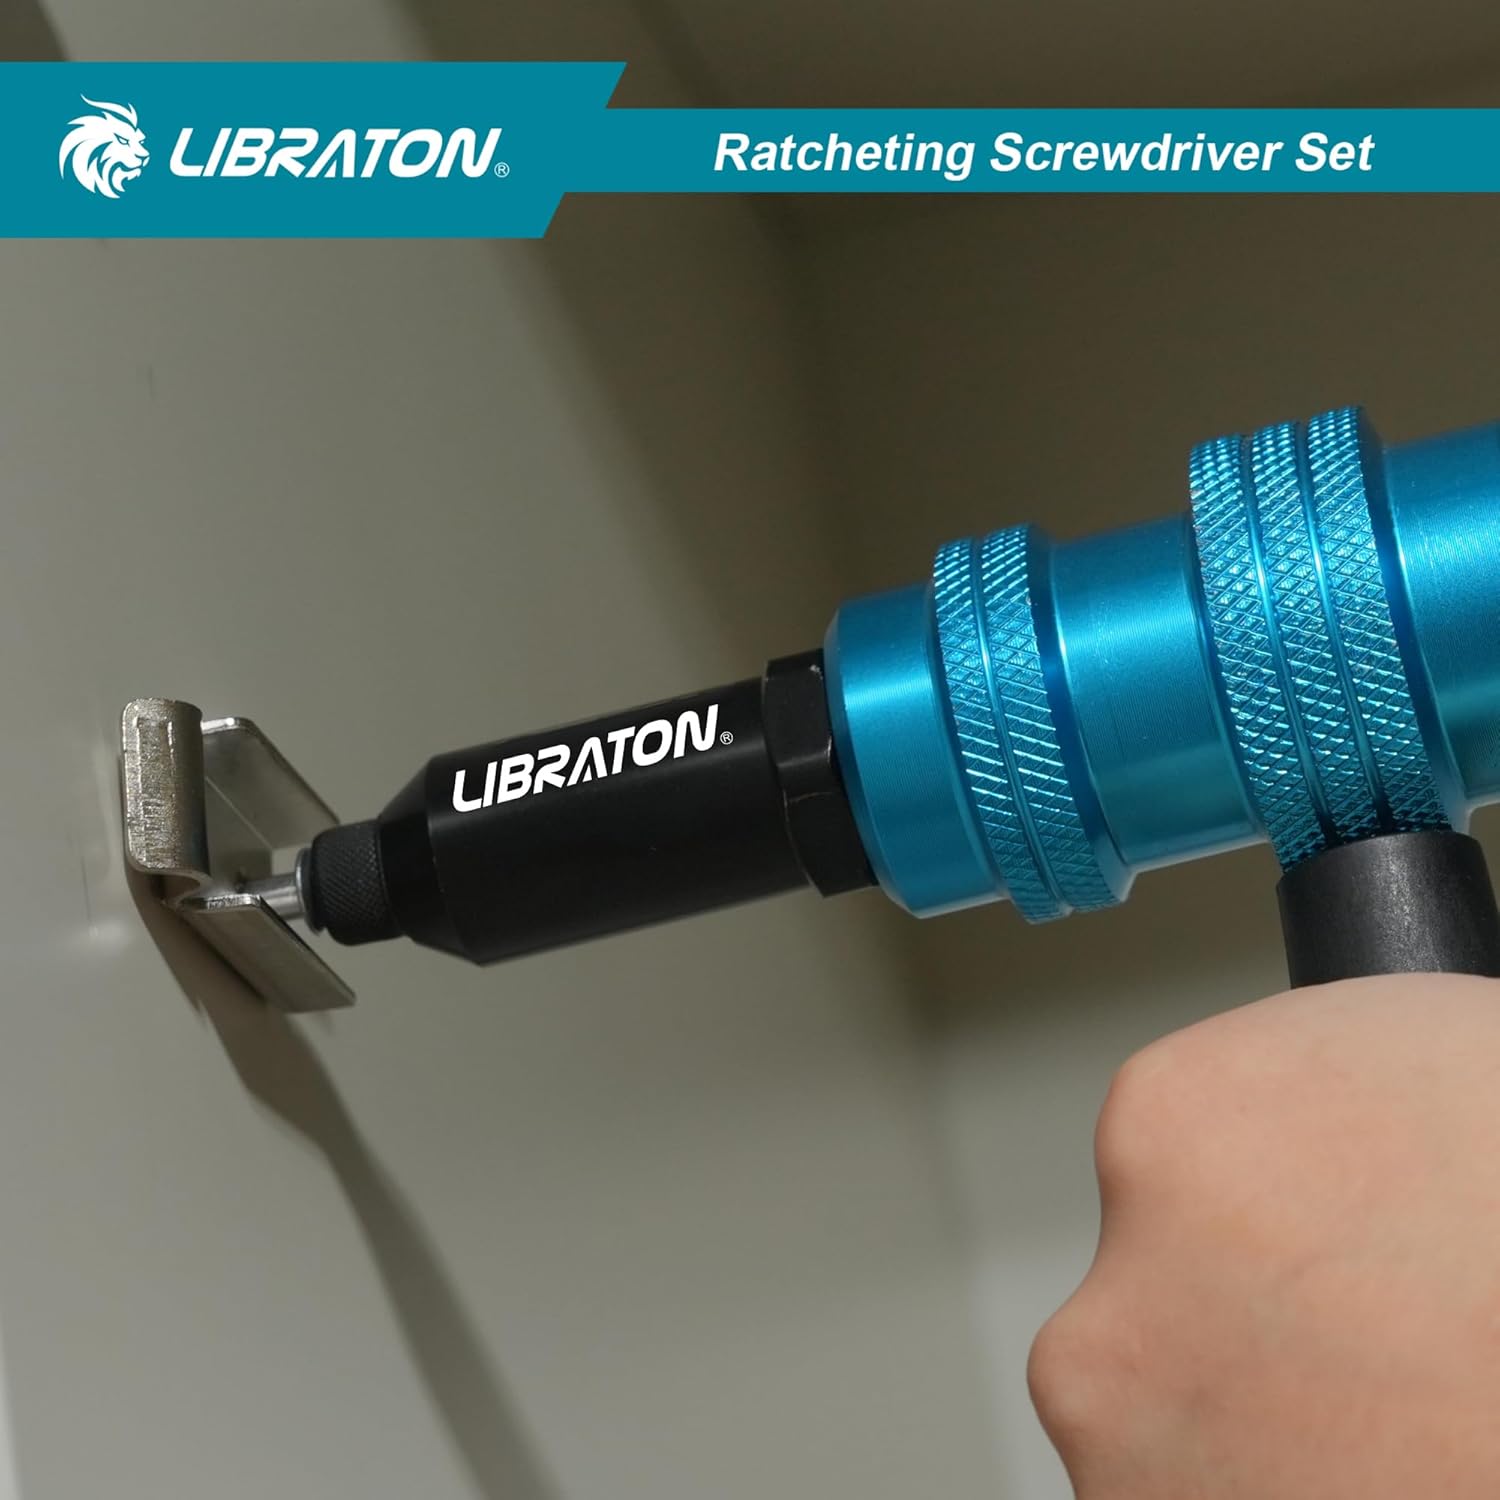
Figure 5: The rivet gun adapter in action, demonstrating its use for securing materials.
Recommended Drill Speed Settings:
- General Speed Range: 1500 - 3000 RPM (optimized)
- Aluminum / Plastic Rivets: 2000 - 3000 RPM
- Steel / Stainless Steel Rivets: 1000 - 2000 RPM

Figure 6: Recommended speed settings for various rivet materials.
Maintenance
Regular maintenance ensures the longevity and optimal performance of your Libraton Rivet Gun Adapter:
- Cleaning: After each use, wipe down the adapter with a clean, dry cloth to remove any dust, debris, or metal shavings.
- Nozzle Inspection: Periodically inspect the nozzles for wear or damage. Replace worn nozzles to ensure proper rivet setting.
- Lubrication: Apply a small amount of light machine oil to the internal moving parts (jaws) if you notice any stiffness or reduced performance. Refer to the nozzle exchange steps to access the internal mechanism.
- Storage: Store the adapter and its components in a dry, cool place to prevent corrosion and damage.
Troubleshooting
| Problem | Possible Cause | Solution |
|---|---|---|
| Rivet not grabbing or setting properly. | Incorrect nozzle size; jaws not gripping; insufficient drill power/speed. | Ensure correct nozzle for rivet diameter. If the adapter cannot hold the rivet, remove the sleeve and turn the drill in reverse briefly to make the jaws close to the nozzle, then re-attach the sleeve. Increase drill speed within recommended range. |
| Broken mandrel not ejecting. | Insufficient reverse drill speed; mandrel stuck. | Ensure drill is set to reverse and run at a sufficient speed. If stuck, carefully remove the nozzle and use a small tool to push out the mandrel. |
| Adapter slipping in drill chuck. | Chuck not tightened sufficiently. | Ensure the drill chuck is tightened securely around the hexagonal shank of the adapter. |
| Excessive vibration or noise. | Loose components; worn parts. | Check that all parts are securely fastened. Inspect nozzles and internal jaws for wear. |
Specifications
| Attribute | Detail |
|---|---|
| Manufacturer | LIBRATON |
| Part Number | 919017 |
| Item Weight | 1.52 pounds |
| Package Dimensions | 7.48 x 2.99 x 2.01 inches |
| Item Model Number | 919017 |
| Batteries Included? | No |
| Batteries Required? | No |
| Compatible Rivet Sizes | 3/32" (2.4mm), 1/8" (3.2mm), 5/32" (4.0mm), 3/16" (4.8mm) |
| Max Drill RPM | 1500 RPM |
| Construction Material | Anodized Aluminum body, High-Carbon Steel components |
Warranty and Support
Libraton products are manufactured to high-quality standards. For any questions regarding product operation, maintenance, or potential issues, please refer to the troubleshooting section of this manual. If further assistance is required, please contact Libraton customer support through their official channels. Specific warranty details may vary; please refer to the product packaging or the official Libraton website for the most current warranty information.
