
ARCCTV Q01
ARCCTV Solar Security Camera User Manual
Model: Q01
1. Introduction
1.1 Product Overview
The ARCCTV Solar Security Camera (Model Q01) is a wireless outdoor surveillance solution designed for comprehensive property monitoring. Featuring 4MP Ultra HD resolution, 360° pan-tilt capabilities, and dual-band Wi-Fi connectivity, this camera provides clear, wide-ranging coverage. Its solar-powered design ensures continuous operation without the need for frequent battery changes or complex wiring. Equipped with night vision, two-way audio, and PIR motion detection, it offers robust security features for both indoor and outdoor environments.
1.2 What's in the Box
Upon opening the package, verify that all components are present and in good condition:
- Camera Body (2 units for 2-pack)
- Solar Panel (2 units for 2-pack)
- Mounting Screws and Anchors
- User Manual (this document)

Image: All components included in the ARCCTV Solar Security Camera package, laid out for inspection.
2. Safety Information
Please read and understand all safety instructions before installing and operating the camera. Failure to follow these instructions may result in injury, damage to the product, or voiding the warranty.
- Ensure the camera is installed securely to prevent falling.
- Do not expose the camera or solar panel to extreme temperatures outside of its operating range.
- Keep the camera and its components away from children and pets.
- Use only the provided or recommended power accessories.
- Avoid direct exposure of the solar panel to fire or excessive heat.
- Do not attempt to disassemble or modify the camera or solar panel.
3. Product Features
3.1 High-Resolution Video
The camera captures video in 4MP Ultra HD resolution (2560×1440p), providing clear and detailed images, which is twice the clarity of standard 1080p cameras.

Image: Detailed view of the camera's 4MP lens for high-definition video capture.

Image: Visual comparison illustrating the enhanced clarity of 4MP resolution over 3MP.
3.2 360° Pan-Tilt Coverage
Control the camera's viewing angle remotely via the ARCCTV app. It supports 355° horizontal pan and 90° vertical tilt, allowing you to monitor large areas and eliminate blind spots. Note that this feature requires manual control through the application and does not support automatic tracking.

Image: The camera's pan and tilt range, demonstrating its ability to cover a wide area.
3.3 Dual-Band Wi-Fi Connectivity
The camera supports both 2.4GHz and 5GHz Wi-Fi bands, automatically selecting the optimal connection for faster speeds or extended range, ensuring smooth live streaming and quick alert responses. For initial setup, it is recommended to be as close as possible to your Wi-Fi router.

Image: Depiction of dual-band Wi-Fi capabilities for optimal network performance.
3.4 Solar Power & Battery
Equipped with a high-efficiency detachable solar panel, the camera operates continuously without the need for wiring or battery replacement. The solar panel can be positioned in the sunniest location for optimal charging, while the camera is mounted where surveillance is needed. This ensures reliable operation year-round, even on cloudy days.

Image: Visual representation of the solar-powered charging system for the camera.
3.5 Night Vision Capabilities
The camera provides clear night vision up to 50 feet, utilizing both infrared and LED light sources. It also features "Night Color" technology for enhanced visibility in low-light conditions.

Image: Comparison of day and night vision, demonstrating the camera's performance in low light.

Image: Illustrates the difference between color and black & white night vision modes.
3.6 Two-Way Audio
Communicate with individuals near the camera using the built-in microphone and speaker. This feature is useful for interacting with delivery personnel or deterring unwanted visitors.

Image: Example of two-way audio in use, showing interaction with a delivery person.
3.7 Motion Detection & Alerts
The camera features PIR motion detection, which is highly responsive and designed to minimize false alarms by focusing on human movement. Upon detection, it sends fast alerts to your connected device. Customizable settings allow you to define specific alarm zones.

Image: Visualizing the camera's instant alert features, including spotlight and siren.

Image: Demonstrates the precise PIR motion detection, focusing on human movement.

Image: How to set up a custom motion detection alarm zone within the app.
3.8 Storage Options
The camera offers flexible storage solutions: local storage via a microSD card (up to 128GB, not included) for free recording, or secure cloud storage (subscription required) for advanced features and remote backup.
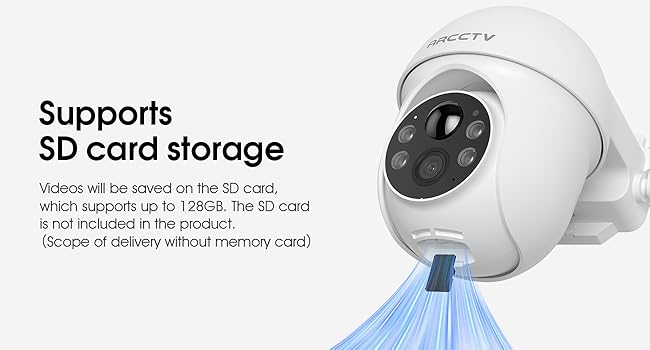
Image: The camera's microSD card slot for local video storage.

Image: Overview of the encrypted cloud storage option for video backup.
3.9 Smart Home Integration
The camera is compatible with Alexa, allowing for voice control and integration into your smart home ecosystem for easier operation.

Image: The camera's compatibility with Alexa for voice commands and viewing.
3.10 Weather Resistance
Designed for outdoor use, the camera is waterproof and capable of withstanding various weather conditions without compromising performance.

Image: The camera's robust design for outdoor weather resistance.
4. Setup Guide
4.1 Preparation
- Ensure your smartphone is connected to a 2.4GHz or 5GHz Wi-Fi network.
- Download the ARCCTV app from your device's app store.
- Charge the camera fully before initial installation, if possible, although solar power will maintain charge.
4.2 Installation Steps
The camera features a 100% wireless design for easy DIY installation in minutes.
- Choose a Location: Select a mounting location that provides optimal camera view and sufficient sunlight exposure for the solar panel.
- Mount the Bracket: Use the included mounting screws and anchors to securely attach the camera's mounting bracket to the desired surface.
- Attach the Camera: Secure the camera body to the mounted bracket.
- Install Solar Panel: Mount the detachable solar panel in a sunny spot, ensuring it is connected to the camera via the provided cable. Adjust its angle for maximum sun exposure.

Image: The camera and solar panel installed on a wall, highlighting the ease of wireless setup.
4.3 App Connection
Follow these steps to connect your camera to the ARCCTV app and begin monitoring:
- Download ARCCTV APP: Search for "ARCCTV" in your app store and install the application.
- Create Account & Add Device: Open the app, create an account if you don't have one, and follow the in-app instructions to add your new camera. This typically involves scanning a QR code on the camera or entering its serial number.
- Connect to Wi-Fi: The app will guide you through connecting the camera to your 2.4GHz or 5GHz Wi-Fi network. Ensure the camera is within Wi-Fi range during this process.
- Start Monitoring: Once connected, you can access the live view, adjust settings, and manage recordings from your smartphone.

Image: Simplified steps for connecting the camera to the ARCCTV mobile application.
5. Operating Instructions
5.1 Live View
Open the ARCCTV app and select your camera from the device list to access the live video feed. You can view real-time footage from your property.
5.2 Pan and Tilt Control
While in live view, use the on-screen controls within the app to manually pan the camera horizontally (355°) and tilt it vertically (90°) to adjust your viewing area.
5.3 Recording and Playback
Recordings are triggered by motion detection or can be initiated manually from the live view. Access recorded footage through the app's playback section. If using a microSD card, ensure it is properly inserted and formatted within the app settings.
5.4 Motion Detection Settings
Navigate to the camera settings in the app to customize motion detection sensitivity, set up specific alarm zones, and configure alert notifications (e.g., push notifications to your phone).
5.5 Two-Way Audio Usage
In live view, tap the microphone icon to speak through the camera's speaker. Tap it again to end communication. Ensure your phone's microphone is enabled for the app.
5.6 Storage Management
Manage your storage options within the app. For microSD card storage, you can view remaining space and format the card. For cloud storage, you can review your subscription status and access cloud-stored footage.
6. Maintenance
6.1 Cleaning
Regularly clean the camera lens and solar panel with a soft, damp cloth to ensure optimal performance. Avoid using harsh chemicals or abrasive materials that could scratch the surfaces.
6.2 Solar Panel Care
Periodically check the solar panel for any obstructions (e.g., leaves, dirt) that might block sunlight. Ensure it remains positioned to receive maximum direct sunlight throughout the day.
6.3 Firmware Updates
Keep your camera's firmware updated to ensure the latest features, security enhancements, and bug fixes. The ARCCTV app will typically notify you when a new firmware version is available. Follow the in-app instructions carefully during the update process.
7. Troubleshooting
| Problem | Possible Cause | Solution |
|---|---|---|
| Camera won't connect to Wi-Fi. | Incorrect Wi-Fi password; Camera too far from router; Router settings (e.g., firewall). | Double-check password. Move camera closer to router. Restart router. Check router's security settings. |
| Poor video quality. | Weak Wi-Fi signal; Dirty lens; Insufficient lighting. | Improve Wi-Fi signal strength. Clean the camera lens. Ensure adequate lighting for night vision. |
| Battery not charging. | Insufficient sunlight on solar panel; Solar panel obstructed or dirty; Faulty connection. | Relocate solar panel to a sunnier spot. Clean the solar panel. Check cable connection between panel and camera. |
| No motion alerts. | Motion detection disabled; Sensitivity too low; Incorrect alarm zone settings; App notifications blocked. | Enable motion detection in app. Increase sensitivity. Adjust alarm zones. Check phone's notification settings for the ARCCTV app. |
| Two-way audio not working. | Microphone/speaker disabled in app; Volume too low; Network latency. | Check audio settings in app. Adjust volume. Ensure stable Wi-Fi connection. |
8. Specifications
| Feature | Detail |
|---|---|
| Model Name | Q01 |
| Brand | ARCCTV |
| Video Resolution | 4MP Ultra HD (2560x1440p) |
| Pan/Tilt Angle | Horizontal 355°, Vertical 90° |
| Connectivity | 2.4GHz & 5GHz Dual-Band Wi-Fi, Bluetooth |
| Power Source | Battery Powered & Solar Powered (5 Volts) |
| Night Vision Range | Up to 50 Feet (Infrared & LED, Night Color) |
| Audio | 2-Way Audio (Video & Audio Recording) |
| Motion Detection | PIR Motion Sensor (Motion Only Alert Type) |
| Storage Options | MicroSD Card (up to 128GB), Cloud Storage (subscription) |
| Compatibility | Smartphone (Android), Alexa |
| Weather Resistance | Waterproof |
| Dimensions (L x W x H) | 8 x 5 x 6 inches |
| Weight | 3.45 pounds |
| Video Encoding | H.265 |
| Zoom Type | Digital Zoom (Ratio 10) |
9. Warranty and Support
For warranty information and technical support, please refer to the official ARCCTV website or contact their customer service. Keep your purchase receipt as proof of purchase for any warranty claims.
Manufacturer: Shenzhen Anran Security Technology Co.,Ltd
Related documentsQ01


Ask a question about this manual
Ask about setup, troubleshooting, compatibility, parts, safety, or missing instructions. Manuals+ will review the question and use this page’s manual context to help answer it.